 Matthew Peverill
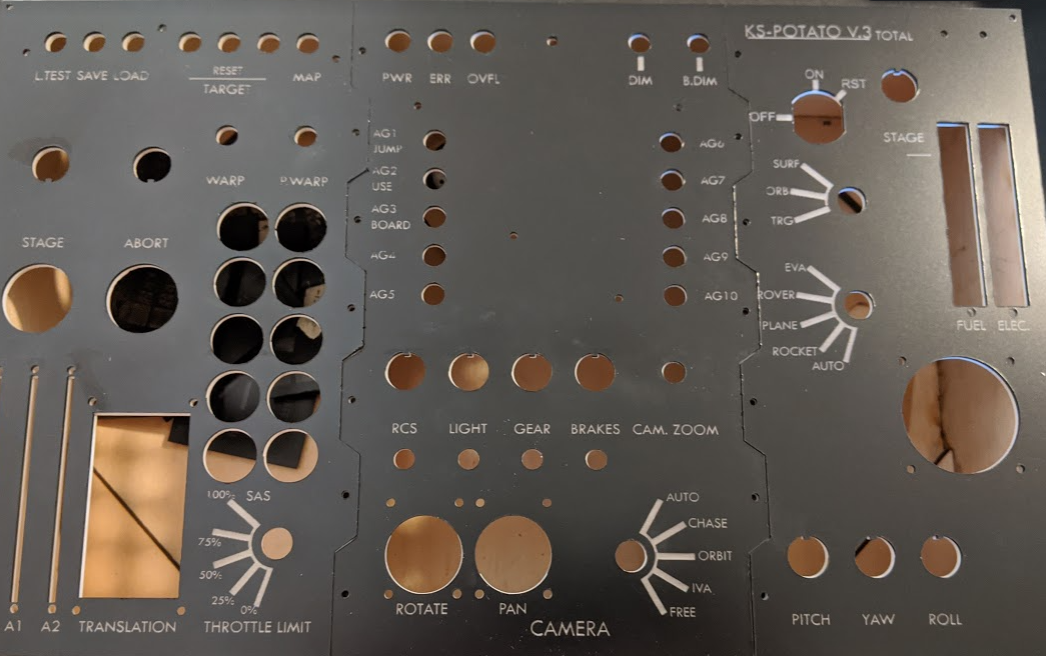
So I wrote a bit last time about a naive approach to making this panel. Short story is, it didn't work very well. The medium length story is that I did a bunch of research, and it turns out this is a famously hard problem. I wouldn't recommend doing this unless you really want backlighting: the material is not cheap, you're going to need extra, and it is a ton of work finding the right settings. That said, I did manage to produce a finished product that looks pretty sweet eventually. There is a little bit of drop-out in some of the finer letters, and some surface marring, but basically this is more than good enough:
It was, however, a pain in the butt. Long story and process after the break.
Here are the swatches from day 1 of testing:
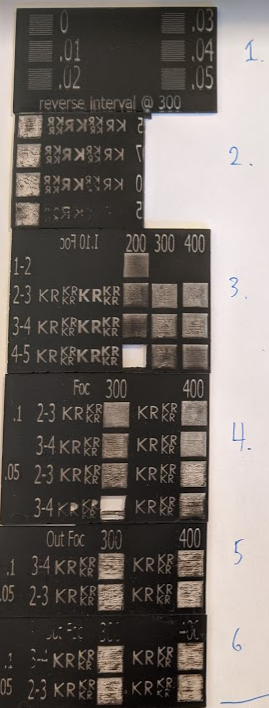
1. is the reverse interval tuning@300 (I already did it at 400). This is a good idea if you want sharp text, because it syncs up the left and right swing so the laser is making clean vertical edges.
2-6 are all testing various combinations of power, speed, and interval. In 3, power is 10-20, 20-30, 30-40, and speed is 200-400. 20-30 at 400 seemed to be the best result, but there is a lot of mess. I then tried to improve things by changing the interval to .05, that didn't help. I tried bringing the laser out of focus, but then the text lost definition. So I cut a panel at 300 speed at 45 or so (a little more power) and hoped for the best. The result is in my last post: there was a lot of mess in the engraving still.
So then I went back to the drawing board. There is a lot of advice about this, but by far the best source, and the one which helped me understand what was going on above, was this one from Mike at Trotec:
My take away messages from this video were as follows:
It's easy to interpret the mess, for example in the samples above, as evidence that power is too low. That's exactly wrong: what's happening is that the laser carves little furrows in to the surface, and they become filled with vaporized acrylic from the top layer, which messes up the contrast. The higher the power, the more vaporization, and the more mess in your cuts. Above, you can see that as I increase power there is actually more mess in the cuts: that's not the black cap layer, that's re-deposited vaporized acrylic.
Instead, you want to use the lowest power you can which will go all the way through the top layer. So, looking above, 20-30 power at 400 mm/s is probably closest. Past that, the best way to avoid mess in your cuts is to defocus the laser. I did try that on day 1, actually, but by way too much and at too high a power. Mike defocuses 9 thou(sands of an inch). Tip number three is cleaning: You want to use mr. clean magic eraser to remove the ejecta (to use a kerbal-y term). This is extra good for us, because we don't have to worry about scratching up the back surface: we won't see it.
Ok so armed with these tips, I skipped work and went back to the shop.

I stuck with 400 speed throughout these tests. My first plan was to engrave once in focus, and then polish (because my out of focus tests on day 1 resulted in blurry text). So first I had to identify a power setting that was just enough. In swatch 8, I did that: we want 400 speed, .1 interval, at 27-30 power. This was about 2mm out of focus already, which I actually didn't realize. In swatch 9, I did the same thing, but then polished at 10% power in a second pass way out of focus (like 4mm). This looked worse: I think perhaps what's happening is that black acrylic is melting in to the engraved areas, but I may be missing something.
Swatch 10-11 I'm refining my power settings. 12 I try a smaller interval (it didn't help). 13 I try a little more power, and finally get a pretty good result. in swatch 13 (line 1), the text is crisp and there is minimal noise in the engraved areas. Then I tested one more time in a part of my final design in 14 (I missed some defects, eg. the O in 'auto' has a missing bit). So that was my final setting: 400mm/s speed, .1 mm interval, 33-35 power, about 2mm out of focus. I stopped after engraving to focus before my cutting. It looks pretty good!
If you're following along at home, I should mention that I'm using a 130watt chinese laser cutter (more info here).
Discussions
Become a Hackaday.io Member
Create an account to leave a comment. Already have an account? Log In.