 leo.currie
Overview
The idea behind the project to 'paint' colour onto a christmas tree like using MS-paint on a PC.
The project is made from several different software and hardware components.
Here is a video demonstrating the tree in action:
Hardware
The most important components are of course the LEDs. The project uses several strings of the ubiquitous WS2811 LEDs. These are commonly sold in strings of 50. The strings are daisy-chained together, with appropriate power supply arrangements
The control signal for the string is generated from an ESP8266 (another Hackaday mainstay!). An ESP01 board is programmed to accept incoming UDP packets over WiFi, with each packet containing the relevant RGB values for each LED on the string.
The video camera used is the standard Raspberry Pi camera
The project could certainly be implemented with different hardware - for example, most modern USB webcams are able to deliver MJPG streams and thus could be used in place of the Raspberry Pi webcam.
Software
There are several components
- The 'pixel server' is the aforementioned firmware running on the ESP8622. This code listens for UDP packets which simply contain 3 bytes of data for each pixel. As soon as a packet is received, the LED string is updated.
This code was implemented using the Arduino IDE and leverages the ESP8266 wifi and NeoPixel libraries. - A live video streamer. Initially the excellent mjpg-streamer was used, but although this produced high-quality, low-latency video, the bandwidth was too much for my DSL uplink. I now use h264-live-player which provides a means to deliver very low-latency h264 video over websockets to the browser. Since the Raspberry Pi can encode h264 using hardware, this provides a reasonable compromise between quality, bandwidth and latency
- A 'pixel-mapping' script. This is a python script that works out the x-y co-ordinates of each pixel. It does this by turning each pixel on in turn, then taking a picture using the camera. OpenCV is used to work out the brightest pixel of each image, and the co-ordinates of this pixel are stored in a 'pixel map'
- An API server is implemented in Java using the SparkJava framework. This API exposes several endpoints that can be accessed over HTTP. These endpoints allow JSON messages from the web page containing pixel data to be forwarded to the pixel server as UDP packets on the local network. It also supports the uploading of animated GIF files, and performs the necessary transformation of those files into pixel buffers (using the pixel map), as well as handling the animation timing for sending the frames as UDP packets.
- A web page to pull it all together. This contains the live video playback, and some javascript to detect mouse clicks. When the mouse clicks over the video, the co-ordinates of the click are used along with a local copy of the pixel map. If a pixel exists within a certain radius of the click, it is marked as 'on'. The required colour and pixels to turn on are placed in a JSON message and POSTed to the API server.
How to build
Hardware
You'll need some strings of WS2812 (or WS2811) LEDs. The more the merrier!
The strings are often sold in chains of 50, but can be daisy-chained together.
Here is an example listing on Amazon, bear in mind there are many different sources for these parts:https://www.amazon.co.uk/WS2811-Pixels-digital-Addressable-String/dp/B00MXW054Y
When starting off, a single string of LEDs can be powered from a small-ish 5V power supply.
However, once you have several strings connected together, the power requirements become substatial.
At full brightness (white), each LED is likely to draw about 60mA. Thus, a string of 50 LEDs can draw up to 3A, and eight strings daisy-chained together could draw 24!
The wire used in the strings is not thick enough for this kind of current. If voltage is applied to only one end of a long string, the voltage drop along the wire will cause inconsistencies in colour, and will prevent the LEDs...
Read more »


 David Elias
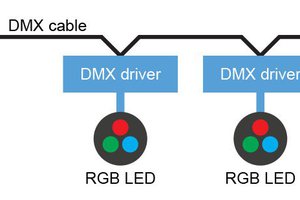
 Jerry Isdale
 Reagen Ward
 MickMake
yes its interesting looking project that you shared i am also working on the similar project like your one you can see here https://paintartdiamonds.com/