 OXullo Intersecans
Glayer has been conceived as a Christmas present for a baby girl, who was always in the need for asking mommy to loop her favorite songs on mommy's ipod.
Primary objective: it had to be dead easy to use.
The interface is composed of a slot, where an ISO RFID card can be inserted and two arcade-style buttons.
The slot uses the card's identification number to select a folder in the SD storage. Each individual card corresponds to a folder, which ultimately is a collection of songs that are played in order. As soon as a card is inserted into the slot, the player starts playing back the first song of the collection.
The buttons allow to skip to the next song or to go to the previous one. A long button press allows to change the volume.
Once the card is removed, the player stops the playback and goes to standby.
In order to keep the overall power consumption to the minimum, the presence of the card is detected by an infrared light barrier, which requires a fraction of the power of the NFC inventory.
The assembly plans are available in fusion 360: https://a360.co/2CC5uf0
The firmware is hosted in github: https://github.com/oxullo/glayer

 Marsupilami
 ssla.co.uk
 William
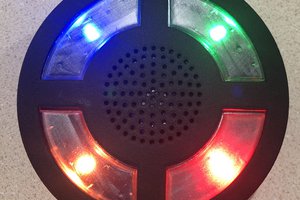
 Nick Sayer