 Adrien Fauconnet
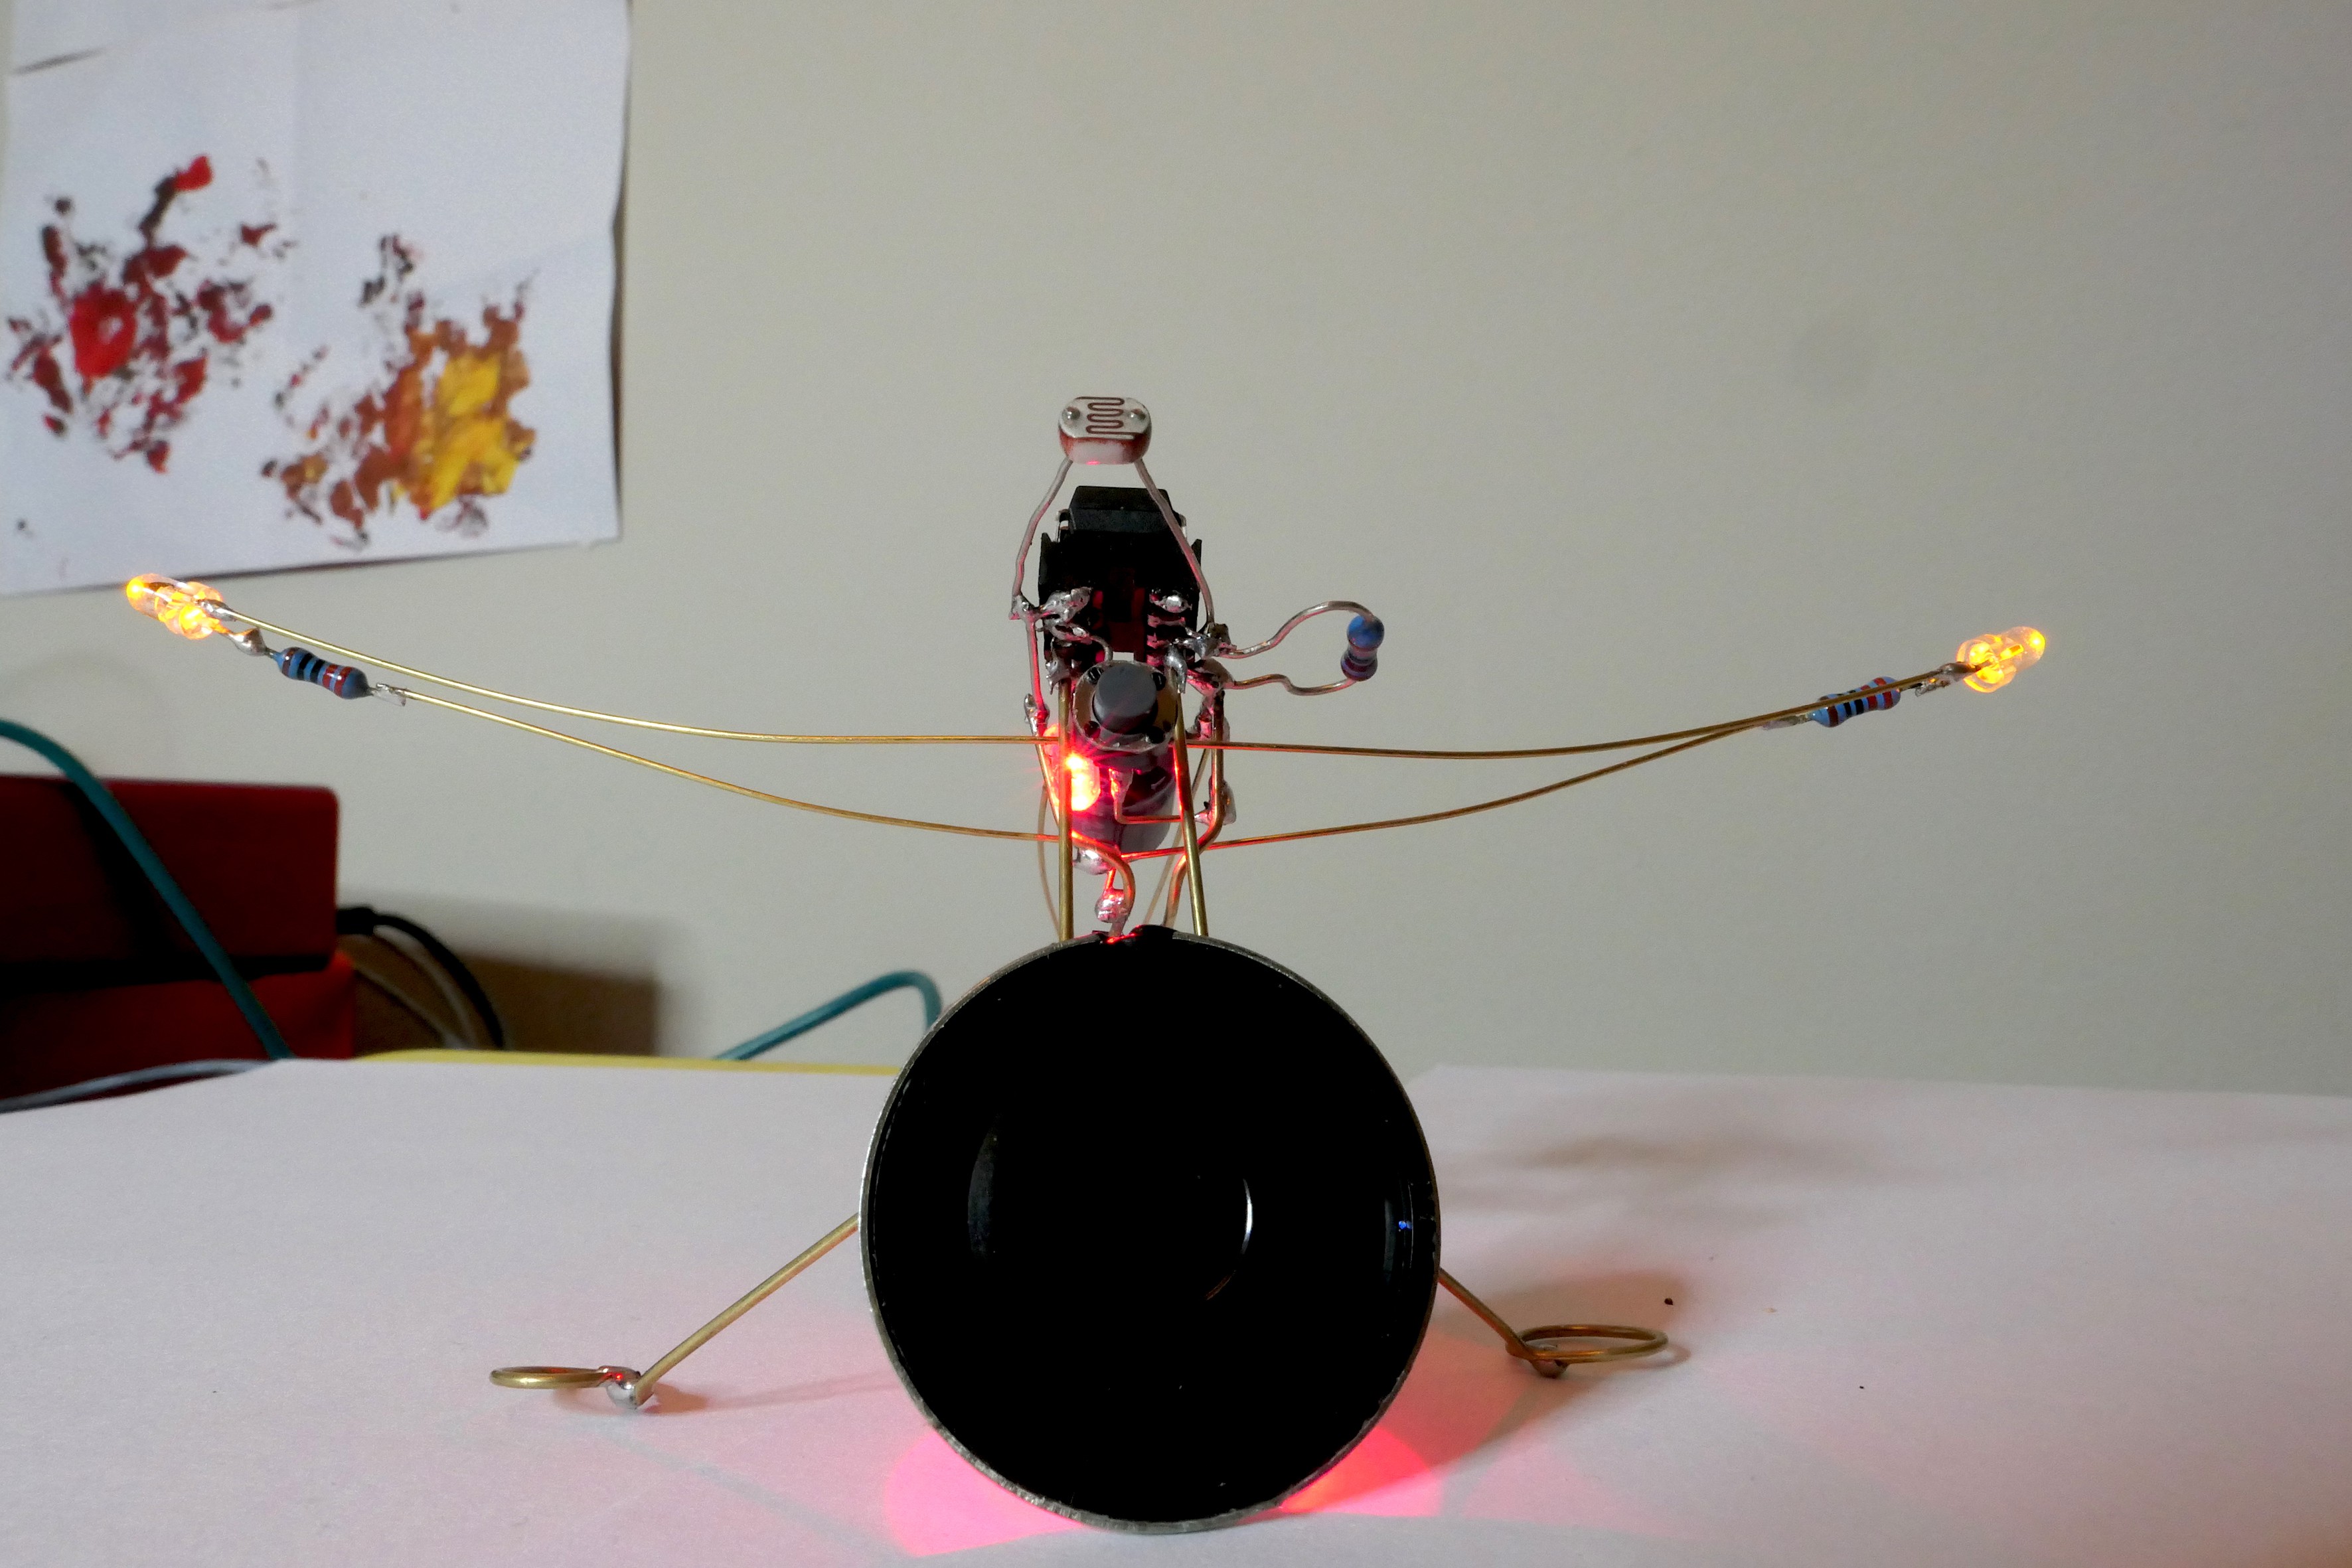
The story of the Tiny Cuicui...
A few events brought the tiny cuicui to life, here's what happened...
- I started following Mohit Bhoite on Instagram a couple months ago and thought: "That just looks amazing! I'd love to give it a go!" but I had no idea that popped in my mind.
- Some time ago, I ordered a 99p USB development board for ATtiny85 on eBay and forgot about it until it arrive last week.
- At the same time, I invested another 99p in a bag of 50 LDR that showed up a day later
- Then came Christmas and Secret Santa. I got some brass rods: 0.5mm, 0.8 mm and 1.5 mm. Thanks Tom ;)
When I saw the Circuit Sculpture contest blog post, I had no excuse not to try and build something!
Making it blink with Micronucleus, Arduino & PlatformIO

First thing first, I had to find a way to get some code onto the ATtiny85 and make it blink. Google told me about micronucleus, a USB bootloader for ATtiny85 and others. I got my good old Arduino ISP and fired up the following commands after cloning the micronucleus repo:
git clone https://github.com/micronucleus/micronucleus.git
cd micronucleus/firmware
make fuse
make flash
Little tip, on OSX you can install everything you need using Homebrew:
brew tap osx-cross/avr
brew install avrdude avr-gcc
If you want to change the configuration of avrdude for your programmer, you can do this here (you might need to change the version accordingly..)
nano /usr/local/Cellar/avrdude/6.3_1/etc/avrdude.conf
In my case, I added the Arduino ISP as a programmer
programmer
  id    = "arduinoisp";
  desc  = "Arduino ISP Programmer";
  type  = "usbtiny";
  connection_type = usb;
  usbvid     = 0x2341;
  usbpid     = 0x0049;
;
Anyway, I diverge... Now we got a bootloader and the ATtiny85 shows up as a generic USB device. So I got cracking and installed the boards in Arduino IDE following this very helpful tutorial from digistump or you can set it up for PlatformIO following the instructions for Digispark USB. Make sure you install the atmelavr platform:
platformio platform install atmelavr --skip-default-package --with-package=uploader
Add this to your platformio.ini file
[env:micronucleus]
platform = atmelavr
board = digispark-tiny
framework = arduino
It works, but could be better...
After all of that it blinks, so I got cracking and experimented a little with some code on the ATtiny85. Very soon, I discovered that this dev board and micronucleus was a little bit annoying to work with... First of all, every time I wanted to upload my code to the micro, I had to unplug and plug the device back in and it wasn't reliably programming... So I decided to go back to the trusty Arduino ISP and make a board that suits my needs.
Practice makes perfect
As I was going to make some kind of sculpture shortly after this board. I decided to practice by using tinned wire and bending it as cleanly as I could on the bottom side of the vero board.
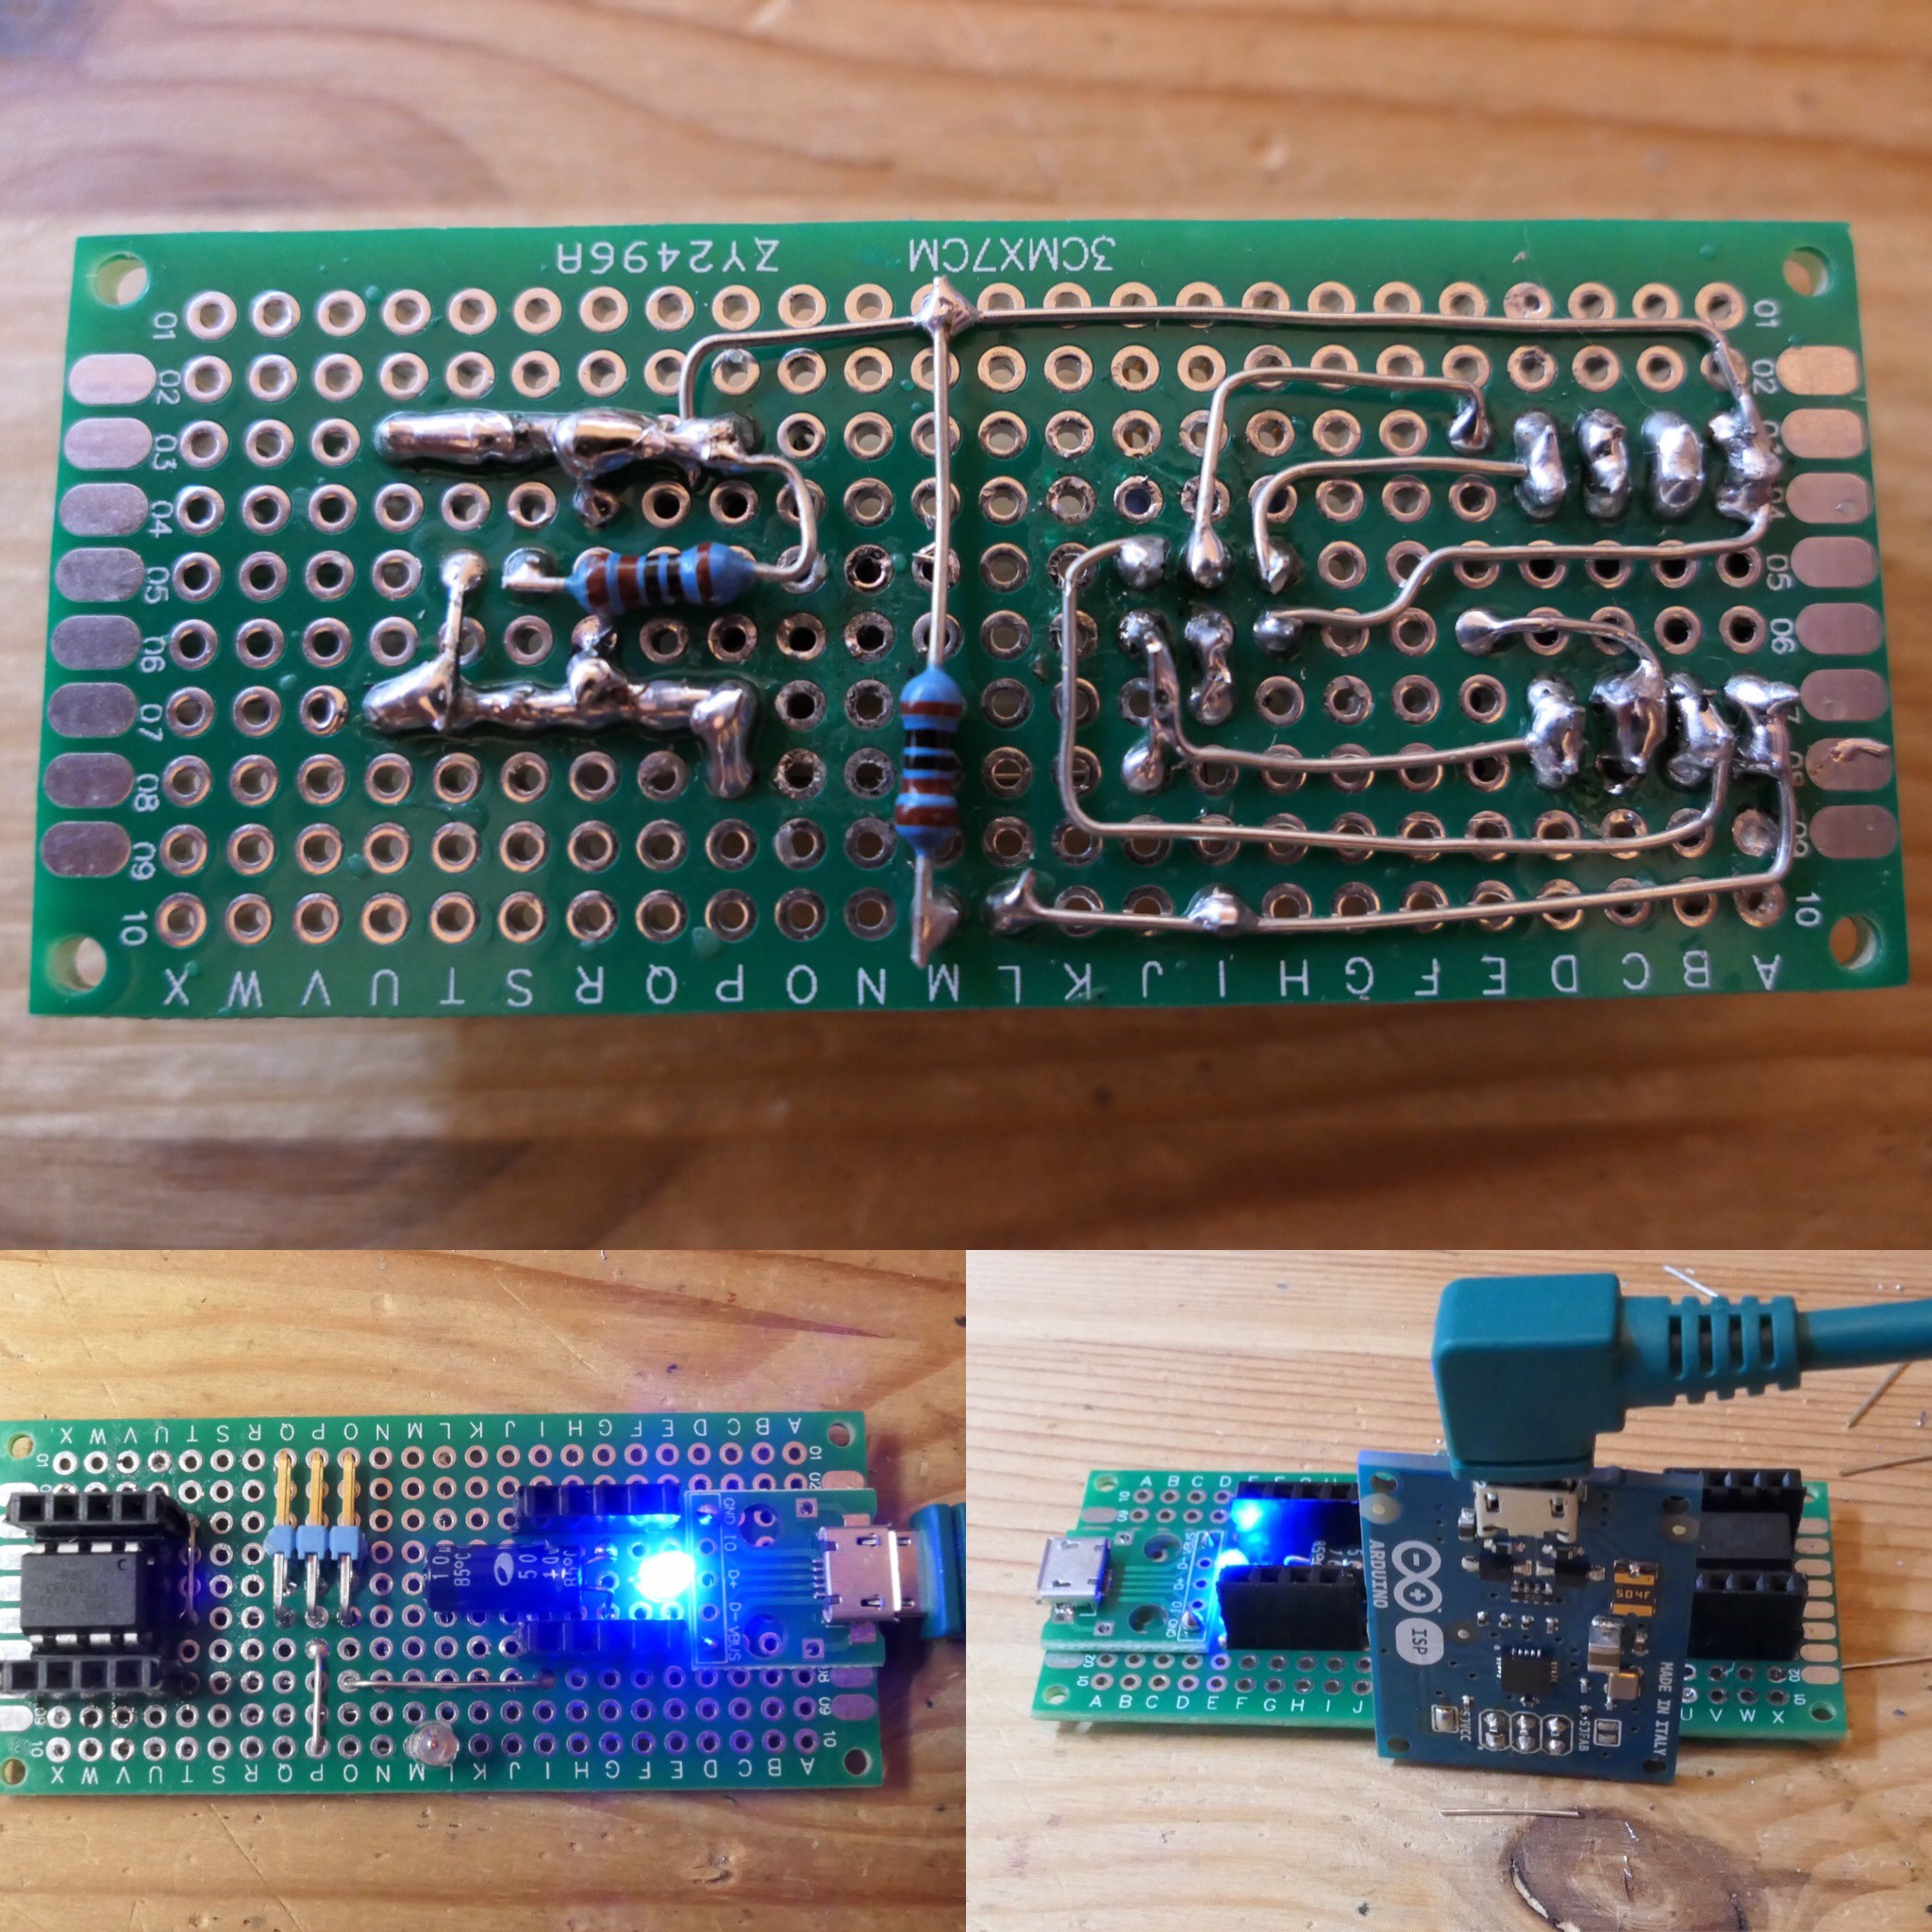
Once the board finished, I found that this was a much better flow for me. Here are some of the features of that board:
- ISP connector - I used a right angle connector to make sure the Arduino ISP is always connected in the correct orientation
- DIP 8 socket for ATtiny85
- 2 x 4 SIL sockets duplicating each pin of the socket
- 5 x GND points
- 5 x Vcc points
- LED on PB0
- USB Power Input - the circuit can be powered by the ISP or from a USB supply
- Blue power LED
In order to use this programmer in PlatformIO, I used the following in platformio.ini according to the docs
[env:attiny85]
platform = atmelavr
board = attiny85
framework = arduino
upload_protocol = arduinoisp
It works. It's reliable, I'm happy.
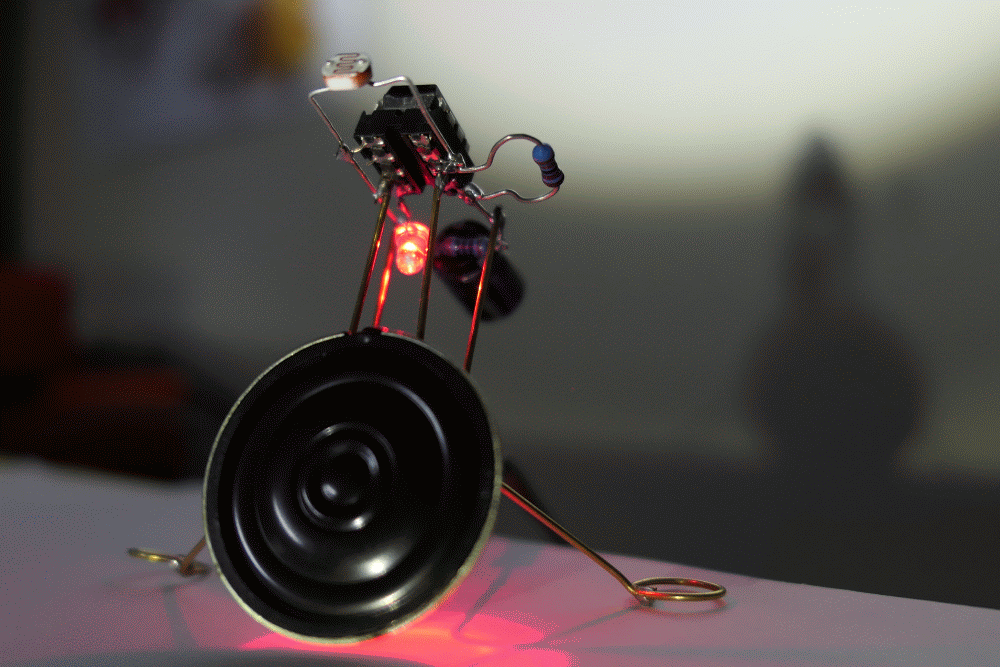
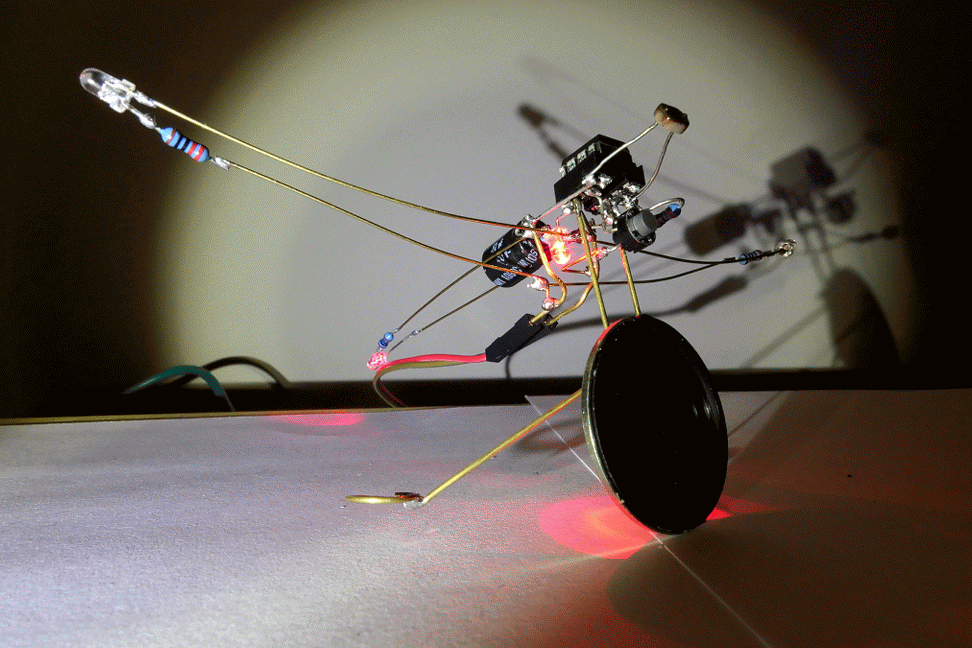
A bird that can't fly...
During the holidays, I ate a lot of turkey, but that's not the reason I made a bird. I just wanted to get some sound out of the ATtiny85 and this is what I got when firing my flash light at it.
At that point, it had no wings... but the circuit was basically done:
The yellow LED got added later when I added the wings. The final version also has 2 of each LEDs.
But he is rather noisy at the table...
My code is rather inspired by this article on the technoblogy showing a simple audio player on the ATtiny85. Instead of a WAV file, I use a wavetable to generate an oscillator of an arbitrary shape. So whilst on the plane between London and Geneva on my way to start the Christmas festivities, I figured a python script would help create the header file with a few useful waveforms. Life is too short to write code if it can be automated...
# Adrien Fauconnet - 2018
# this file will generate wavetables.h
# don't forget to : pip install numpy==1.15.0
# usage : python wavetables.py > wavetables.h

import numpy as np
import numpy.random as rd
from math import pi

size = 256
min_value = 0
max_value = 255
datatype = np.uint8

def print_const(arr, name):
    print("const uint8_t "+name.upper()+" [] = ")
    print(np.array2string(arr, separator=",", threshold=size+1).replace("[", "{").replace("]", "};"))
    print("")

saw = np.linspace(min_value, max_value, size, dtype=datatype)

angles = np.linspace(0, 2*pi, size)
sine = np.array(max_value/2*(1 + np.sin(angles)), dtype=datatype)

tri_section_1, tri_step = np.linspace(max_value/2, max_value, size/4, retstep=True, dtype=datatype)
tri_section_23 = np.linspace(max_value-tri_step, min_value, size/2, dtype=datatype)
tri_section_4 = np.linspace(min_value+tri_step, max_value/2-tri_step, size/4, dtype=datatype)
triangle = np.concatenate((tri_section_1, tri_section_23, tri_section_4), axis=0)

square = np.array([max_value]*(size/2) + [0]*(size/2), dtype=datatype)

noise = rd.randint(min_value, max_value, size, datatype)

print("#ifndef WAVETABLES_H")
print("#define WAVETABLES_H")
print("#define N {}".format(size))
print_const(saw, "SAW")
print_const(sine, "SINE")
print_const(triangle, "TRIANGLE")
print_const(square, "SQUARE")
print_const(noise, "NOISE")
print("#endif")
Let's see some code
/*
* Adrien Fauconnet - 2018
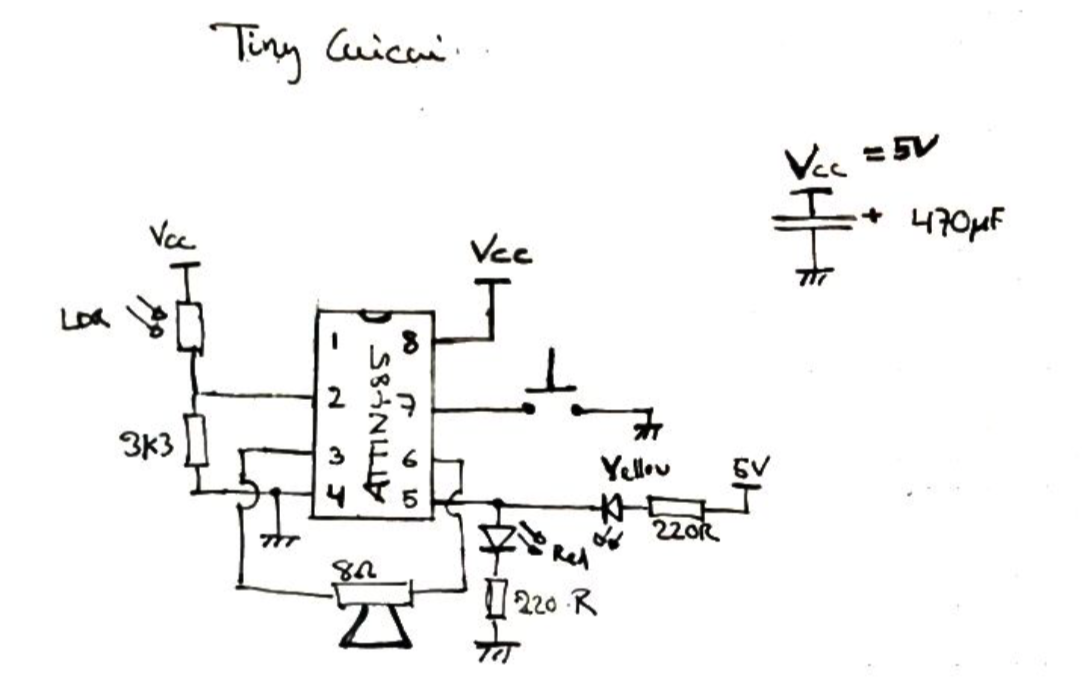
* Tiny Cuicui - for ATtiny85
*
* Pin 1 - PB5 = Disconnected
* Pin 2 - PB3 = LDR / 3k3 voltage divider
* Pin 3 - PB4 = Speaker (pin 1)
* Pin 4 = GND
* Pin 5 - PB0 = LEDs
* Pin 6 - PB1 = Speaker (pin 2)
* Pin 7 - PB2 = Momentary switch to GND - using internal pull up
* Pin 8 = 5V
*/
#include "Arduino.h"
#include "wavetables.h"
// don't forget to generate wavetables.h
#define WAVE SINE
#define SWEEP_LENGTH 50
#define THRESHOLD 768
#define N_MODES 3
int wt_counter = 0; // wavetable position
int s = 1; // step in the wavetable (controls frequency)
int ldr_counter, pitch_counter, led_counter = 0; // counters for LDR read and pitch refresh and LED
boolean output_enable, led_state, current_sw, previous_sw = 1; // states
int mode = 0; // current mode (0 = sweep / 1 = pitch)
int ldr; // LDR voltage divider ADC value
long map(long x, long in_min, long in_max, long out_min, long out_max)
{
return (x - in_min) * (out_max - out_min) / (in_max - in_min) + out_min;
}
void setup() {
// Enable 64 MHz PLL and use as source for Timer1
PLLCSR = 1<<PCKE | 1<<PLLE;
// Set up Timer/Counter1 for PWM output
TIMSK = 0; // Timer interrupts OFF
TCCR1 = 1<<PWM1A | 2<<COM1A0 | 1<<CS10; // PWM A, clear on match, 1:1 prescale
GTCCR = 1<<PWM1B | 2<<COM1B0; // PWM B, clear on match
OCR1A = 128; //OCR1B = 128; // 50% duty at start
// Set up Timer/Counter0 for 8kHz interrupt to output samples.
TCCR0A = 3<<WGM00; // Fast PWM
TCCR0B = 1<<WGM02 | 2<<CS00; // 1/8 prescale
TIMSK = 1<<OCIE0A; // Enable compare match
OCR0A = 124; // Divide by 1000
pinMode(PB1, OUTPUT);
pinMode(PB4, OUTPUT);
pinMode(PB0, OUTPUT); // LED
pinMode(PB2, INPUT_PULLUP); // on/off mom switch
}
// loop() is empty
void loop() { }
// everything is handled by the ISR
ISR (TIMER0_COMPA_vect) {
current_sw = digitalRead(PB2);
if (current_sw != previous_sw){
if(current_sw == HIGH){
mode = (mode + 1) % N_MODES;
}
previous_sw = current_sw;
}
ldr_counter += 1;
if (ldr_counter >= 80){
// read LDR value
ldr_counter = 0;
ldr = 1024-analogRead(PB3);
}
switch (mode){
case 0:
pitch_counter += 1;
if (pitch_counter >= ldr/2){
// update pitch according to LDR value
pitch_counter = 0;
s = (s + 1) % SWEEP_LENGTH + 1;
}
break;
case 1:
s = map(ldr, 1024, 0, 0, SWEEP_LENGTH);
break;
default:
output_enable = !output_enable;
mode = 0;
break;
}
wt_counter = (wt_counter + s) % N;
if (ldr <= THRESHOLD){
// LED Control
led_counter += 1;
if (led_counter >= ldr*4){
led_counter = 0;
led_state = !led_state;
digitalWrite(PB0, led_state);
}
// Audio output
if (output_enable==1){
OCR1A = WAVE[wt_counter];
OCR1B = WAVE[wt_counter] ^ 255; // PWM values, ACR1B is complementary to OCR1A
}
} else {
// The bird is resting ...
OCR1A = 0;
digitalWrite(PB0, 0);
}
}
The PlatformIO project is available on my github
In the dark, the bird is rather silent. It's only when the sun comes out that he starts singing. There are a couple of modes:
- The first one makes some rather funky bird sounds by doing a rather gross frequency sweep. Aliasing and other horrible things are very present here, this is what gives this little guy its character. The speed of the sweep is determined by the value read by the ADC on the voltage divider formed by the LDR and the 3k3 resistor.
- The second mode controls the pitch of the oscillator with the value of the ADC
Cycling through the modes by pressing the bird's belly switch will then also toggle the audio output as that can be rather annoying for some (This is where I would like to thank my girlfriend for her patience) but you can still see his true colors when the audio output is disabled.
First flight
After the first experiments shown above, I felt something was missing... The little Cuicui needed a pair of wings and a little tail to set him free.
And here it is in action...