Close
0%
0%

8Note

Testing small production runs: an op-amp relaxation oscillator piano

Public Chat
Similar projects worth following
158 views
0 followers
A battery powered oscillator that can have 8 different timing resistors switched into the circuit by pressing one of the buttons. The frequency of each button can be adjusted independently with the pots. The upper pot adjusts all the frequencies so that other octaves can be played. Sound can be heard from the on board speaker.

This project's main goal was to see if I could complete a small scale assembly run in a cost effective manner. In other words, would the price I would have to charge for materials + my time be worth it?

I also wanted the experience of completely assembling something from start to finish to improve my DFM (design for manufacturability) ability.

Christmas offered a good opportunity, so I made a batch of 10 and gave them away to family in 2018. I had estimated they would take 2 hours to assemble. It ended up being around 12. The big time killer was cleaning the solder flux.

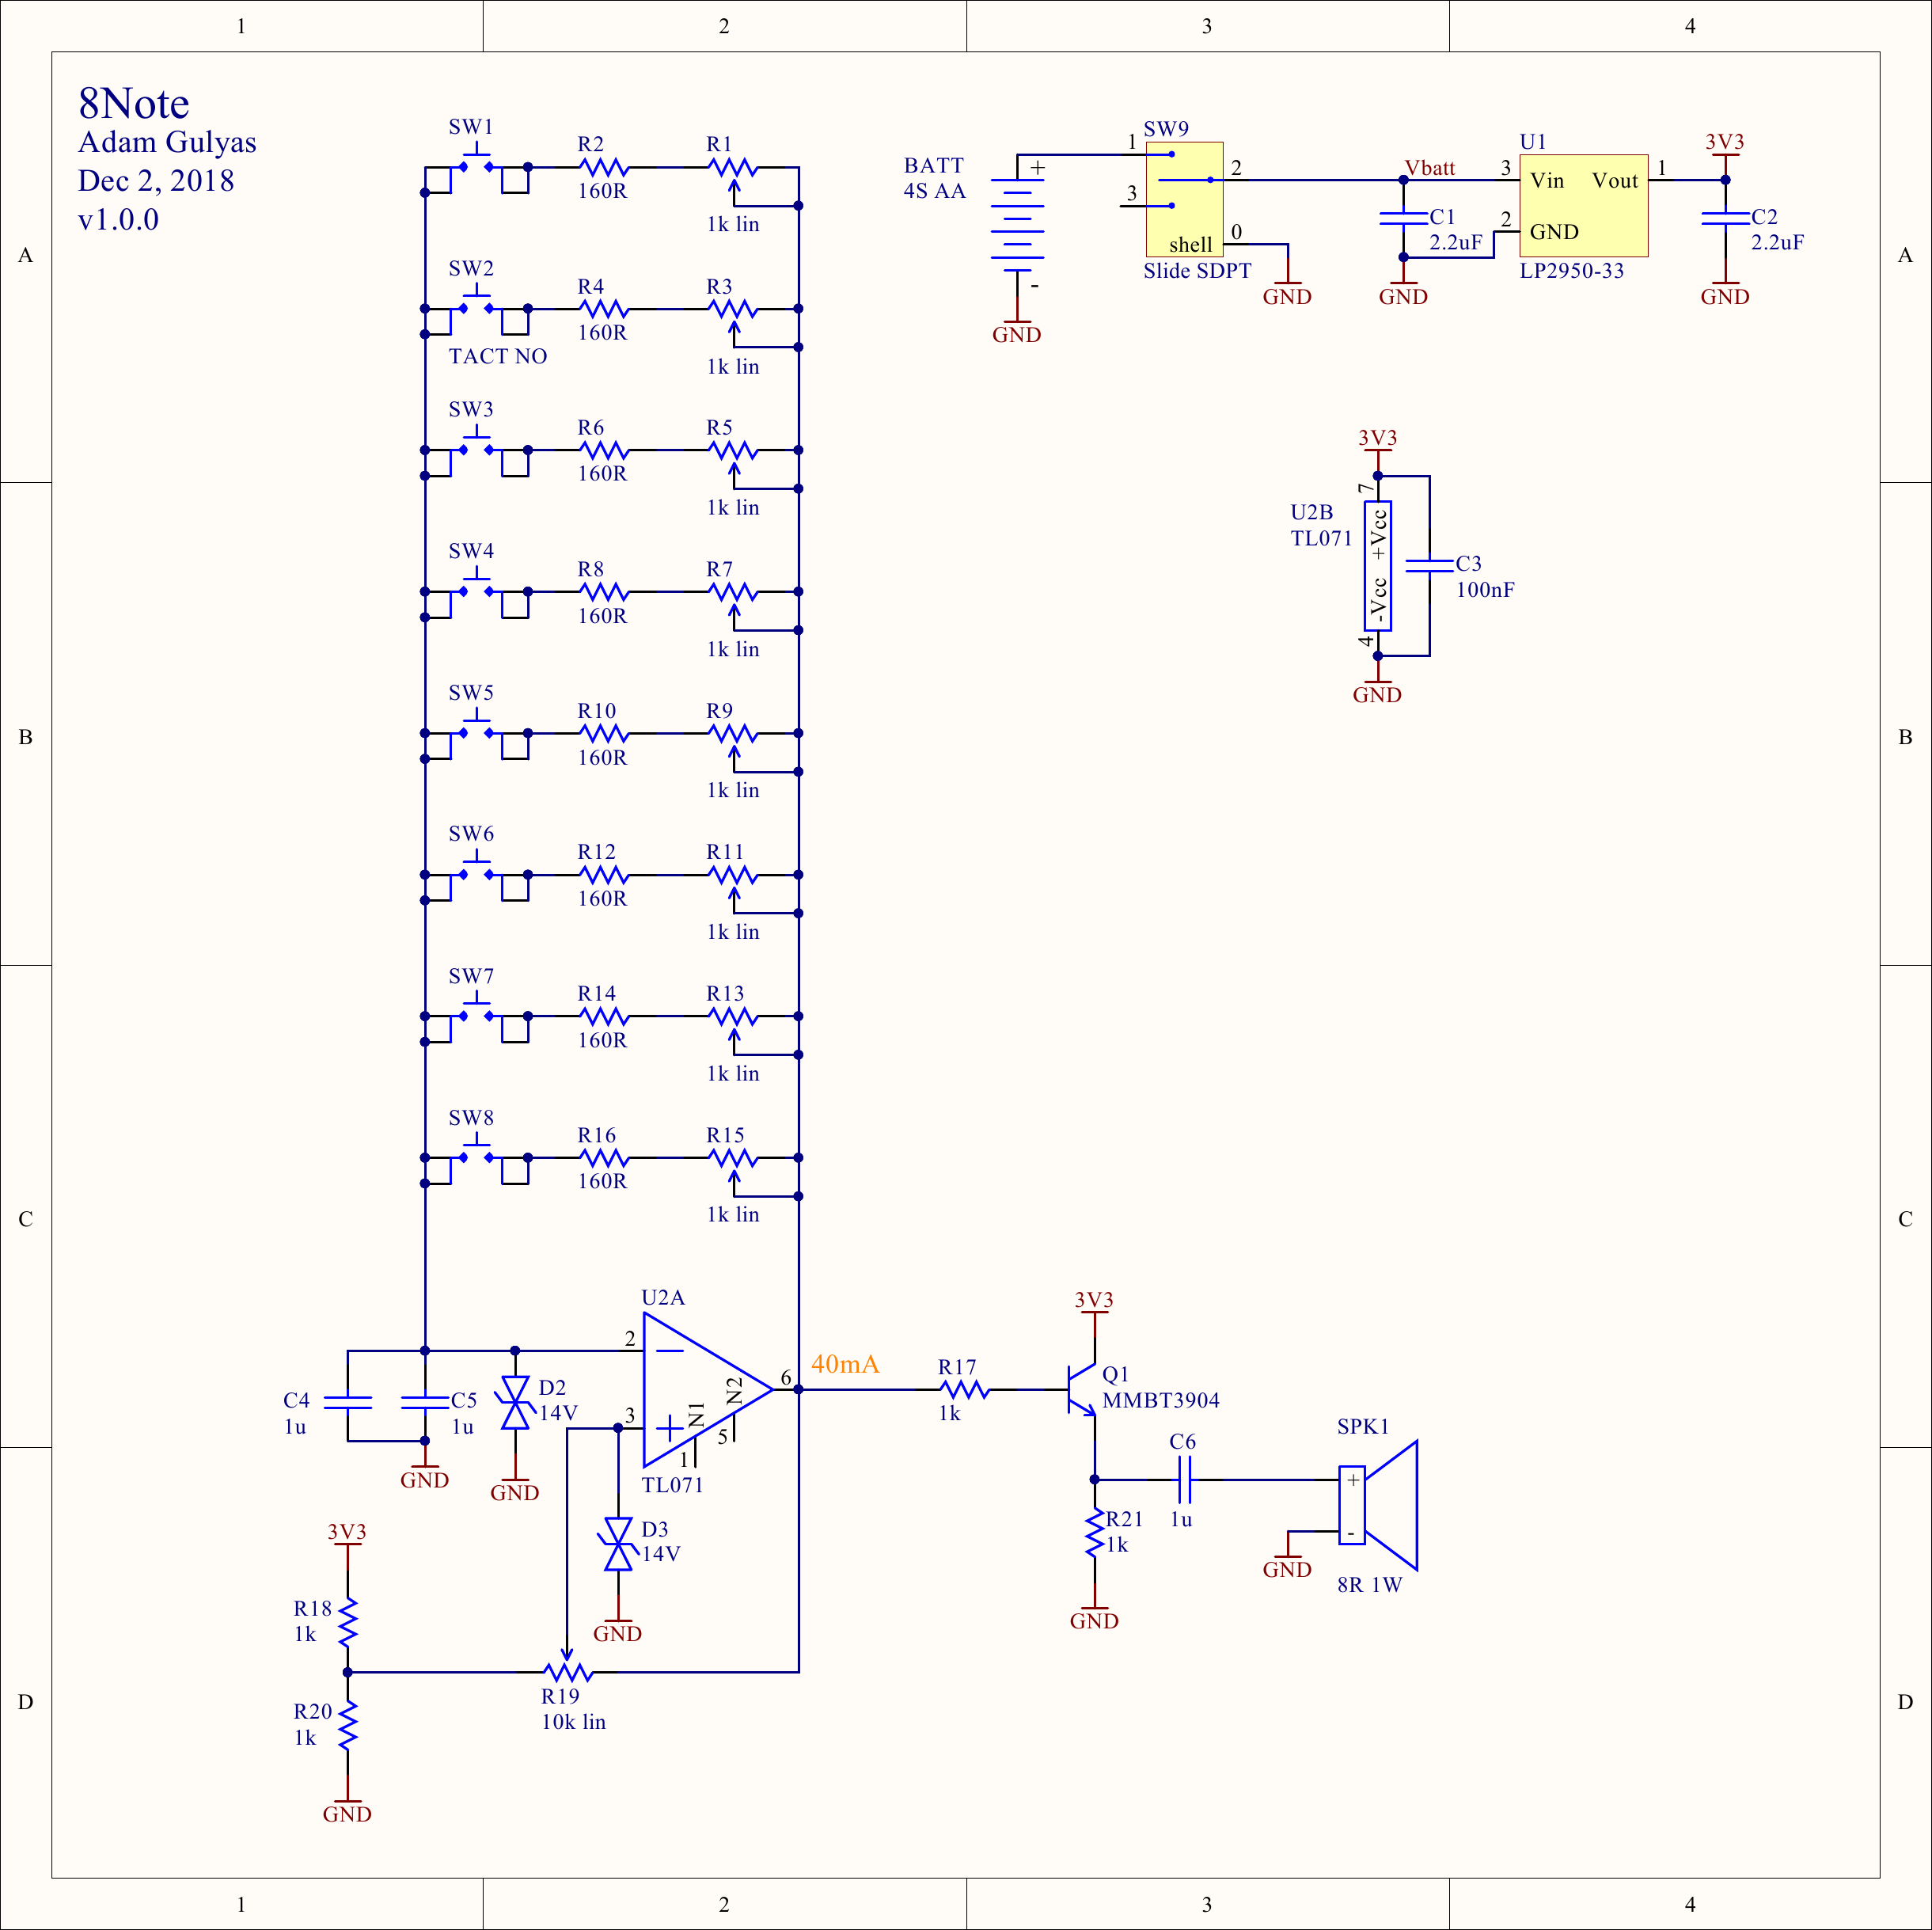
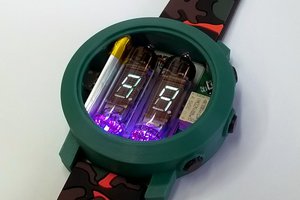
I've build previous versions of this circuit in the past, but always on a breadboard. One time it was for the tech display that was part of Geer Week, the annual competition between the engineering disciplines at the University of Alberta. Another time I helped a student who was job shadowing me to solder together a version on perf board. Since I kept using it, I decided to make an actual PCB and formalize it. I'd also been wondering about the feasibility of doing small run electronic projects, so I decided to make 10 and time myself.

I've put all the details of the project in the Project Logs on this page. However, since hackaday doesn't let you reorder them once made, they're in the order that I realized I needed each section, not a logical order. Here's an index with links, ordered as it should be.

Schematic Designhttps://hackaday.io/project/163064-8note/log/171661-schematic-design
Batteryhttps://hackaday.io/project/163064-8note/log/171662-battery
PCB Designhttps://hackaday.io/project/163064-8note/log/171663-pcb-design
Sourcing Componentshttps://hackaday.io/project/163064-8note/log/171664-sourcing-components
Cost Analysishttps://hackaday.io/project/163064-8note/log/171656-cost-analysis

Common collector analysis.pdf

The DC transfer function of an npn common collector circuit

Adobe Portable Document Format - 132.30 kB - 12/09/2019 at 06:26

Preview
Download

Adobe Portable Document Format - 182.73 kB - 01/01/2019 at 02:44

Preview
Download

  • Sourcing Components

    Adam Gulyas12/08/2019 at 06:59 0 comments

    The main criteria for picking components was cost. Fortunately I had recently discovered Tayda Electronics, which seems to specialize in cheap hobby level electronics. I bought all my components from either them or Digi-Key.

    Mechanical Parts

    These are usually the most expensive parts since they have moving pieces. These include the driver, pots, and switch. It was easy to find the cheapest slide switch on Digi-Key, but their selection of pots and drivers was actually pretty small. Fortunately Tayda  has a selection of these kind of parts. I was surprised at how cheap their pots were, since I'm used to seeing them cost multiple dollars/part and Tayda had them for 67 cents. They also had small mylar speakers for under a dollar.

    Linear Regulator

    There weren't a lot of requirements for the regulator. 8Note is powered by batteries, so the regulator doesn't need a high power supply rejection ratio. The current draw of the circuit is relatively low, so the max current output can be low .

    I bought the absolute cheapest one I could find, LP2950-33LPRE3 from TI for about 60 cents/unit on Digi-Key. Generally I try to stay away from through hole components because they take more time to clean after soldering, but cost was more important here.

    Battery Holder

    I wanted some sort of surface mount battery holder, but apparently it's cheaper to add actual wires instead of just making the wire terminal contacts extend past the plastic. I guess most applications don't involve mounting the holder directly to the PCB. I bought ones with wire, and found a way to solder them that was pretty clean looking.

    PCB

    I haven't found a PCB house that can beat JLCPCB for small quantity, simple orders. I think OSHpark has higher quality, but for basic boards you don't need it. A basic board from JLC "costs $2" for 5 pieces, their advertised price. You can usually get 10 for a few dollars extra. They tack on $25 for shipping and there's an import fee that's around $15, but it's still cheaper than OSHpark for anything larger than a few square inches.

  • PCB Design

    Adam Gulyas12/08/2019 at 06:58 0 comments

    This is the stage where all the mechanical design was done. Since I wasn't using an enclosure, I had to answer all the questions about what it would look like when it was done.

    General Layout

    I wanted the buttons along the bottom for easy access and the pots in either a line or a grid so that it was intuitive which pot controlled which button. The switch should be out of the way

    Mounting The Driver And Battery Holder

    One of the bigger issues was figuring out how to mount the large components. I couldn't find any surface mount or through hole drivers or battery holders that were cheap enough. I ended up planning to epoxy both of them to the PCB. The driver had a much smaller contact area, so I removed the solder mask and copper from the PCB under it. I assumed epoxy would stick to the PCB core better than to the solder mask.

    Buttons

    I rotated the buttons so that their legs were above and below them, not between them. This made it easier to clean the flux on top of the board since I could just brush in a straight line instead of going between each button individually. I also spaced out the buttons enough that they didn't feel crowded to the user and you could get a brush between them if flux did happen to go there.

    Pots

    One of my main regrets is that I orientated the pots in a "mirrored" pattern, with the pins of the two columns of pots facing each other. It made routing the PCB easier and I thought it looked cool. It also put the pins closer together, concentrating the flux to make cleaning easier. However, since the pot knobs had a line on them, turning them all the way in one direction left the marks pointing different directions. It's would have been easier to see the tuning if there was only one angle that corresponded to the lowest note for all the pots. As it is, it imposes sort of a "mental lurch" when you try to think about it and you have to choose to ignore the marking.

  • Battery

    Adam Gulyas12/08/2019 at 06:54 0 comments

    I wanted this to be battery powered, which raises two questions: which cell to use, and in what configuration? Looking around online, I found this chart:

    Read more »

  • Schematic Design

    Adam Gulyas12/08/2019 at 06:22 0 comments

    The basic circuit is an op-amp relaxation oscillator:

    There already exists a lot of documentation online for this circuit:

    Design and Implementation of Opamp Relaxation Oscillator by Md. Moyeed Abrar

    Relaxation Oscillator Circuit by TI (SNOA998)

    Its Wikipedia article

    This Electronics Tutorials article

    The basic idea is that the op-amp compares the rising and falling voltage of the cap with the reference voltage set by the voltage divider from the output. The output is always at one of the rails, so the reference voltage is always the same magnitude (assuming ± voltage rails). The RC time constant sets the cap voltage slew rate, and the voltage divider sets the point the cap voltage has to reach before the output toggles.

    We can change the frequency by changing either the ratio of the voltage divider or the RC time constant.

    Here's the final schematic. 

    • pressing one of the buttons will put a different value resistor in the RC circuit, which will play a different frequency
    • Changing R19 will change the frequency of every note, so you can shift the entire octave
    • Component values were based on breadboard tests

    The R18,19,20 circuit that provides V+, as well as the value of the 160Ω resistors and 1k pots were all tested on the breadboard to give a frequency range of 76 - 2380 Hz. I was happy with this since higher frequencies start to get annoying, and adding more range would make it harder to set precise frequencies and tune properly.

    One of the main factors in choosing components was price. I looked at a few websites and found that while the selection at Tayda Electronics wasn't as wide as Digi-Key, their prices were much lower. I was able to buy the more expensive components, like the driver and pots, at a much cheaper price than I thought possible.

    The voltage regulator has a drop out of ~360 mV @ 50 °C. 

  • ​Cost Analysis

    Adam Gulyas12/08/2019 at 03:04 0 comments

    All prices in Canadian dollars.

    There's some issues with the following analysis.

     - It's done for very small scale (10 units). Per unit prices get cheaper as quantity increases.

     - Some of the costs are estimated. I didn't have the foresight to weigh all the parts of the PCB before soldering so I could measure the weight of the solder used. I also didn't measure the volume of epoxy I was using, or how much paper towel and rubbing alcohol I used to clean flux.

     - After about the 5 hour mark, I stopped tracking my time so closely. I could see I was going to far exceeded my estimate of 2 hours that I needed if I was going to hit the price point I was aiming for. My best guess is that I spent 12 hours building 10.

    With that said, here's the per unit cost calculation.

    Read more »

View all 5 project logs

Enjoy this project?

Share

Discussions

Nathan Stanley wrote 11/16/2020 at 00:53 point

Interesting project! Do you have any video or audio of how it sounds and operates? I'm curious!

  Are you sure? yes | no

Similar Projects

Does this project spark your interest?

Become a member to follow this project and never miss any updates