Giovanni
The bom2buy cube is going to be first presented in China, so that is why you will see some of the information in Chinese!
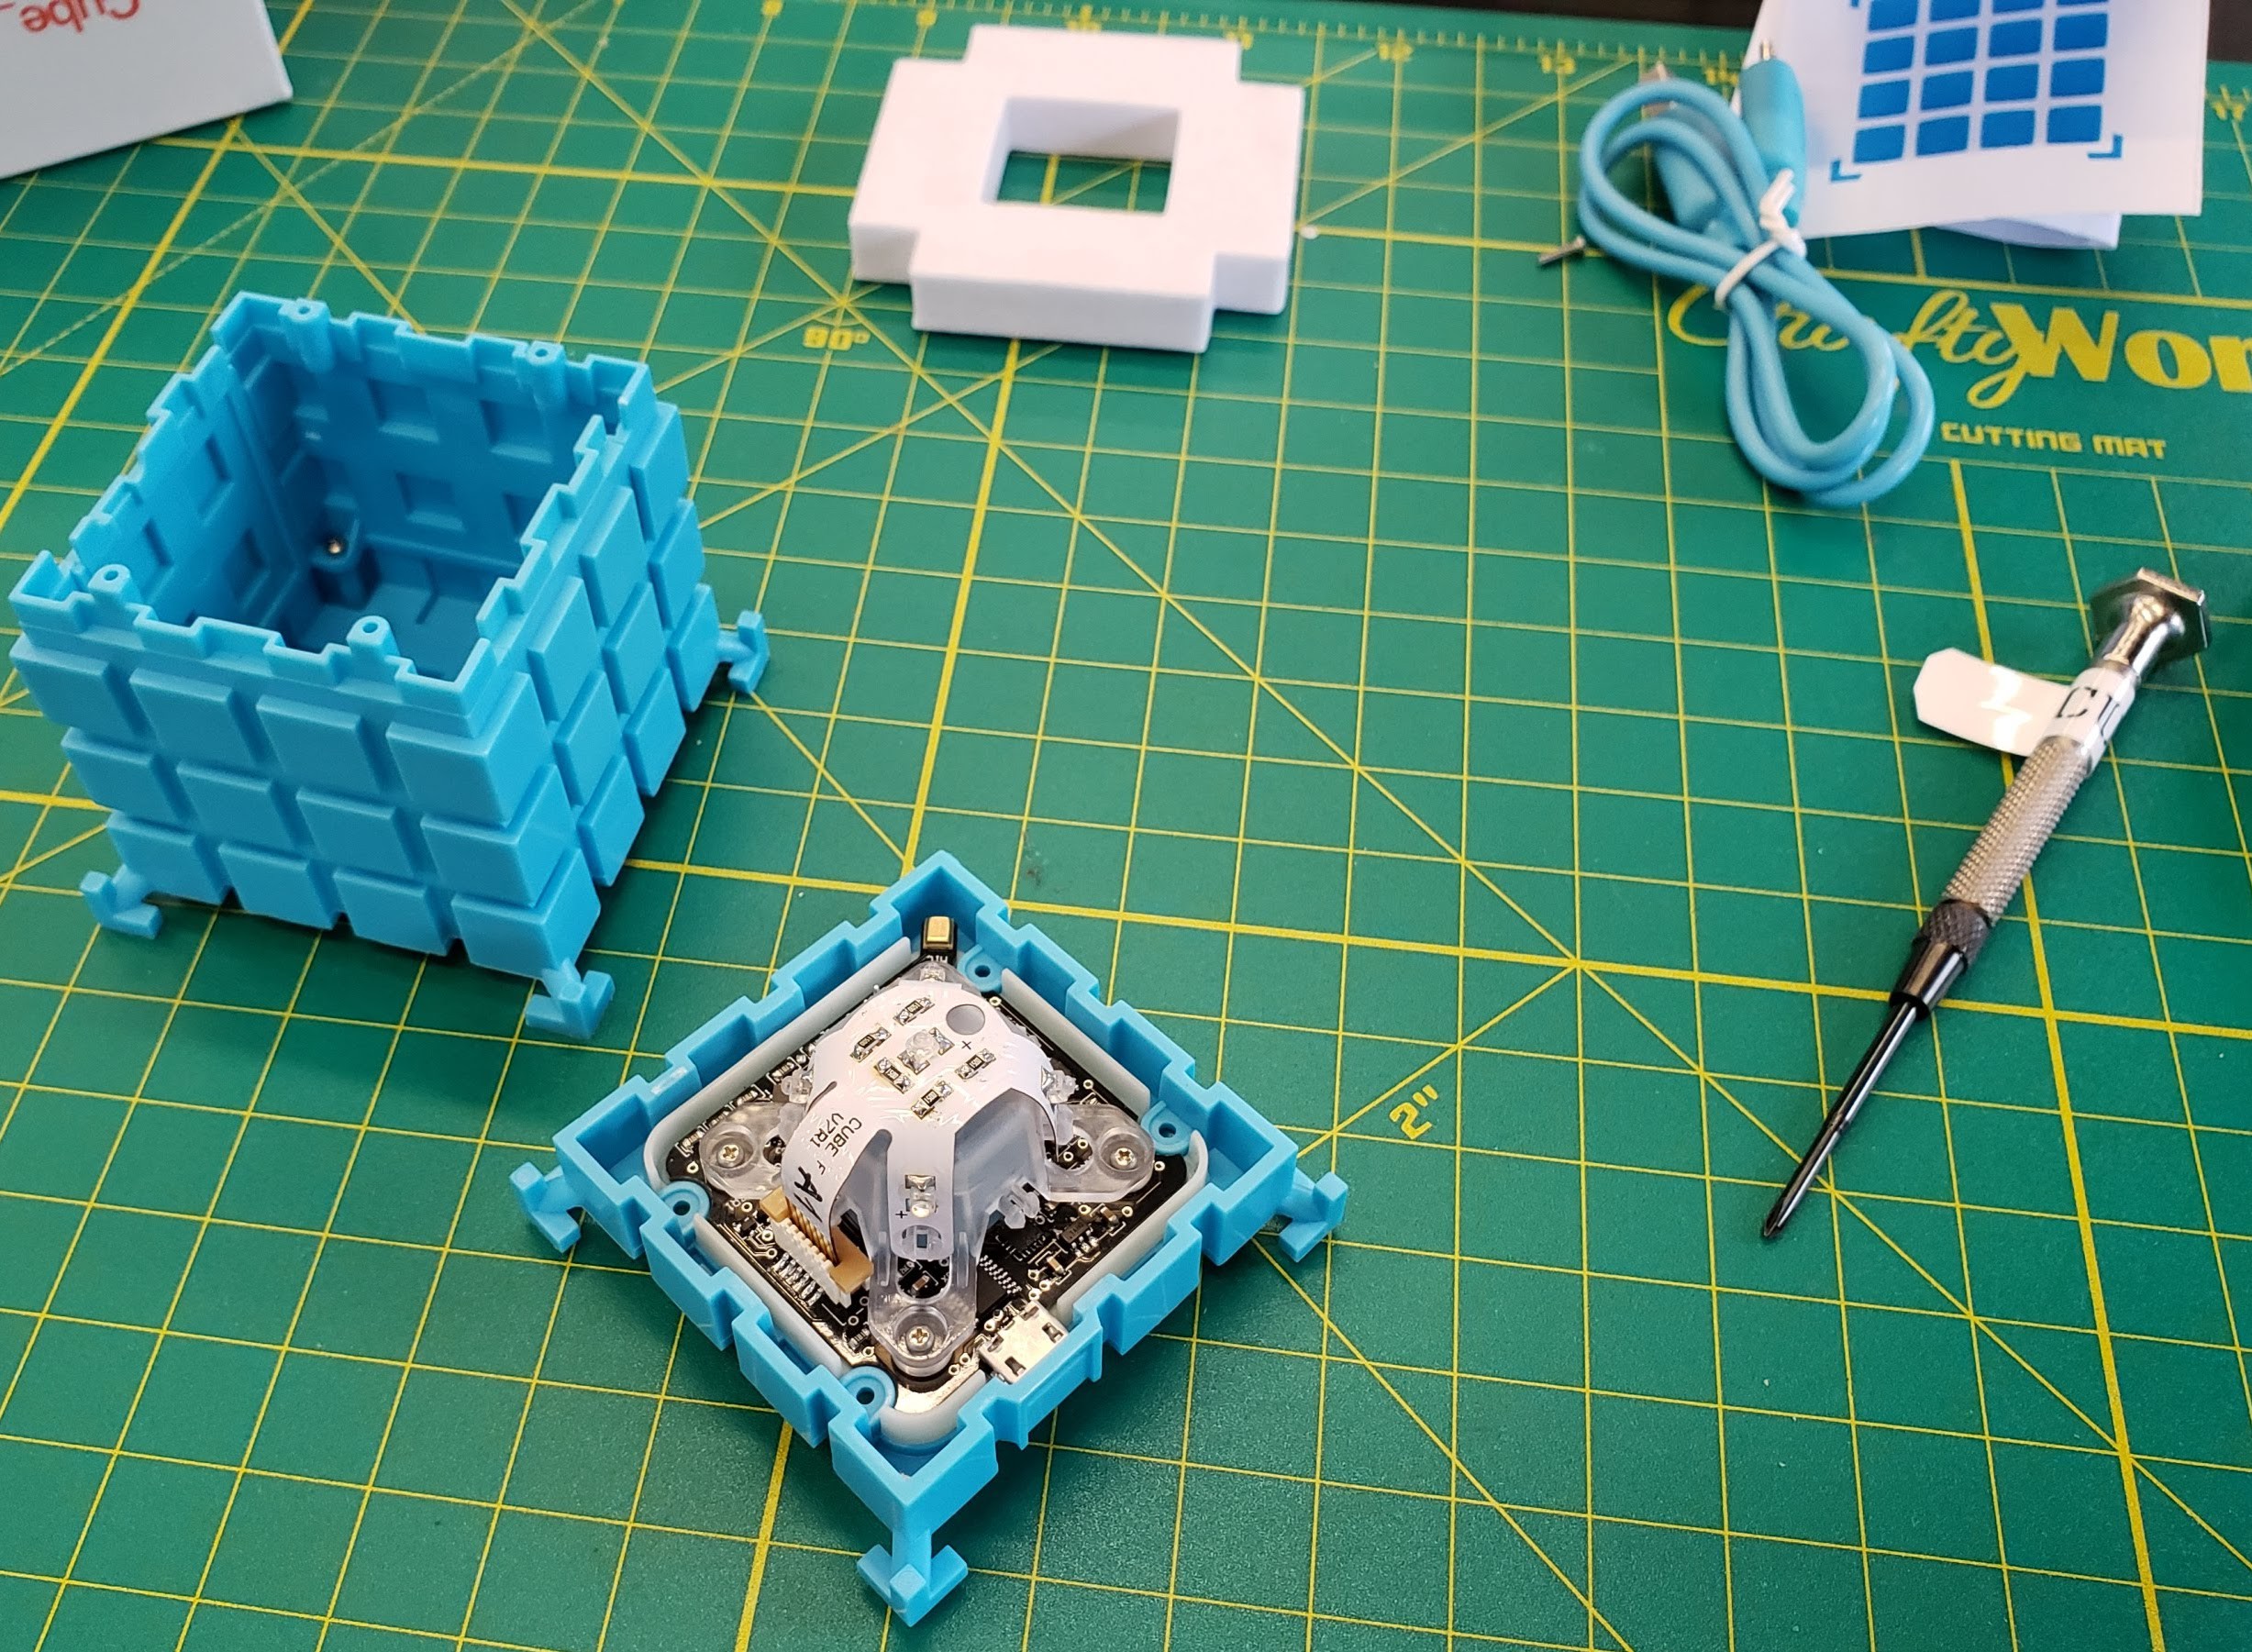
All the electronics (boards, firmware) were developed by Voja Antonic, and the enclosure was designed and developed at Supplyframe's DesignLab in Pasadena, California by me, Giovanni, using some of the awesome equipment available.
Connecting to a computer
If you establish communication between the cube and the computer, there's much more. The communication is performed via the virtual serial port, so if you should have some serial terminal program (RealTerm, or similar) in your computer, you can send a command to the cube, and it will send you back some data. Communication parameters are 9600, 8, N, 1. This port is used to issue the command or parameters to the cube, get the status, switch modes, turn lights on and off and so on. Don't forget to set automatic CR and LF characters after every command, as the cube firmware expects it after every command.
The command line is not case sensitive, so you can use uppercase or lowercase. It should contain one command word (or its abbreviation), one (optional) single-character operand or one (optional) numeric data, separated by spaces. All command abbreviations contain two characters, except the command HELP, which is abbreviated by a single question mark. So, if you type “?” (followed by <CR> and <LF>), you will get the HELP screen, like this:
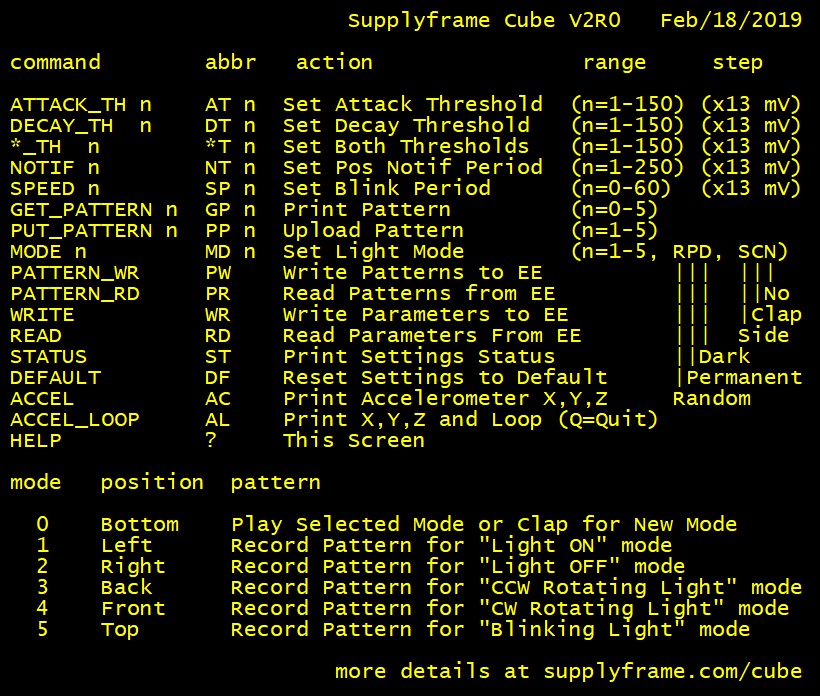
This will give you an idea what the cube can do, but there are some stand-alone functions also, so you don't need to have the terminal software to operate the cube. However, USB connection is needed, at least for power supply, so you must have the USB cable connected to the computer or, at least, to the USB charger.
BASIC FUNCTIONS
There are two lights inside the cube, the lower one, which employs 10 LED's at the bottom of the cube, and the main one, with 5 high power LED's at the top. The lower one blinks randomly by default, but it can be turned OFF or permanently ON by command MODE, followed by R (Random), P (Permanent) or D (Dark). The top light is ON by default (which is MODE 1), and it can be switched OFF (MODE 2), rotating CCW (MODE 3), rotating CW (MODE 4), or blinking (MODE 5). Please note that every command can be replaced by typing its two-character abbreviation.
You can also switch the mode by clapping your hands, or by beating with some object on your table. To perform this, you must record your patterns for every mode separately, and these patterns will be your "passwords" for turning lights on and off. We will talk about it later.
Command STATUS is used to read the current status of the cube: Attack threshold, Decay threshold, Notification period, Speed and Mode. We will talk about these parameters in detail later, but now we will say that all listed parameters can be reset to their default state by typing DEFAULT.
Inside the cube there is an accelerometer, MEMS sensor which senses gravitational acceleration for X, Y and Z axis, and thus the angular position of the cube. By typing ACCEL, you can read the current position of the cube. Command ACCEL_LOOP does the same thing in the endless loop, so you can watch how those parameters change while you are rotating and moving the cube. The loop can be terminated by sending character Q (this is the only command that can be issued without <CR> and <LF>).
During normal operation, the cube will send the position change every time it turns to a new position. Try turning it and it will communicate ‘Cube Left’, ‘Cube Right’, ‘Cube Bottom’ and so on. Also, after every mode change by clapping, it will communicate ‘Clap 1’, ‘Clap 2’ and so on. Both options can be switched OFF by command MODE N, and the first one can be switched on by MODE S (Side), and the another one by MODE C (Clap).
PATTERN PROGRAMMING
To program the clapping pattern for light ON (MODE 1), turn the cube to the left side. If the terminal program is connected, "Cube Left" will be displayed. Also, the main (upper) light will be ON for some time (which can be affected by NOTIF command), and then switched off. Now you can clap your hands, fingers or beat on the table surface slightly by some hard object or by your hand nails (timings between claps are the only significant parameters, not the intensity). Pattern should contain between 3 and 31 claps, otherwise it will not be accepted. When you've finished the pattern, wait silently until the cube repeats the same pattern by light. Then you can turn the cube back to the upright position (bottom down) and test if it works. You can program up to five patterns, for all available modes. Here is the list of modes:
- MODE 1 (main light ON) LEFT position
- MODE 2 (main light OFF) RIGHT position
- MODE 3 (running main light CCW) FRONT position
- MODE 4 (running main light CW) BACK position
- MODE 5 (blinking light) TOP (upside down) position
Note:
If you've forgotten any of these patterns, just turn the cube on the desired side, and wait silently for at least 3 seconds, and the cube will play the pattern with lights.
If you don't like your new patterns, you can reset the cube (by command PATTERN_RD, or simply disconnecting and reconnecting the USB connector) and the last recorded patterns (if they were saved by command PATTERN_WR) will be reloaded. When you've finished all patterns programming (or reprogramming, as it can be performed many times), maybe you will like to record patterns at the internal non-volatile EEPROM memory. Type the command PATTERN_WR and, when you connect the cube the next time to the power supply, it will be reloaded with your last recorded patterns.
ADVANCED COMMANDS
- ATTACK_TH n Attack threshold level (n × 13 mV)
- DECAY_TH n Decay threshold level (n × 13 mV)
- *_TH n Both attack and decay threshold level (n × 13 mV)
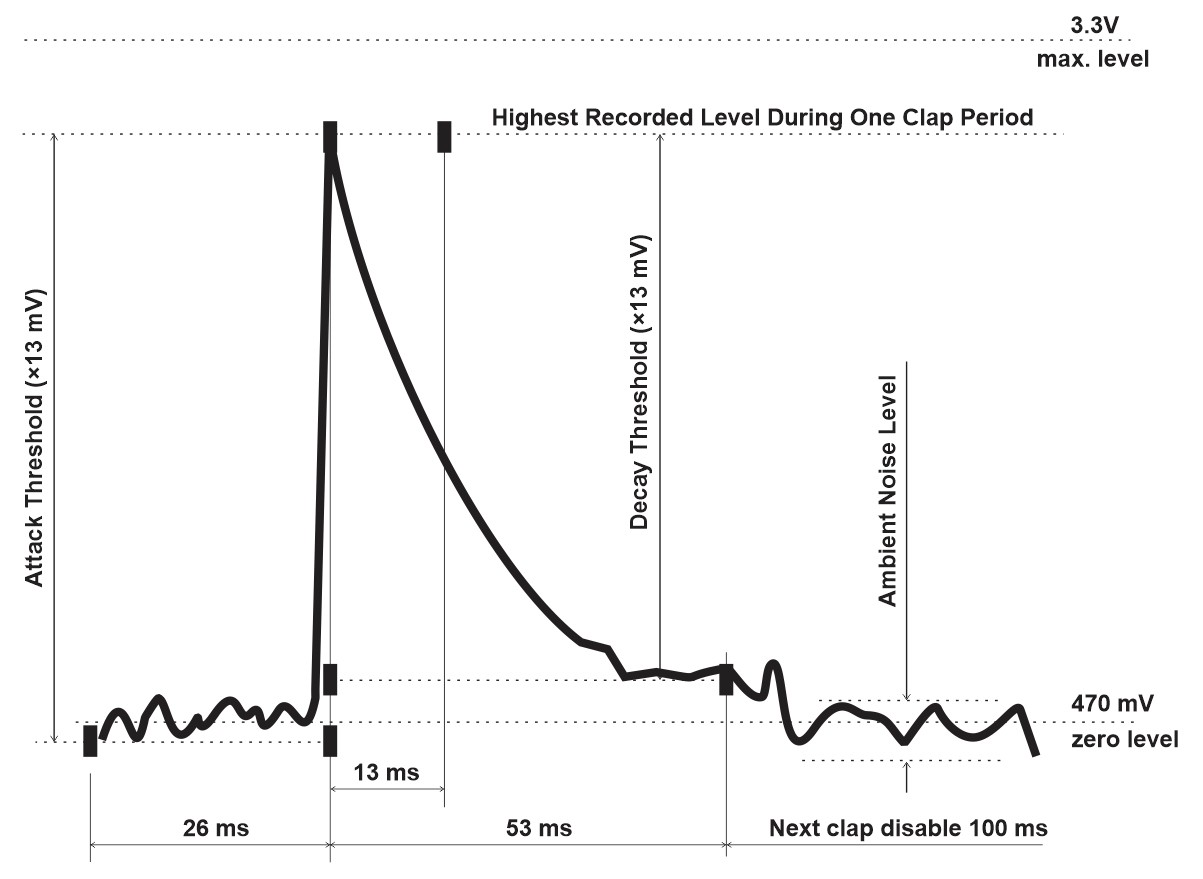
There is a threshold sound level which will decide if the clap occurred. If the threshold is too high, then some claps will not be registered, and if it is too low, the ambient noise will cause false claps. So it is essential to have the threshold adjusted to the optimal level. You can adjust the attack threshold and decay threshold separately. Default values for attack and decay threshold are 80 and 60, respectively.