The following log is going to be a bit of a brain dump on the current state of the firmware/software development. This snapshot is captured in the R0.3 ROM uploaded to the files section today (also tagged in the Git repo).
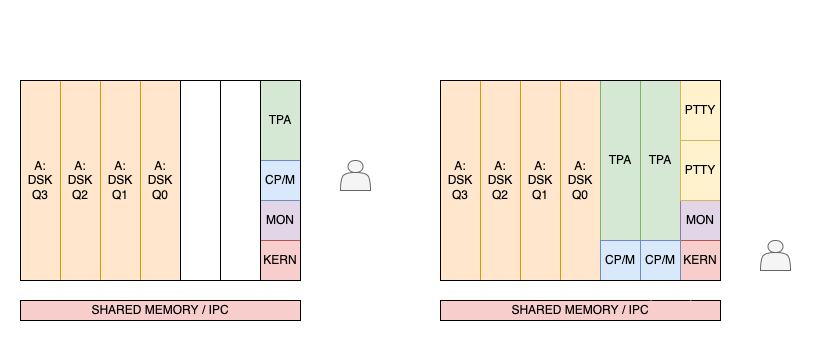
First a quick overview of how the current software is structured:

The R0.3 ROM was the final phase of the Kernel/CPM testing and debug (Test/Debug Configuration). Here the CP/M instance is running in the Kernel space of CPU1. It can access the input and output ports directly to simplify the console access. It is also possible to exit CP/M and return to the system monitor to examine the RAM. The Kernel is only used to talk to the RAM disk (CPU4-CPU7 contexts).
The next stage of development is switching to the final Multi-user Configuration. Here there are two CP/M instances running on the CPU2 and CPU3 contexts. These cannot access the console directly and will interface via the Kernel to access the console. This additional layer of abstraction provides the ability to create pseudo-TTY terminals and allow the user to switch between the two CP/M instances (similar to Unix).
Test/Debug Configuration
The rest of this log describes the functions/features of the R0.3 ROM in the Test/Debug Configuration. On a cold boot (power on or hardware reset) the machine will boot to the 8080 system monitor. There are a couple of issues to clean up with the keyboard initialization, so there may be an extra character shown after boot.
The monitor accepts input via the console (PS/2 keyboard and VGA display) and the RS232 serial port. This is the default start up, so the keyboard and display are not required. The board can be connected to just a serial terminal.
Serial Port
The RS232 serial port has a fixed speed of 9600 baud, one start bit, 8 data bits, no parity (9600-8-N-1). The serial port uses RTS/CTS hardware flow control. The LED is connected to the RTS line and will light when RTS is asserted. If the LED is off then the board is not ready for serial data.
The serial status can be toggled using the 'T' command in the monitor. Typing 'T' will turn the serial thread off/on and the RTS LED will toggle to show the serial status. An additional state is tracked by the serial interface to manage flow control. If a command is sent via the serial port then the monitor will enforce flow control and prevent the input and output buffers from overflowing. This will cause the RTS LED to go out during heavy serial load, like doing a dump command.
Note: some serial terminals and interface programs do not support RTS/CTS flow control correctly. This can result in some glitchy behavior.
Console
There are four native video modes supported by the board, with additional timings and fonts available. This provides the following 8 text modes:
- VGA @ 60Hz - 8x8 glyphs - 104x60 text
- VGA @ 75Hz - 8x8 glyphs - 80x60 text
- VGA @ 75Hz - 8x10 glyphs - 80x48 text
- VGA @ 75Hz - 8x16 glyphs - 80x30 text <-- cold boot starts here
- SVGA @ 60Hz - 8x8 glyphs - 80x75 text
- SVGA @ 60Hz - 8x10 glyphs - 80x60 text
- SVGA @ 60Hz - 8x16 glyphs - 80x37 text
- XGA @ 60Hz - 8x16 glyphs - 64x48 text
The video mode can be changed from the keyboard using a CTRL-ALT escape sequence as follows:
- CTRL-ALT-DEL - reboot machine to current mode
- CTRL-ALT-PAGE_UP - reboot machine to next mode
- CTRL-ALT-PAGE_DOWN - reboot machine to previous mode
The cold-boot console color scheme is set to the classic green text on a black background. The font, background, and foreground color can be changed by sending a byte to output port 2F ($CONF). The following command would update this to 78:
O2F 78
A control sequence from above will restart the video and fill the console memory with this value. The least-significant 3 bits from the first nibble sets the foreground color (RGB) and the least-significant 3 bits from the second nibble sets the background color. The most significant bits from the two nibbles set the one of the four fonts. The example shown sets the foreground text color to 7 (white) and the background color to 0 (black). The selected font is the 0b01 (thin serif). The available fonts are shown below.
Fonts with 8x8 and 8x10 glyph timings:
- 0 - thick serif - IBM PC BIOS. ca. 1981
- 1 - thin serif - COMPAQ MS-DOS 3.31 (Rev. G). ca. 1990
- 2 - thick san-serif (8x8) - Phoenix Enhanced Video BIOS PLUS (Chips 82C435) ca. 1985
- 3 - thick san-serif (8x10) - ditto with underline
Fonts with 8x16 glyph timings:
- 0 - thick serif - IBM PS/2 VGA/MCGA. ca. 1987
- 1 - thin serif - COMPAQ MS-DOS 3.31 (Rev. G). ca. 1990
- 2 - thick san-serif - Phoenix Enhanced Video BIOS PLUS (Chips 82C435) ca. 1985
- 3 - thick san-serif - ditto with underline
Note: dark fonts on a light background will show some smudging of the video signal. This is due to the parasitic capacitance of the analog switch FETs. The CD4053 is the one of the original CMOS chips released by RCA 50 years ago. It has huge features!
Graphics
The machine supports a range of graphics modes, both 256 color and a hybrid 8-color version using a combination of the text mode with graphics-mode timing. So far only static image demos have been shown on the machine. The focus was on bringing up the operating system and text mode, so still a lot of work to do here.

Audio
The audio thread is off by default and the sound is muted. To use audio the thread can be turned on by sending a byte to output port A as follows:
OA 1
From 1 to 3 melodic voices can be enabled by sending the relevant value. A value of 0 will disable the audio thread and mute the audio. The audio instructions are part of the extended set that follow 0xDD: 0x10-0x13 configure the voice, 0x18-0x1B set the note (MIDI number), 0x1C-0x1F gate on, 0x14-0x17 gate off.
The following program sets up voice one and will gate on:
 MVI A, 2       ; wave:0=sine,1=saw,2=sqr,15=noise
 LXI B, 00905H  ; attack,decay
 LXI D, 00C02H  ; sustain, release
 DW     011DDH  ; config voice 1
 MVI A, 33H     ; MIDI note number
 DW     019DDH  ; set note 1
 ;GATE ON
 DW     01DDDH  ; gate note on
 RET
 ;GATE OFF
 DW     015DDH  ; gate note off
 RET
This can be loaded at location 0x100 via the monitor command L100 followed by this code:
3E
02
01
05
09
11
02
0C
DD
11
3E
33
DD
19
DD
1D
C9
DD
15
C9
Use the monitor command C100 to call the config and gate on code to hear the note. Use monitor command C111 to gate off. To play the same note again, just call gate on with C10E.
Note: Don't forget to start the audio thread first with at least the one voice using: OA 1
System Monitor
More details can be found in this log. The following is a quick summary of the commands that came with the original monitor code:
- AD<start> <end> Dump memory in ASCII from <start> to <end>.
- AL<address> Load ASCII data to <address>. End with Control-X.
- AS<start> <end> <chars> Search for ASCII data consisting of one or two characters, from <start> through <end> address.
- C<address> Call routine at <address> (should end in RET instruction).
- D<start> <end> Dump memory in hex and ASCII from <start> to <end>.
- F<start> <end> <data> Fill memory from <start> to <end> with byte <data> (hex or ASCII preceded by "'".
- G<address> Go to routine at <address>.
- H<address1> <address2> Hex math: report sum and difference of two hex addresses.
- I<port> Input (read) and display data from i/o port <port>.
- L<address> Load or edit memory from <address>. Enter new data in hex, ASCII preceded by "'", or <Return> to advance. <Control>-X will return to prompt.
- M<start> <end> <new> Move (copy) memory from <start> through <end> address to <new> start address.
- O<port> <data> Output (send) data to i/o port <port>.
- R<start> <end> <from> <to> Replace every occurrence of hex byte <from> to <to>, in range of addresses <start> through <end>.
- S<start> <end> <byte> <byte> Search for byte or word size data from start through end address.
- V<start> <end> <to> Compare (verify) data between <start> and <end> address with data starting at <to> address.
- Z<start> <end> Write zeroes to memory from addresses <start> through <end>.
The following additional commands were added to support the Novasaur:
- KF Kernel command - Format RAM disk drive - confirm with (capital) 'Y'.
- KG<track><sector> <to> Kernel command - Get RAM disk record <track><sector> and copy to <to> address.
- KP<track><sector> <from> Kernel command - Put RAM disk record <track><sector> copied from <from> address.
- P Measure 8080 processor speed and display in KIPs.
- T Toggle serial mode (default on, toggle off).
- Q Quit monitor program and run CP/M.
CP/M
In the final configuration the machine will boot to CP/M 2.2. There are two ways to get to CP/M from the monitor: use the quit command Q or call the BDOS directly with CDA00
Before using CP/M the A: drive needs to be formatted. Use the monitor command KF to do this followed by capital 'Y' to confirm. This initializes the A: drive directory of the RAM disk. This is only needed once if the battery is installed to backup the RAM.
The ROM contains a bank of memory with the basic CP/M utilities installed. This is represented as the read-only B: drive. Commands can be run by switching to the B: drive or by referencing the drive at the start of the command. The disk information can be shown using the following:
b:stat dsk:
There are a couple of additional programs on the B: drive: basic.com and xmodem.com These are still work in progress, but basic is mostly functional. There are a couple of issues to be aware of: This version of basic is expecting upper case. There isn't a caps-lock, so hold the shift key down to enter programs (sorry!). The test/debug console code has a race condition that causes an infinite loop when a program is interrupted via ctrl-C.
To be continued...
 Alastair Hewitt
Discussions
Become a Hackaday.io Member
Create an account to leave a comment. Already have an account? Log In.