Close
0%
0%

LoRa ESP32 Radios Easy getting started tutorial

Get started with LoRa Radios easily without ann much wiring. This is possible by using stackable modules from DFRobot.

Similar projects worth following
Checkout UTSource for electronic components for your DIY Projects with free shipping: https://www.utsource.net/

Hey, what's up guys? Akarsh here from CETech.

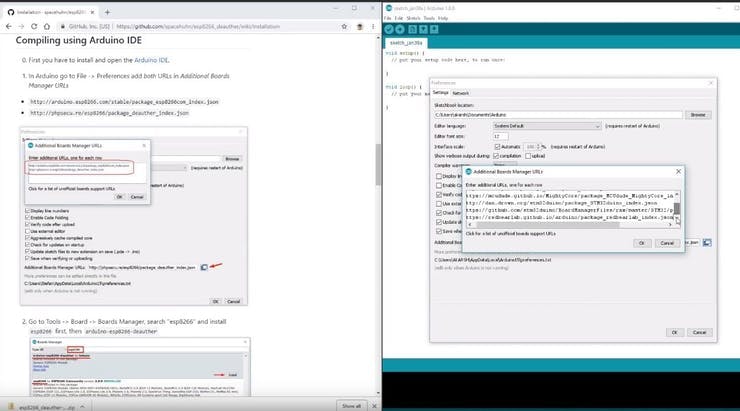
Today we are going to make a project which is basically about setting up LoRa radios to talk with each other in the easiest way possible.

Here the microcontroller that I have used is the ESP32, which is connected to LoRa boards of 915MHz, I have also attached an OLED display to one of the Radio so that the packet information is visible. All the modules used in this project are from DFRobot as the pin compatibility is there for these modules, So I do not recommend using modules of different manufacturers. So let's get started!

I have also made a video about building this project in detail, I recommend watching that for better insight and detail.

  • 1
    Parts

    To make this you will need an ESP32 board or an ESP8266 and you can also add a battery if you want.

    I used firebeetle LoRa board of 915MHz frequency. DFRobot offers 3 types of boards depending on the frequency that is legal in your area:

    1)  433MHz

    2)  868MHz

    3)  915MHz

    For the display, I used an OLED shield.

    I suggest using boards from DFRobot with this module as the pinout will be compatible and you will face no issues anywhere.

  • 2
    Get PCBs for Your Project Manufactured

    You must check out JLCPCB for ordering PCBs online for cheap!

    You get 10 good quality PCBs manufactured and shipped to your doorstep for 2$ and some shipping. You will also get a discount on shipping on your first order. To design your own PCB head over to easyEDA , once that is done upload your Gerber files onto JLCPCB to get them manufactured with good quality and quick turnaround time.

  • 3
    Download and set up the Arduino IDE

    Download the Arduino IDE from here.

    1. Install the Arduino IDE and open it.

    2. Go to File > Preferences

    3. Add https://dl.espressif.com/dl/package_esp32_index.json to the Additional Boards Manager URLs.

    4. Go to Tools > Board > Boards Manager

    5. Search for ESP32 and then install the board.


    6. Restart the IDE.

View all 6 instructions

Enjoy this project?

Share

Discussions

Similar Projects

Does this project spark your interest?

Become a member to follow this project and never miss any updates