Sponsor Link:
UTSource.net Reviews
It is a trustworthy website for ordering electronic components with cheap price and excellent quality.
Mounting the circuit
Note: Look at the pinout of the OLED display in the diagram and of your OLED display. It may be different like in this case, as the pictures above and the diagram above has different pinout orders from the left. You can follow the schematics for pin-to-pin wiring.
Since this i2c OLED display runs on the i2c protocol, it only require a simple, four connection wiring. This wiring could be used in, practically any i2c device as it all follows the same interface. Before starting, remove any power sources going through the Arduino and the circuit, as it can be a safety hazard. Let's now get started by using the Male to Female jumper wires for the connections because no breadboards are needed. First, use one of the wires to connect GND (-) on the OLED to anyone of your Arduino's GND (-) pins. Secondly, connect the VCC (+) pin of your 1.3" OLED to the 5v (+5 volts) pin on your Arduino. Consecutively, connect the SCL (serial clock) pin from the display to A5 (analog pin 5) on your Arduino, as well as connecting the SDA (serial data) pin to A4 (analog pin 4) on your Arduino. That wraps up your wiring for this module!
Arduino 1.3" i2c White OLED Display Project Code
#include "U8glib.h"
U8GLIB_SH1106_128X64 u8g(U8G_I2C_OPT_NONE);

void draw(void) {
  u8g.setFont(u8g_font_profont12);
  u8g.setPrintPos(0, 10);
  u8g.print("This is the 1.3\"");
  u8g.setPrintPos(0, 25);
  u8g.print("White i2c OLED from");
  u8g.setPrintPos(0, 40);
  u8g.print("ICStation.com.");
}

void draw2(void) {
  u8g.setFont(u8g_font_profont12);
  u8g.setPrintPos(0, 10);
  u8g.print("Check out the project");
  u8g.setPrintPos(0, 25);
  u8g.print("and review on");
  u8g.setPrintPos(0, 40);
  u8g.setFont(u8g_font_profont10);
  u8g.print("electorials.weebly.com.");
}

void setup(void) {
}

void loop(void) {
  u8g.firstPage();
  do {
    draw();
  } while (u8g.nextPage() );
  delay(3500);
  u8g.firstPage();
  do {
    draw2();
  } while (u8g.nextPage());
  delay(3500);
}
About the code
At first glance, this code may seem complex and difficult for some, but, after we break it down into smaller parts and we really get to understand the code functions, it won't seem so intimidating anymore. First, this code starts with declaring a library we will be using, the U8glib library, which helps us to operate the OLED being used. The U8glib library supports many display types, with different resolutions and drivers, like the SH1106 driver or the SSD1306 driver. After that line of code, a constructor is outlined where it defines the OLED used. The constructor, word-by-word in this case, means that it uses the U8glib library, runs on the SH1106 driver, has a 128x64 pixel resolution, and it doesn't require an optimisation. The constructors (which you can take from the library page) must match your display. Moving on, we now declare a void statement, a section which we can execute to the display later. This section is named draw. In this statement, the font for the OLED text is assigned which is the profont12 font. The types of fonts can be found in the U8glib home page. After that, the position for the text is set, which is (0, 10) on the pixel display with dimensions of 128 pixels and 64 pixels. Then, the text is written, in order for it to be displayed. This same concept of declaring the position of the text and printing the text is repeated twice with the text being varied in this void block. The repeated lines now end this void statement. The following block of code (void draw2) follows the exact same concept mentioned above, except, the name of the block is changed and we add in another line of code which changes the font for one string we want to print. We change the font to a smaller font, profont10, and it only applies to the next string (...
Read more »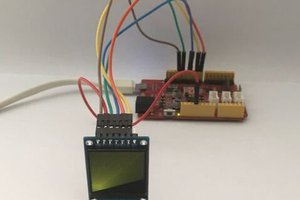
 Alex
Alex

 Hulk
Hulk