Close
0%
0%

100+ Switches in a Single Pin of Arduino

Did you run out of input pins, don't worry here is a solution without any ICs.

Public Chat
Similar projects worth following
109 views
0 followers
Did you run out of input pins, don't worry here is a solution without any shift registers. In this tutorial, we are going to learn about connecting more than 100 switches to a single pin of Arduino.

Working Theory

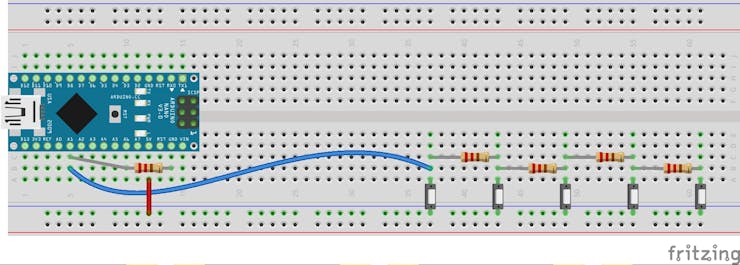
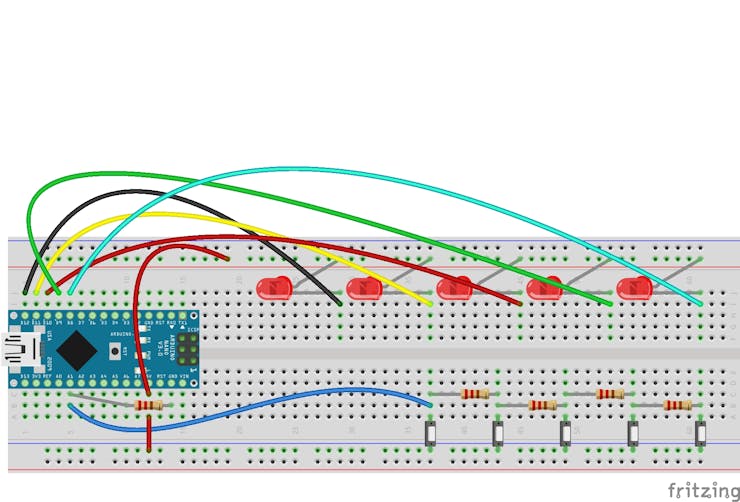
Take a look at the circuit diagram first, other wise you won't be able to understand what I'm saying. Whenever I press a switch the circuit will be completing through different number of resistors, 

  • In the circuit, if we press the 5th switch then the circuit is completing through all the 4 resistors,
  • If we press the 4th switch the circuit is completing through 3 resistors, 
  • If we press the 3rd switch the circuit is completing through 2 resistors, 
  • If we press the 2nd switch the circuit is completing through 1 resistors, 
  • and if we press the 1st switch the circuit is completing without any resistors.

That means the current reaching the analog pin A1 will be different for each switches, so we will use analogRead() function to read the values from the pin A1 and then we use a if else if condition to perform different operations for each switches.

Video

  • 1 × Arduino Nano
  • 1 × Microswitches
  • 1 × Bread board
  • 1 × Jumper wire

  • 1
    Let's Build
    • First connect five push switches to a bread board.
    • Of course you can connect maximum of 1023 switches theoretically to a 8 bit micro controller like Arduino. 
    • then inter connect resistors in between the push switches as shown in the diagram.
    • connect the other end of all the switches to 5v of Arduino, as you can see here I have connected the in such a way that one end is connected to the blue line of the beard board which is connected to the 5v.
    • then from the end of the final switch connect a wire to analog pin A1 of Arduino.
    • then connect a resistor across A1 and GND of Arduino, which is for pull down, That is to keep the value to zero when no switch is pressed.

  • 2
    Connect some LEDs

    Let's connect some LEDs to check the functioning of our circuit.

    Connect the LEDs as shown in the circuit,

    • connect all the positive terminal all LEDs to the 5v.
    • connect the negative terminal of each LEDs to the Digital pin D12 to D8 of Arduino respectively.
    • Practically we have to connect the LEDs through resistors for good life time.

  • 3
    Coding

    Take a look at the program, all the lines are commented properly. Now let's upload the code and see it in action.

    //www.diyusthad.com
    //https://www.youtube.com/channel/UCjwtJsOrZyH7E6sBr_YJSeA
    //Code by Najad
    
    #define sw A1 //name for analog pin A1
    #define led1 12
    #define led2 11
    #define led3 10
    #define led4 9
    #define led5 8
    
    void setup() 
    {
      Serial.begin(9600);
      pinMode(led1,INPUT); digitalWrite(led1,HIGH); //setting led1 pin HIGH ie LED will be off according to our circuit
      pinMode(led2,INPUT); digitalWrite(led2,HIGH); //setting led2 pin HIGH ie LED will be off according to our circuit
      pinMode(led3,INPUT); digitalWrite(led3,HIGH); //setting led3 pin HIGH ie LED will be off according to our circuit
      pinMode(led4,INPUT); digitalWrite(led4,HIGH); //setting led4 pin HIGH ie LED will be off according to our circuit
      pinMode(led5,INPUT); digitalWrite(led5,HIGH); //setting led5 pin HIGH ie LED will be off according to our circuit
    
    }
    
    void loop() 
    {
      Serial.println(analogRead(sw)); // reading and printing the values from analog pin A1
    
      if(analogRead(sw) >197 && analogRead(sw) <207 )
      digitalWrite(led1,LOW);// LED will turn ON
      else if(analogRead(sw) >248 && analogRead(sw) <258)
      digitalWrite(led2,LOW);// LED2 will turn ON
      else if(analogRead(sw) >333 && analogRead(sw) <343)
      digitalWrite(led3,LOW);// LED3 will turn ON
      else if(analogRead(sw) >509 && analogRead(sw) <514)
      digitalWrite(led4,LOW);// LED2 will turn ON
      else if(analogRead(sw) >1015 && analogRead(sw) <1023)
      digitalWrite(led5,LOW);// LED2 will turn ON
      
    
    }

View all 5 instructions

Enjoy this project?

Share

Discussions

Similar Projects

Does this project spark your interest?

Become a member to follow this project and never miss any updates