 ptrav
ptravOverall design notes.
Hardware:
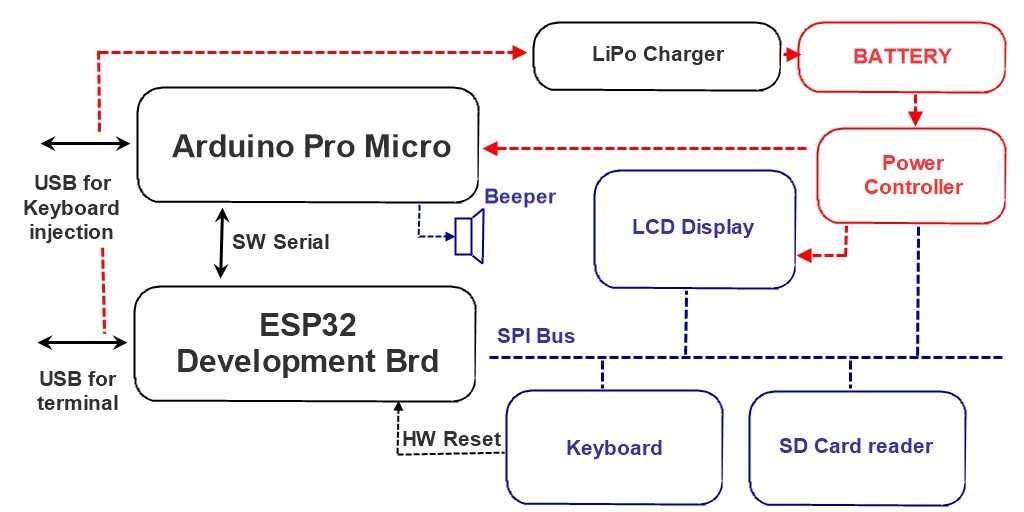
The main processor is ESP32 WROOM 32U. For the final version can possibly source a board with an in-built LiPo charger, such as GeeekNet https://www.seeedstudio.com/GeeekNET-ESP32-Development-Board-p-2945.html For now, the testing board is more conventional DevKitC.
ESP32 has been selected for two reasons. Firstly, it has excellent low-power features, allowing to save the battery. Secondly, the processor provides double-precision FP computations, which is essential for an engineering calculator. ESP32 can communicate to the PC via its USB port, WiFi and Bluetooth, so BASIC can be used from a PC terminal emulator - for, example, the user may want to enter and debug a complex routine by using the conventional keyboard and the big screen. The same USB port is connected to the LiPo charger / power supply (or will be using different ESP32 boards in the future - have not decided yet).
The main processor is connected to 4 peripheral devices via its primary SPI bus: the SD card reader, the 128x64 LCD display (may consider a different display although), the keyboard and the power controller. The latter allows the ESP32 to manipulate the LCD back-light, thus reducing the power consumption. It also controls the power supplied to the Arduino Micro Pro. The keyboard provides a hardware Reset button, which is needed to load programs into the ESP32.
The primary use of the Arduino Micro Pro is to impersonate a conventional keyboard/mouse for a PC (for example, for a text injection). The processor is connected to the ESP32 via Software Serial. Via the same interface, the ESP32 can send commands for a single-tone sound generation, such as beeps and simple melodies. As an alternative design, the LCD display back-light LED may be driven via the Arduino Micro Pro PWM output.
Software:
1. BCL interface. In true tradition of retro calculators, this should be a comprehensive BASIC-system. All file system manipulations and other functions should be accessible from the BASIC command line (BCL). For example, to change the calculator mode from Radians to Degrees, the user switches into the BCL and types something like SET ANMODE DEGREES. To change the calculator precision and output pattern to scientific with 4 decimal places, one types, for example, SET NUMODE SCI4 The arithmetic expressions can be evaluated directly from the BCL, for example, ? 1e13/SIN(45) immediately evaluates into 1.175e+13. PRINT HUMODE returns the numeric code for the SCI4 constant: 14 (or rather 1.4e+01 as we requested a scientific format). Naturally, all standard BASIC commands should work in BCL as expected, e.g. 10 PRINT 1e13/SIN(45) returns OK and inputs the program line into the memory. The user should be able to use arrows to scroll the screen up and down beyond the 8-line boundary. At least 40 lines should be supported. Text selection and Copy/Paste function should be supported.
To make the system more practical, several additions to BCL are essential.
2. RPN interface. The screen displays three positions of stack: X, Y, Z. The total stack capacity should be about 20, plus an additional slot for the previous X value. The buttons should work as expected for an RPN calculator, e.g. pressing <1>, <9>, <.>, <7> results in X displaying "19.7". Then, pressing <Enter>, <2>, results in X displaying "1.970e+01" (remember, we are in sci-4 mode) and Y displaying "2". Pressing </> results in X displaying "9.850e+00". The previous X slot contains 2.000e+00. The RPN interface should be accessible from the BASIC programs. For example, the user wants to implement a program for calculating roots of a quadratic equation:
010 SET RPNLABELS "C (input)", "B (input)", "A (input)"
020 HALT RPN
030 A = RPNSTACK(2)
040 B = RPNSTACK(1)
050 C = RPNSTACK(0)
060 D = B*B - 4*A*C
070 SET RPNSTACK 2, D
080 IF D < 0 GOTO 130
090 SET RPNSTACK 0, -(B+SQRT(D))/A/2
100 SET RPNSTACK 1, -(B-SQRT(D))/A/2
110 SET RPNLABELS "Root 1", "Root 2", "Discriminant"
120 GOTO 160
130 SET RPNSTACK 0, -B/A/2
140 SET RPNSTACK 1, SQRT(-D)/A/2
150 SET RPNLABELS "Real part:", "+/- Imaginary part", "Discriminant"
160 HALT RPN
170 GOTO 10
To solve quadratic equations, the user goes to BCL and types CHAIN QUAD <Enter> (assuming QUAD.BAS is the program name). The system presents the user with the RPN screen, there instead of labels "X", "Y", "Z" are labels "C (input)", "B (input)", "A (input)". The user operates the RPN to fill the data and presses <Run> button. The system displays the answer in "Root 1", "Root 2", "Discriminant" form. To proceed with the next computation, the user presses RUN, and gets labels "C (input)", "B (input)", "A (input)", etc. To terminate the program, the user presses <Halt> button, and the labels change back to "X", "Y", "Z". The program remains in the memory and could be restarted by pressing <Run> button or by going to BCL and typing RUN <Enter>.
3. EDT interface. In this mode the system allows a direct edit of the program (note that LIST command on a 8-line screen is very inefficient, and even on a large screen is limited). The expected user interaction is similar, but not identical to Windows Notepad editor. NEW, LOAD and SAVE functions are available in BCL and should not be duplicated here. Find, Replace, Copy/Cut/Paste, Move Line Up/Down should be available in the EDT interface. A text "wrap" and "no wrap" modes should be supported. Besides the BASIC files, the same editor may be used to view data files, make quick notes, etc.
4. DIR interface. In this mode the user can traverse the calculator file system. Note that FILES command on a 8-line screen is extremely inefficient. The typical use in BCL would be as following. The user wants to save the file in a certain folder. In the BCL, the user types SAVE <Space>, then presses <Dir> button, navigates to the folder and selects the file name. Pressing <Enter> on a file name, for example, QUAD.BAS, results in the system returning into BCL mode and SAVE QUAD.BAS appearing instead of SAVE. At this point, the user may edit the name, for example, to SAVE QUAD_2.BAS and press <Enter> to complete the command.
Discussions
Become a Hackaday.io Member
Create an account to leave a comment. Already have an account? Log In.