Close
0%
0%

Free Stress Gaming

Our team provides an open-source real-time embedded project to monitor the stress level of a video game player.

Similar projects worth following
126 views
0 followers
Depression can stem from chronic overstimulation of the body's hypothalamic-pituitary-adrenal axis, which produces cortisol in humans. However, while adults can face stress with therapy and different skills, children are a very enthreaten sector of the population that does not own skills against that. Therefore, we can imagine that one of the riskiest situations for a child are videogames where we set an unprepared person against a stressful and addictive situation, causing severe damage to the child. Then, this project constitutes a reliable and attractive solution for parents, therapists, and adults that want to monitor and control the stress status of the player.

[HeartBeat Detection]

The heartbeat measurement technology that we chose for this project is the photopletismography. This technique is based on the use of a photodiodethat emits a light pulse in a specific wavelength which, after passing by the blood vessel, the wavelength signal captured by the photosensor changes.

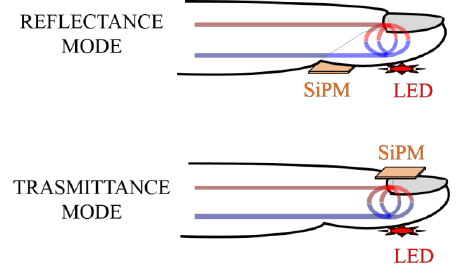
According to that change, we can determine whether a pulse of blood has passed in a specific time, depending on our sampling rate.

[Stress Recognition]

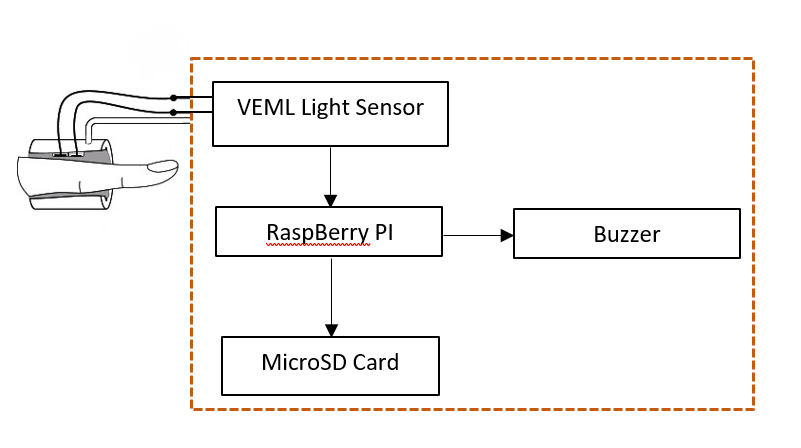
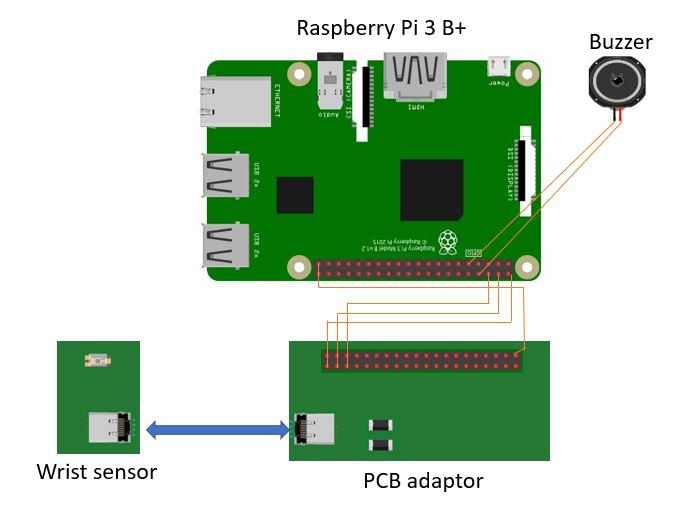
Once the signal is taken, it is carried to the raspberry Pi using a proper wirebased connection to avoid any unwanted interaction with other signals and for a better performance of the device. Then, the Raspberry PI will process the data in real time and, at the same time, it will do a basic threshold based control for deciding whether the person is under stress or not. When this process recognize the stress, it makes beep sound for warning.

Webpage.zip

That is for making 'Local Web server' for communicating between 'Raspberry Pi' with 'Webpage'.

x-zip-compressed - 3.36 MB - 04/14/2019 at 09:24

Download

PCB - EAGLE Files.zip

Eagle files for making 'Wrist Sensor', 'Finger Sensor' and 'PCB connector'.

x-zip-compressed - 965.67 kB - 04/14/2019 at 09:23

Download

Code.zip

Code for 'BPM Detection', 'Stress Recognition' and 'Signal Filter'.

x-zip-compressed - 913.27 kB - 04/14/2019 at 09:23

Download

3D modeling Files.zip

Solidworks files for making cases of PCBs with Keyshot images.

x-zip-compressed - 4.36 MB - 04/14/2019 at 09:23

Download

  • 1 × Raspberry Pi 3 B+
  • 2 × 2Kohm SMD resistors
  • 1 × Raspberry Pi case
  • 1 × VEML6030 Light sensor
  • 1 × IR SMD LED

View all 11 components

  • Project for Stress Controller Device

    Daewon Jung04/14/2019 at 10:27 0 comments

    07/01/2019

    Decide our team project's topic. 

    23/01/2019 

    Make schematic diagram for 'Wrist Sensor' PCB and 'Pi connector' PCB (Mark-P1).

    01/02/2019 

    User case draft for making all process clear. 

    06/02/2019 

    Start to test PCB and make a code for BPM detection and driver. 

    04/03/2019 

    Make cases for 'Wrist Sensor' PCB and 'Pi connector' PCB (Mark-C1).

    14/03/2019 

    Make 2nd version PCB because of circuit connection and light sensor problem (Mark- P2). 

    15/03/2019 

    Make new cases for new PCB (Mark-C2). 

    27/03/2019 

    Make 3rd version PCB for improving light detection (Mark-P3). 

    30/03/2019 

    Design Local server for communicating between Pi with Web page.  

    01/04/2019 

    Light detection code is completed.  

    Start to make codes for stress recognition and data filtering.  

    10/04/2019 

    Make 4th version PCB for using finger type, instead of wrist one (Mark-P4). 

    Make new case for finger type PCB (Mark-C3). 

View project log

  • 1
    Hardware setting

    To deploy and starts working with this device, you need to follow some steps.

    • Connect PCB adaptor with Wrist sensor by RJ45 cable
    • Connect PCB adaptor pins with Raspberry Pi pins as shown in below table
  • 2
    Software setting

    To build our program in your Pi, you need to follow some steps. 

    sudo apt-get update
    
    git clone https://github.com/GGChe/Stress_Controller_Device

     You would need to update and install the libraries of PHP5.6, Apache2 and compilers if your are working on a vanilla version of the OS.

    sudo apt-get install php5.6
    
    sudo apt-get install apache2
    
    sudo apt-get install g++

    To compile the whole code, you only need to go to the code's folder and type on the terminal

    cmake .
    
    make 
    
    sudo ./StressC.out

    To run the program from the boot of the system

    sudo nano /etc/rc.local
    

    And then, write before "exit 0" the following scrypt:

    sudo ./PATH/StressC.out

    * We developed a driver for the VEML6030 sensor, that uses I2C communication protocol, using the data obtained from the link below. The driver given in that project was initially prepared for Arduino but we had to modify it completely to make it run in every system using a proper c++ code

    Reference : https://os.mbed.com/teams/MSS/code/VEML6030/

View all instructions

Enjoy this project?

Share

Discussions

Similar Projects

Does this project spark your interest?

Become a member to follow this project and never miss any updates