Close
0%
0%

One IoT

A series of development boards aimed at making IoT development a breeze!

Similar projects worth following
This project aims to make the development of IoT devices by makers easy as pi!

No longer will makers have to fiddle around with getting Bluetooth or WiFi to work, nor will they have to delve into the depth of web development to make a good looking web interface.

This project simplifies all of that, with a series of development board, all based off the ESP32. These boards will seamlessly connect to a master board, based off a Raspberry Pi, and will be ready for hacking!

Prepare for IoT to become seamless...

The source for OneIoT can be found at https://github.com/lirwin3007/OneIoT

  • 1 × Raspberry Pi 3 Raspberry pi to act as central hub

  • Success!

    Louis Irwin06/02/2019 at 20:34 0 comments

    After a fair bit of troubleshooting, I now have a major part of this project complete:

    The ESP32 can now be programmed remotely from a web interface

    I'm still working on the UI, but for now it's okay:

    At the top is a code editor, with full syntax highlighting. Shown is a simple example of a capacitive touch sensor program for the ESP32

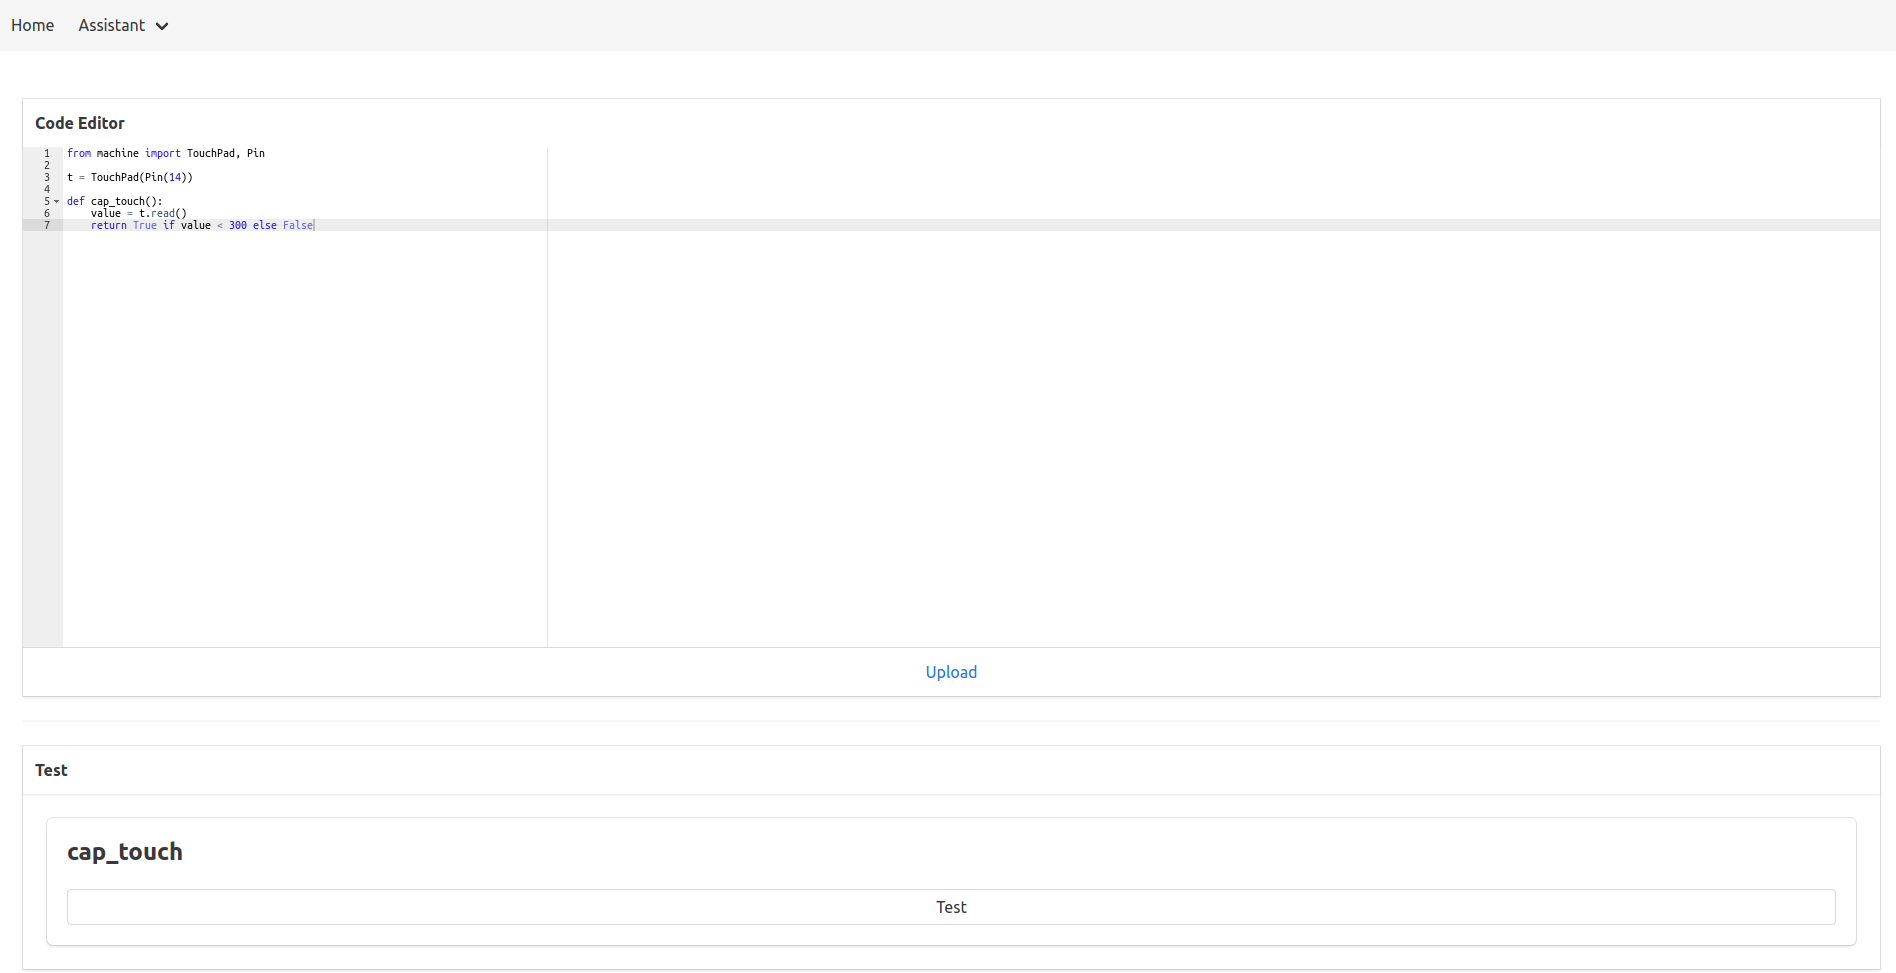
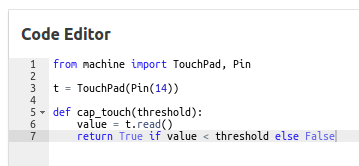
    The general idea is that each function in this file can be called remotely as a part of a larger routine initiated by the Google Assistant. For example, there could be a function turn_on_tv(), which uses an IR LED to turn on a TV. When the assistant recognises the phrase 'turn on my TV', it calls this function and the TV is turned on.

    Once code has been written, the Upload button triggers the compilation of code to include a lightweight web server, connects to the ESP32 via WebREPL and transfers all the required files.

    To test the code, the page also has a testing area where the user can pass in any values that the function requires, and get an output from the ESP32:

    There are a few UI changes that need making to tidy things up a bit, and at the moment it struggles a bit knowing they type of any values a user gives in the test area, but I'm very happy with the progress that's being made

  • Google Assistant

    Louis Irwin05/18/2019 at 17:22 0 comments

    One thing that must be good for a successful IoT system is it's user interface. For OneIoT, I have chosen the google assistant.

    The google assistant will sit on the central raspberry pi, listening out for the phrase 'OK Google'. When it hears this, it will be able to trigger a user defined action on any connected ESP32 device, or respond as the Google assistant normally would, for example, to answer a question that it is given.

    I'll shortly be putting out instructions on how to install the assistant and manage the phrases that it responds to.

  • Installing Micropython

    Louis Irwin04/24/2019 at 20:42 0 comments

    With a breakout assembled, I now have to install Micropython.

    There's a great set of instruction here, but I found I needed to take some additional steps. 

    Below, I will outline what worked for me. I was working on Ubuntu with Python 3 installed.

    Required:

    • ESP-WROOM-32
    • FTDI Breakout Board
    • 3v3 Power Supply

    Steps:

    1. Wire up the ESP32 as shown in the following diagram
      The 3v3 and GND connections power the board
      The EN connection controls resetting the board
      The GPIO0 and GPIO2 connections set the board in 'DOWNLOAD_BOOT' mode
    2. Download esptool from here, and unzip
    3. Download the latest micropython .bin file from here (Latest version as of 25/4/19 is esp32-20190425-v1.10-293-g56f6ceba7.bin)
    4. Open a terminal in the esptool directory
    5. Power the board and plug in the USB cable
    6. Move the enable line (shown in blue) from GND to 3V3 to enable the ESP32
    7. Run this command to find the port that is being used 
      dmesg | grep tty

       In my case, running this gave

      [    0.000000] console [tty0] enabled
      [   167.73492] usb 1-6: FTDI USB Serial Device converter now attached to ttyUSB0

       So I can see that it is attached to ttyUSB0 from line 2

    8. Then run the following, replacing 'ttyUSB0' with the port the previous step gave

      sudo python3 esptool.py --port /dev/ttyUSB0 erase_flash
      
    9. Finally, run the following, again replacing 'ttyUSB0' and the location of where you downloaded the .bin file ('esp32-201 ... 9.4.bin)

      sudo python3 esptool.py --chip esp32 --port /dev/ttyUSB0 write_flash -z 0x1000 esp32-20180511-v1.9.4.bin
    10. With this completed, I can now use that serial port to access micropython's REPL python prompt and run commands!

  • The ESP32 Arrived

    Louis Irwin04/24/2019 at 20:00 0 comments

    Today the ESP32 arrived, and I was surprised by how small it was! I was both pleasantly surprised by the small form factor, as well as horrified of what soldering I had ahead of me...

    The ESP32 has 38 pads surrounding it, on 3 sides. It is far from breadboard friendly!

    To make it more breadboard compatible, I created this breakout board:

    It breaks out all 37 (One is NC) pads into a breadboard friendly format. The breakout sits nicely on a breadboard, and the top header can be used with female to male jumper cables.

    This was by far the most fiddly bit of making I have done in a long time! I started by hot gluing the ESP32 to the centre of the board, then, with the headers seated in a breadboard I began the painful process of connecting each pad to it's corresponding pin.

    Whilst it's not the neatest thing in the world, it works. Each pad is connected to a pin that plugs into a breadboard.

  • Choosing a Language

    Louis Irwin04/22/2019 at 17:15 1 comment

    There are many languages that could be chosen for this project. It could be programmed in C, the Arduino variation of C etc...

    However for this project, I chose MicroPython. The reason being that one of the main aims of this project is to make IoT easily accessible to makers, just as the Raspberry Pi made computing accessible and Arduino made microcontrollers accessible.

    MicroPython is super simple to write, and is very powerful. Also, MicroPython is available on the ESP32, the microcontroller I have chosen to use for this project.

    Quick update on that ESP32 I ordered - It hasn't arrived yet 😔, I assume the postal service has been really busy over the Easter weekend

  • Choosing a Communication Method

    Louis Irwin04/14/2019 at 19:27 0 comments

    In order to meet my first objective, I need a method of communicating with other devices on the network. There are a number of technologies that could allow this:

    • Bluetooth
    • WiFi
    • RF Communication

    Given all of these, WiFi seems the best and most reliable. RF communication is prone to noise, whilst Bluetooth is more suited to a one to one relationship between master and slave.

    WiFi allows for one device to act as an access point, with others connecting to that access point to allow communication to take place.

    With all this in mind, the ESP32 looks like a good IC to use. It can act as a WiFi access point, or connect to another access point - exactly what is required.

    As an extra bonus, it has Bluetooth built in - it'll be interesting to see if that becomes useful at a later point.

    Finally, the entire IC is a microprocessor, negating the need for an external one such as an Arduino or raspberry Pi.

    With this decided, I have purchased an ESP32 module - it should arrive in 3 days!

    ESP32
    The ESP32 IC

  • Project Aims

    Louis Irwin04/14/2019 at 19:05 0 comments

    I thought it would be good to start by outlining the main aims of this project. That way I can have a clear objective of what I'm working towards.

    This project can be summarised into 3 aims:

    1. Create a network of devices that can communicate with each other
    2. Allow each device to interact with the outside world
    3. Have one, central, managing device that receives data and sends instructions to the other devices

    In terms of specific details of how the devices will connect, or what the devices will do to interact with the outside world, I have yet to decide. I want to approach this project with no preconceptions of what IoT means, and how it can be implemented.

View all 7 project logs

  • 1
    Set up a raspberry pi with OneIoT and the Google Assitant

    Instructable coming soon!

  • 2
    Like this project to be notified when more devices are available to be added to your OneIoT network

View all instructions

Enjoy this project?

Share

Discussions

Similar Projects

Does this project spark your interest?

Become a member to follow this project and never miss any updates