 Shih Wei Chieh
Laser Dye Project merges alternative photography with digital fabrication by producing cyanotype (New Cyanotype and Vandyke Brown) images on sewn garments constructed from natural fibers or delicate and slightly uneven organic substrates through maskless laser exposure with a DIY programmable laser galvanometer system. The maskless development approach also broadens the potential to work with large exposure areas and enables the printing with multiple laser machines from different angles.

1. Programmable Galvanometer laser system
The galvanometers module PT-A40 using in this project was purchased from GT-TECH. For the laser source, It is a single wavelength purple source purchased from Blaser on Taobao, 405nm, 400 to 800 mW. You can also go for RGB source with two more extra audio signal inputs.
For the laser signal control, classical ILDA interface is ignored here, all the signal is synthesized in Max/MSP and sent from the MOTU sound card to the DIY laser machine with audio cables and a adaptor board. MOTU is a powerful sound card outputs DC coupled outputs which is important for the printing application here. If you have your own laser projector and wish to control your machine with conventional ILDA d-sub connector, you can also reference here. However, due to the price of the MOTU device is around 800 dollars, I am also developing another project to drive the PT-A40 with Daisy board. I am using Sub-Module board to make this standalone laser system. The reason to pick SM is because I can upload PD or Max patch to it, and it has DC coupled outputs.

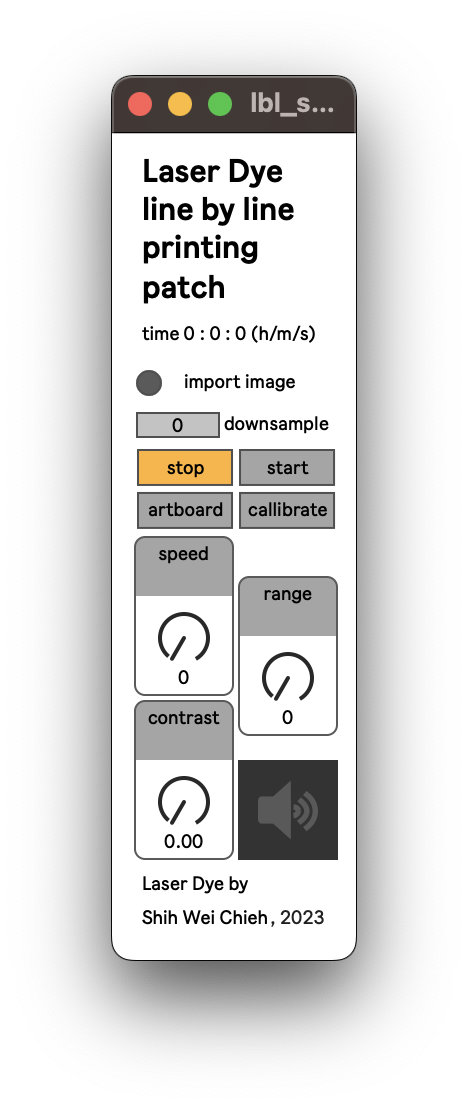
2. Laser graphic synthesis in Max/msp
The control software is made with Max/MSP. I wrote few patches to translate jpg and png to stereo audio to control the x and y galvanometers in the laser projector system. The Max/MSP patches with different functions which can be found on my Gitlab.
3. Cyanotype solution preparation
I reference new cyanotype process made by Mike Ware for the laser cyanotype. Basically I follow all his instruction but only alter the quantity of the citric acid in the sensitizer solution according to the long exposure time for large prints. I also alter the water portion in the working solution in order to change the blue property of the final works.
Sensitizer Chemicals needed
1. Ammonium Iron(III) Oxalate (NH4)3[Fe(C2O4)3].3H2O: 30 g
2. Potassium Ferricyanide K3[Fe(CN)6] : 10 g
3. GPR Grade (98-99%) purity is adequate.
Preparation of Sensitizer
The preparation of this sensitizer solution calls for a bit more experience in chemical manipulation than is required to make a traditional cyanotype sensitizer, so follow the instructions carefully. This work should be carried out under tungsten light, not fluorescent or daylight.
Please note that all the chemicals are poisonous - tho' not dangerously so!
- Measure 20 cc of distilled water from a measuring cylinder into a small pyrex glass beaker, heat it to ca. 70 °C (160 °F), and completely dissolve 10 g of potassium ferricyanide in it, with stirring. Keep this solution hot.
- Measure 30 cc of distilled water likewise into another beaker, heat it to ca. 50 °C (120 °F) and dissolve in it 30 g Ammonium Iron(III) Oxalate.
- Add 0.1 g of solid Ammonium Dichromate to the Ammonium Iron(III) Oxalate solution and dissolve it. (Alternatively, if you can't weigh out such a small amount, add 0.5 cc of 20% w/v Ammonium Dichromate solution, previously prepared by dissolving 2 g of the solid in distilled water and making up to a final volume of 10 cc). Mix thoroughly.
- Now add the hot Potassium Ferricyanide solution to the Ammonium Iron(III) Oxalate solution, and stir well. Set the solution aside in a dark place to cool to room temperature and crystallise - it will take about one to two hours.
- Separate most of the liquid from the green crystals by filtration (Whatman no. 1 paper, or even coffee filter paper is ok). The green solid (Potassium Iron(III) Oxalate - about 15 g of it) is disposed of safely (somewhat poisonous - but not dangerously!). The volume of solution should be ca. 62 cc.
- Make up the yellow-green coloured solution with distilled water to a final volume of 100 cc. The sensitizer can be made more dilute (e.g. up to 200 cc): it will be faster to print, but yield a less intense blue.
- Filter the sensitizer solution and store it in a brown bottle kept in the dark; its shelf life should be at least 4-5 years.
4. Coating for 120x120 cotton fabric
Also followed the Mikes Ware's instruction of the paper coating: "The range of useable papers can be extended by adding citric acid to the sensitizer, to a level of ca. 2%. This inhibits the decomposition, improves the stability of the coating and helps clearing. The citric acid should not be added to the stock sensitizer solution, but just to the volume used for coating. Make up a stock solution of citric acid to 40% w/v, and add one drop (0.05 cc) to every cc of sensitizer." Pre-processing the fabric for printing
- Firstly soak the fabric in boiled water to remove the chemical, stains on it.
- Soak the fabric in light acid water for 10 minutes, then rinse it with distilled water and let it dry.
- Prepare. 100 cc of stock sensitizer solution
- Add up 5 cc of 40% citric acid solution in the sensitizer.
- Fold the fabric into small square and soak it into the sensitizer directly, pressure it to make sure it's dyed properly without empty blank left. Extract the extra solution out to make the fabric as dry as possible.
- Leave it completely flat on floor or table (no wrinkles are allowed) and dry for 30 minutes in completely dark space.