XenonJohn
-
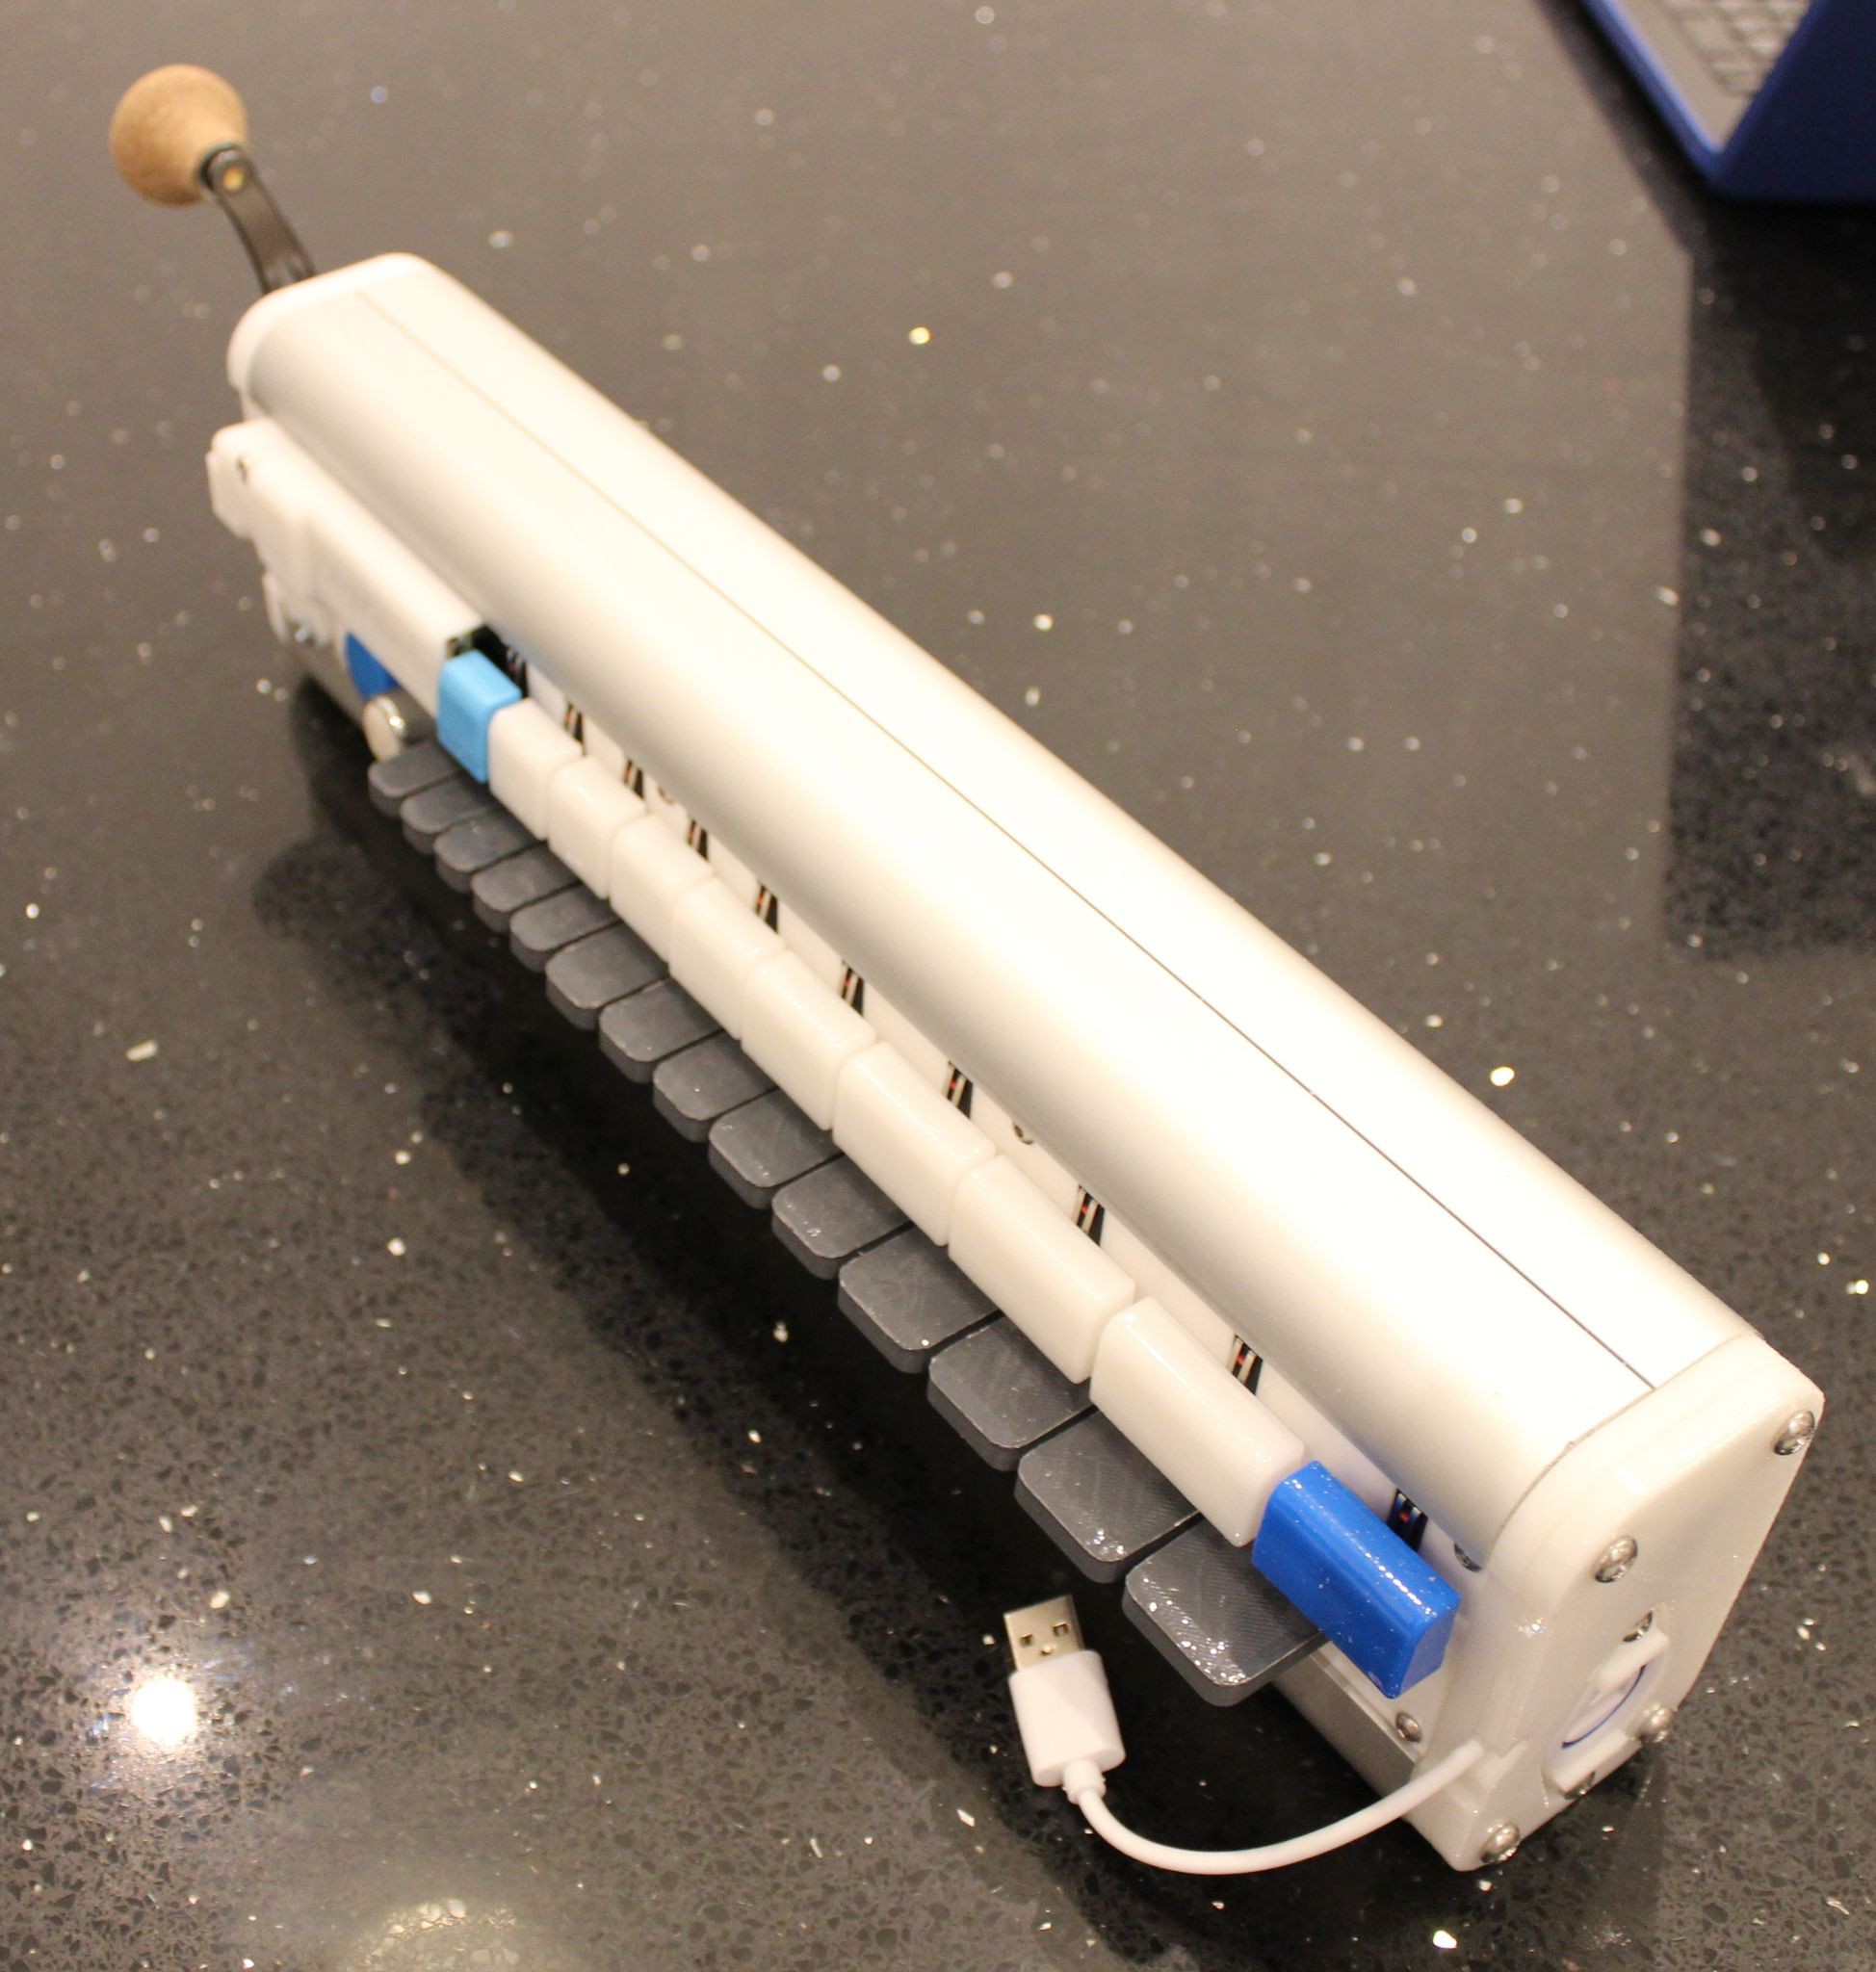
Project Log #20: Big redesign as the laser cut DigiNerdyGurdy
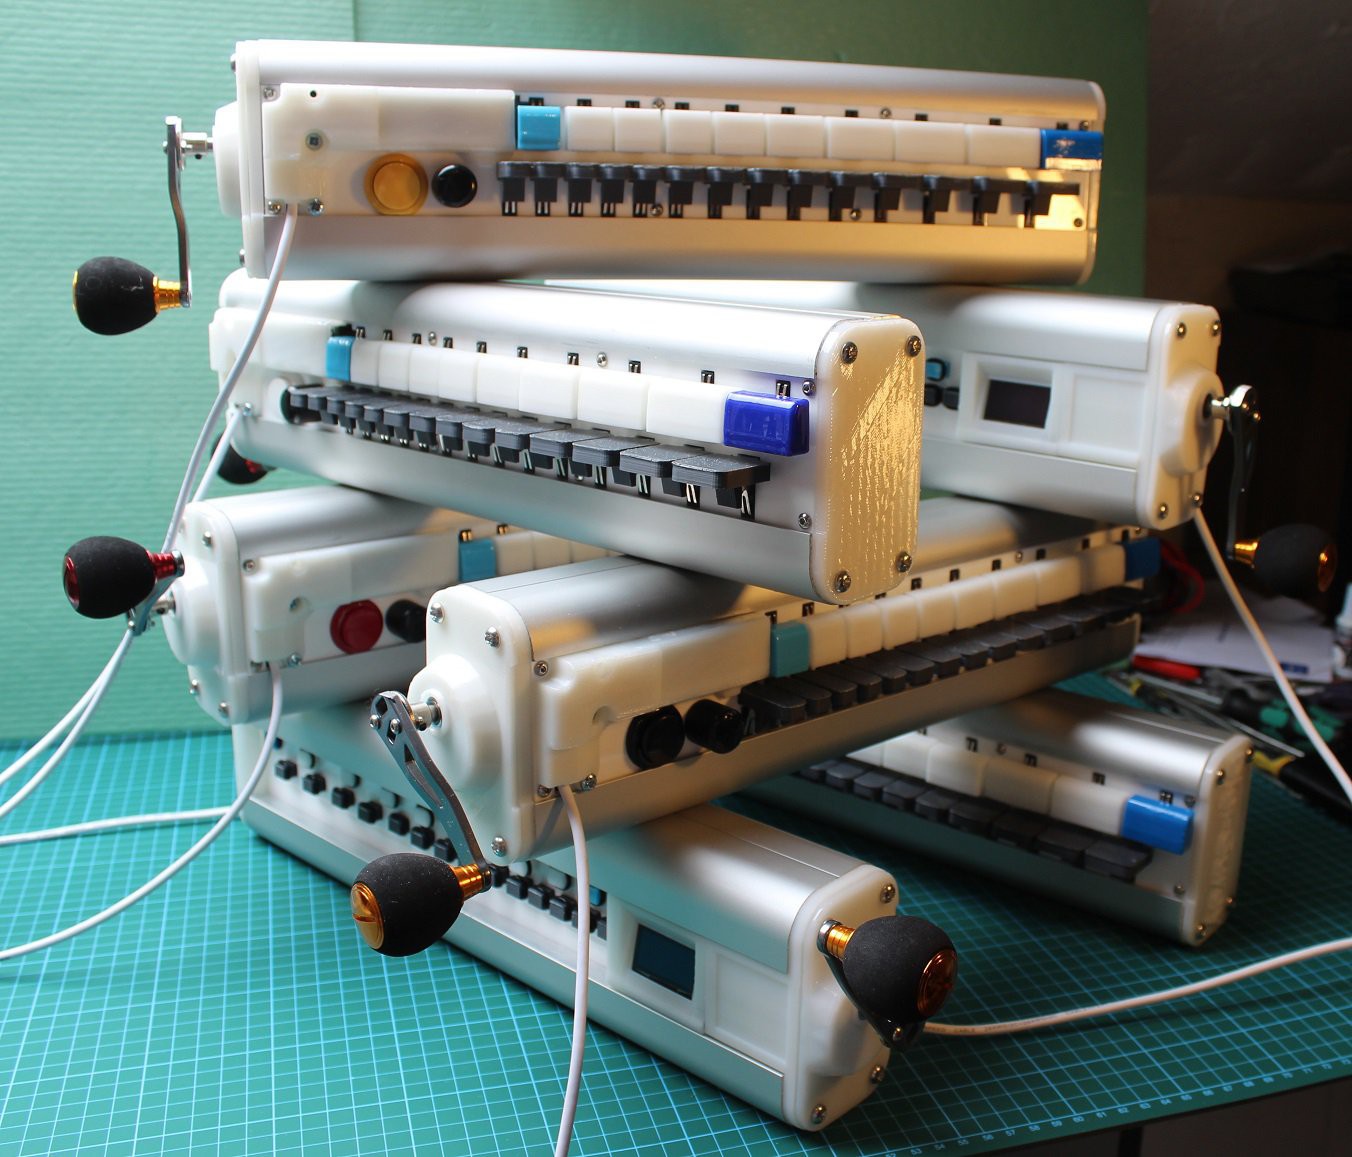
04/11/2021 at 12:13 • 2 commentsTotal redesign, main objective being to offer more features for same build cost.
Main changes listed below.
1) New PCB which places key stems in more correct positions when viewed from rear of keybox. This means key stems are no longer in centre of each key, therefore....
2) All new 3D designs for each key. As in a real hurdy gurdy the keys for higher notes are more complex as they overlap each other to some extent but must still not interfere with each other.
3) I tried a snap-into-place key design but stems do not look nice when viewed from rear. Therefore they have holes in ends of stems to take a 3mm diameter 6mm long bolt. Bolts screw straight in as holes just slightly undersize......see, I make life easy for you.
4) Keybox now is fully laser cut ply and glued together. However top panel is removable with 4 screws so a) you then have access to rear of PCB to make any repairs and b) you can make a more elaborate top panel should you wish later on.
5) Keybox is removable from soundbox, but will still fully function as a MIDI device emulating a hurdy gurdy (but without crank). This keybox will then fit into a bag should you wish to practice at work in lunchbreak or take it on holiday.
6) Keybox "docks" with a soundbox designed by Jaap Brand of Nerdy Gurdy fame, to create a proper gurdy shaped instrument with keys and crank in correct positions relative to your body. Crank is on end of soundbox. Special connector plug allows it to dock and undock easily.
7) Soundbox is much easier to construct than Nerdy Gurdy version as less curvaceous. This is a deliberate compromise to ensure easy buildability and almost no clamps are required when gluing it together.
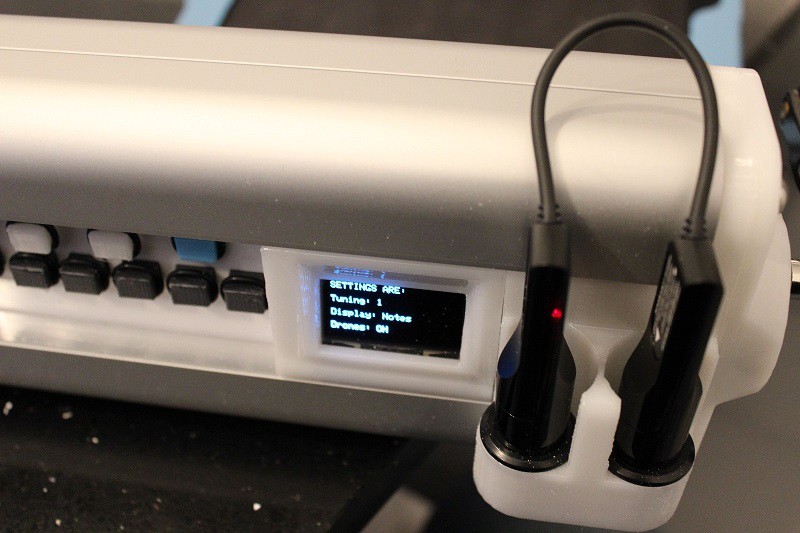
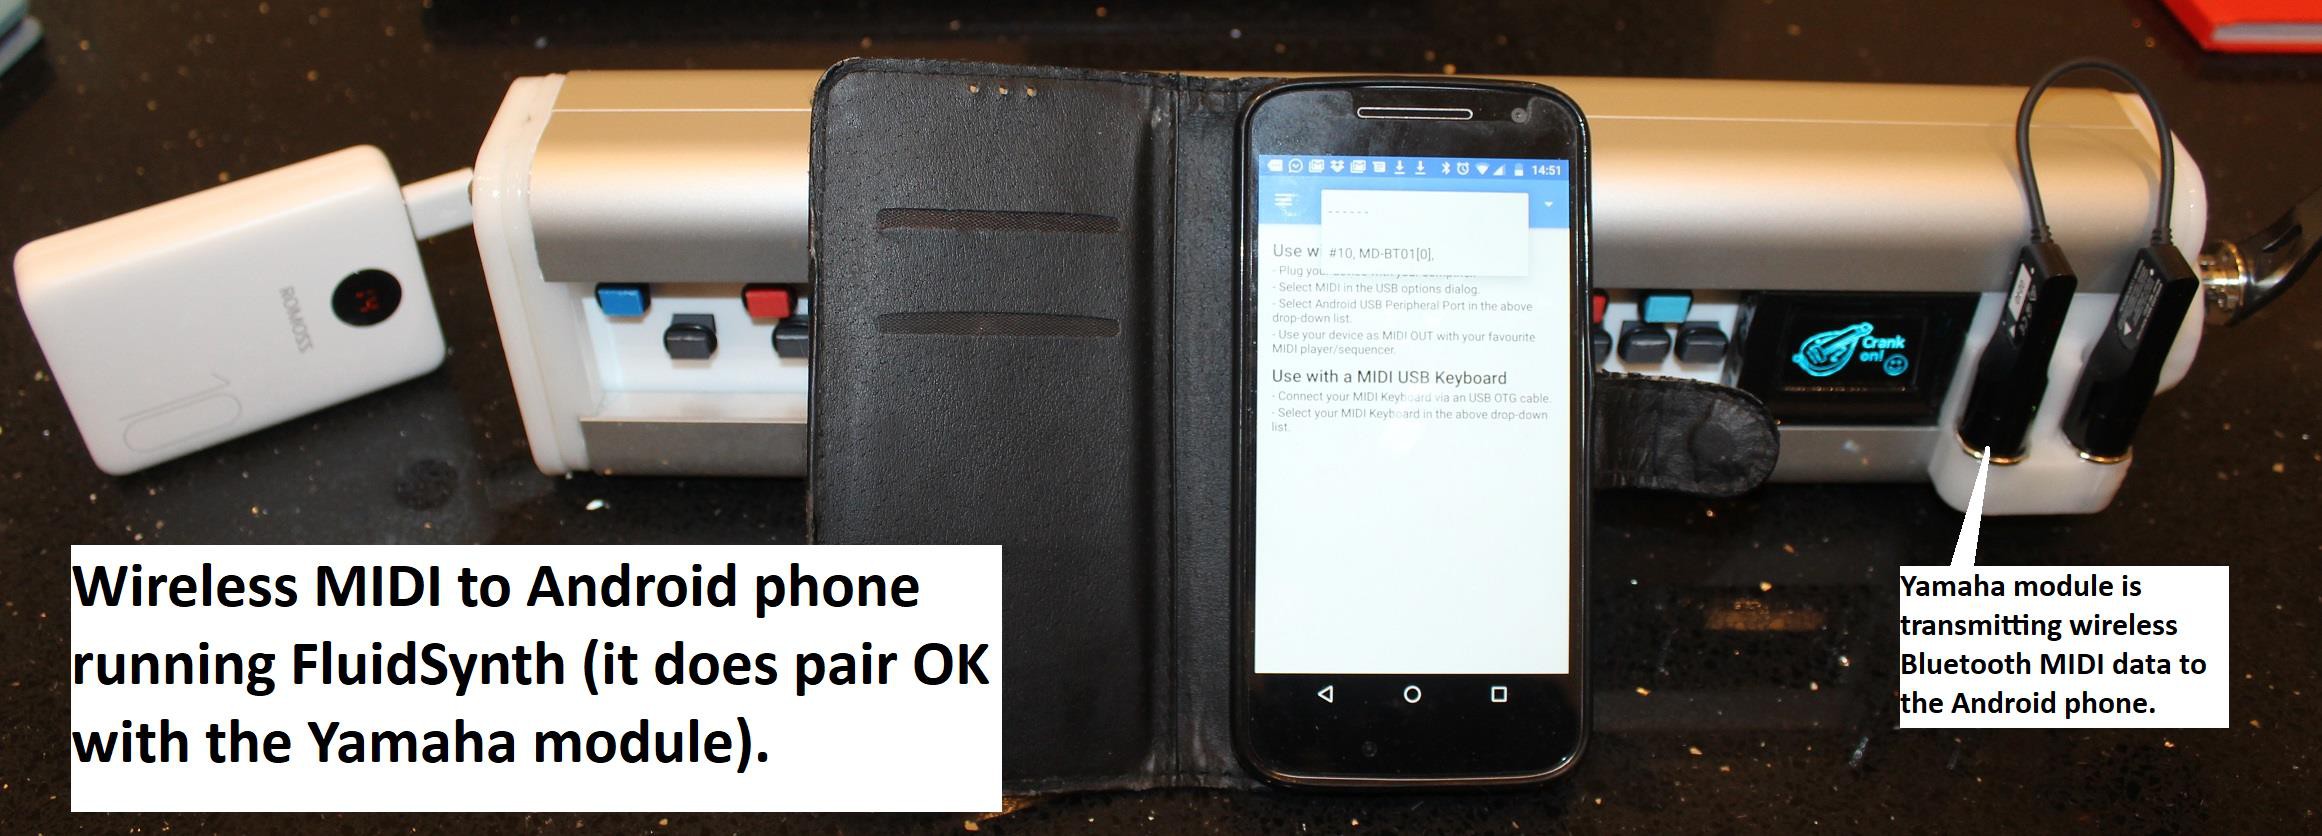
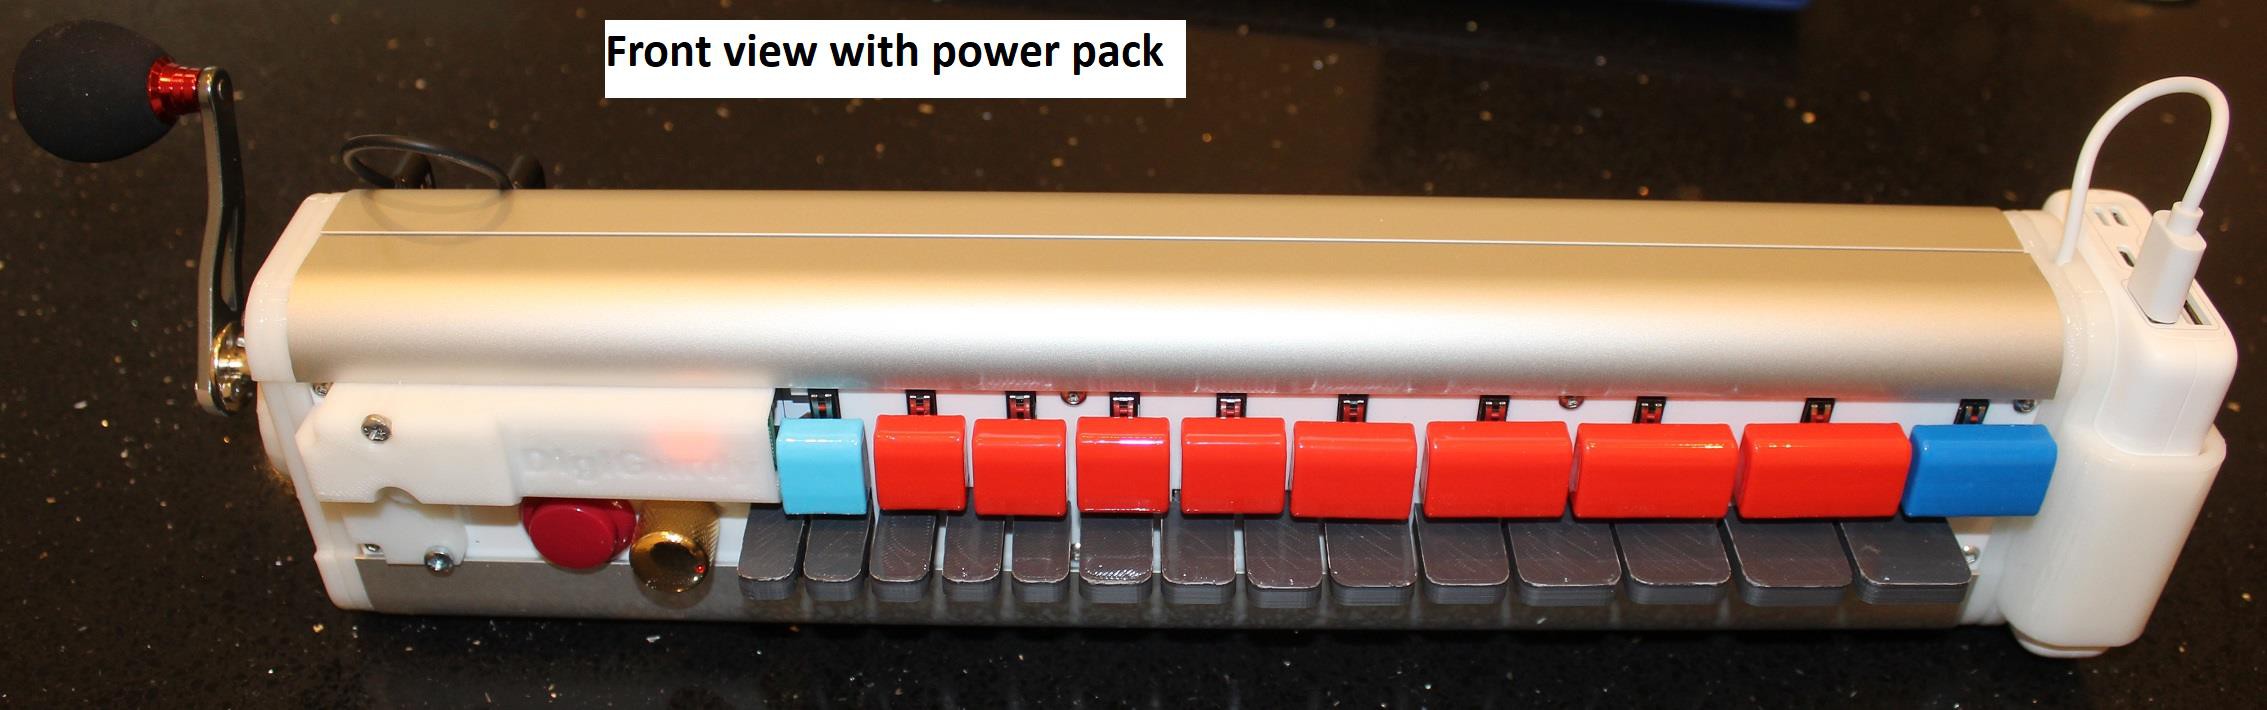
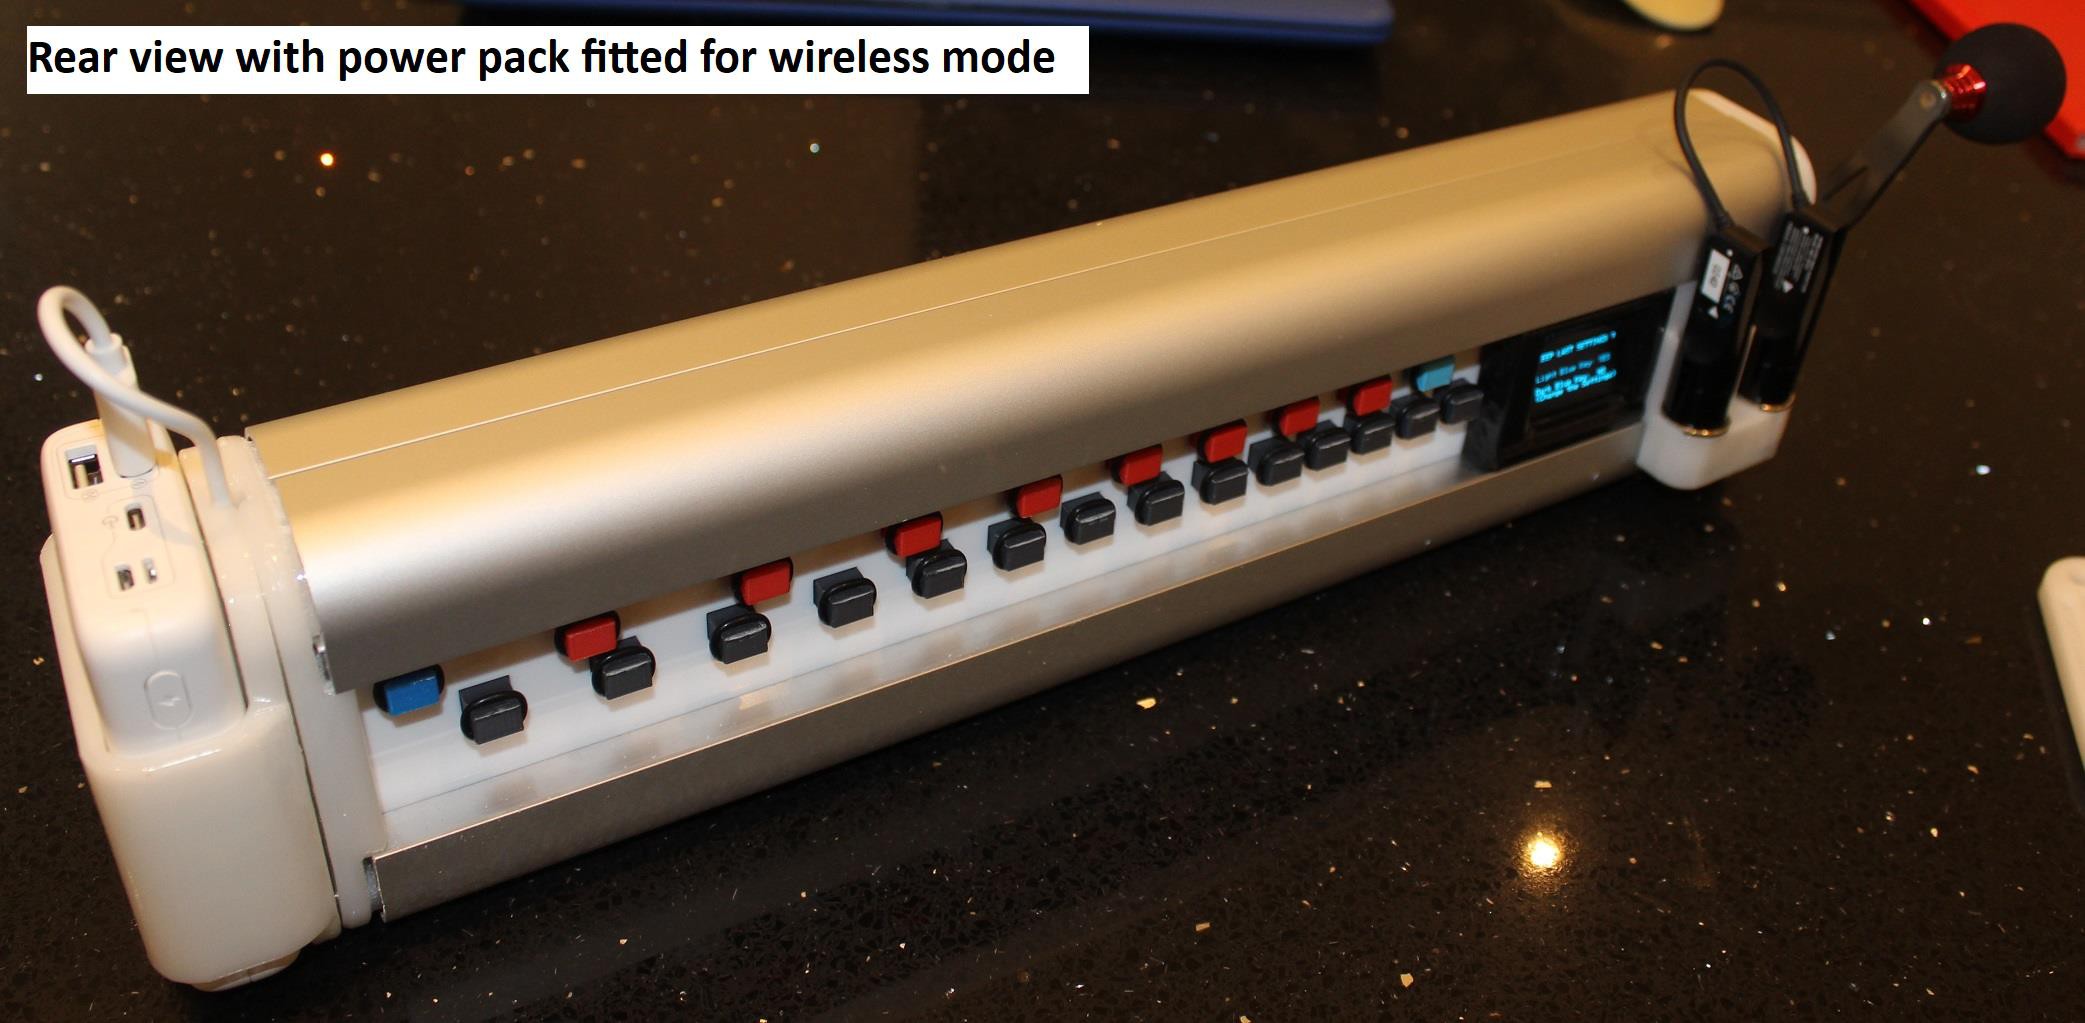
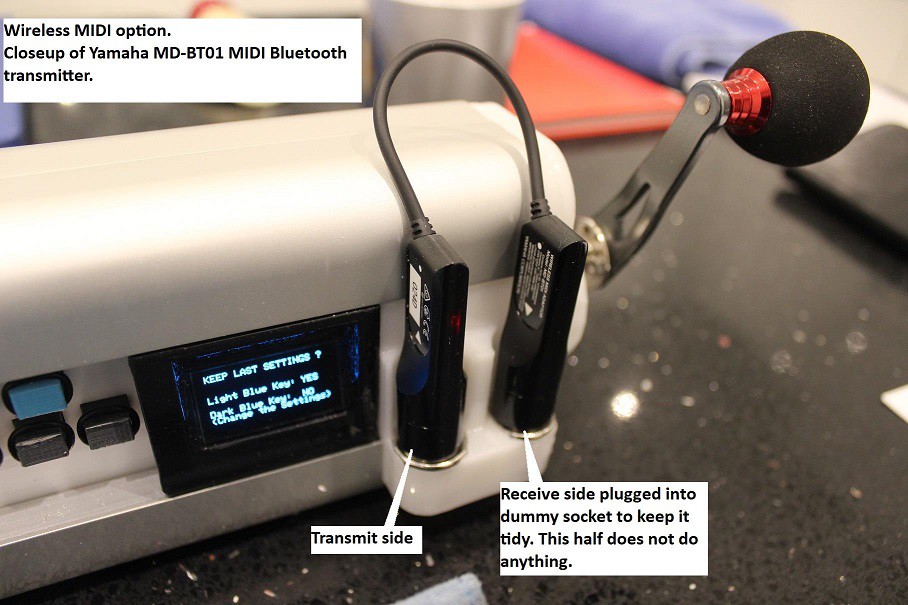
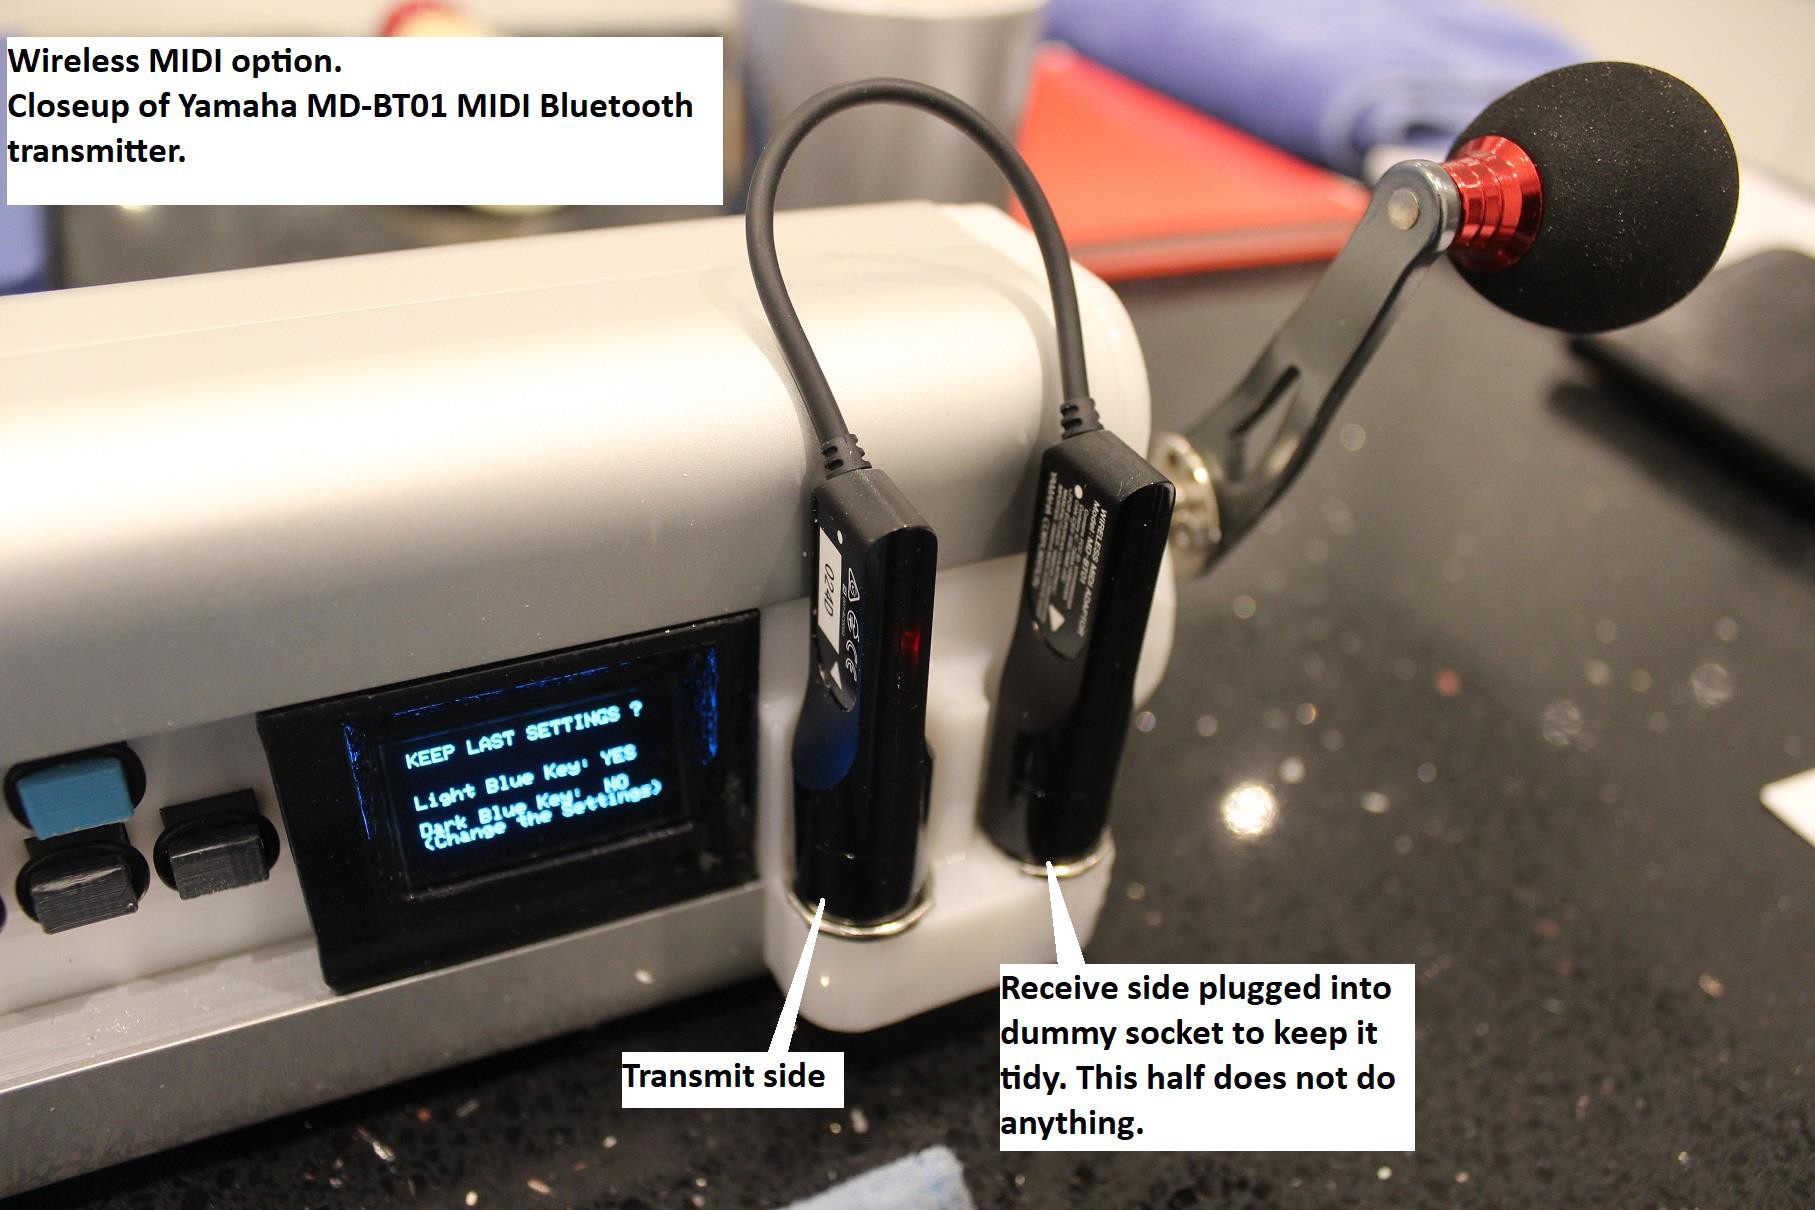
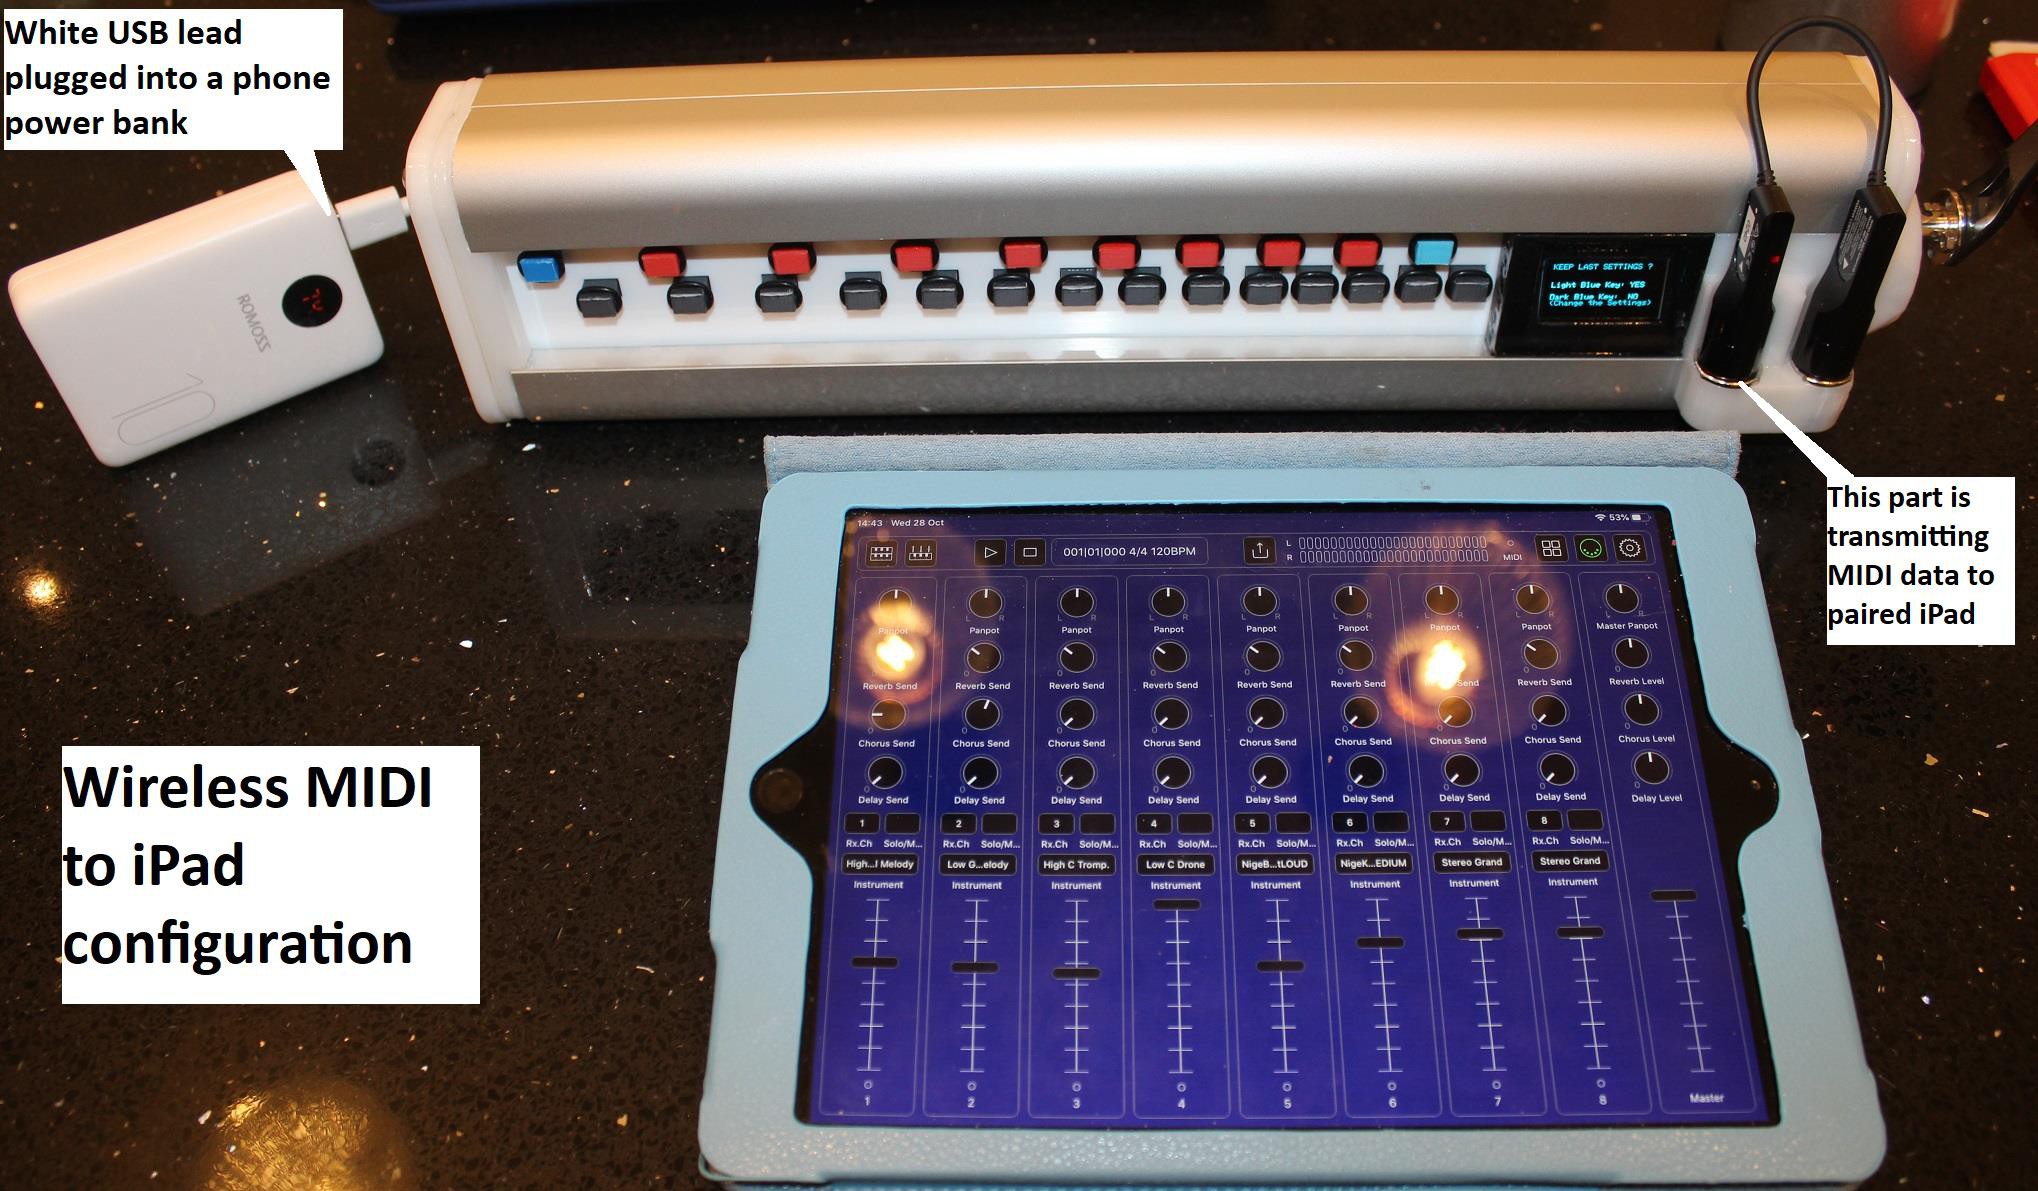
8) MIDI sockets provided in keybox should you wish to use an aftermarket plug in MIDI Bluetooth dongle to transmit wirelessly to your paired iPad or phone. These are recessed now, to protect the dongle better.
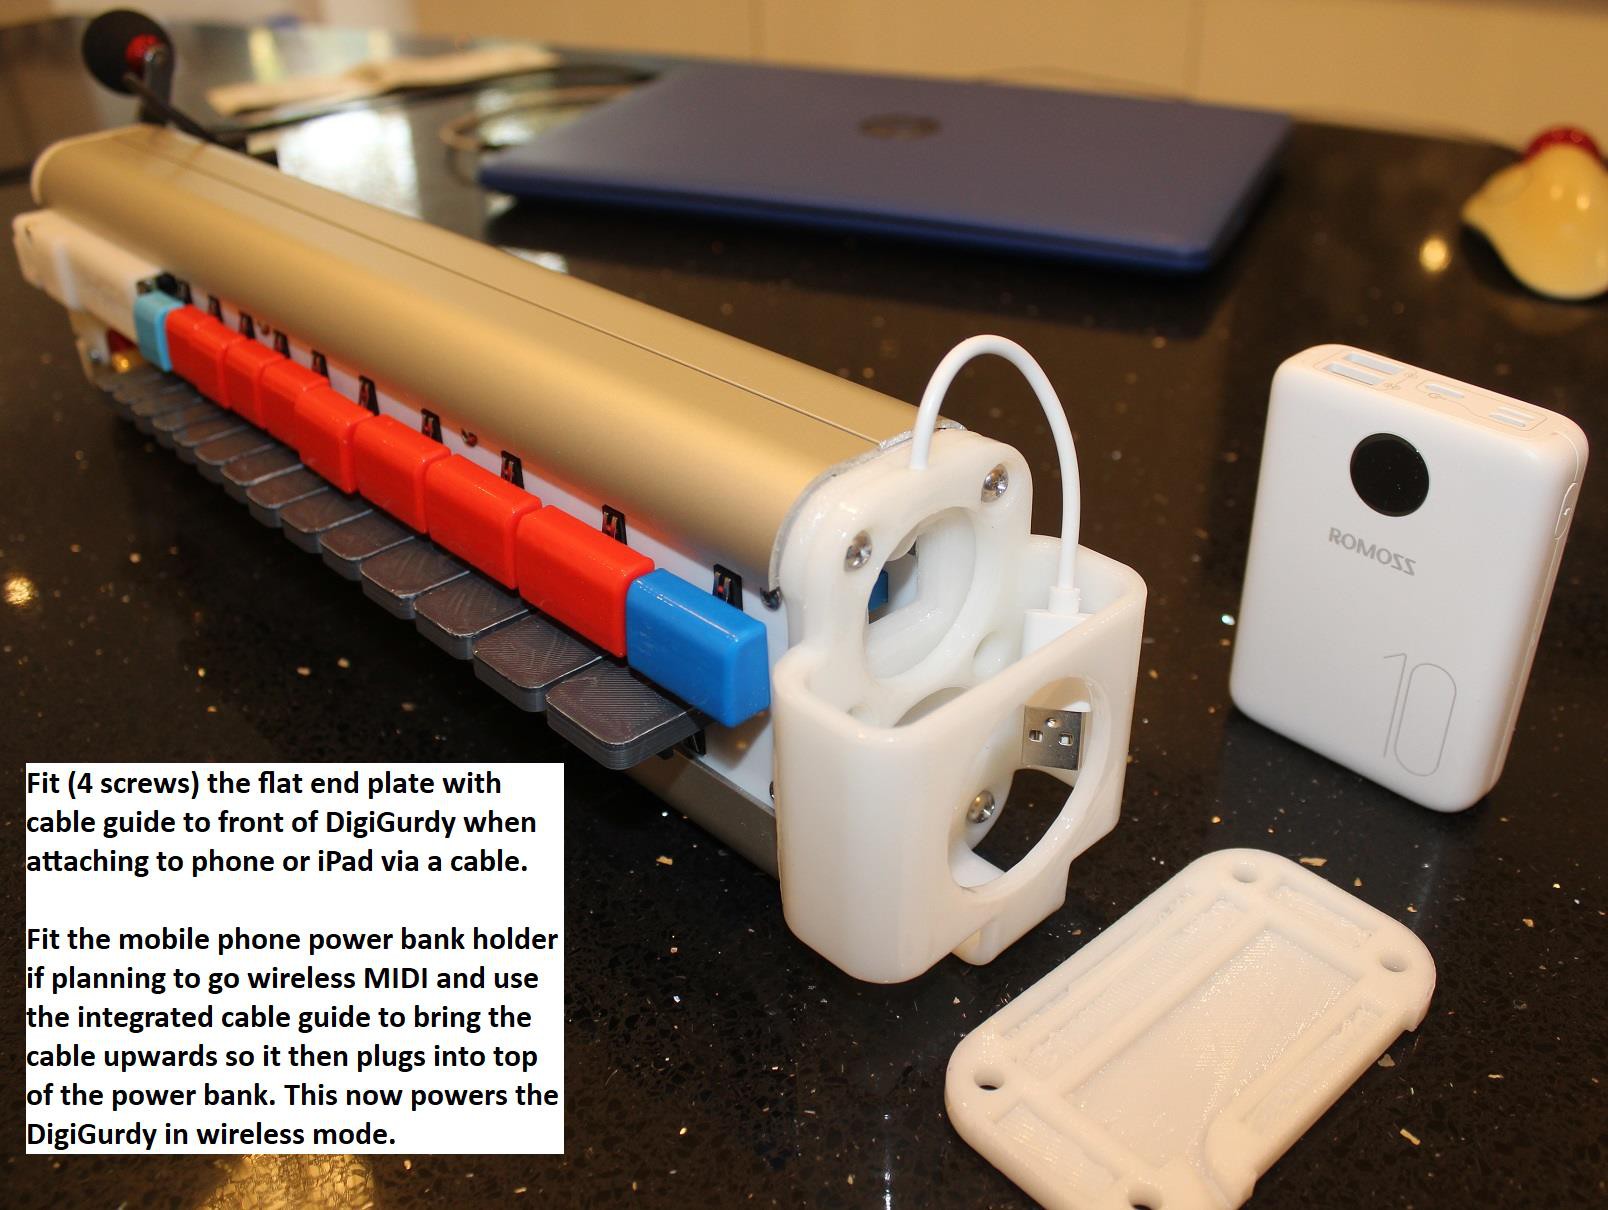
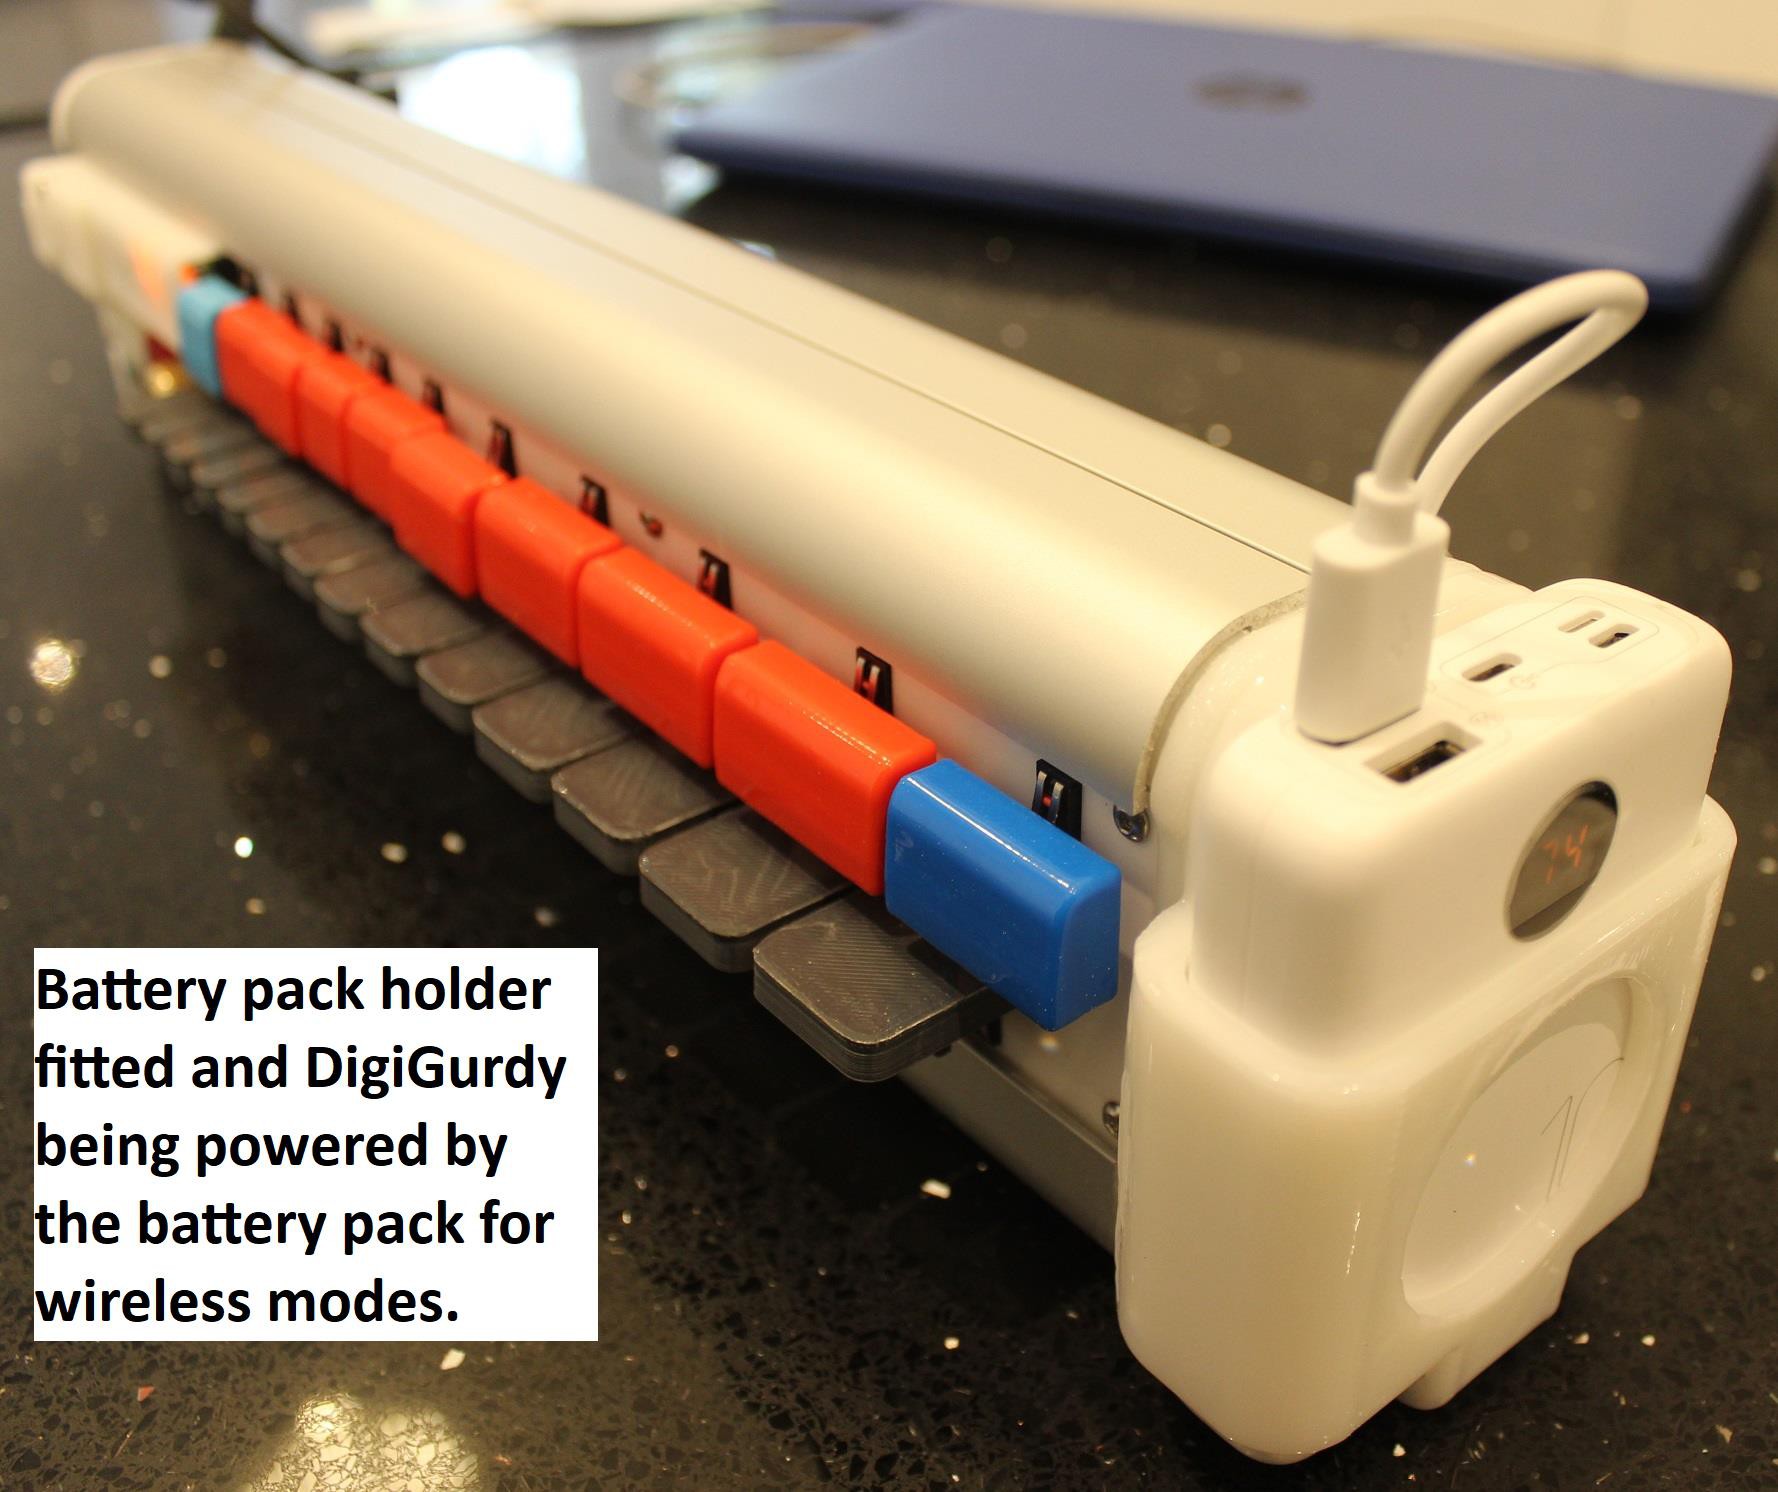
9) Internal battery holder (a mobile phone emergency battery bank) is embedded in left hand end of the keybox. Should you wish to go fully wireless (i.e. when using a plug-in MIDI Bluetooth transmitter), the keybox can no longer draw power from the attached (via USB cable) phone or iPad and instead will now need its own power supply. Loop the short USB lead danging from left hand end of keybox around and plug it into this rechargeable battery module, and the keybox will now run on this internal power.
10) Four detailed build videos for the Digi[Nerdy]Gurdy are below. Also there are two setup and use videos showing how to navigate and use the tunings menu, how to connect to an iPad or Android phone, and also how to use the internal battery module should you wish to go wireless when using a plug-in MIDI Bluetooth transmitter dongle.
-
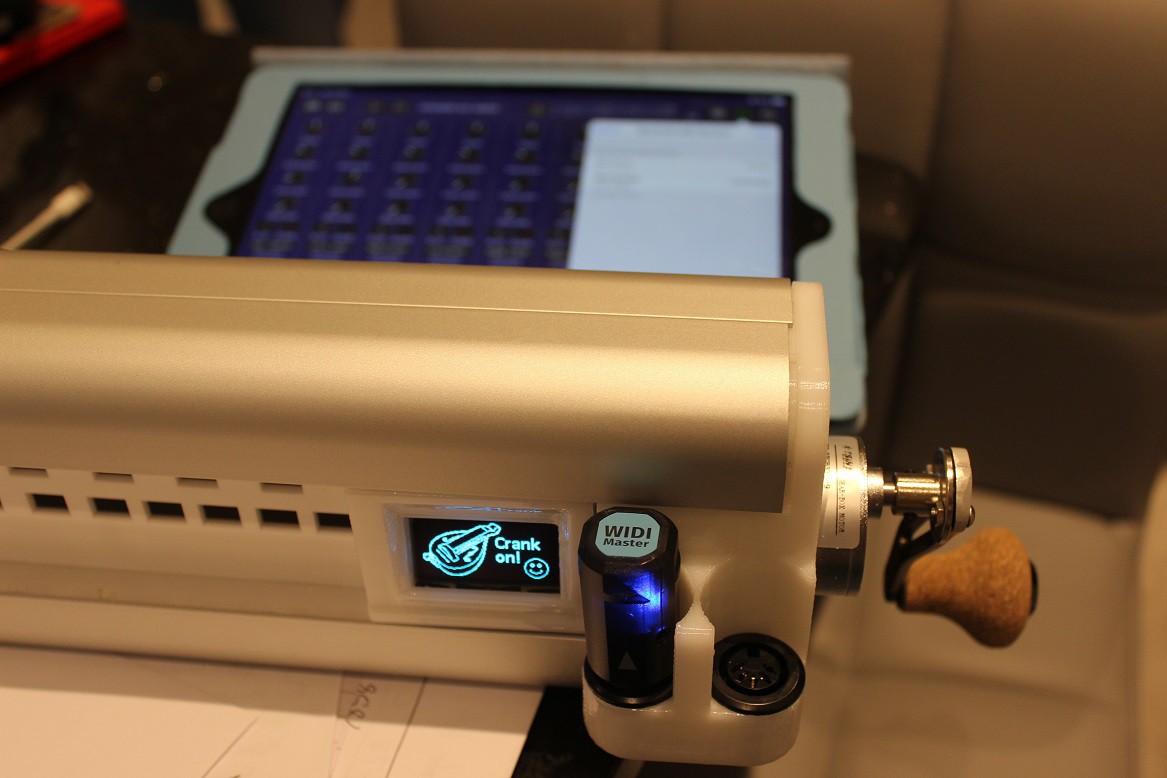
Project Log #19: Internal battery for BT. Tunings. Alternative designs.
12/28/2020 at 19:58 • 1 comment1) Battery pack design: After a lot of experimenting I have settled on a design that allows a single 18650 based phone battery pack to be built into the left hand end of the DG. It just fits with <1mm to spare. This can be charged up using any mobile phone charger. The USB lead emerging from left hand end can either be plugged directly into for example in iPad, drawing power from the iPad as in previous versions or plugged into the USB socket of the internal battery pack to provide power if you want to use the DG wirelessly i.e. connected to the iPad via a plug-in USB MIDI module. These plug into the MIDI sockets now provided at the crank end. Examples of such Bluetooth MIDI transmitters are the Yamaha MD-BT01 and the WIDI-Master. Photos below.
2) Tuning options: With a lot of help from people who know what they are talking about, I am working on an alternative method of tuning. Instead of the 14 set tunings which tell you how to set up each virtual string on the attached ipad/phone, in this variant there are just 4 basic tunings.
- You then use keys to increase all 4 strings by one octave, or move them down one octave.
- In addition a capo allows you to move the trompette and drone strings up or down by one full tone.
This gives you a large number of combinations, similar to the original 14, but presented to you in a way that some players might prefer, more in keeping with a real hurdy gurdy.
Still debugging this but it does work and will be offered as an alternative code upgrade soon.
![]()
![]()
![]()
![]()
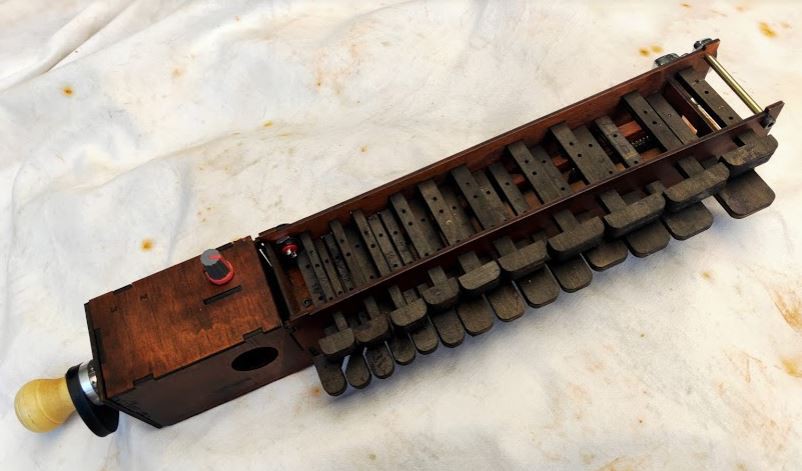
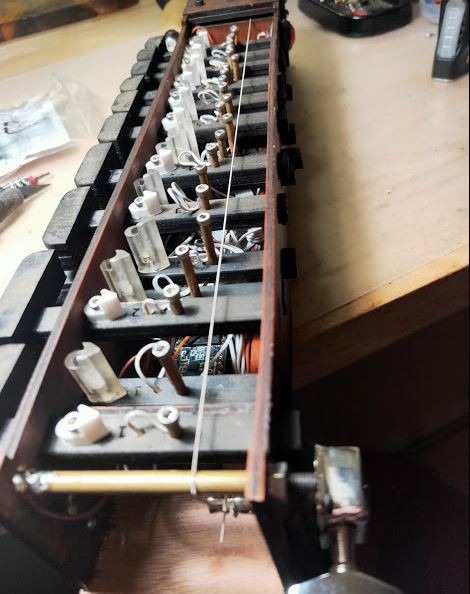
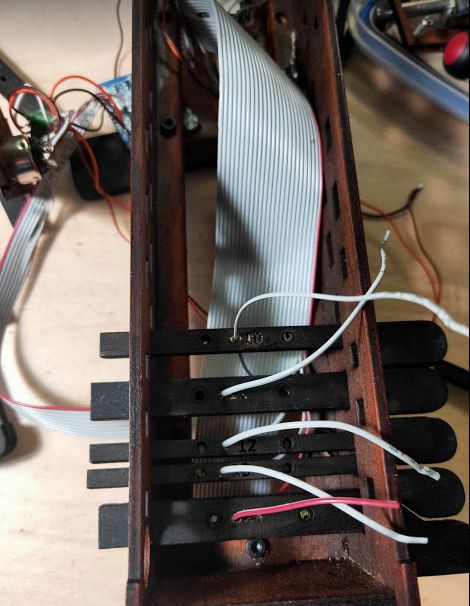
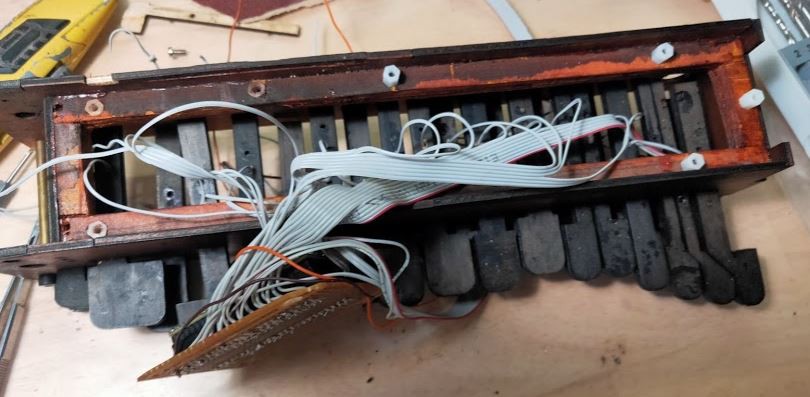
3) Alternative keybox design by David Jacobs: This design is laser cut from 3mm ply and files have been attached with more photos in the file download section. Construction manual to follow. This uses same DG software but instead of using microswitches (which connect solder pins on the Teensy microcontroller to ground when pressed), it uses individual wires running to long or short brass contacts on each key. When the key is pressed they contact a metal string under tension so completing the circuit to ground. This gives the keybox a degree of feel that is more like that of a real hurdy gurdy. Images provided below. More in the downloadable file.
![]()
![]()
![]()
![]()
-
Project Log #18: Many improvements. Experiments with BTooth MIDI
11/02/2020 at 14:30 • 3 commentsMany improvements to the code.
- Strange extra click sounds all removed. Generally smoother sound.
- Buzz sound is now at same pitch as the (virtual) trompette string.
- 2 melody strings one octave apart.
- 2 screen display options: Original with notes on stave plus also a Do, Re, Mi style notation.
- Remembers your last-used setup. Useful with bs-16i on an iPhone.iPad as that also will remember your last used settings.
Hardware improvements.
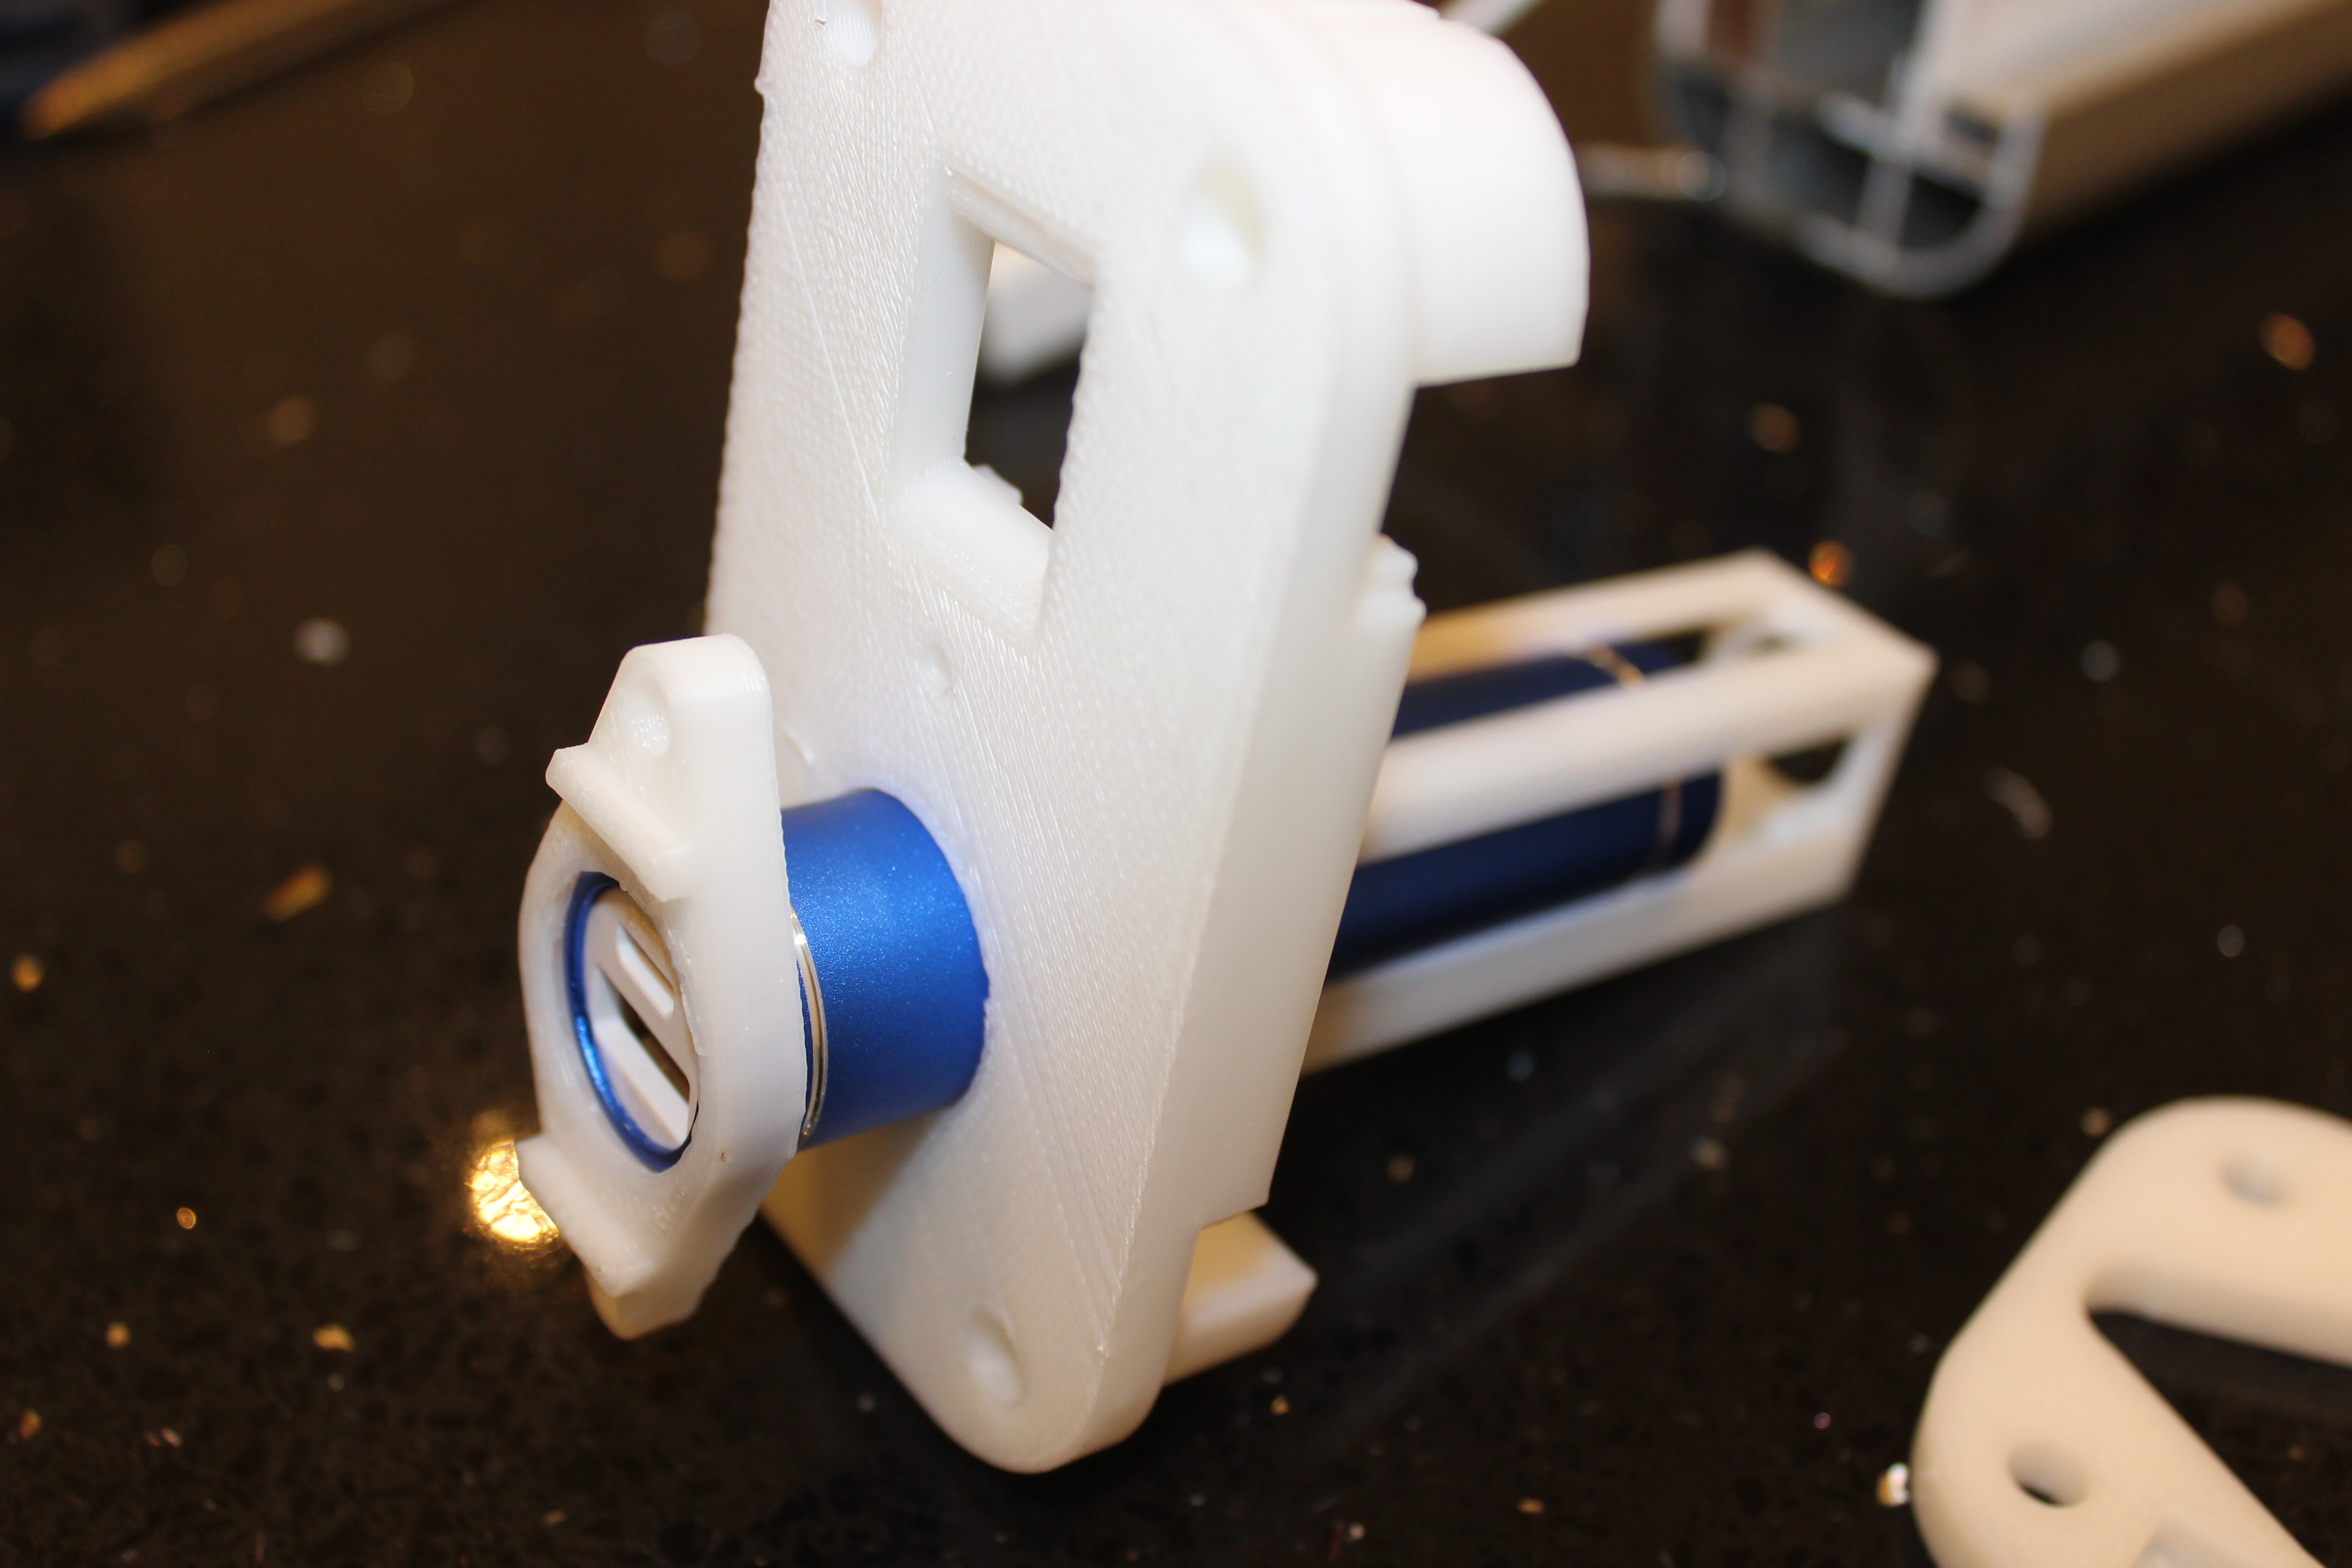
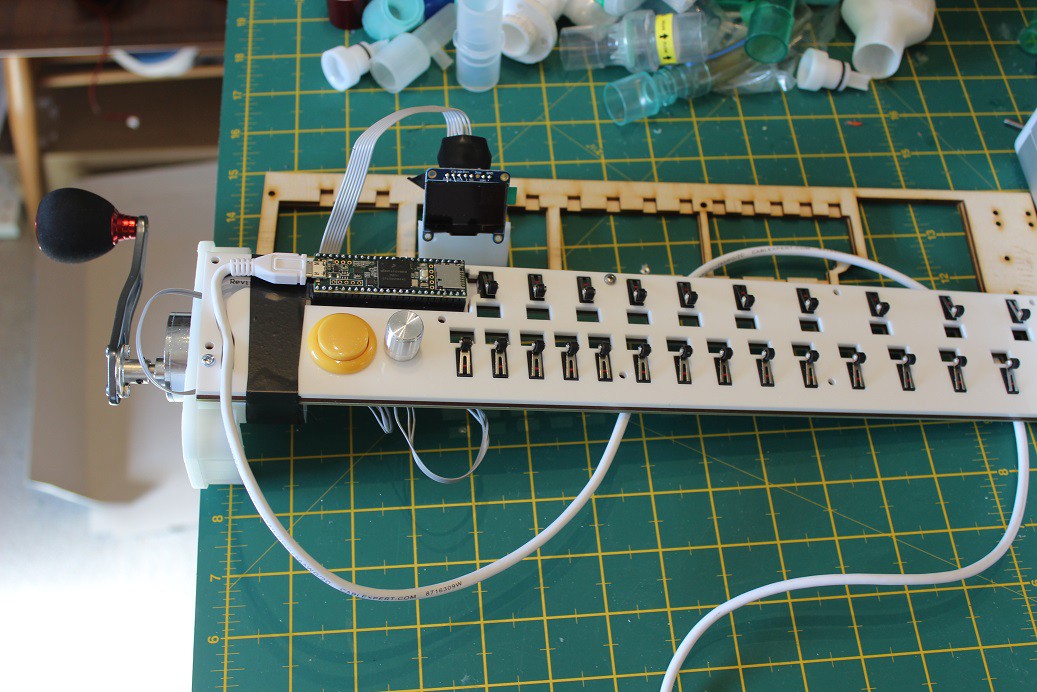
Have changed the right hand 3D printed motor/crank housing design to include two 5 pin sockets to accept MIDI devices. When used with a Yamaha MD BT-01 Bluetooth MIDI transmitter you can link to the iPad or phone wirelessly. When in wired (to phone) mode, as in the previous versions, the DG is powered by the phone up the USB cable. When in wireless BTooth mode, you need to plug the now unused USB cable into something else to power the DGurdy. Initially I tried a large phone power bank in a holder on the left hand end. However, as the power draw of the DG is low, I have now redesigned the left hand end main 3D print so it accepts a smaller 18650 cylindrical battery and charger module from a smaller phone power bank. This fits internally within the DG and is a very neat solution. The USB cable can still be hard wired to a phone or iPad as before so you now have both options for connecting to your device, a) wired via USB cable or b) Bluetooth, if you buy a Yamaha module or similar later on plus the battery cell for the left hand end (readily available all over the world).
![]()
![]()
![]()
![]()
![]()
![]()
![]()
![]()
![]()
![]()
![]()
-
Project Log #17: Issues when connected to ios devices
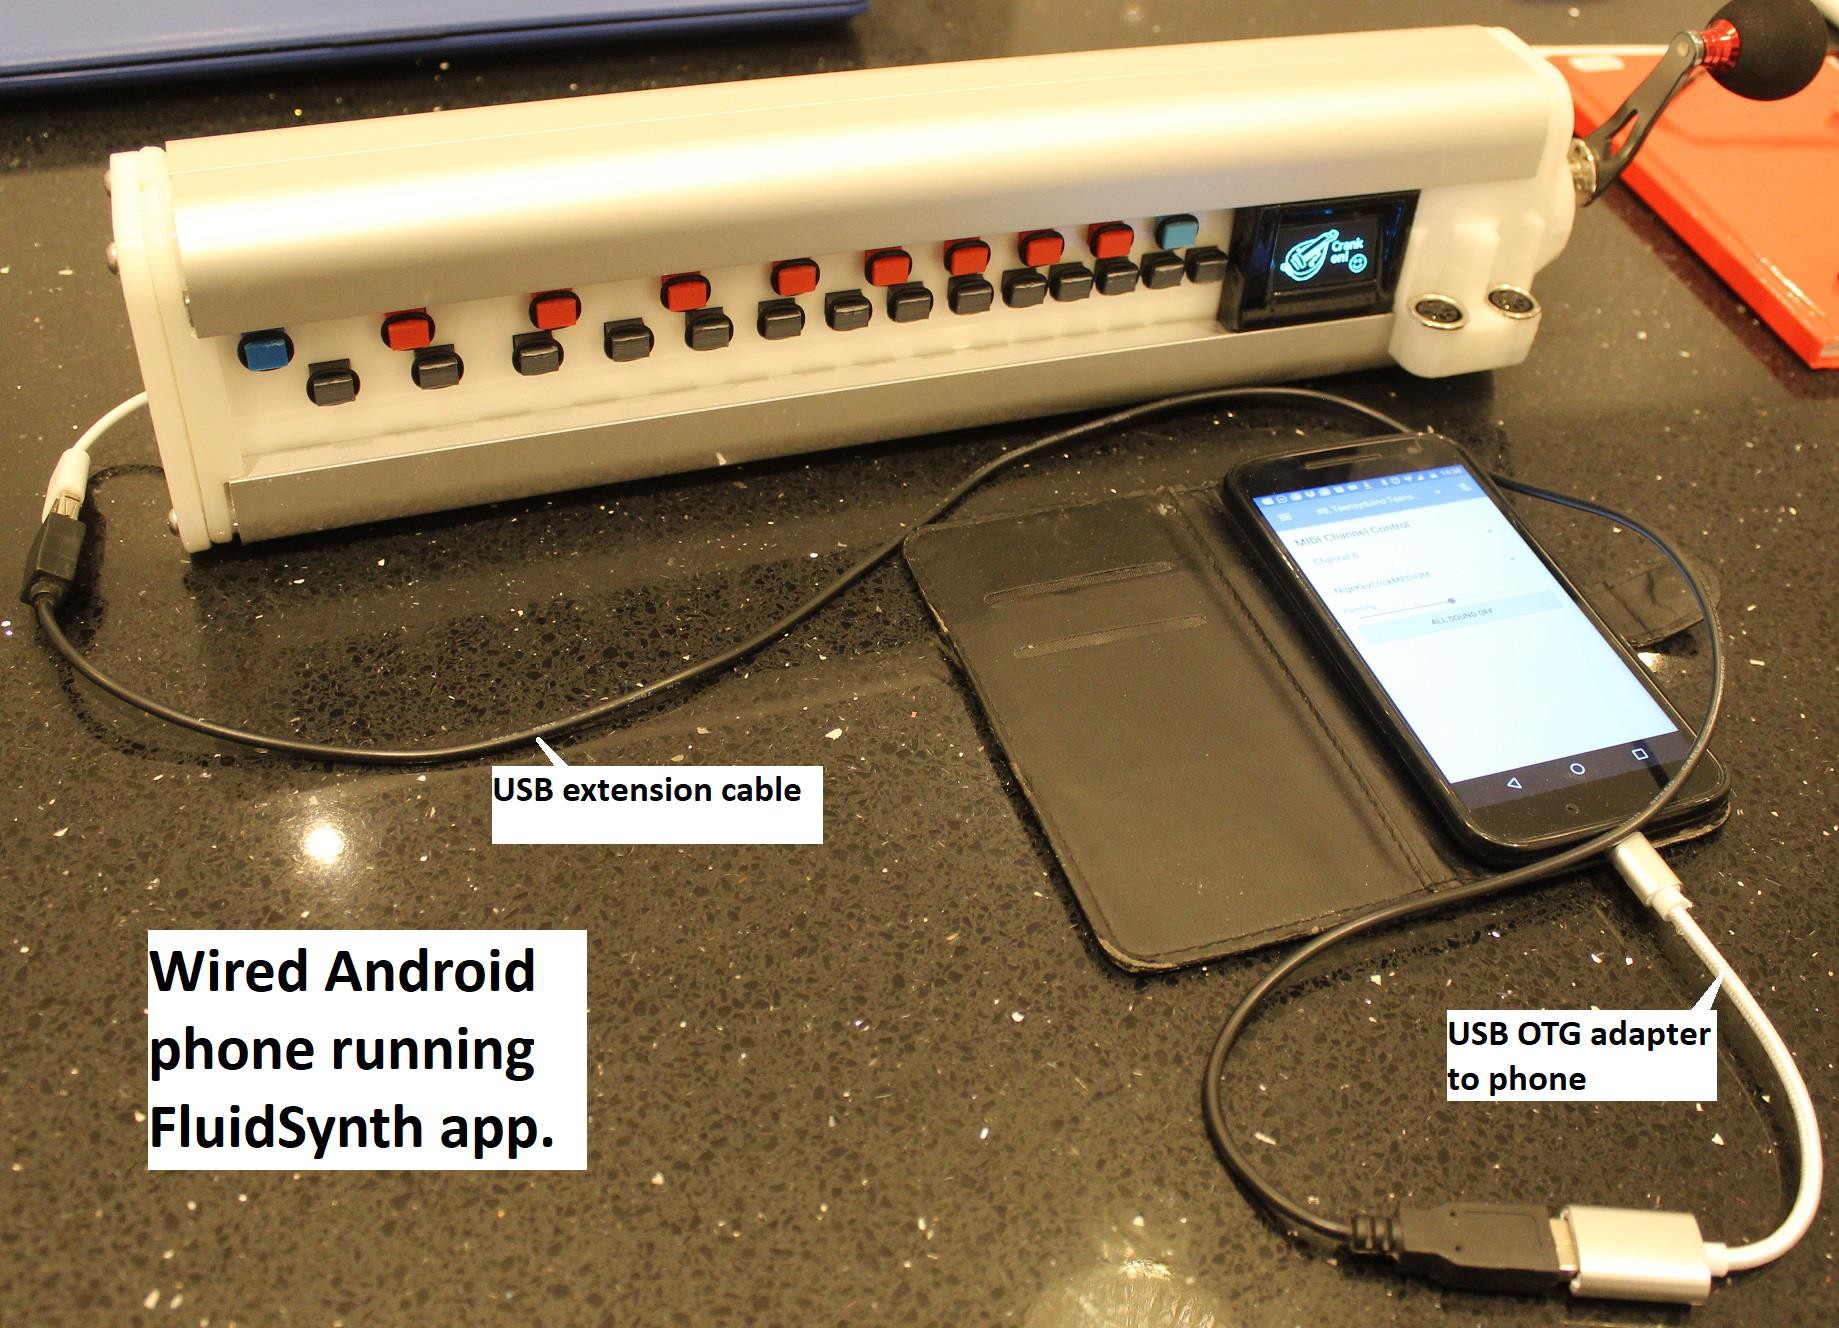
07/04/2020 at 18:45 • 1 commentThe DG was intended to work with the free FluidSynth app, running on an Android phone.
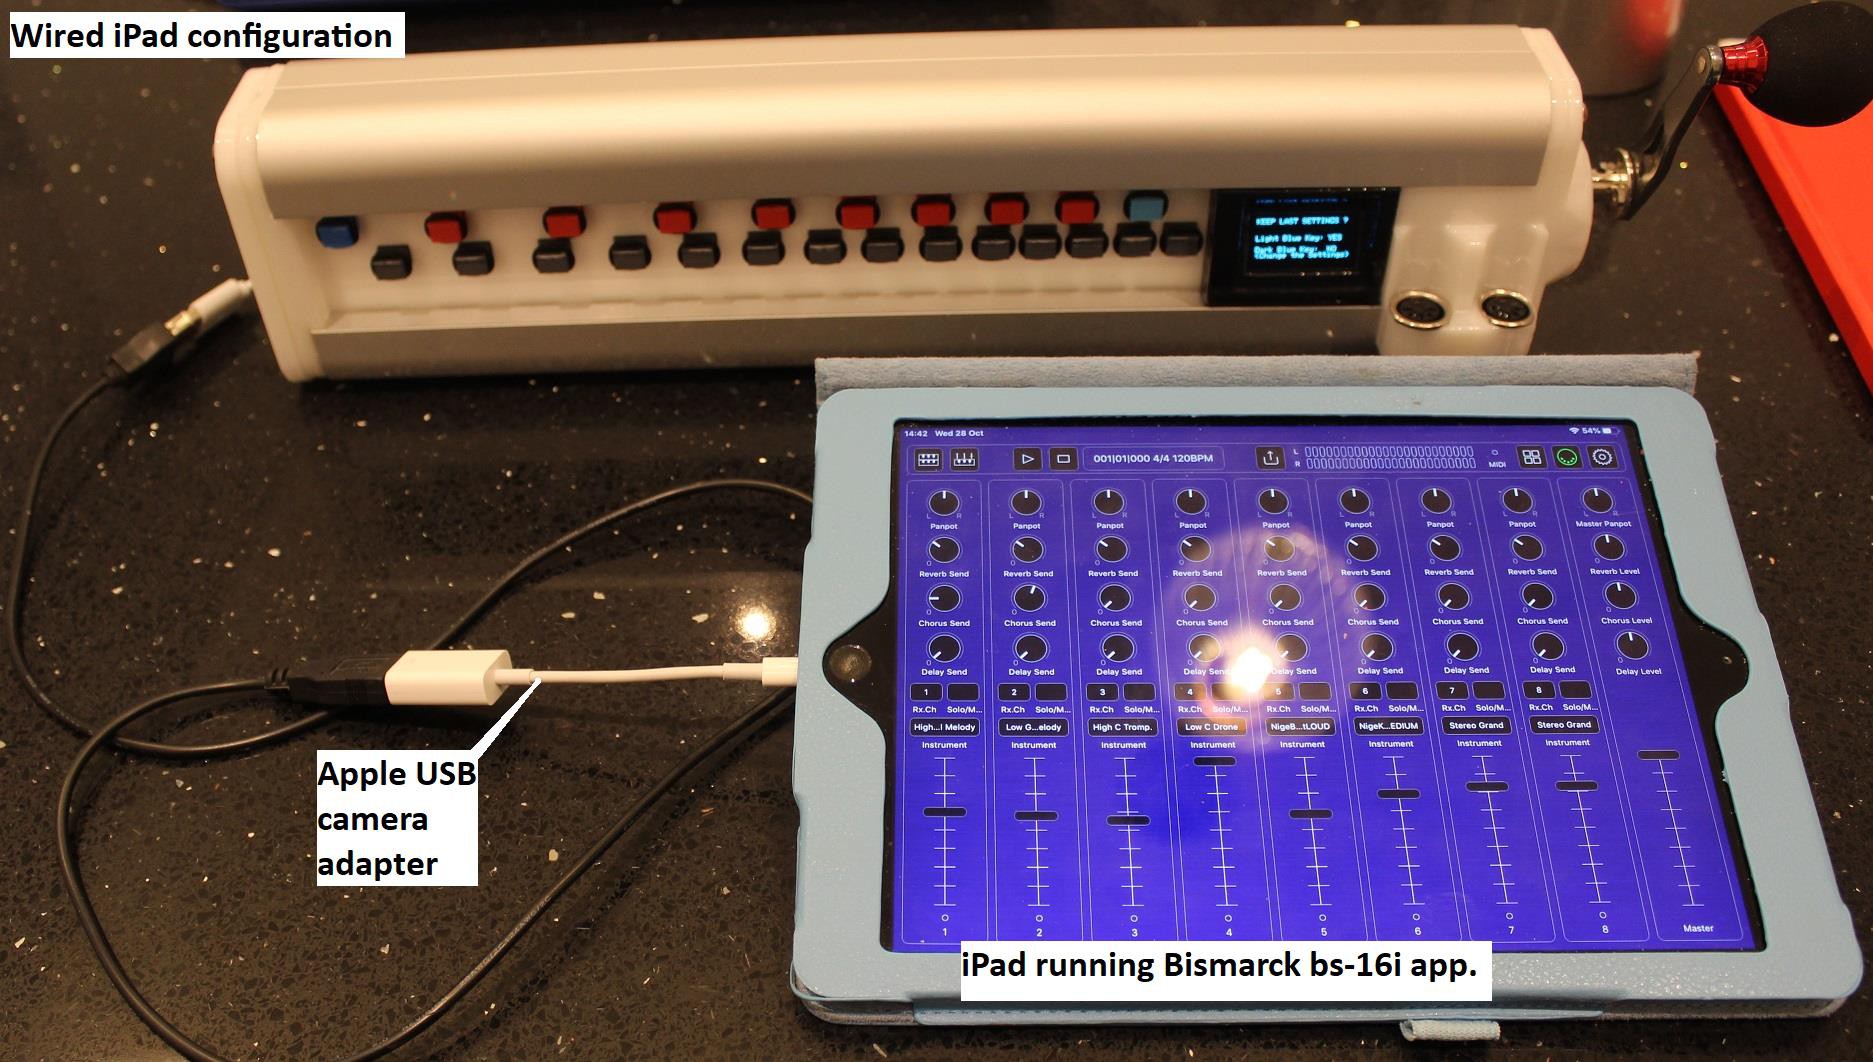
Some have tried it with an iPad for example running Bismarck bs-16i. This seems to work OK most of the time but there are some bugs.
The main one is that when you stop cranking, sometimes a note can get stuck in the ON state and you have to unplug and plug the DG in again to the iPad to restart it. Am working on a software upgrade to try and fix it but even if I send a MIDI command to turn off every single note if crank has stopped turning for >1 second, the issue still happens sometimes which makes me wonder if it is an issue with bs-16i. Working on it !
-
Project log #16: Quick update on software and phones it works with
05/31/2020 at 19:46 • 0 commentsQuick update for people asking me what phones it works with, whether it works with an iPhone / iPad and potential PC based software.
PHONES that definitely work using the (free) FluidSynth app for Android phones that I originally intended it work with:
My old MOTO G4 works OK.
Also from currently available new budget phones:
STK One Max
Nokia 2.2Apps that work:
I have it working, as I originally designed it, with:
Fluidsynth Midi app (Free from Google Play store) on an Android phone.
Others also have it working in these ways although I have not tried these myself yet:
a) bismark bs-16i app on an iphone, [NOTE: You have to use the Apple camera adapter which is about GBP35], cheap ebay versions may not work.
b) Also, Reaper with the TX16Wx software sampler plug on a PC.
c) Also apparently works with a device called an Organelle M. https://www.critterandguitari.com/organelle -
Project Log #15 Version 5 finally built using the PCB's
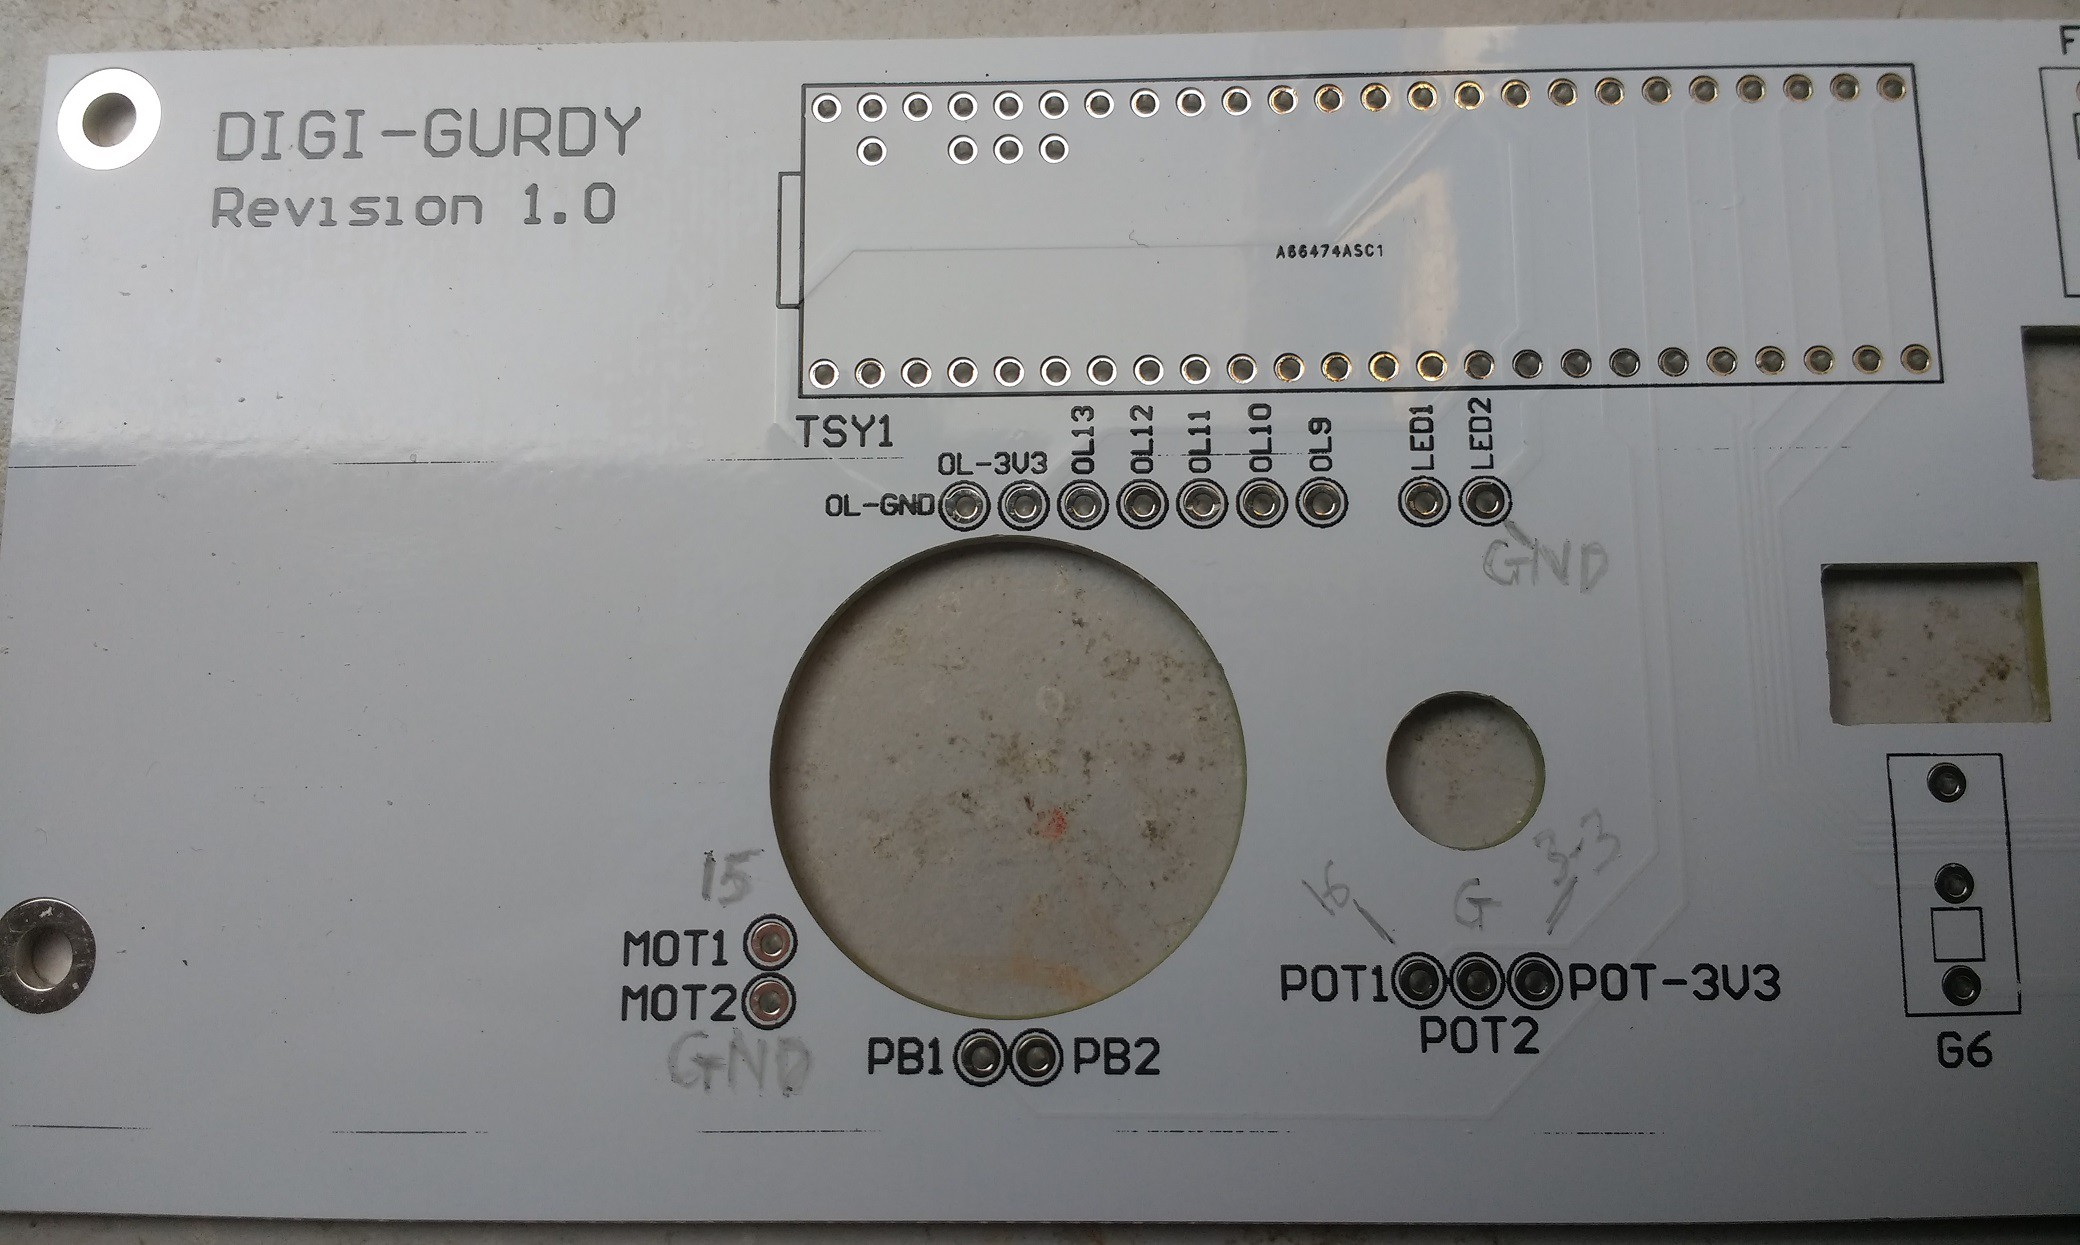
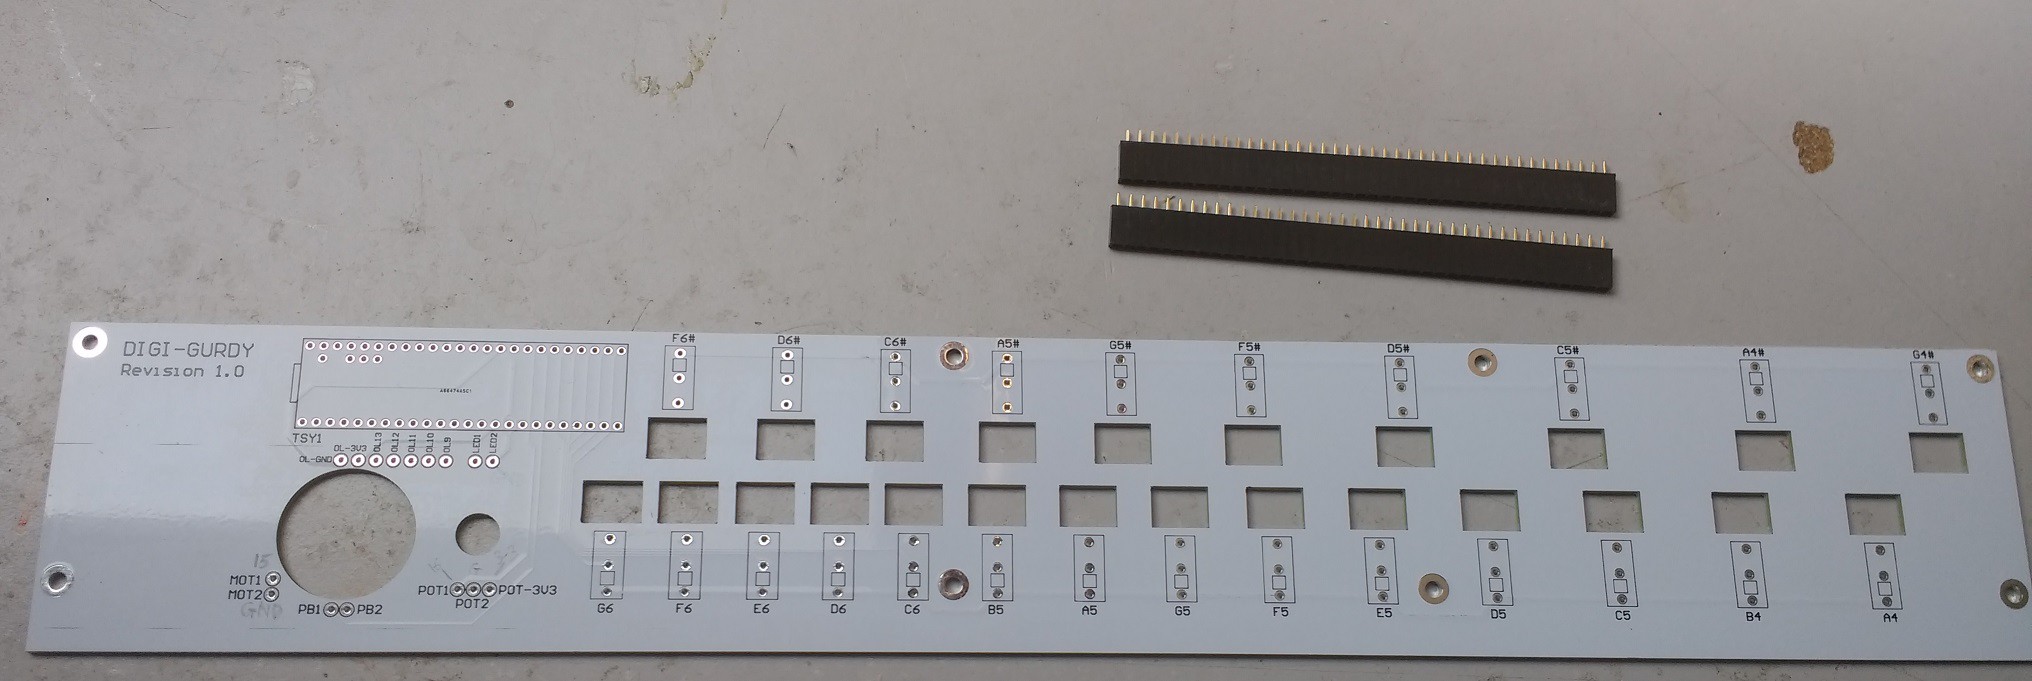
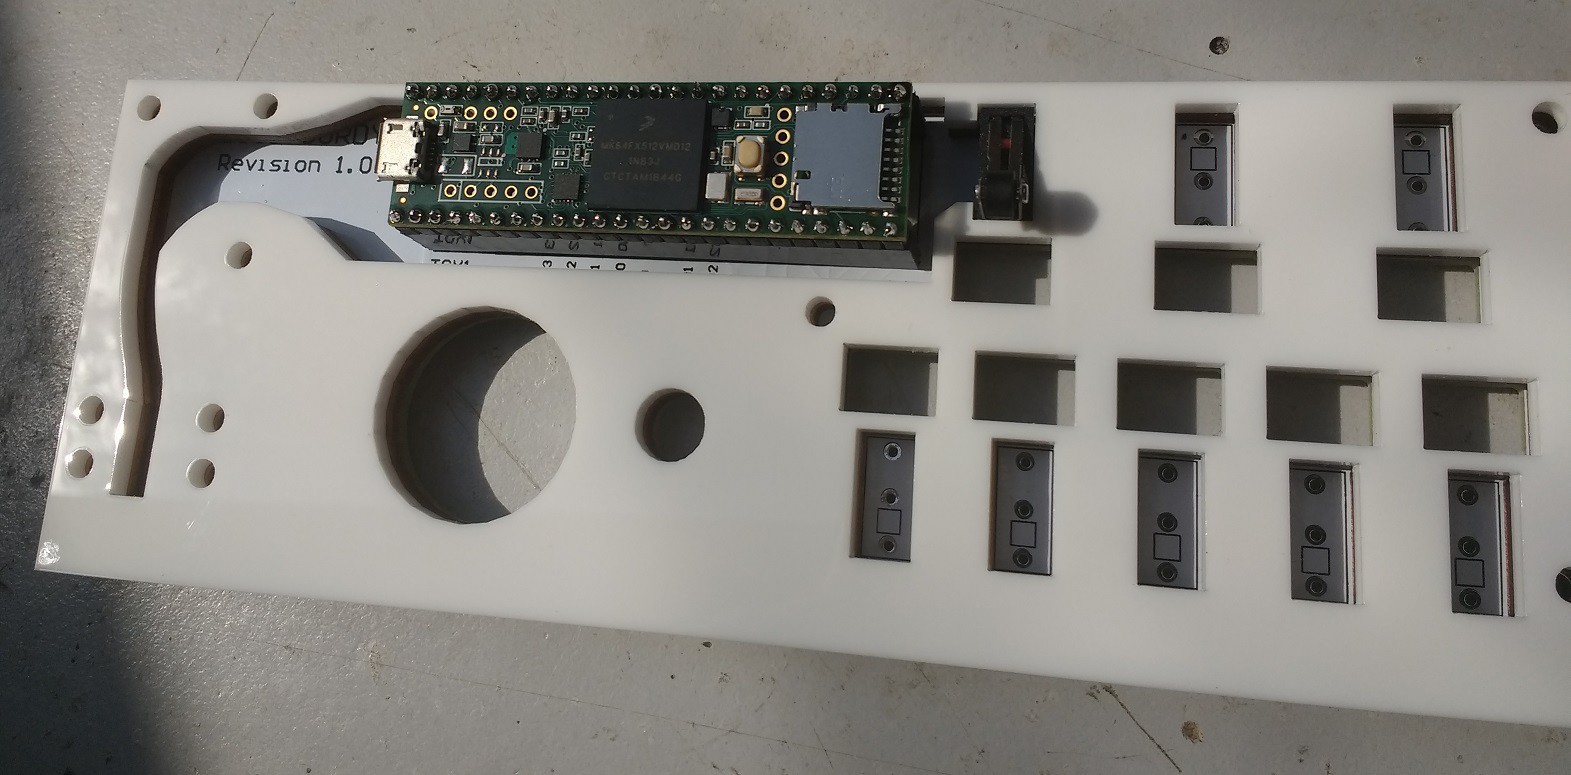
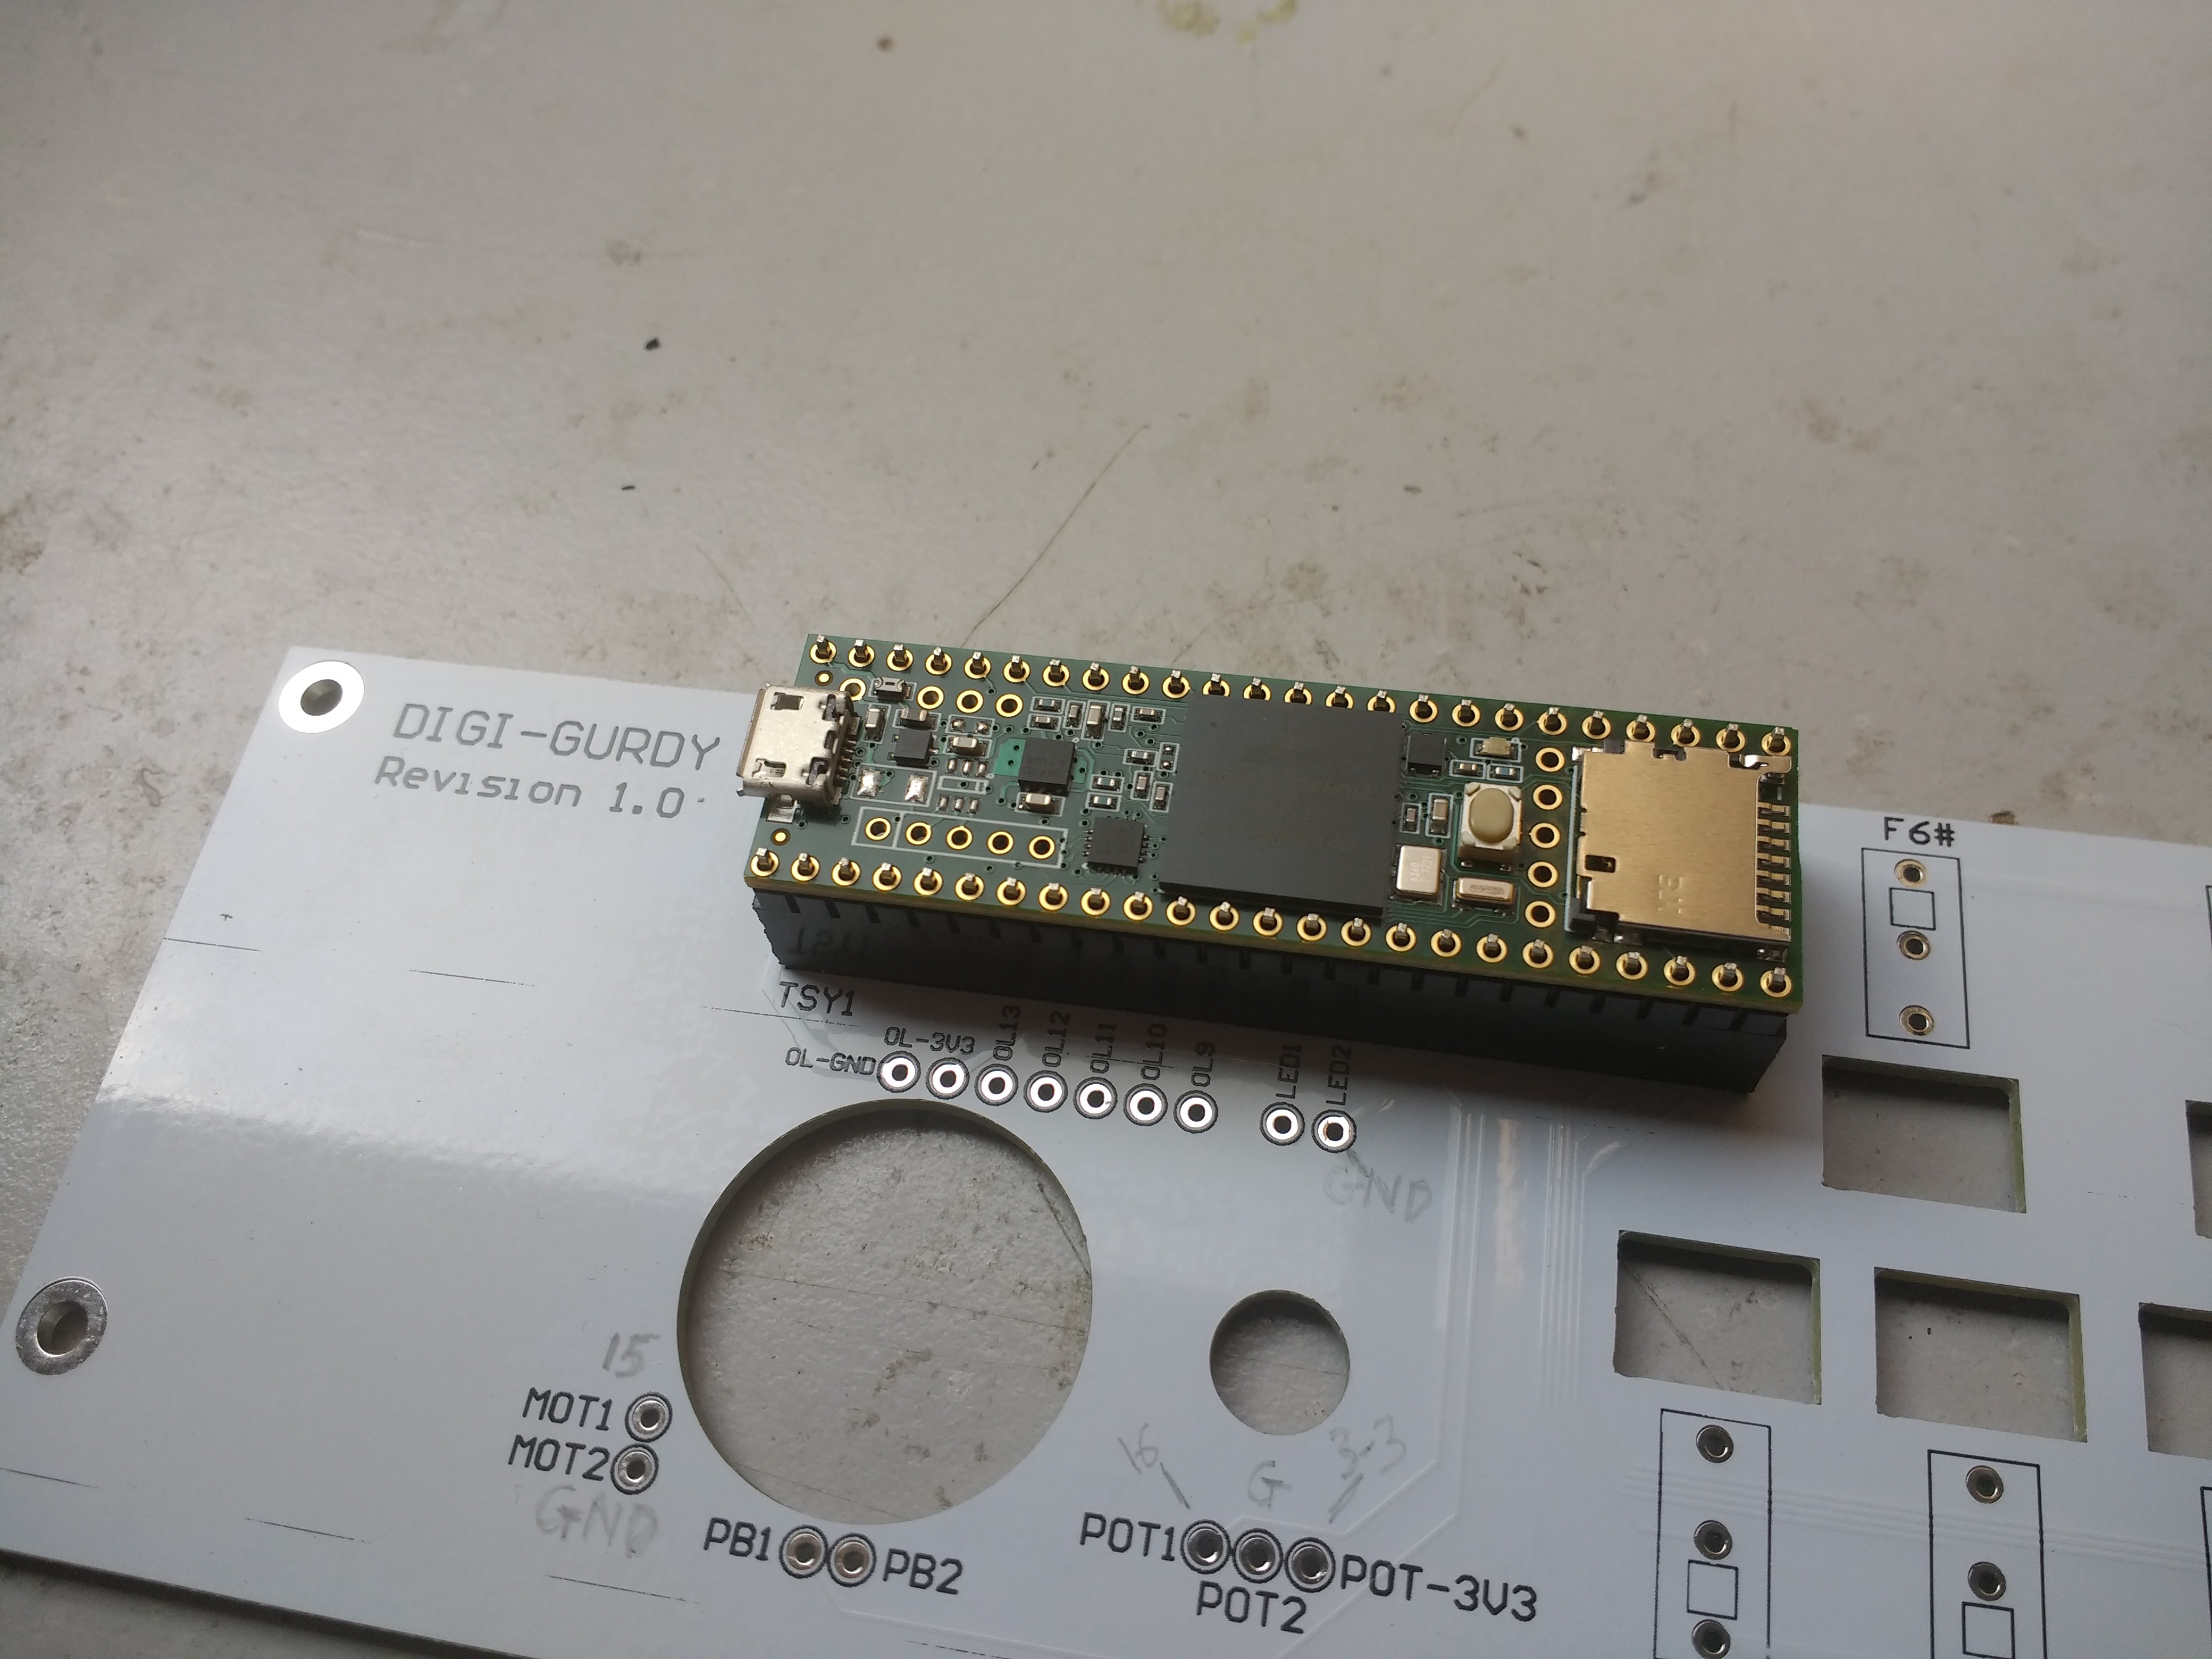
05/19/2020 at 17:44 • 0 commentsHave been involved in a ventilator project but finally got around to making a few of the V5 DigiGurdy's which have a custom PCB inside onto which everything connects. Also has the unpluggable Teensy 3.5 on the front under a white 3D printed cover. I have made 2 videos describing everything about this version, see below. All white / aluminium and now using white laser cut acrylic for the front and rear surfaces. I have made 7 so far.
![]()
DigiGurdy Jenga.
This is 15min long but explains just about everything. The screen flicker on the display is due to my GoPro camera, it does not flicker in real life !
-
Project Log #14: PCB's have arrived for latest version
04/26/2020 at 23:26 • 1 commentThis is a very quick update.
20 PCB's have arrived from China which I can solder the microswitches to and also 2 rows of pin headers to allow the Teensy board to be plugged into the FRONT of the DigiGurdy.
The whole machine will be white as in the left-hander featured in Project Log 12b.
The Teensy will have a small 3D printed removable plastic cover. This allows it to be unplugged and sent to me if not an Arduino enthusiast so I can mail it back to you with a software upgrade.
It also allows an SD card to be slid into the end of it, should I wish to use that for something - working on it. For those who have suggested I design a custom board with WiFi connectivity for software upgrades, my answer would be that to do that I would have to employ someone and unless making 1000 of them, not much point. As it is I paid someone to design this PCB.
It does speed up the build time considerably and is much neater.
Other project taking up 99% of my time right now but I thought I would put one of these together just to check that it works - which it does.
Photos below, just the electronics assembled for testing purposes.
![]()
![]()
![]()
![]()
![]()
The USB lead will be held captive in the slot cut for it by the cover which will enclose the Teensy and this cable.
-
Project Log 12b: Version 4, neater & easier to construct
03/06/2020 at 22:18 • 0 commentsVersion 4
- Many software improvements based on suggestions from Nigel Eaton, David Jacobs and others.
- Have sorted out a reasonable set of tuning options. Startup menu gives you 6 tuning options. Trying to offer a reasonable selection for the more experienced, but not an overwhelming set of options for the beginner either. Select one and it will then show you how to set up the FluidSynth app on your phone so it all works correctly and sounds as it should. The software does not "know" how you have set up the phone app so this is the easiest way to set both up so they work with each other.
- Many changes to the 3D prints so the whole thing holds itself together just using the 4 long screws at each end.
- Alloy channel now runs the full length of the device, enclosing the larger gearmotor crank mechanism.
- Using white laser cut acrylic panels rather than plywood.
- White USB cable.
- Going for an aluminium and white plastic effect, rather like an *pple product.
- 6th tuning option allows you to set it up as a Tenor gurdy.
These are all shown in the video below. Please note in the video below I am demonstrating them on a LEFT-handed version i.e. back to front !
To come.......
I am awaiting imminent arrival of some printed circuit boards onto which the microswitches will be soldered directly. This will eliminate most of the internal wiring and simplify the build further.
-
Project log #12: Stronger Crank and many code changes
01/24/2020 at 14:26 • 0 commentsList of changes to original version based on feedback from a couple of early users:
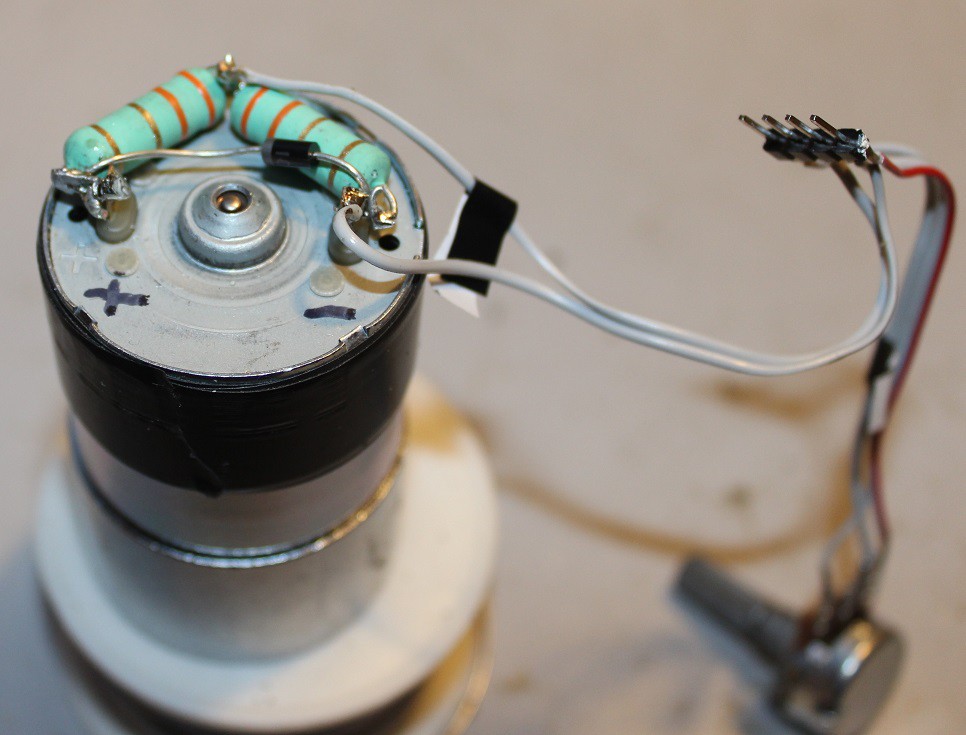
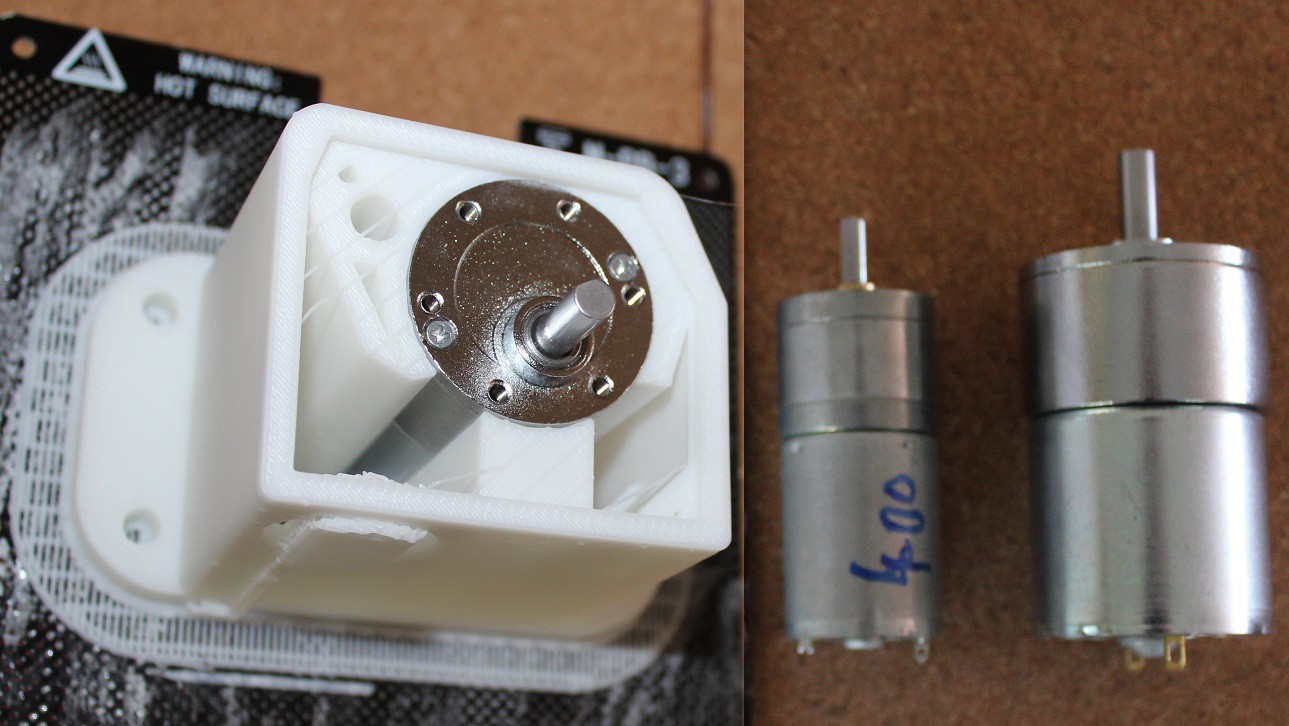
1) Much stronger crank mechanism based around a larger gearmotor in new 3D printed enclosure with a 6mm shaft. The bulb has been removed as if it blew, the system would not work as intended. Replaced with wire-wound resistor bridge.
2) No run-on when you stop cranking. Originally this was intended to help beginners as it would sound even if you momentarily stopped cranking.
3) Keys do not play at all unless you are either cranking or have pressed the gaming FIRE button.
4) Drones did not sound right in previous code when using tuning other than G/C. As the DG code has to be aware of your selected drones on the FluidSynth app on the connected smartphone, this has been addressed by the OLED screen offering you 4 tuning options on startup. Once you select one, it then tells you what drones to select within FluidSynth. This keeps it all working correctly. Tunings are: melody G / Playing in key of G; melody G / playing in C; melody D / playing in D; melody D / playing in G. Trying to keep beginners from information overload but also keep more experienced users moderately happy.
5) If you intermittently crank with a note key held down, it will sound the note each time, in previous code you had to release and re-depress the key.
6) In new FluidSynth soundfont (V10 onwards) I have added larger choice of different loudness buzz sounds and keyclick sounds. PM me for the soundfont. I will send by wetransfer as large file.
7) Repeat MIDI - off commands being sent out on some channels have been much reduced. With FluidSynth these were not noticeable but if attached to a more sophisticated synthesiser program running on a laptop, this could produce problems.
![]()
![]()
-
Project Log #11: More design tweaks and assembling the first six.
11/24/2019 at 15:19 • 0 commentsI am assembling six DG's for some brave early adopters out there.
A few design changes:
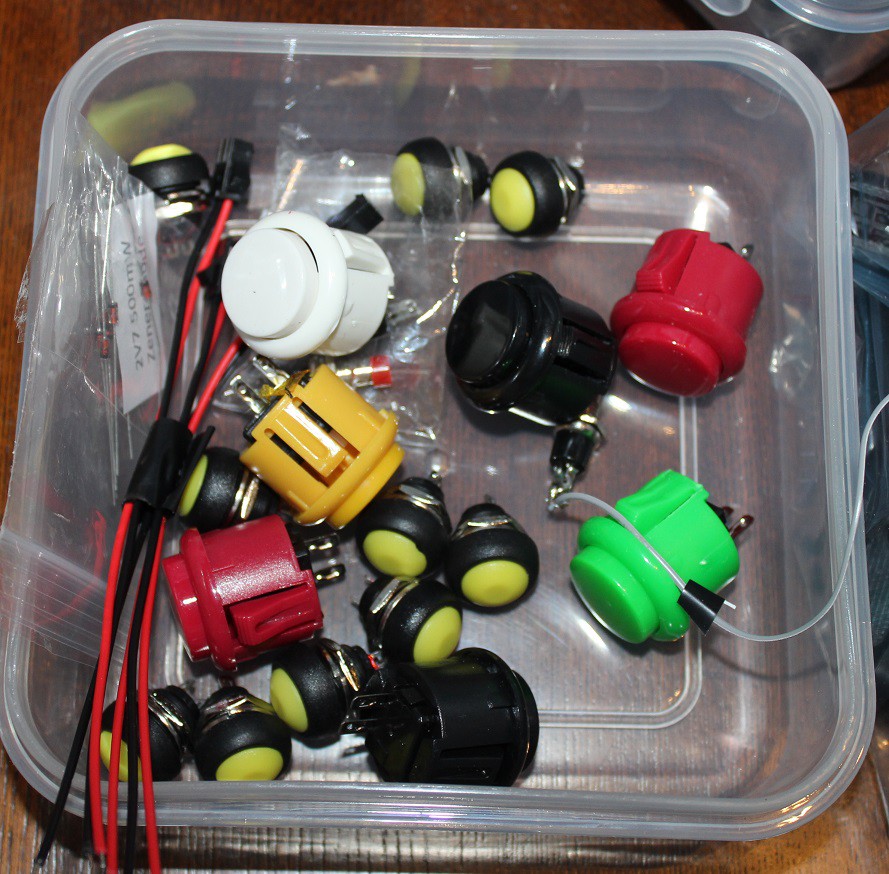
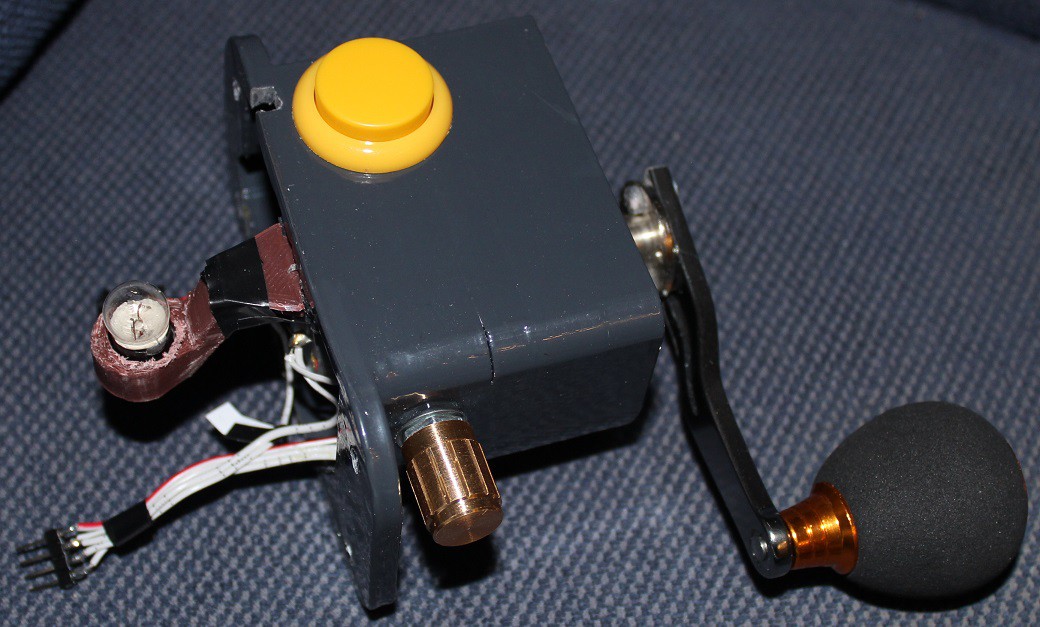
i) On startup the software measures the voltage on the analog pin from the buzz-sensitivity potentiometer 200 times and calculates the standard deviation. If low, a crank module is present and if large it is not. This means I can use same software for both variants of the design. I have added a gaming button to the crank module now instead of a small switch, so you can play it by tuning the crank, or by pressing this button with right hand. If you want to remove the crank module at some point in the future, you can unbolt it, remove the glowing glass dome and remount the switch from the crank module into the hole where the glass dome was (it will fit exactly). Screw on an end blanking plate, which will be supplied and the machine will then work again just fine in crankless mode with no software changes required.
ii) In demonstration mode there are now 22 songs.
iii) Some changes to the code have been made allowing the crank buzz to operate a little more like the real thing.
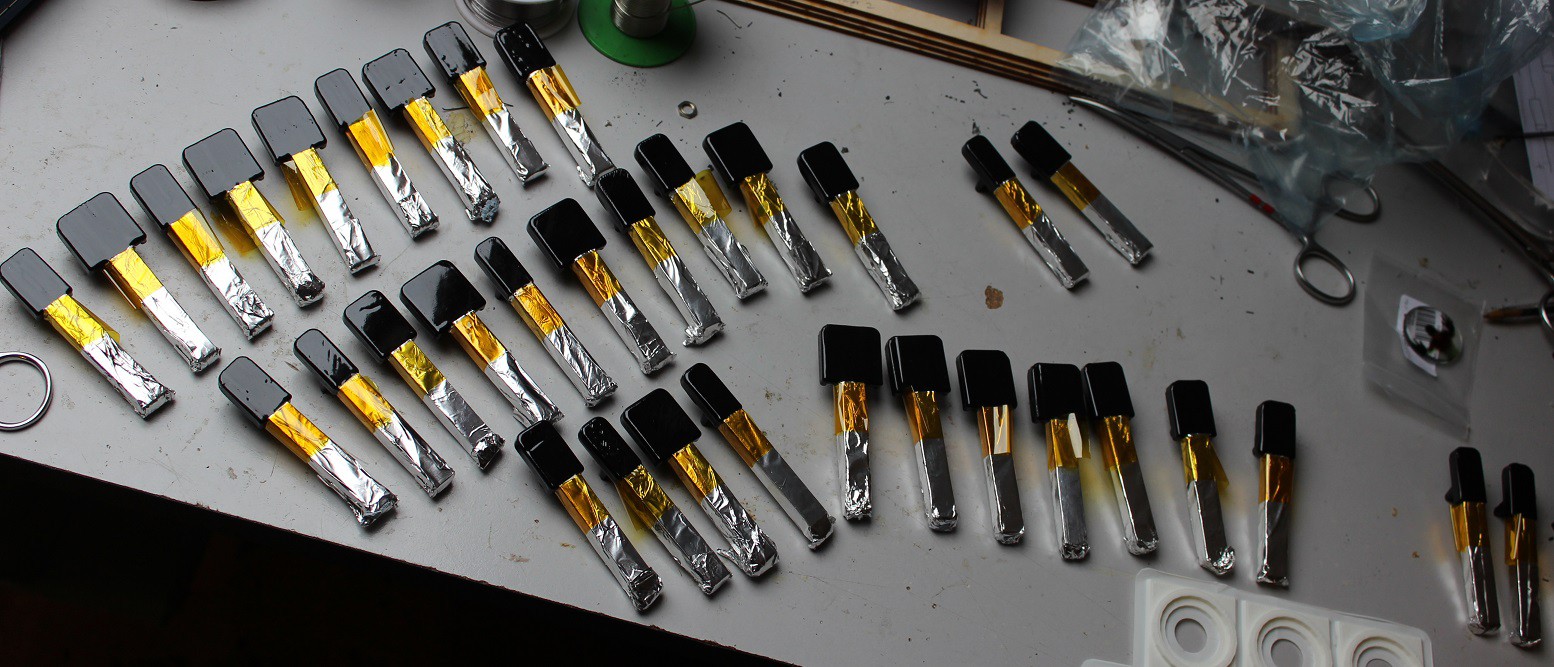
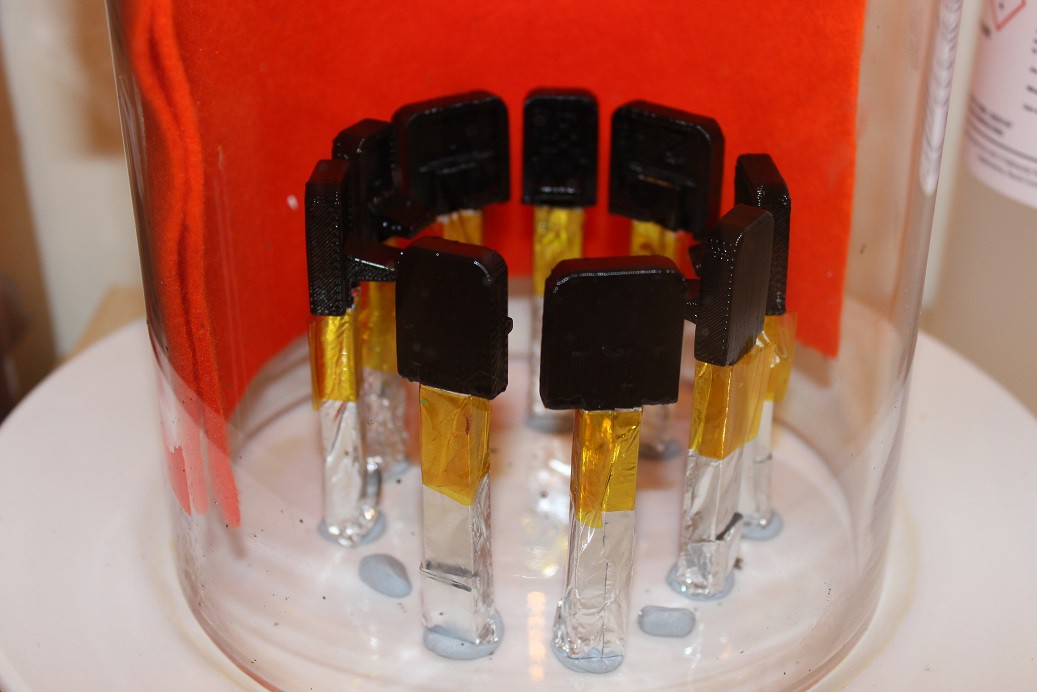
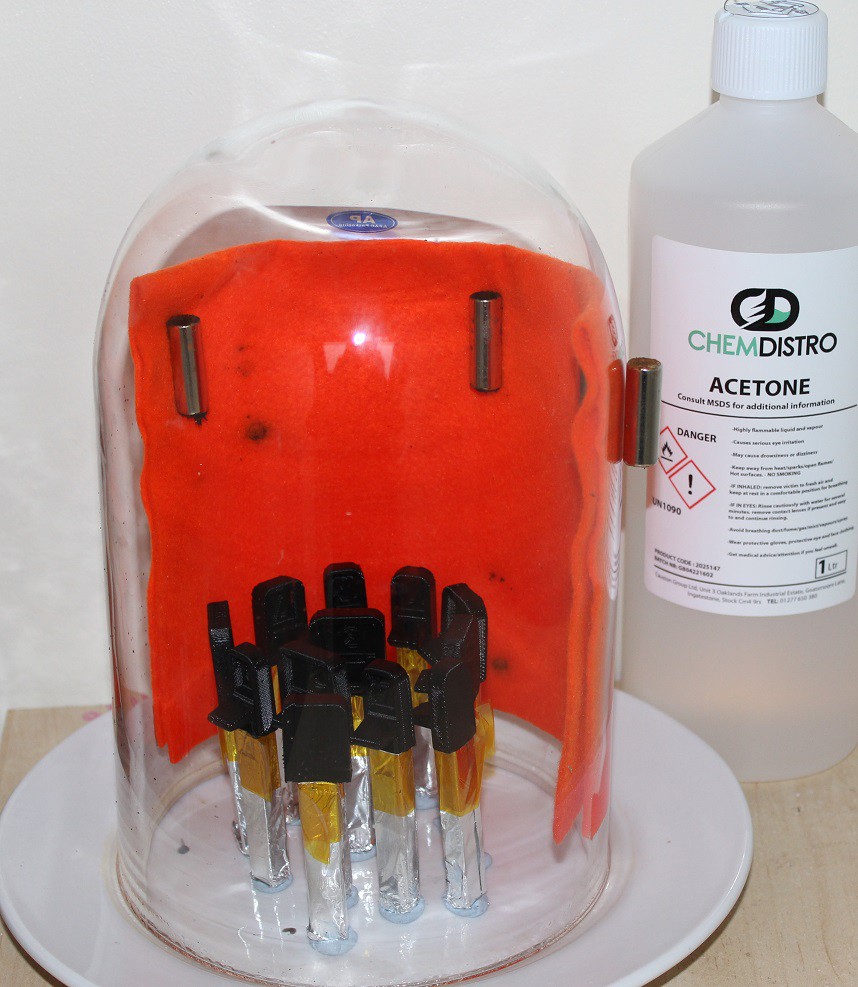
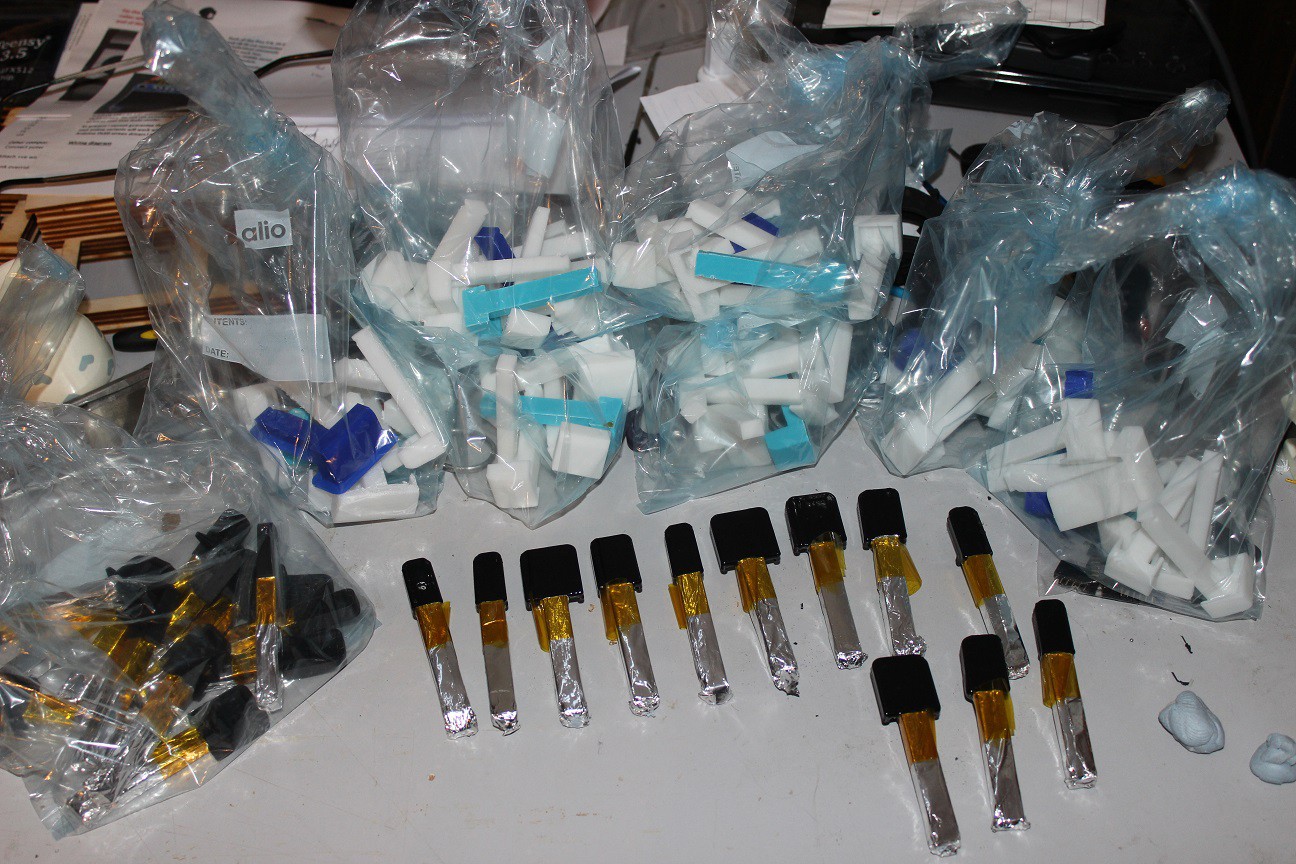
iv) Acetone polishing of the 3D printed keys: I want the stems to remain unchanged as they fit the slots in the wooden laser cut panels perfectly, but I do want the key ends to be smooth and shiny, i.e. I want to acetone vapour polish the ends of the keys only. The solution is to wrap the stems in aluminium foil before placing them into my vapour chanber.
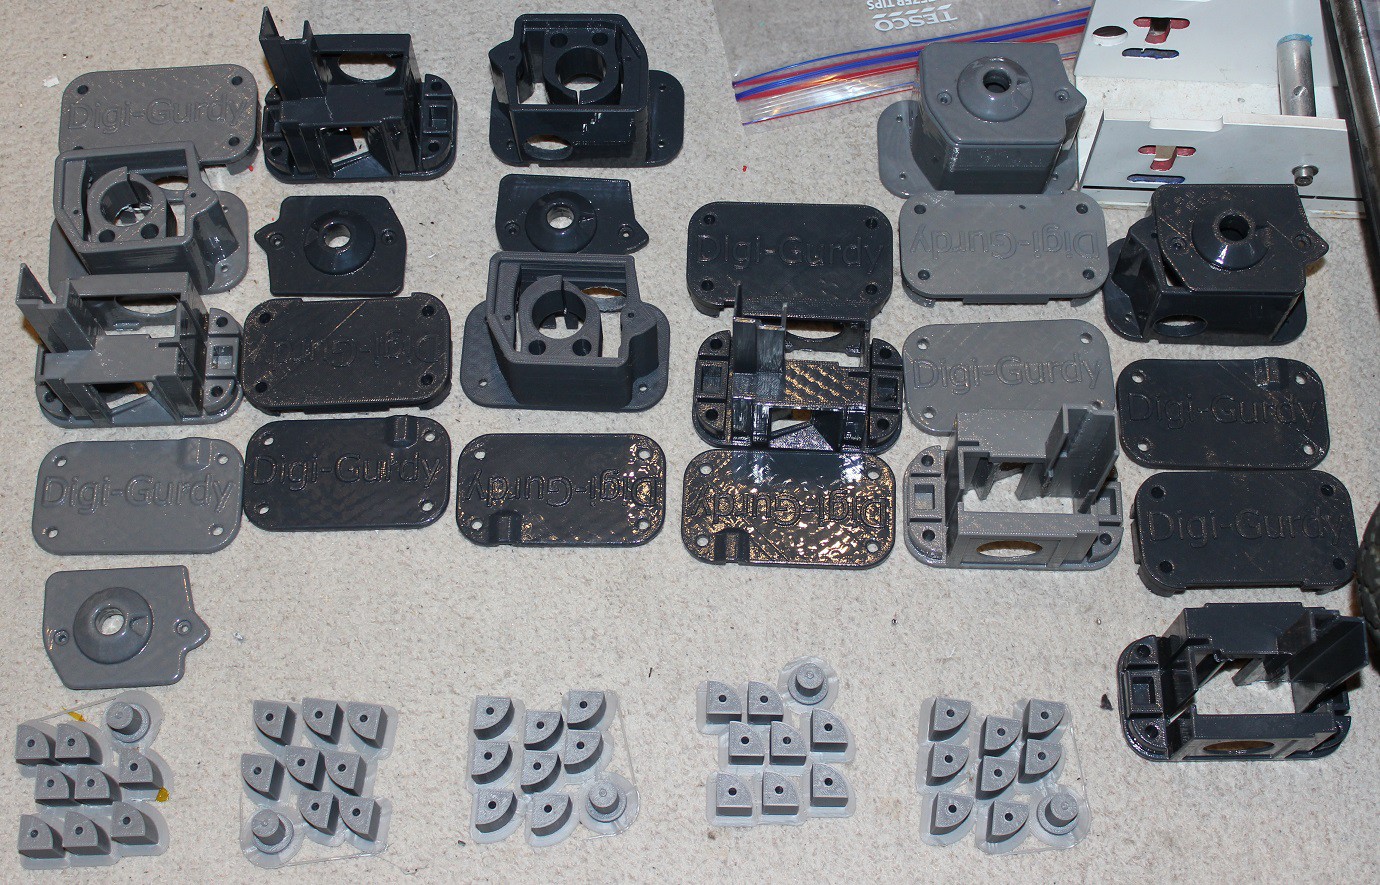
Despite using laser cut panels to reduce the amount of 3D printing, as you can see I have been on a 3D printing-fest for the past 3 weeks to produce all the parts required.
![]()
Have experimented with various pushbuttons, the gaming ones work best.
![]()
Just some of the acetone polished keys.
![]()
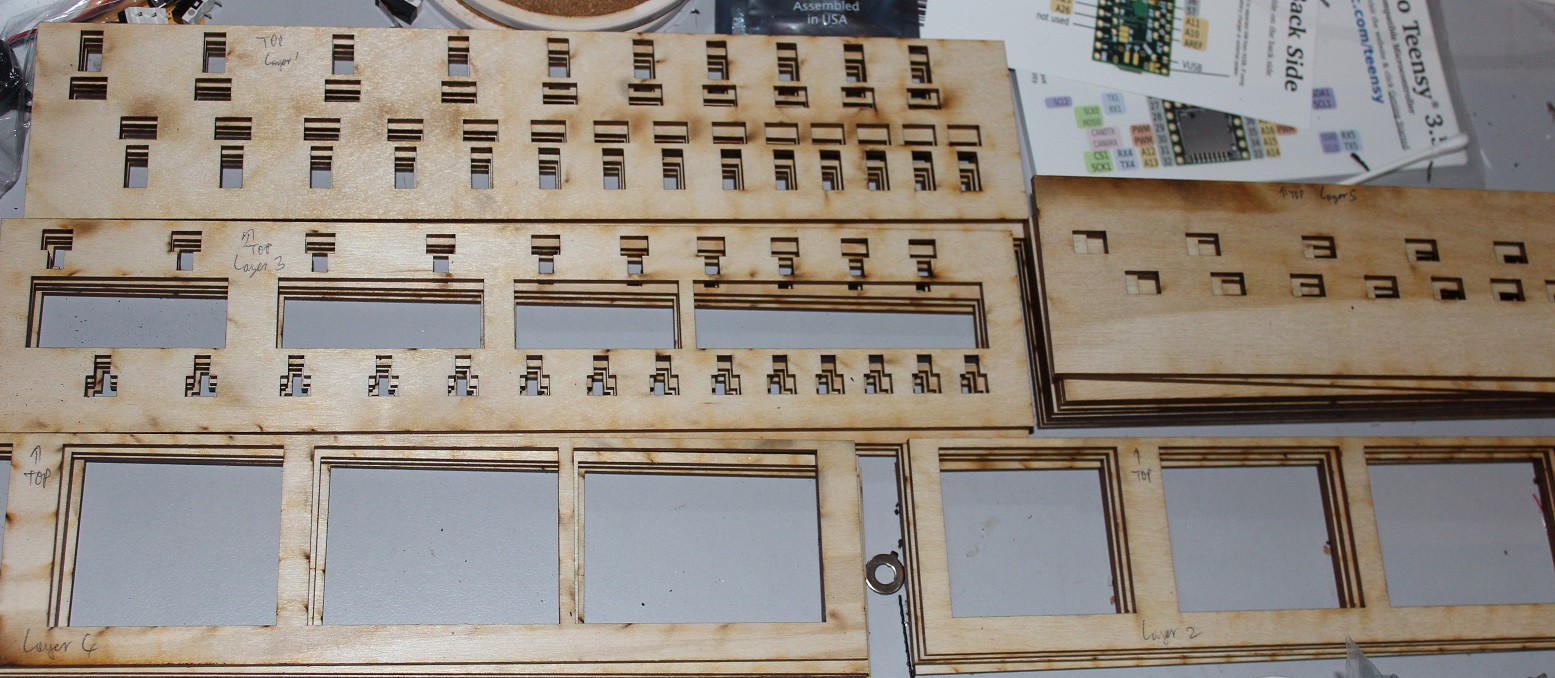
Some of the laser cut panels.
![]()
End structures and crank housings, printed and acetone polished.
![]()
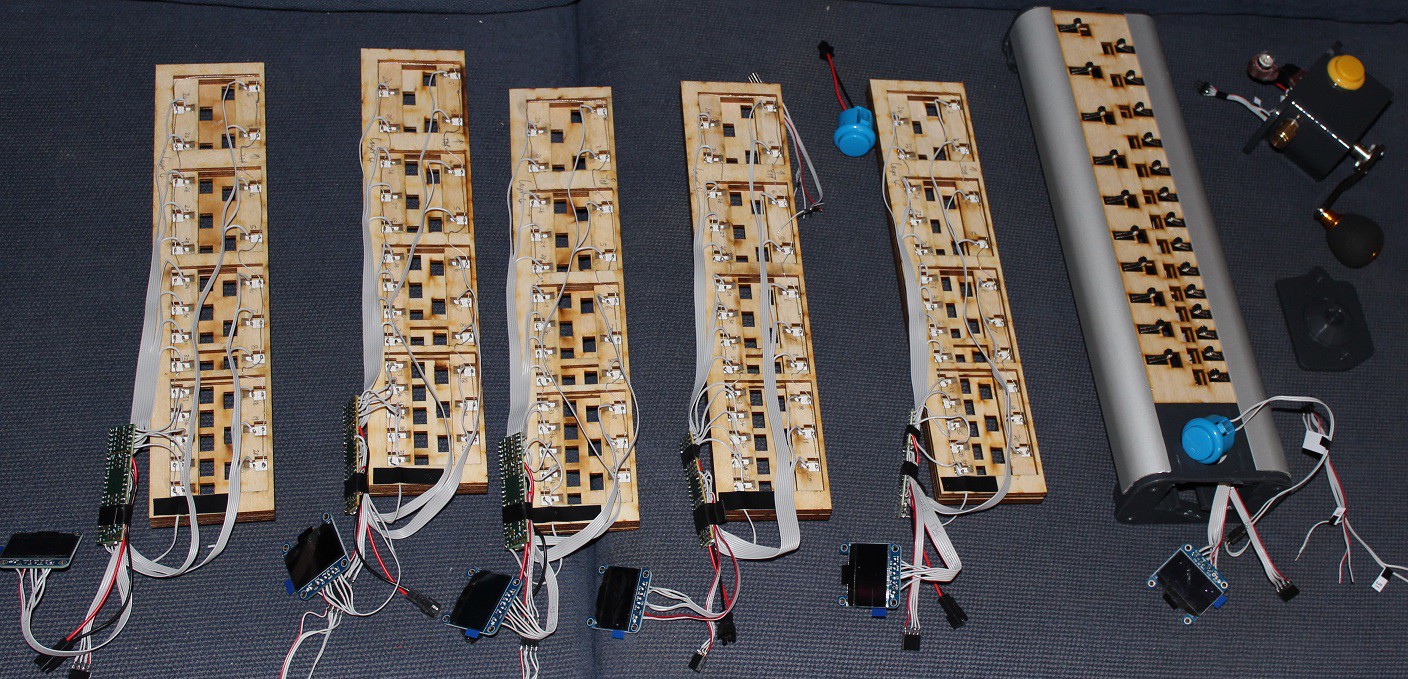
Six sets of microswitches mounted and wired up to Teensy boards along with the OLED screens.
![]()
Key-Henge. My acetone polishing rig. The felt is soaked with acetone and held to inside of glass bell with magnets.
![]()
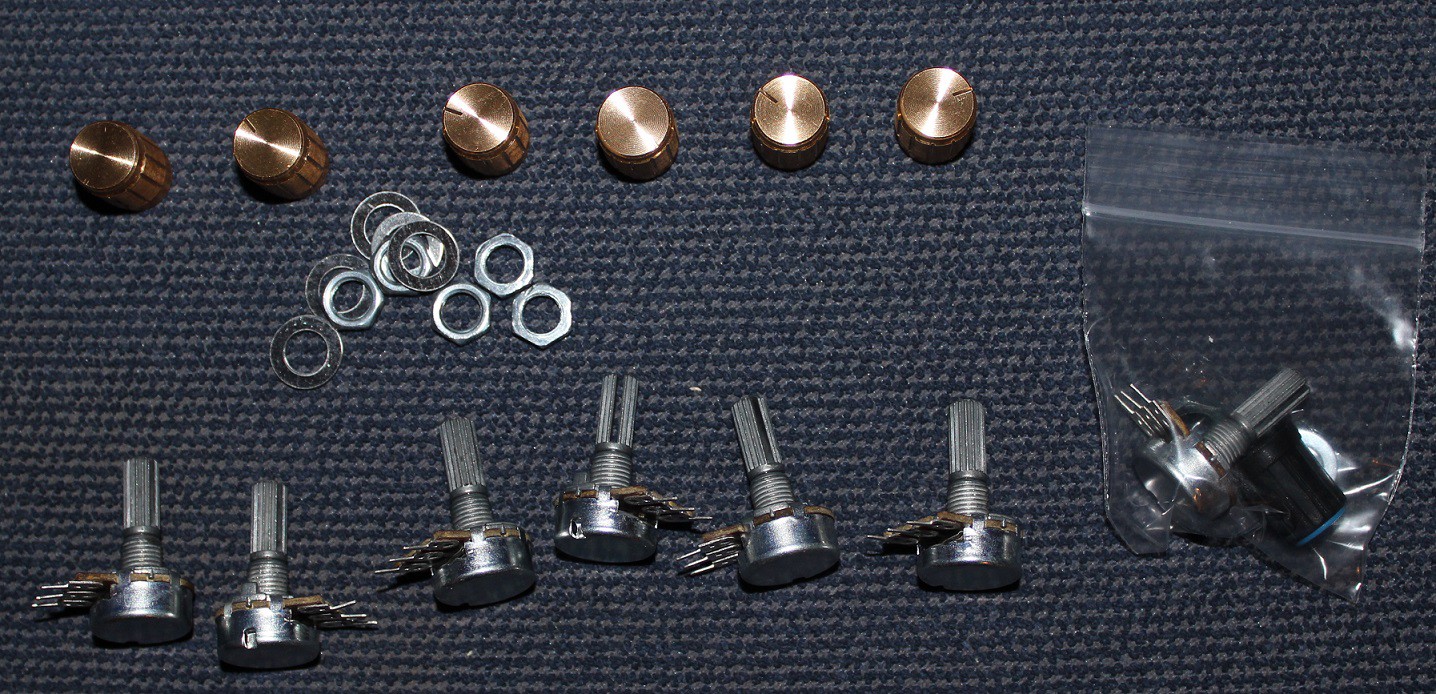
Some nice potentiometers with gold anodized knobs.
![]()
Alloy extrusions all cut to length.
![]()
Fishing reel handles from China.
![]()
Better photo of the acetone polishing rig.
![]()
Self contained crank module wiring now has multi-pin plug to connect it to main body of the DG.
![]()
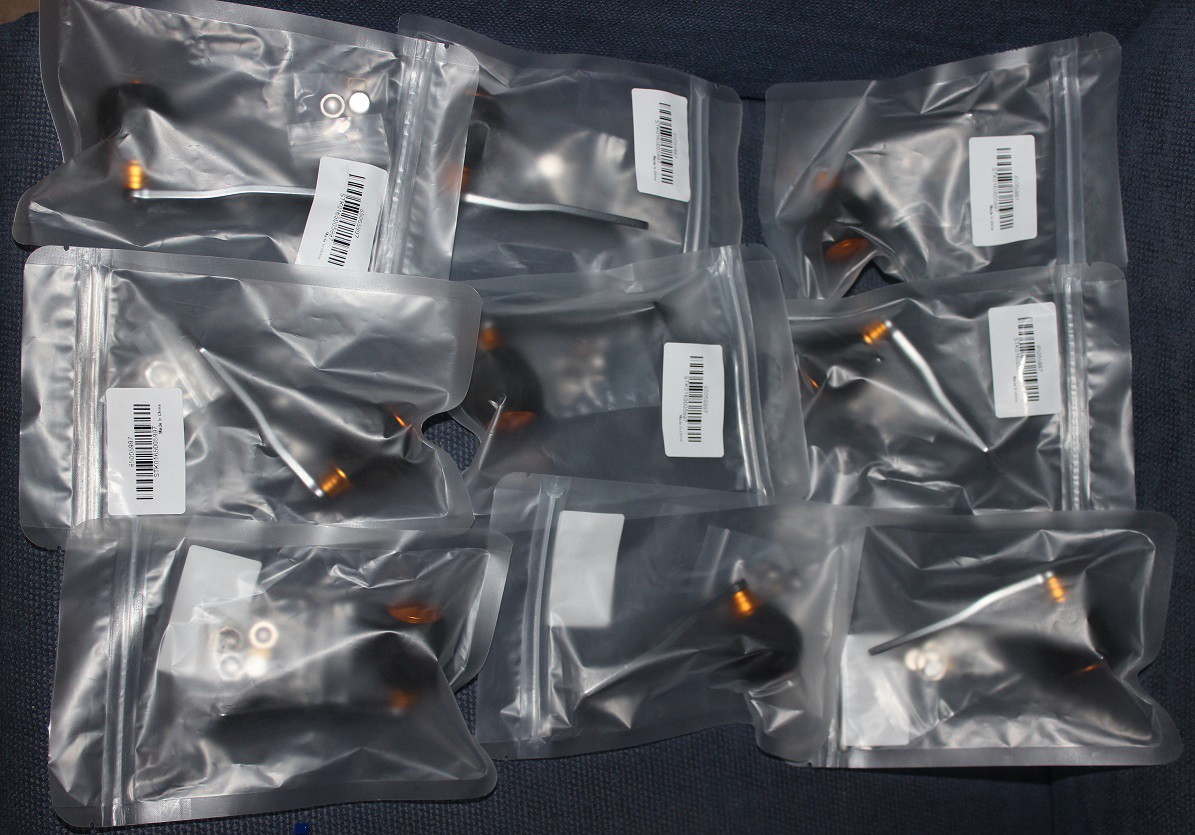
Bags and bags of 3D printed upper and lower keys, all of which are in the acetone polishing queue!
The Digi-Gurdy and Digi[Nerdy]Gurdy
MIDI electronic portable practice hurdy-gurdy: It's always in tune.