 Timescale
Last time, I finished the asset loader and the main loop. Now I want to take the stuff I loaded and so something with it, preferably displaying it inside the canvas element. So I'll be starting the game state data structure and a render engine that will take this state and display it graphically.
The game state basically is a scene and a bunch of objects. For the scene we hardcode the following. Eventually the final data structure will be loaded from the XML file.
sceneData['stage'] = 'scene'; // the graphic asset
sceneData['character'] = 'PittRivers'; // controllable character
sceneData['offsetX'] = 0; // scroll X
sceneData['offsetY'] = 0; // scroll Y
This array will probably not be so small in the future. meta files, layers and all sorts of mischief could go into here.
objectData.push(new Array());
objectData[objectData.length - 1]['name'] = "PittRivers" // in game name
objectData[objectData.length - 1]['asset'] = "pittStanding" // graphic asset
objectData[objectData.length - 1]['type'] = "character"
objectData[objectData.length - 1]['hidden'] = false;
objectData[objectData.length - 1]['x'] = 35;
objectData[objectData.length - 1]['y'] = 165;
objectData[objectData.length - 1]['anchorX'] = 15; // Where is his middle
objectData[objectData.length - 1]['anchorY'] = 45; // Where are his feet!
objectData[objectData.length - 1]['fixed'] = false;
This is the basic object. it also has a lookup table for, but this is basically all that is needed to render a scene with the objects in it. That looks something like this!
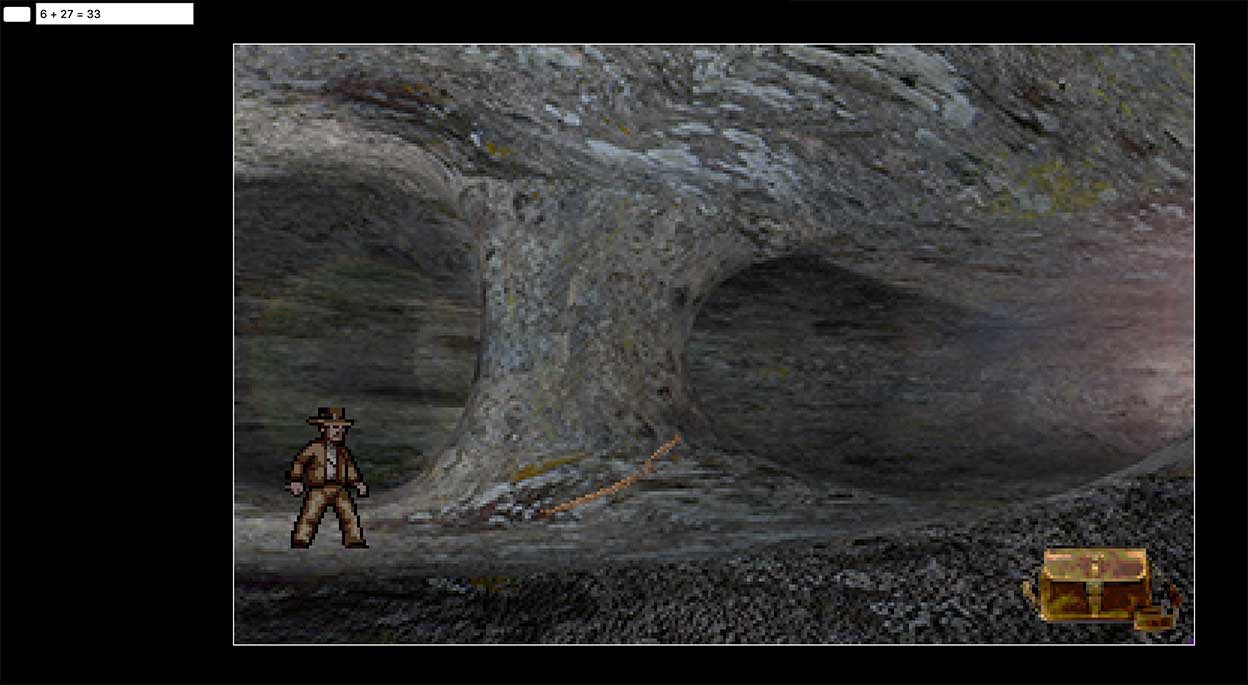
Here you can see the scene with 3 elements, Pitt Rivers, The stick in the middle and the bag which is a fixed object. You might think that I left out a few steps, but in reality I did manage to re-purpose some code from the earlier attempt as well as my online image editor to quickly implement the drawing function which looks a bit like this.
function draw(x,y,tileName){
    var tileID = assetPointer[tileName];
    // Draw graphic at position in the scene
    for(tileX = 0; tileX < sceneGraphics[tileID].width; tileX++){
        if (tileX + x < 320 && tileX + x >= 0){
            for(tileY = 0; tileY < sceneGraphics[tileID].height; tileY++){
	        var curPixel = (tileY *  sceneGraphics[tileID].width + tileX) * 4,
		    curScreenPixel = ((tileY + y) * 320 + (tileX + x)) * 4;
		if (sceneGraphics[tileID].data[curPixel + 3] > 16){
		    imgdata.data[curScreenPixel + 0] = sceneGraphics[tileID].data[curPixel + 0];
		    imgdata.data[curScreenPixel + 1] = sceneGraphics[tileID].data[curPixel + 1];
		    imgdata.data[curScreenPixel + 2] = sceneGraphics[tileID].data[curPixel + 2];
                }
	    }
        }
    }
}
This is the basic function I use to write the graphics onto the scene. Of course this will not stay this short (and readable), but really this is all that is needed to draw the scene, characters and objects. It uses the alpha channel to "cut out" the objects. I could use the alpha channel more granularly, giving the object opacity, but I think opacity should be an attribute in the data structure. Of course for things like car windows, selective alpha would be nice and that will probably be included in this function at one point with the general (controllable) opacity attribute.
Note in the screenshot the numbers in the upper left corner. The last number is the total of the 33th of a second. The first number however is the time that the render engine takes to draw a frame in that 33th of a second. This means that we have cycles to burn for more rendering and of course the state engine which actually is the game! I still find it amazing that in browser Javascript performs this well.
In the next log, I hope to have added some user input and I'll be implementing the masking functions. At this point, I have not coded myself into some corner.
Discussions
Become a Hackaday.io Member
Create an account to leave a comment. Already have an account? Log In.