 Drew Pilcher
I've been working on this turret off and on for over 5 years. I hit a huge milestone on May 29th 2019. The turret successfully tracked and shot down a Tiny Whoop (micro drone)! The next day I set the turret up in my living room and captured some footage of it in action, which you can see above.
This is a huge project, so I broke it down into several sub-projects, which I tackled one at a time. These are:
- 2 Axis Gimbal
- Gimbal Electronics
- Lidar Tracking (Xbox Kinect V2)
- PC Application (getting everything to play nice, adding a GUI, etc)
- Nerf Blaster Mount and Auto-Loader
See below for details on each sub-project, as well as cad models, code, and the bill of materials.
2 Axis Gimbal
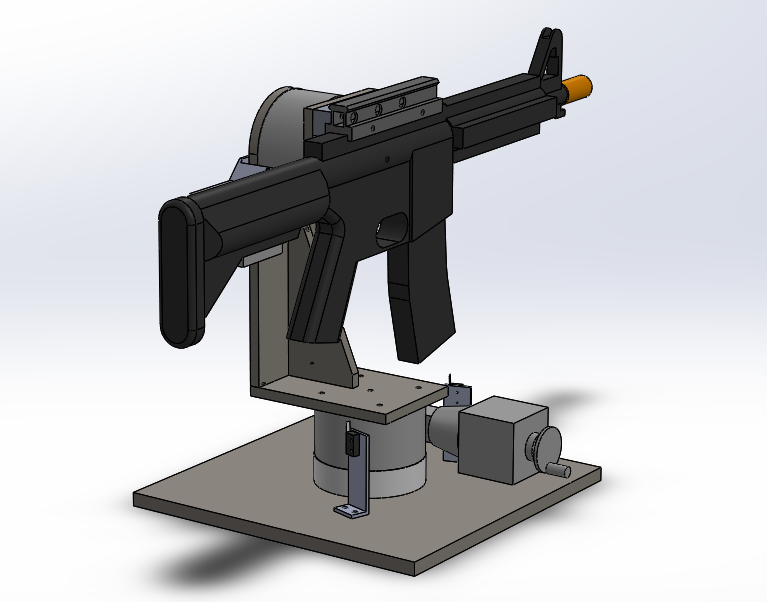
This project started with the gimbal, which I designed in solidworks. (Originally the turret was intended to mount an airsoft gun).
I decided to make the whole thing out of steel just to try working with a new material. I've used mostly aluminum before this.
I didn't take many pics of the process, but basically all the parts can be cut from steel plate. I used 1/2 for the base and 3/8 for the moving parts. It took a while, but I cut them all out on a CNC mill after work.
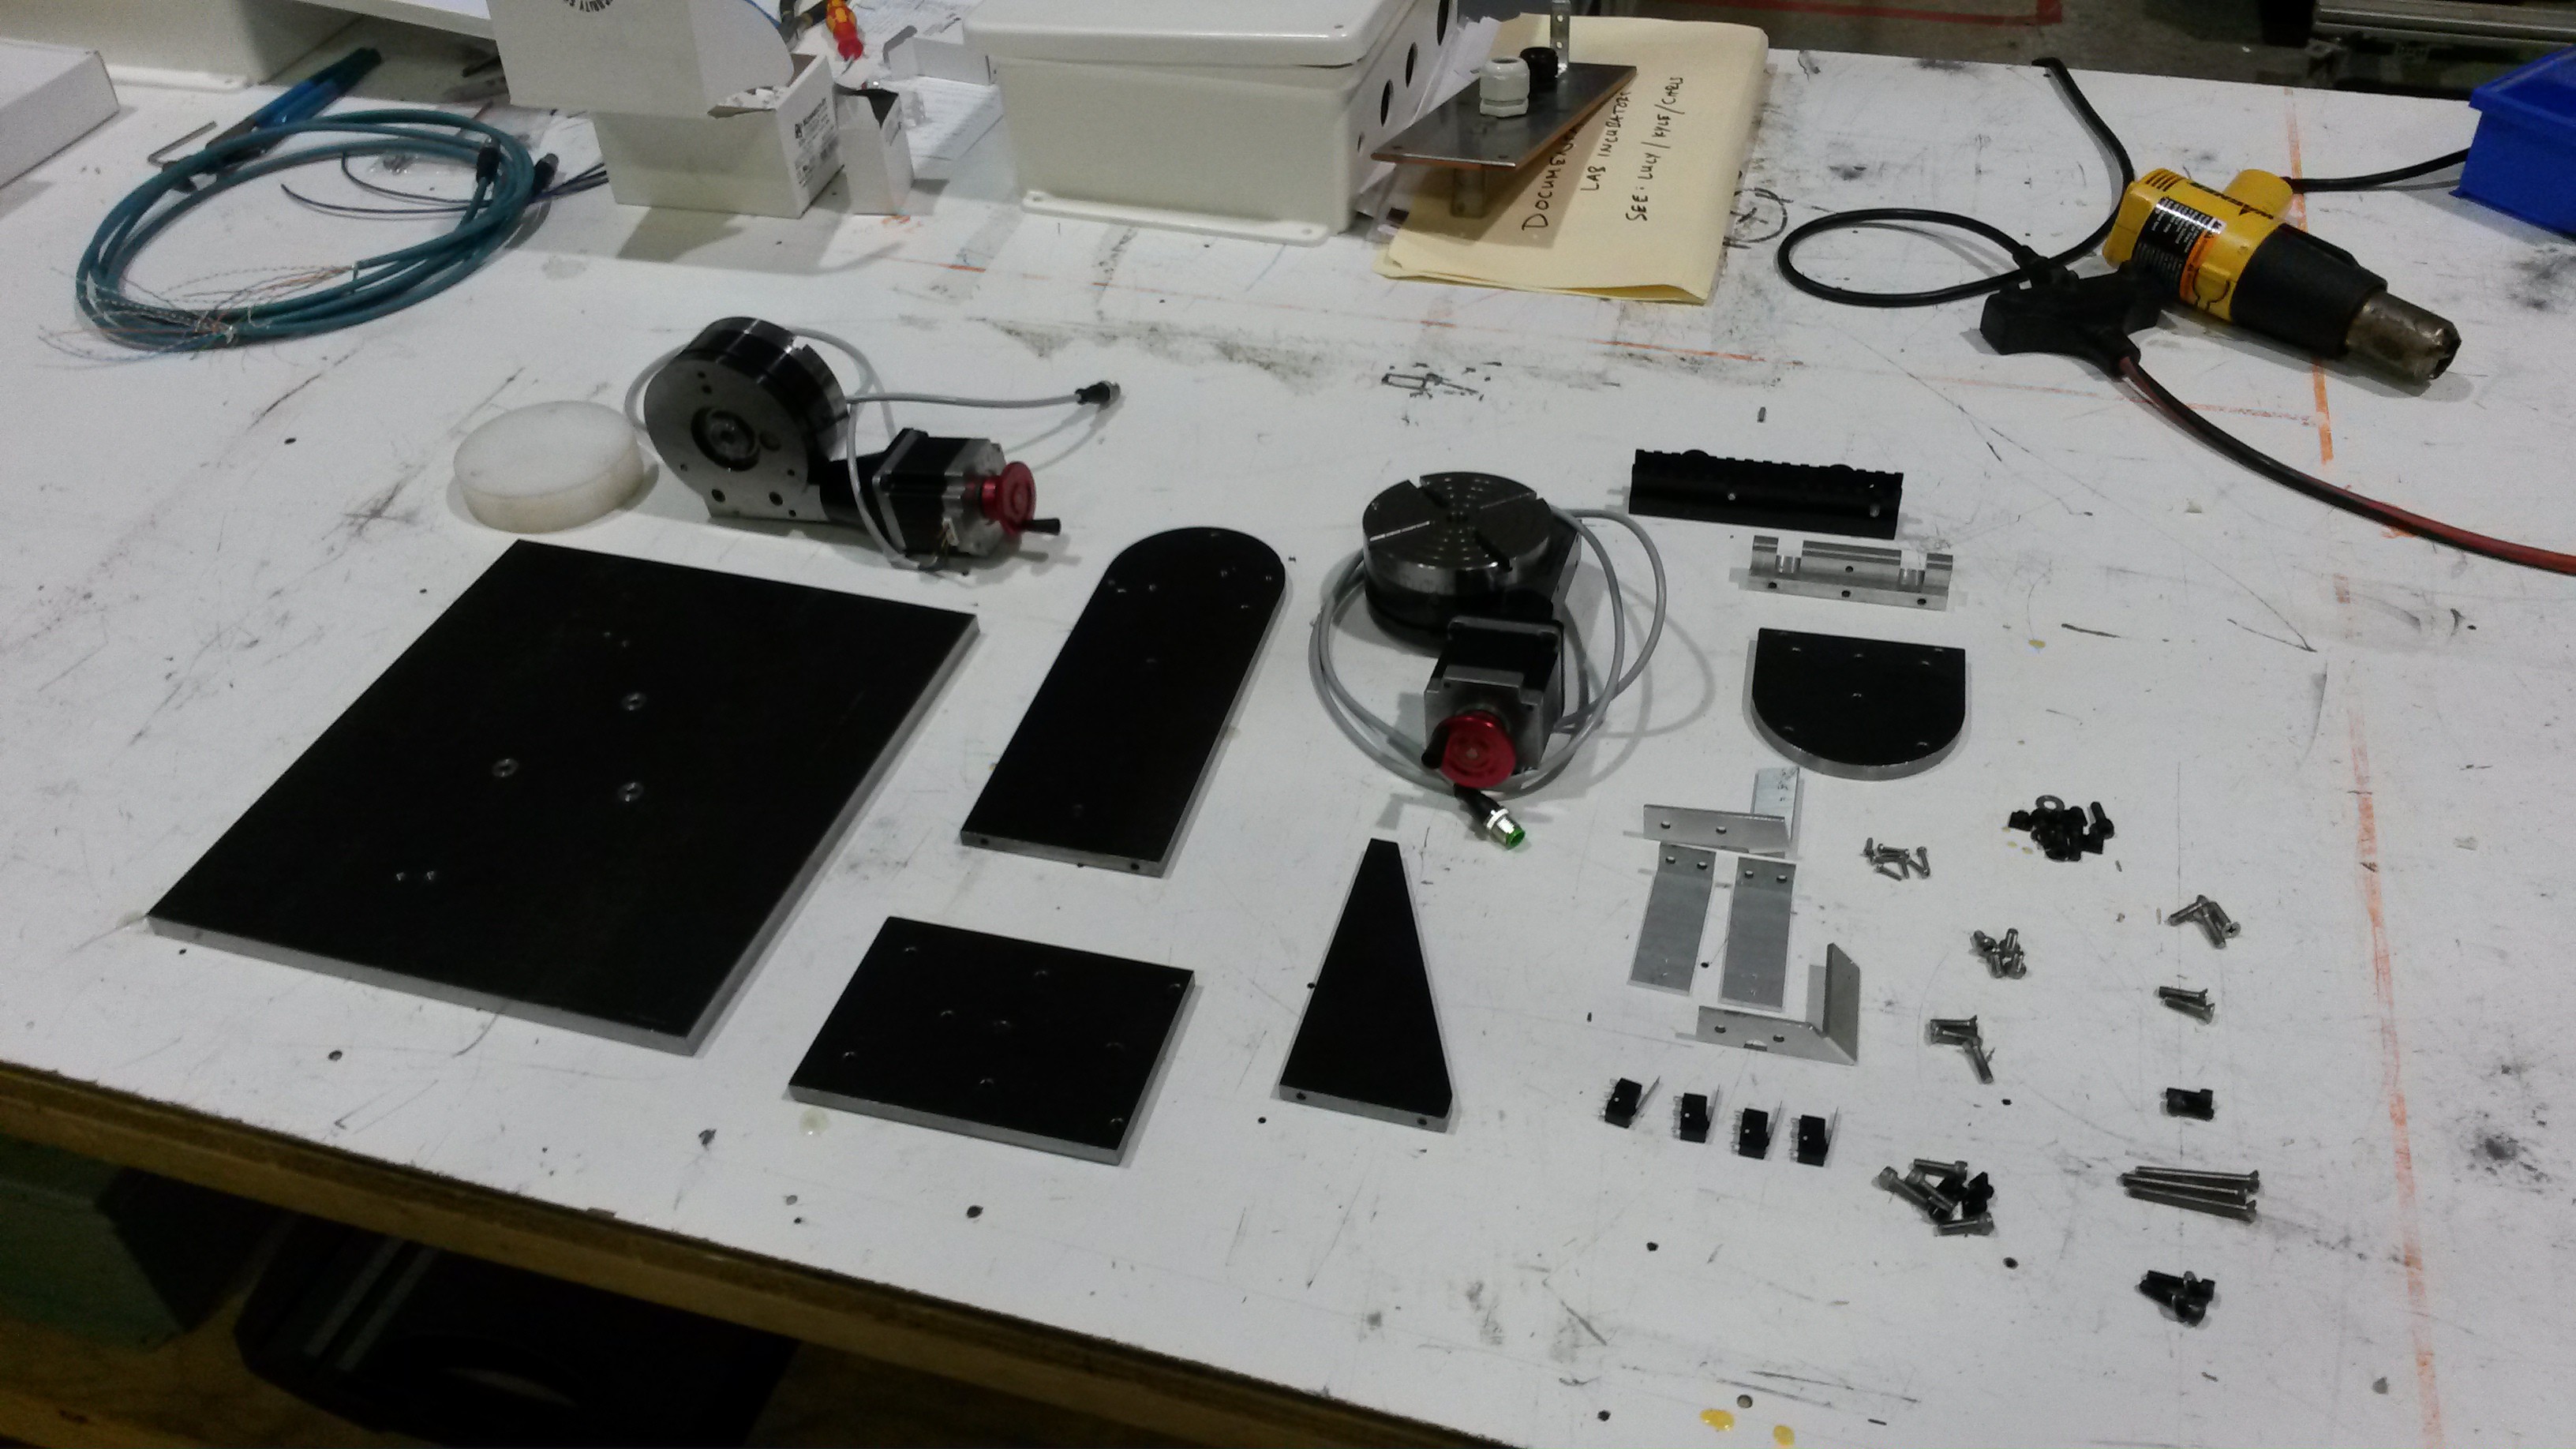
Each axis uses a Sherline 4" CNC rotary table as both the bearing and drive mechanism. They weren't cheap, at $375 each, but they give the turret extremely good rigidity and durability. They're also stupidly accurate for this purpose, with a full step resolution of 1/40th of 1 degree.
Everything basically fit on the first assembly, which is amazing!
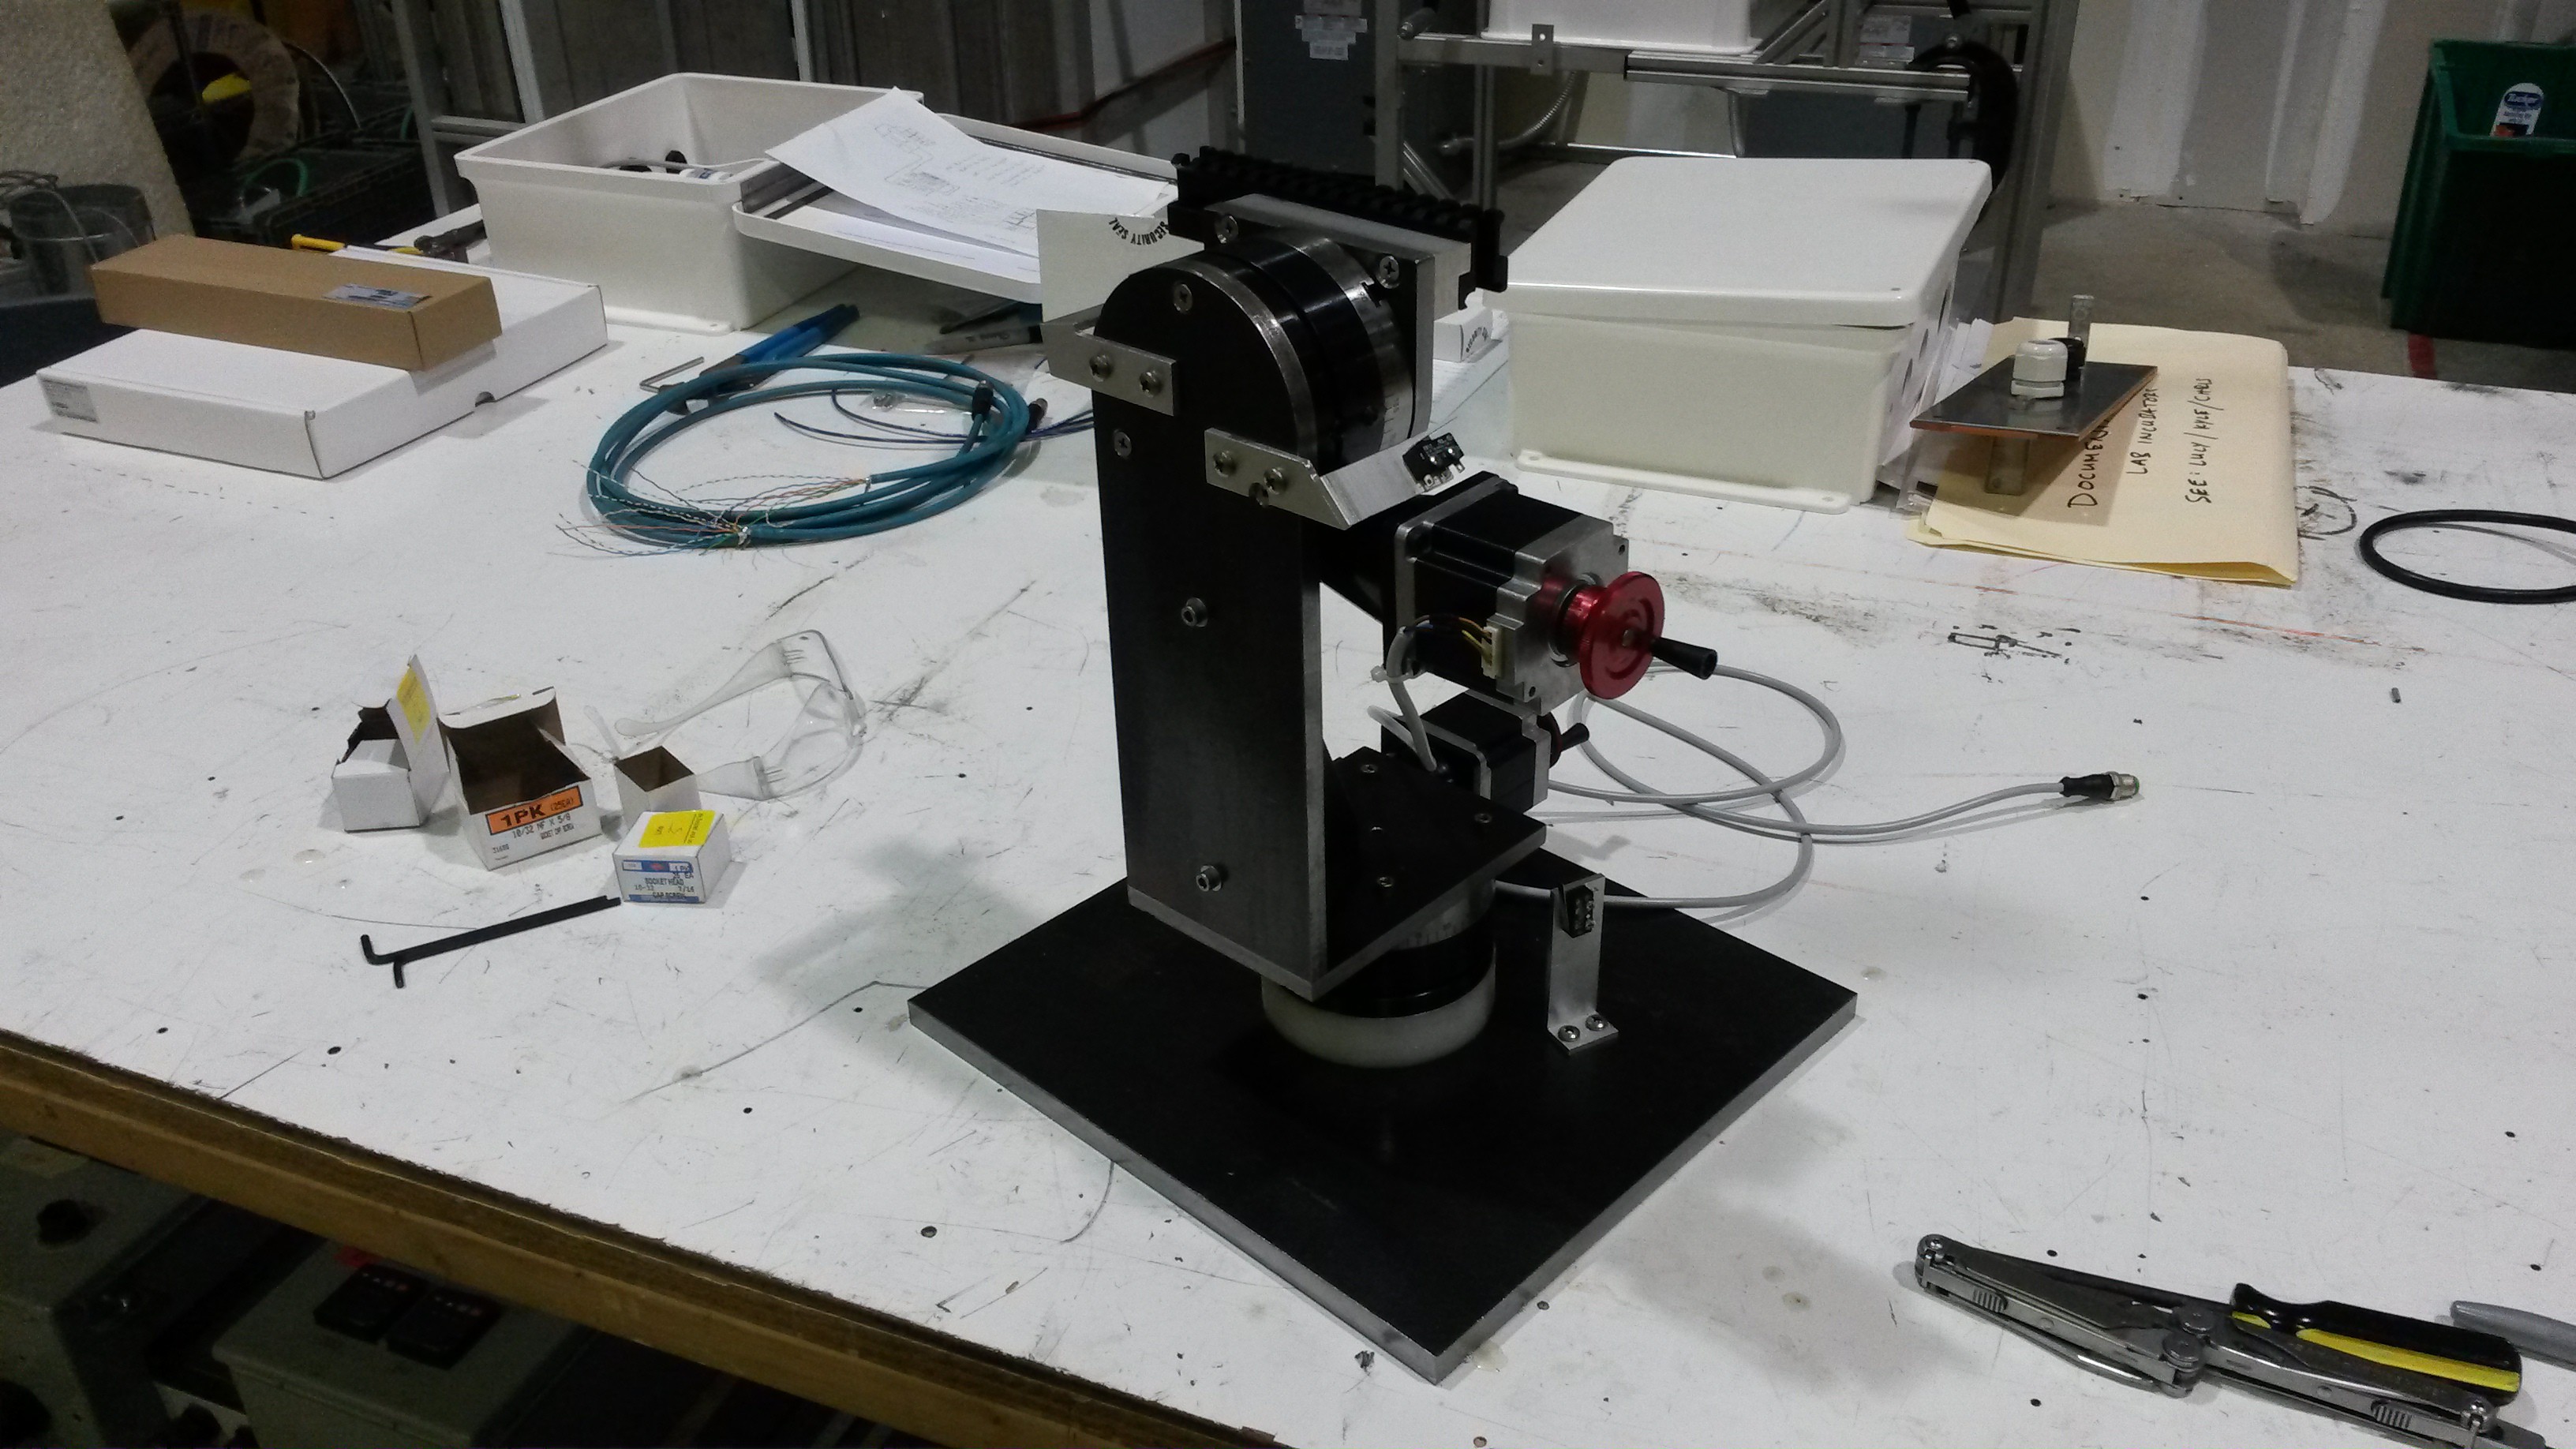
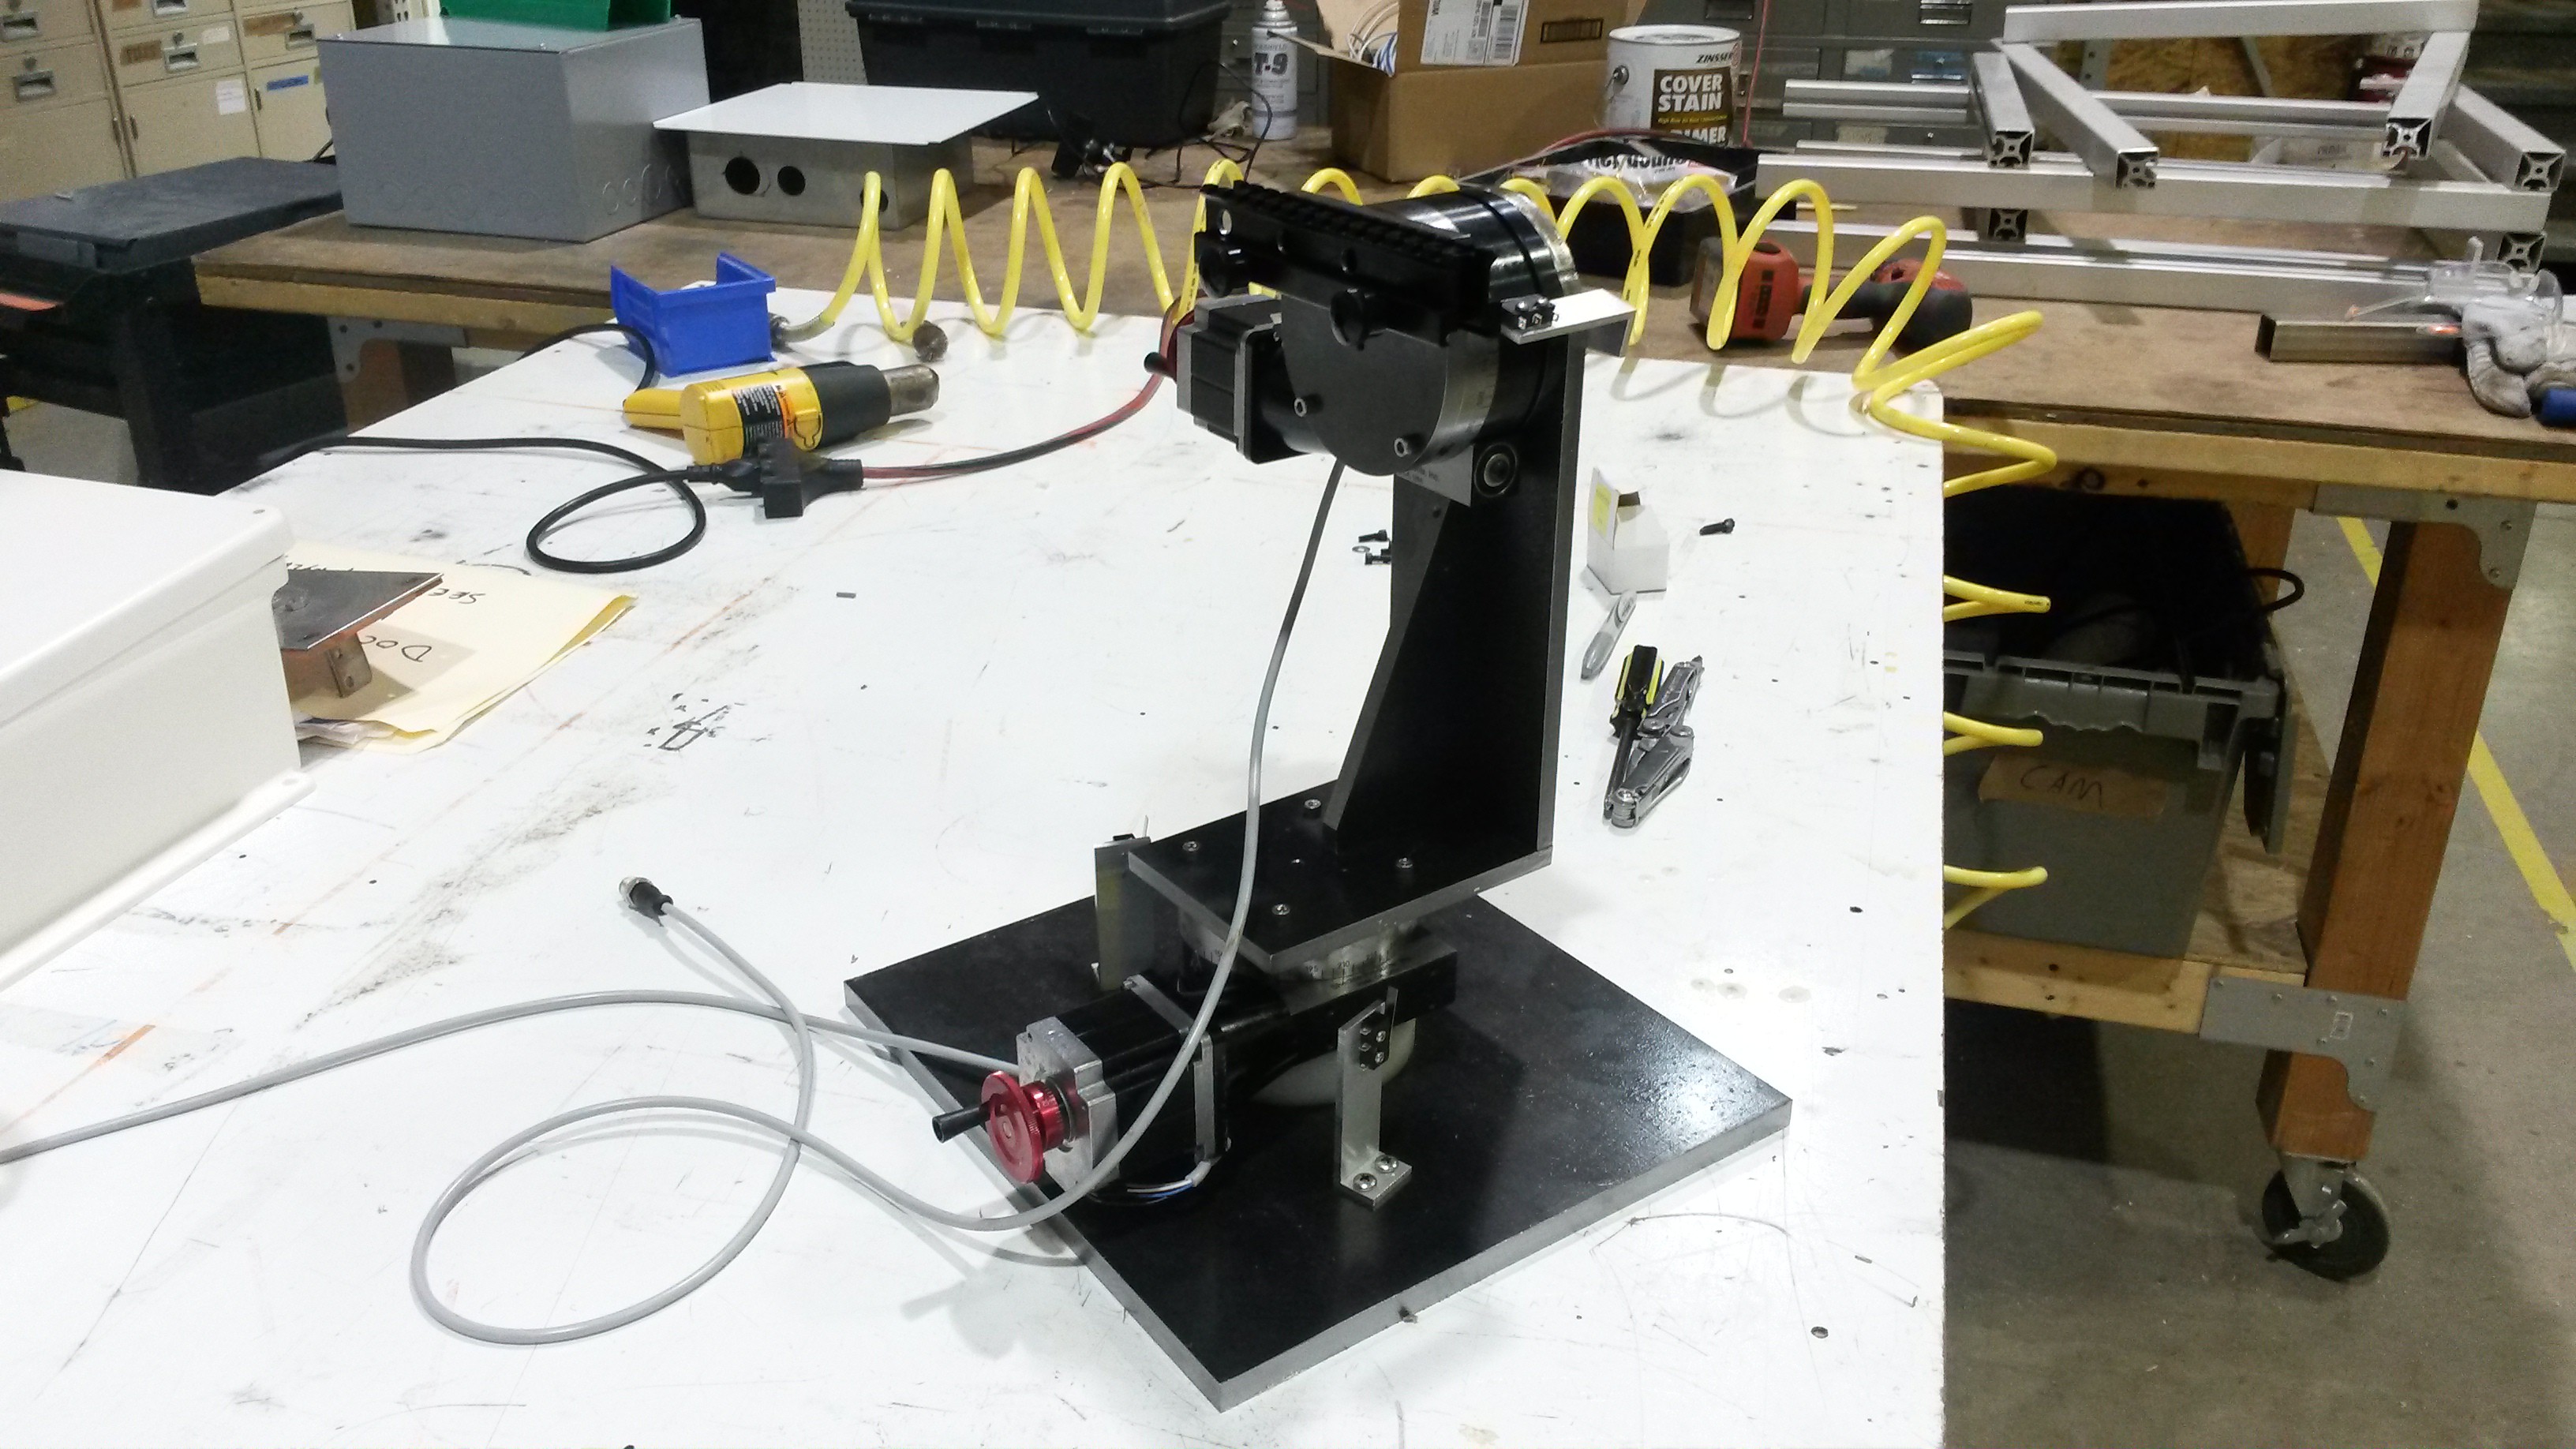
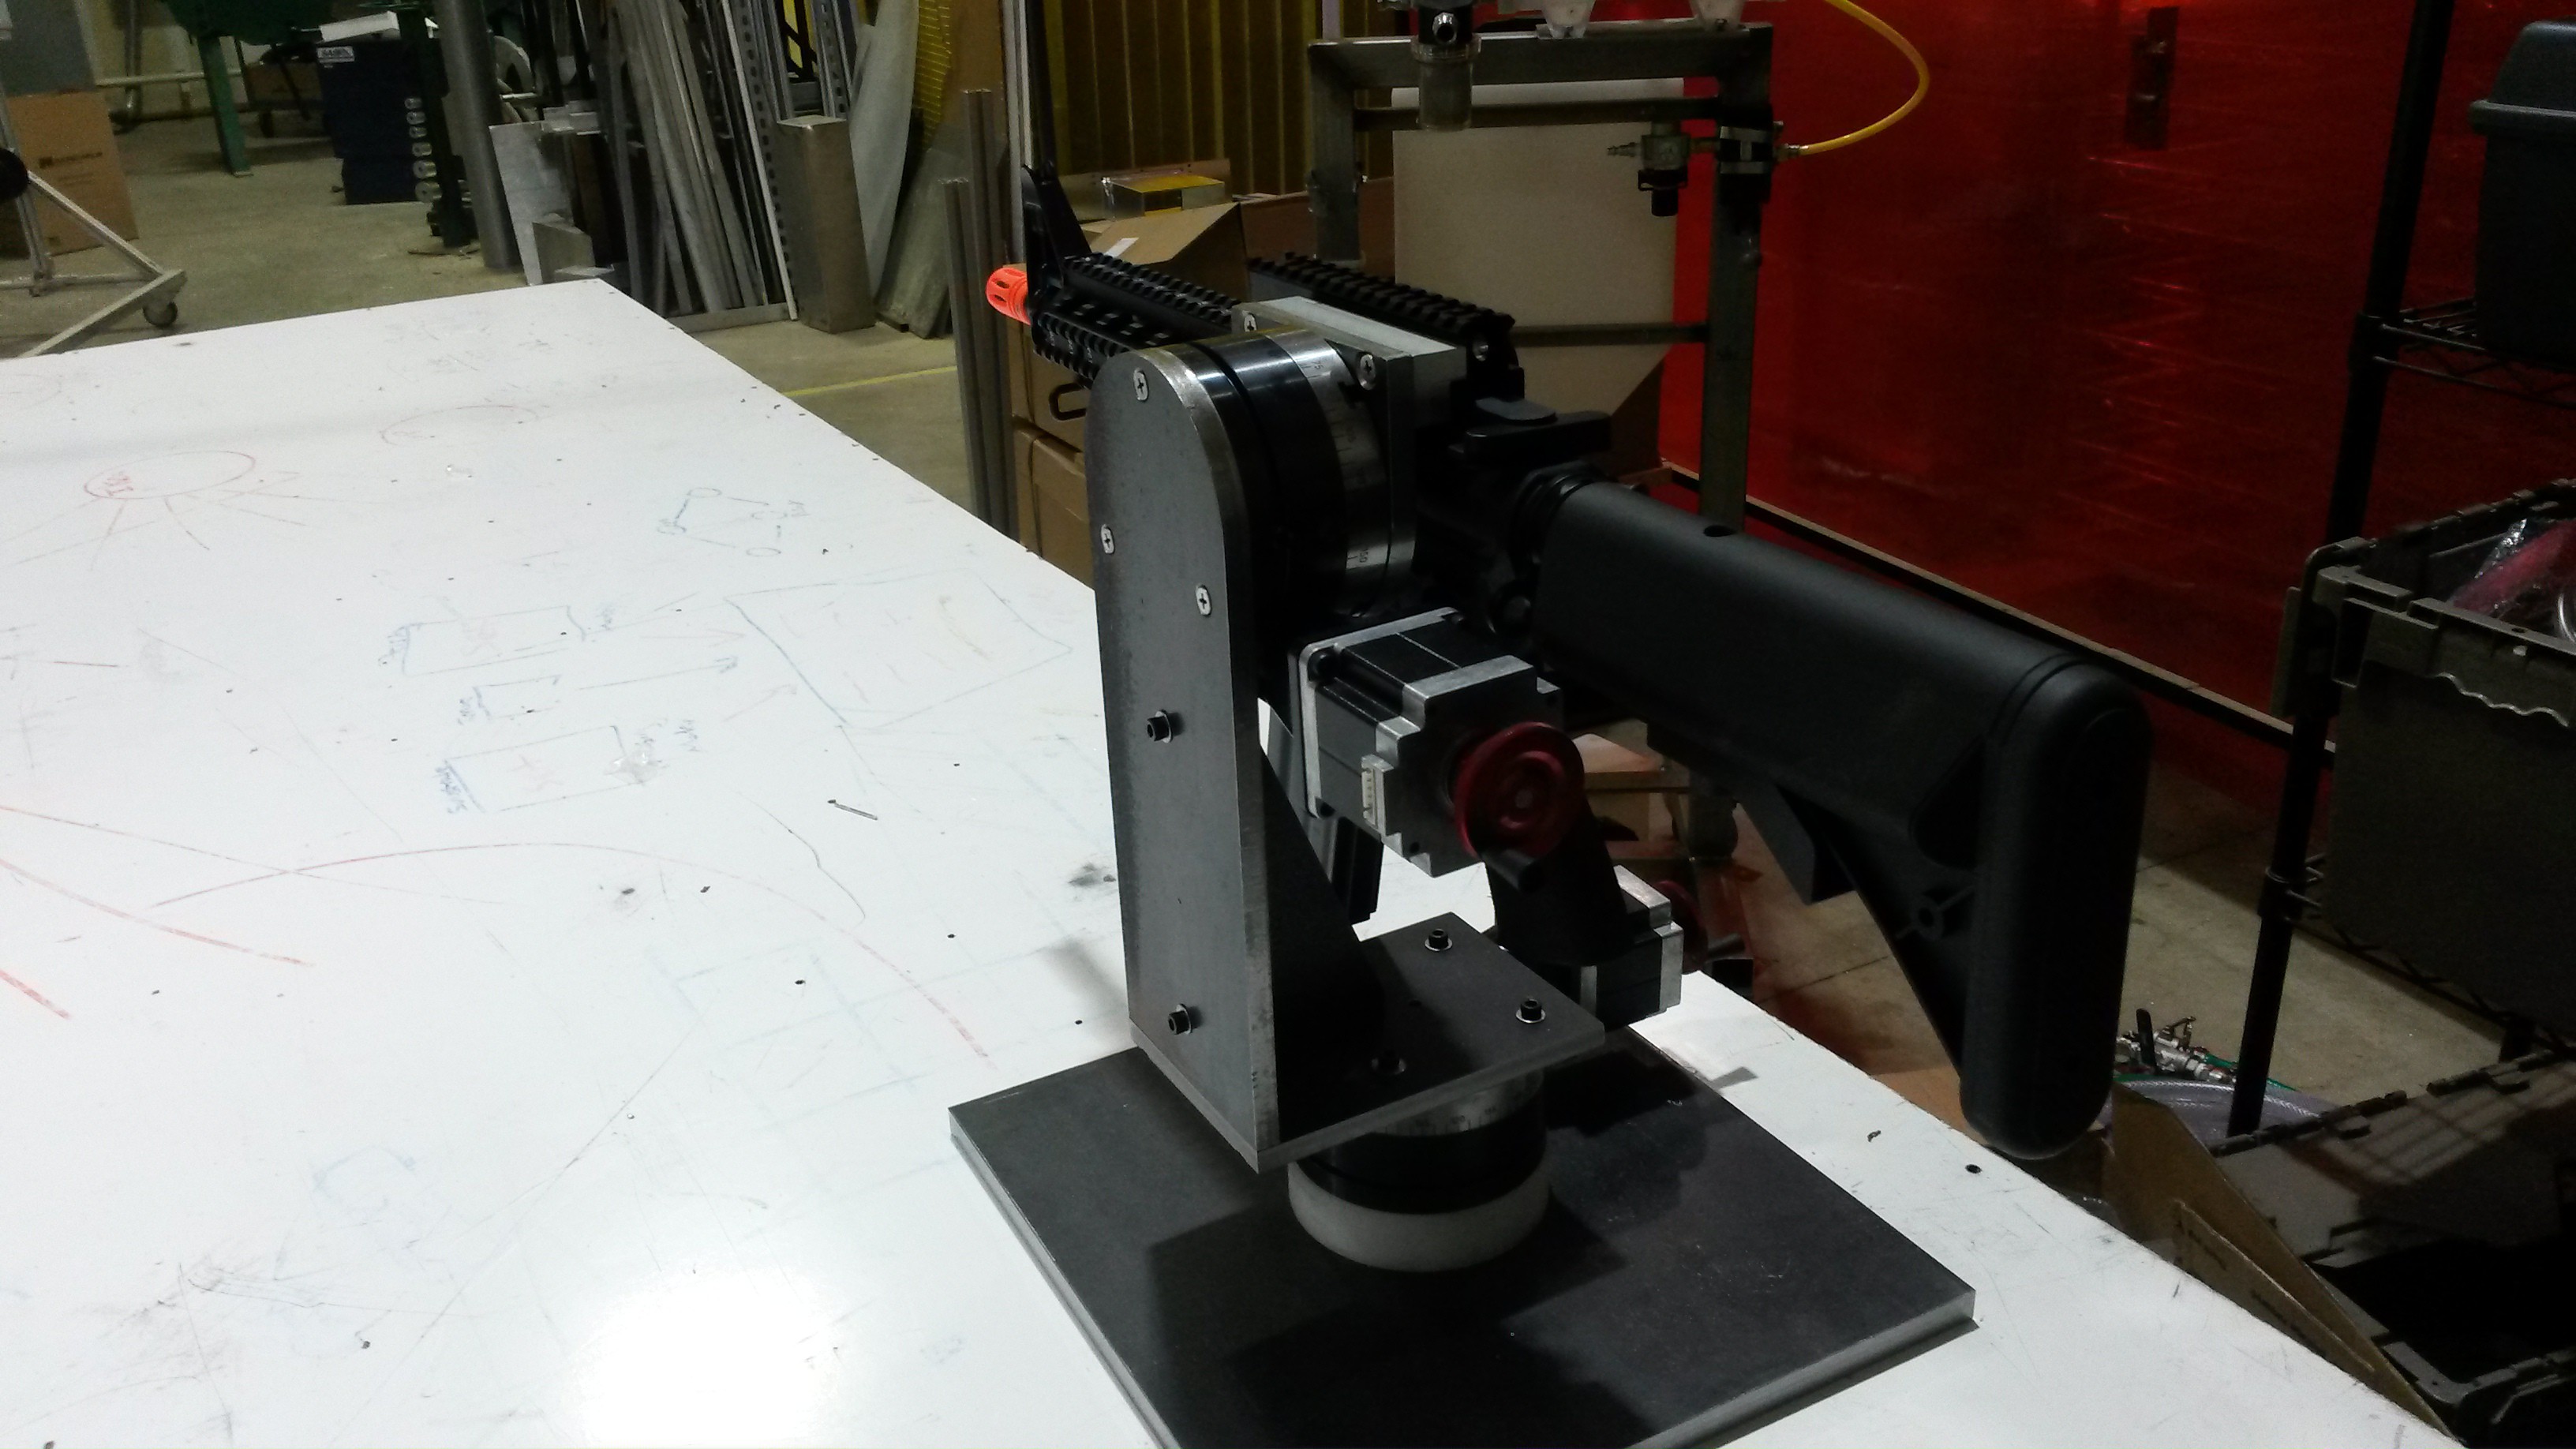
I couldn't resist throwing the airsoft gun on there just to check the fit. It looks wicked! And if you try to wiggle the gun barrel, the whole thing feels like one solid object; it's that rigid. The rotary tables were a good choice.
It's at this point that I realized that I should have checked the mass of this design in solidworks. Because now that it's done, it weighs a whopping 52lbs! and it doesn't even have handles. But oh well.. at least it's extremely stable. :)
Gimbal Electronics
I decided to pair the Sherline rotary tables with a CNC stepper controller.
I went with the BC2D20 from Peter Norberg Consulting. It supports 2 motors with adjustable current up to 2A, and it's controlled with serial commands (using a built-in USB-serial adapter). It supports limit switches, goto commands, acceleration and speed limits, and many other things useful for CNC.
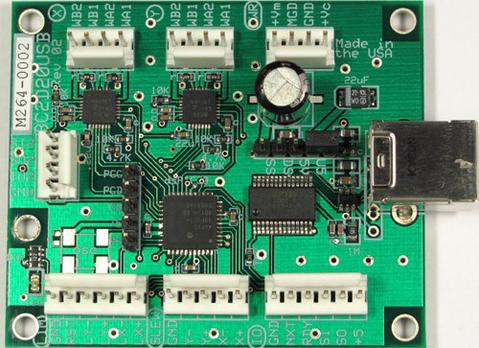
I could have gone with something cheaper but with the amount of time I had invested in this project it seemed sensible to not skimp on the controller.
I followed the manual's recommendation on the power supply, and went with a Rhino 24V 4.17A from Automation Direct (they're great). I mounted these along with a few other miscellaneous components in a cheap electrical enclosure from Amazon.
Here you can see everything mounted:
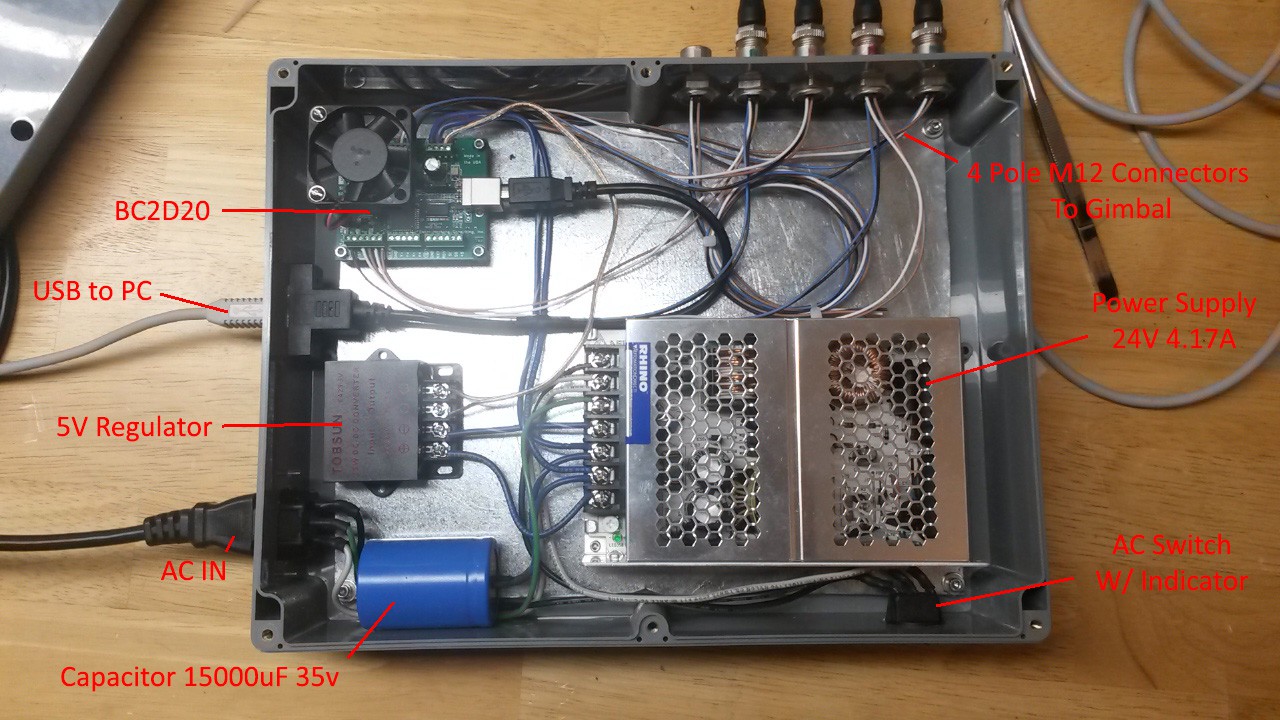
The capacitor was recommended by the manual. One interesting thing is the connectors. They're 4-Pole M12's. I use them whenever I can, since they're durable, and pretty cheap for how awesome they are.
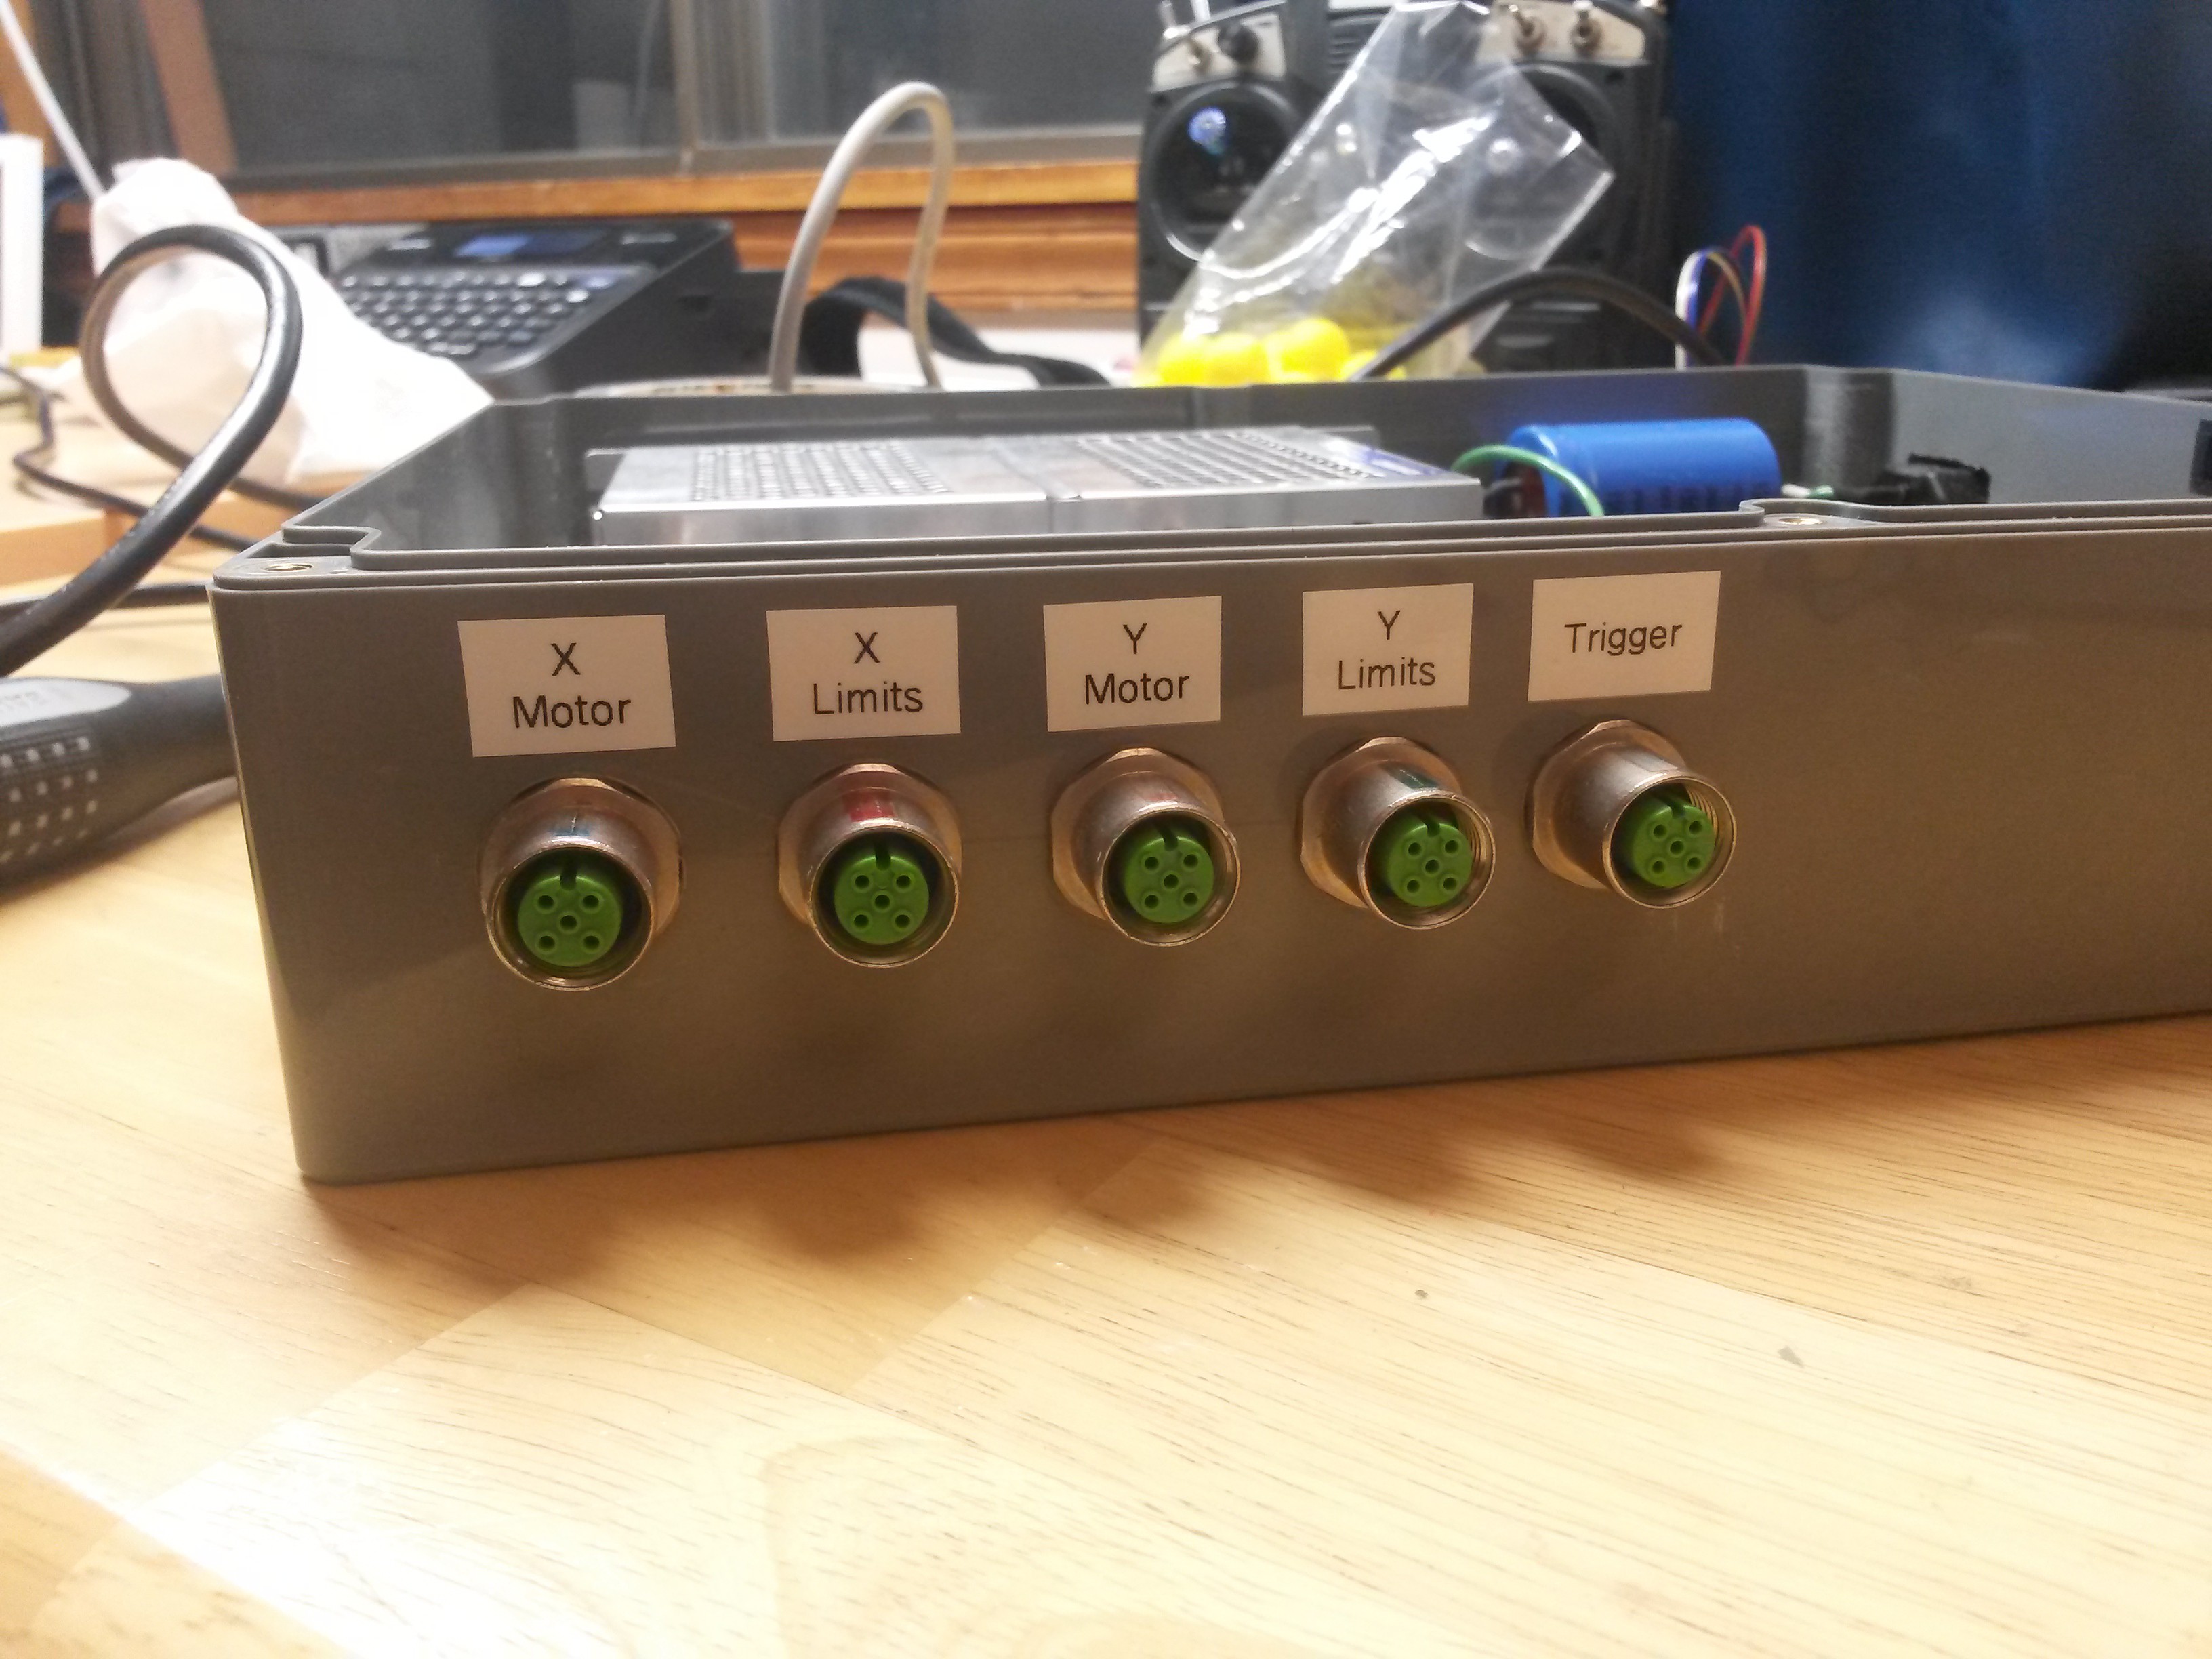
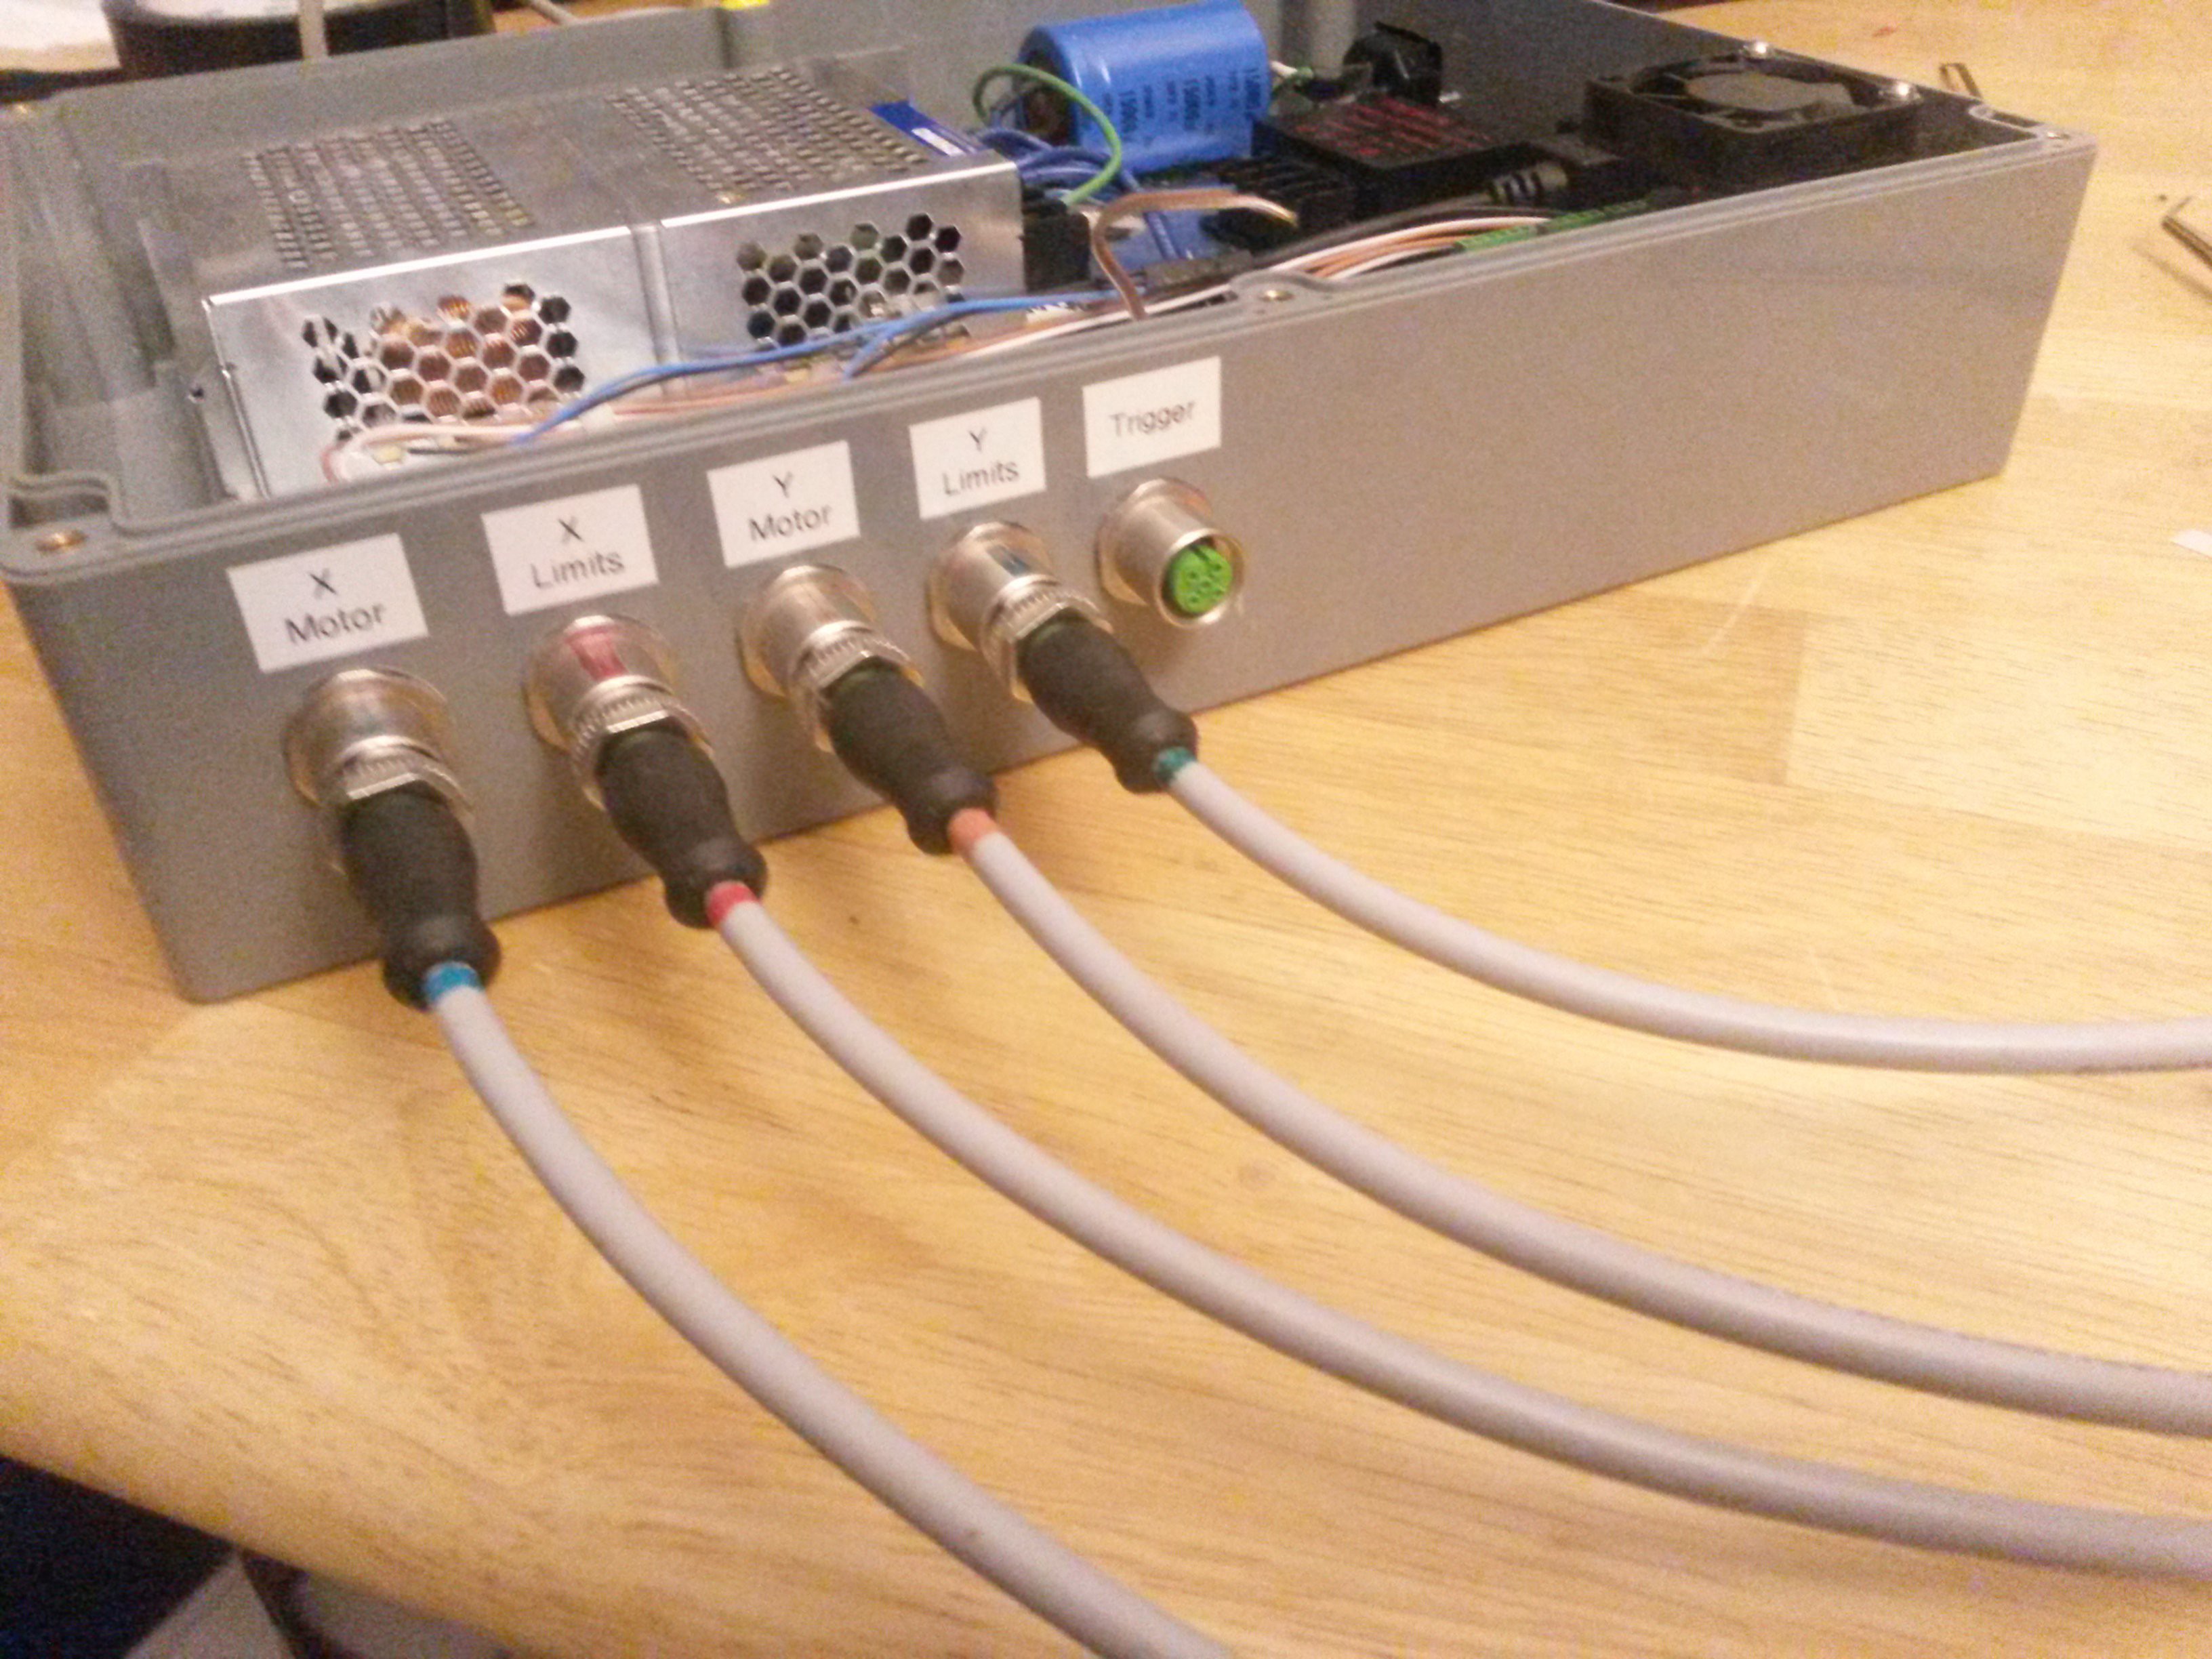 Links: Bulkhead Connectors Cables
With the cabinet assembled, I connected to the stepper board and tentatively moved the turret around a little bit. One nice thing about this board, is it's not too hard to type commands into a terminal manually and get the turret to do stuff.
Curiosity satisfied, I went on to configure the limit switches and current setting. From there I was able to write a simple python script to ping of the limits and "zero" the turret.
It's ALIVE!!!
Lidar Tracking
This project sat on the shelf for a few years at this point. I experimented with several video camera based tracking systems throughout that time, but the performance was always so-so.
Then, a while back I bought an Xbox Kinect V2 for $30 on a whim. It sat on the shelf for a good year before I got around to trying it out. ..Well I shouldn't have waited so long, because the performance was exceptional! Seriously this thing is a marvel of engineering. It provides a 512x424 pixel depth image at a snappy 30hz, where each pixel is a real, time-of-flight depth measurement. ..for $30.
To test it, I hung a tiny whoop from the ceiling with a thread, and pointed the Kinect at it from about 3m.
It was able to get several laser "hits" on the whoop no problem. Because the result is a depth image, the Kinect easily distinguishes the whoop from the background. Even in cluttered, and moving scenes.
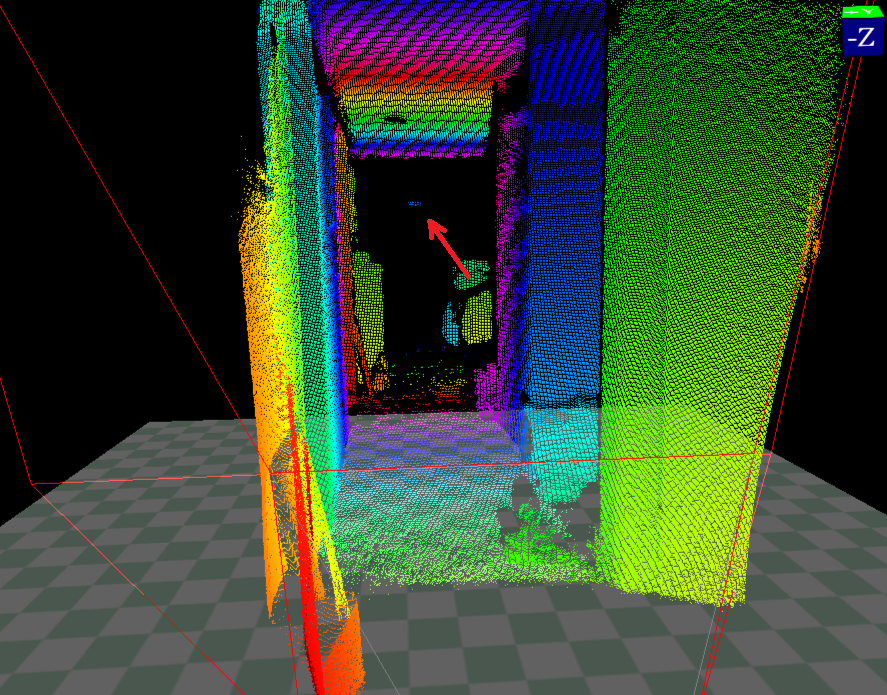
From here I took the depth demo app from the Kinect SDK, and hacked OpenCV into it. I applied an engagement window to the the Kinect data (in X, Y, and depth). And then took whatever passed through that into an OpenCV blob detector.
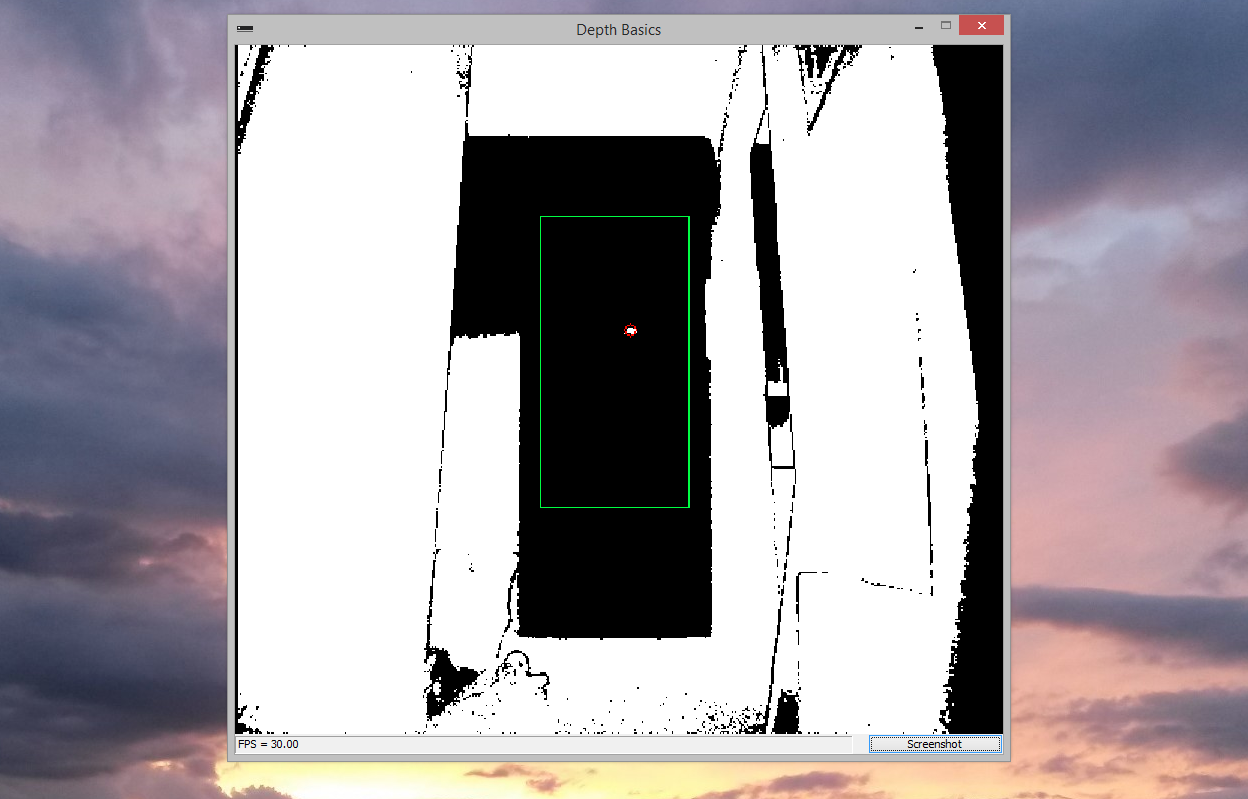
And we have tracking! It still needs a lot of work, but it's a proof of concept!
Side note: I wrote all the code for this in C++. Previously I did everything in Python. But after chasing down the 100th performance killing bug, I bit the bullet and switched over.
PC Application
At this point I'd demonstrated all the parts sufficiently, so it was time to make them play nice with each other. To make this easier, I broke the program up into logical subsystems, then got them working one at a time. The systems are:
Access_Kinect - Does all the proprietary shenanigans to retrieve Kinect data.
Computer_Vision - Updates the engagement window every frame using data from the motion system. Uses OpenCV blob detection to find objects in the kinect data. Correlates objects from one frame to the next. Creates graphical overlays.
Target_Picker - Target prioritization. Right now it just picks the first object, and tracks it as long as it continues to be detected.
Ballistics - Takes the object that the target picker has designated and applies a ballistics algorithm. Outputs and continuously updates a "ghost target", that should result in a direct hit if the turret were to fire at it. The current ballistics program corrects for parallax error but doesn't lead the target.
Fire Control - Uses an error signal from the motion system to calculate a historical hit probability. If the error is sufficiently low for some number of milliseconds, the fire signal is sent to the motion system.
Motion - Sends motion commands to the gimbal controller. Also contains the tracking functions which attempt to keep the crosshairs on the ghost target. Inserts a fire signal into the serial stream if requested by fire control.
GUI - Uses QT to create and update a GUI. Changes settings in the other systems based on the GUI widgets.
This is the result:
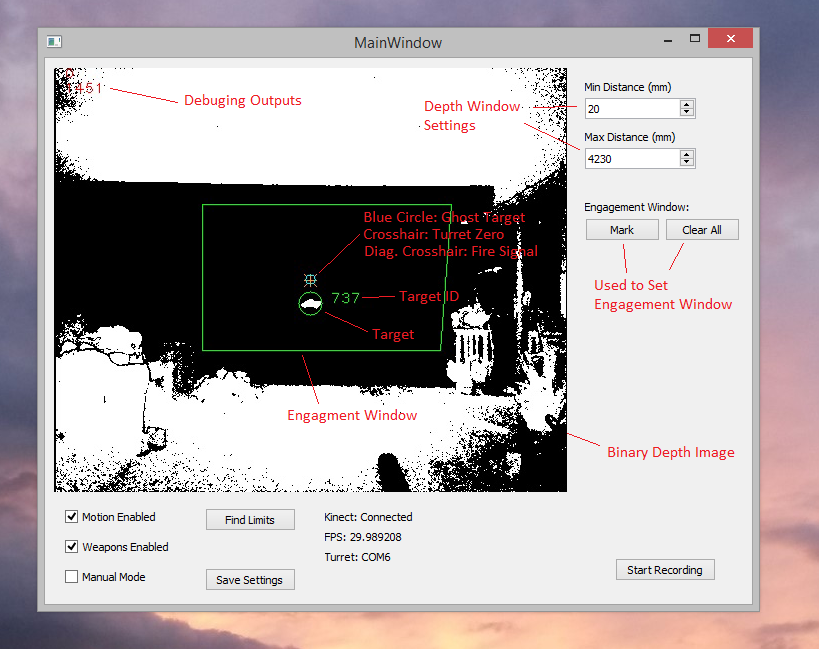
At first I didn't have any safeties (bottom left), but a bunch of times I forgot that I had manual mode enabled, and fired the gun when I hit the space bar while alt-tab'd.
The subsystems form a data pipeline starting with new data being received from the Kinect. The Kinect runs at a consistent 30hz, so I've designed the whole system to run synchronously at that frequency.
Most of the time I sank into this was getting the Kinect SDK, OpenCV, and QT to work at the same time. They each come with example code, but the architecture of each was different, so it took some doing to get them to work together.
Writing the computer vision, tracking, and ballistics algorithms was relatively fast. Or maybe it just felt that way, because it was actually fun, lol.
After a lot of tweaking, I was able to replicate my earlier proof of concept, and successfully track a drone!
Nerf Blaster Mount, and Auto-Loader
Now it's time to put a Nerf gun on this thing! I decided on the Nerf Artemis Blaster. It's about the right size for the turret, and the large mag capacity (30 shots) is a plus. I know it would've been easier to use a motorized blaster, but I've always thought those were kind of lame for some reason. Besides, I'm going for "one shot, one kill" not "spray and pray".
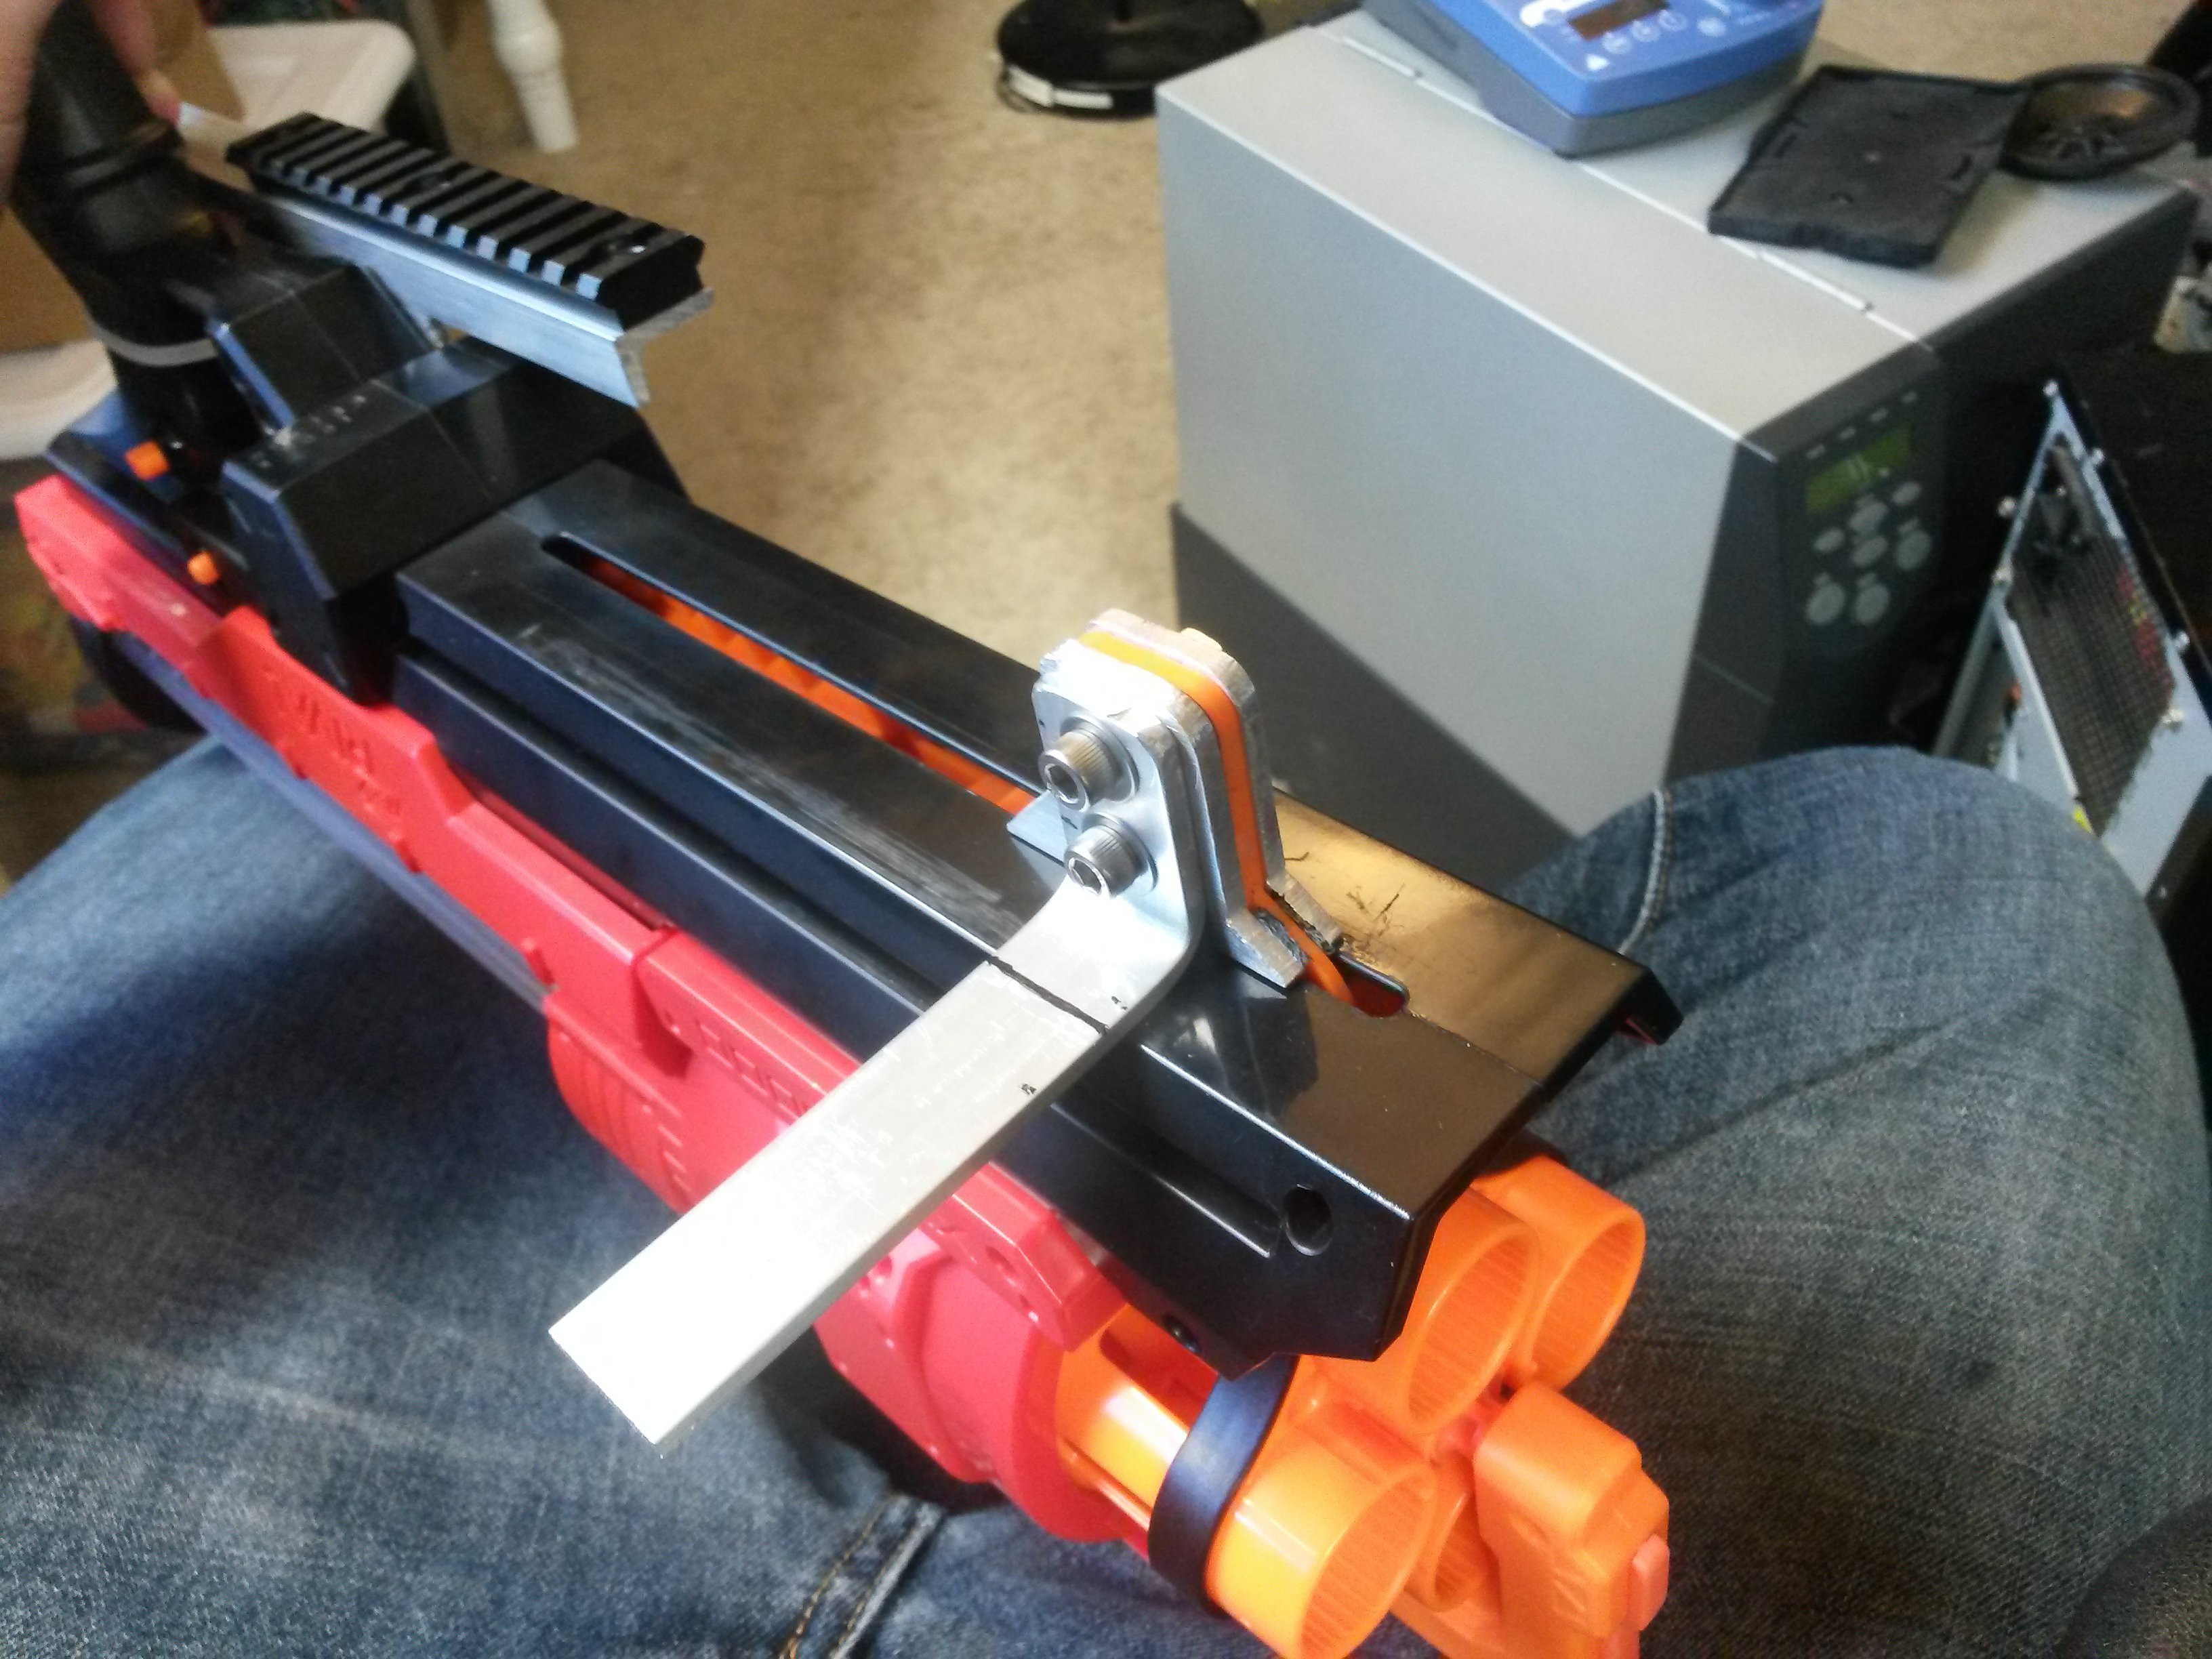
The first step was to attach it to the turret. I hot glued some nuts and washers inside the case to act as hard points. I used these to bolt on a piece of aluminum angle from the outside.
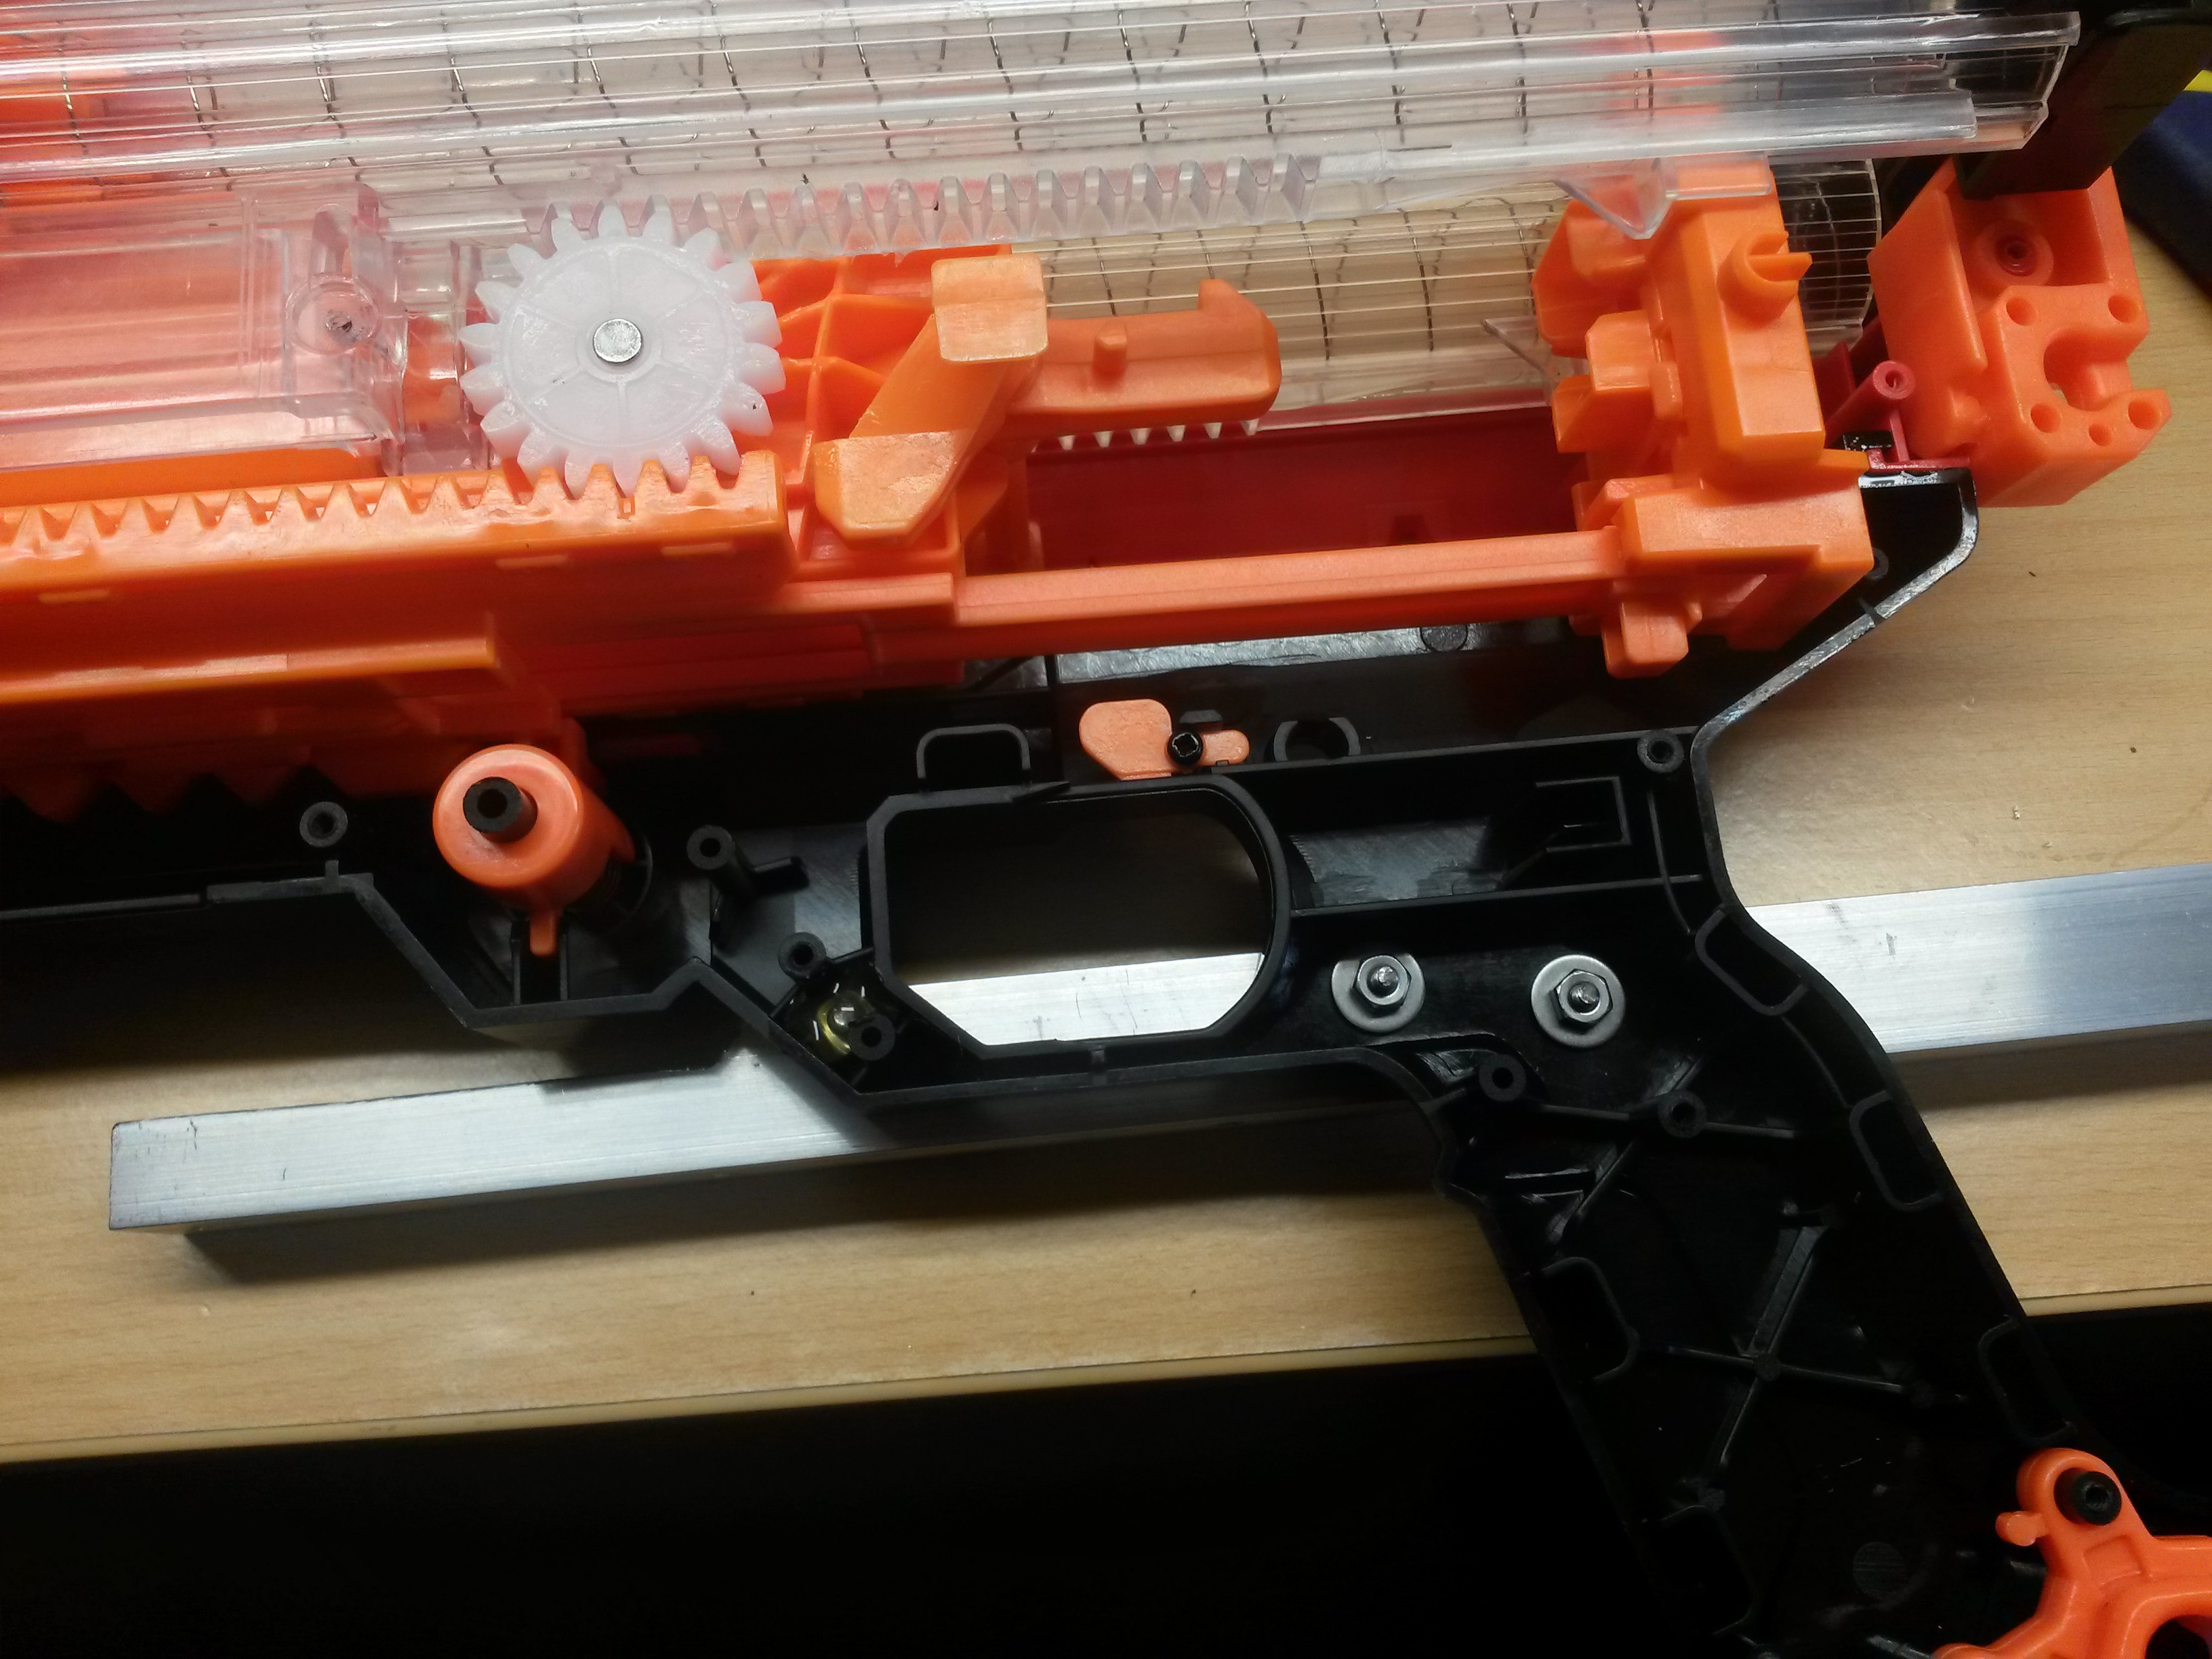
To this I attached a picatinny rail that the turret can clamp onto.
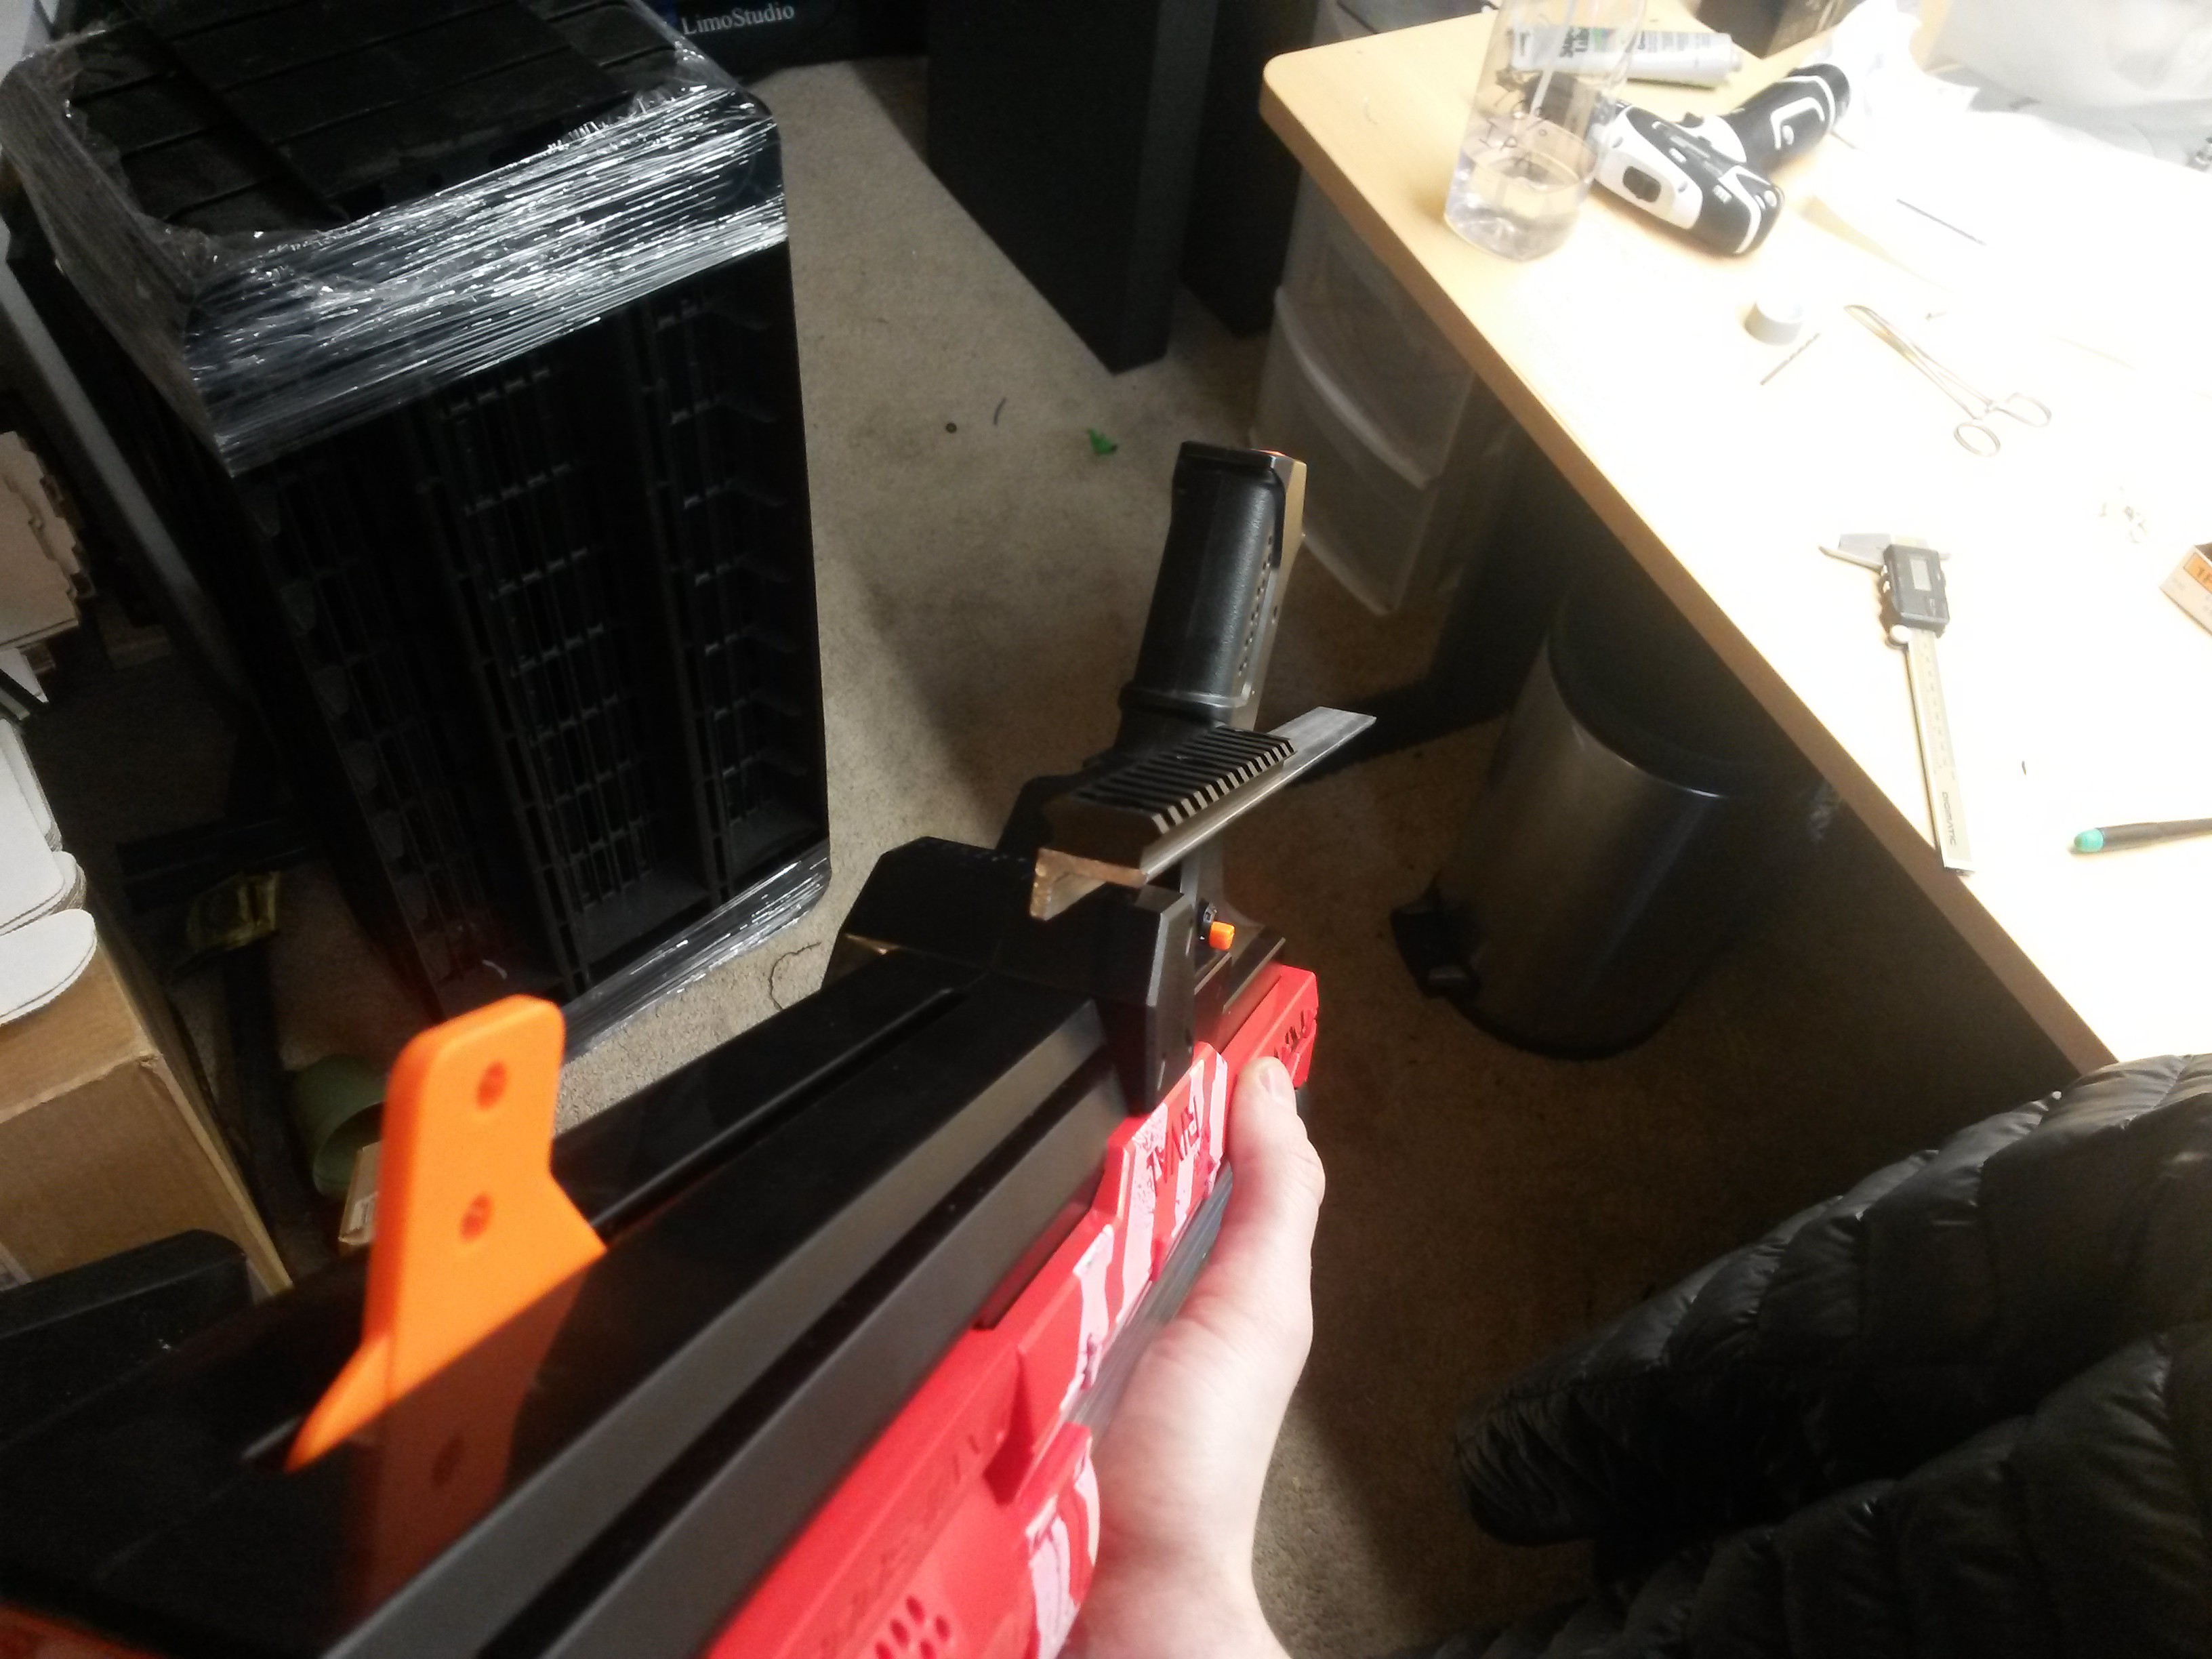
 So far so good. The next step was to attach some kind of actuator to the charging handle. Originally I was going to stick the actuator right in front, but it turns out that occludes a large part of the Kinect's FOV. I opted instead to mount in on the side, in a similar manner to the picatinny rail.
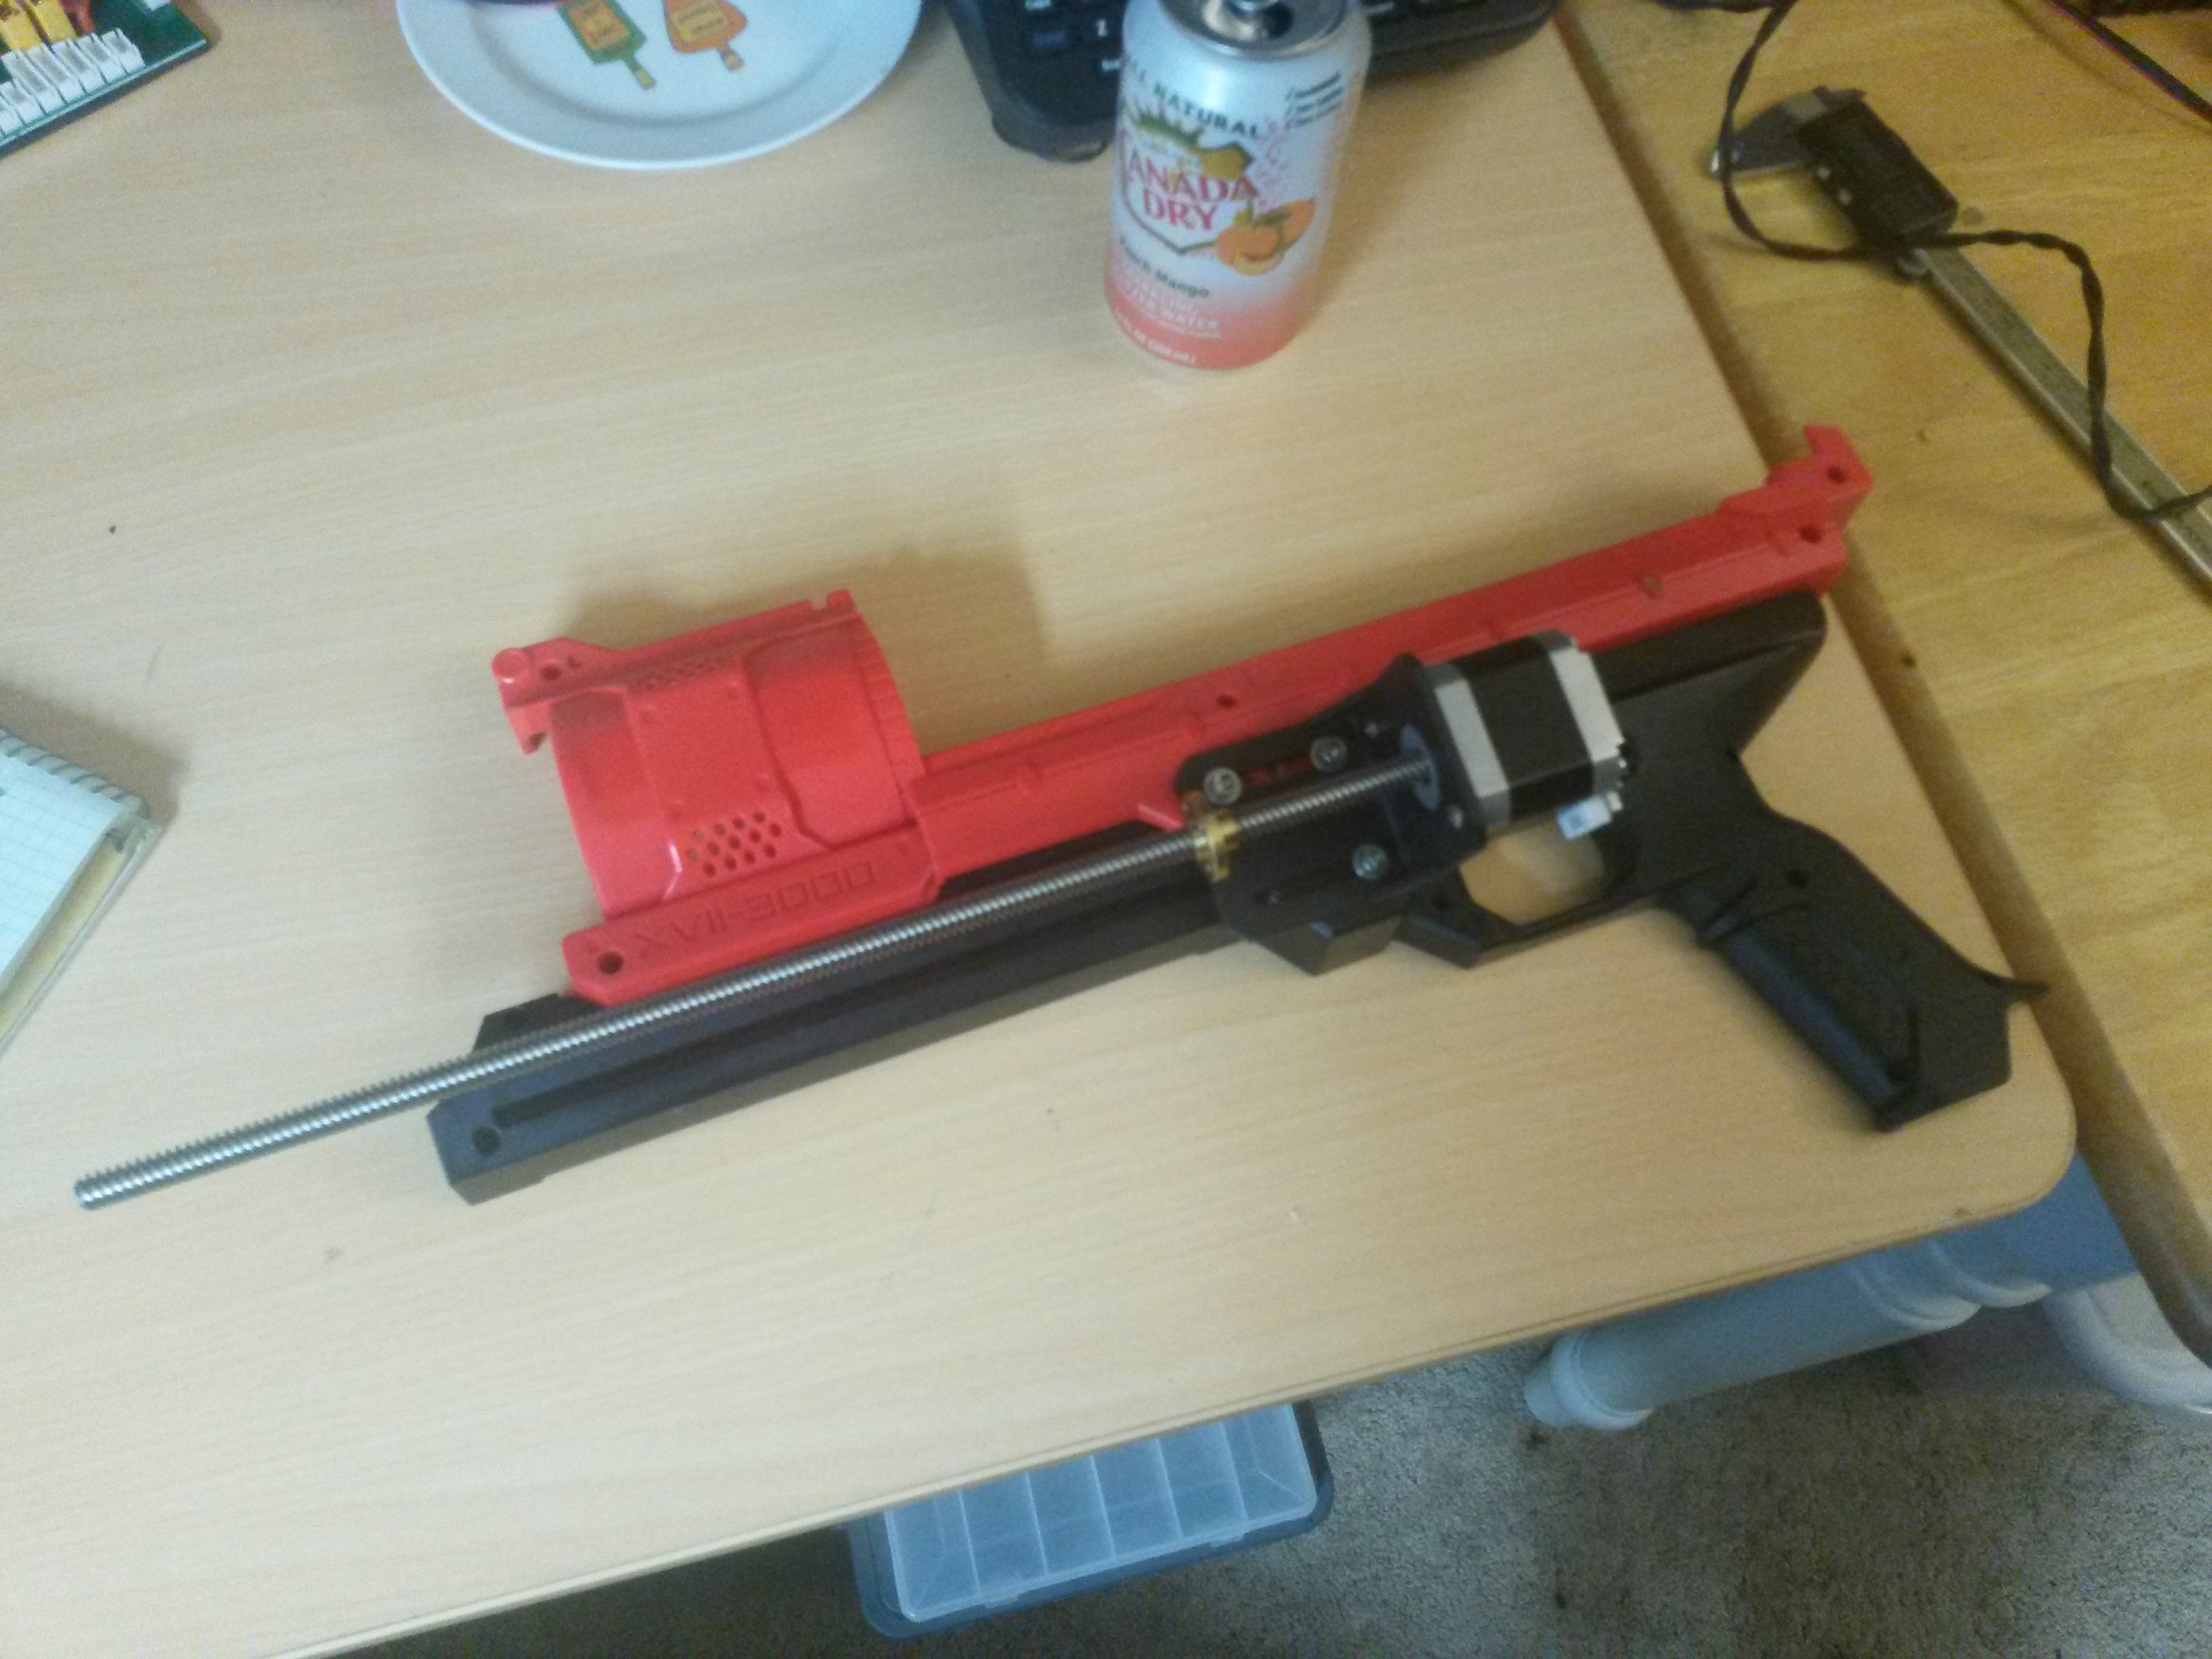
This necessitated an additional arm to connect to the charging handle. It was too flexy at first, but I added an aluminum plate sandwich and that improved the rigidity a lot.
 After that I attached the arm to the actuator nut with a small bracket. I hooked the stepper up to a L298N motor driver I had lying around (it turns out these can be used as a stepper driver). They have a high power capability, but no current control. It seems to work pretty well for this application.
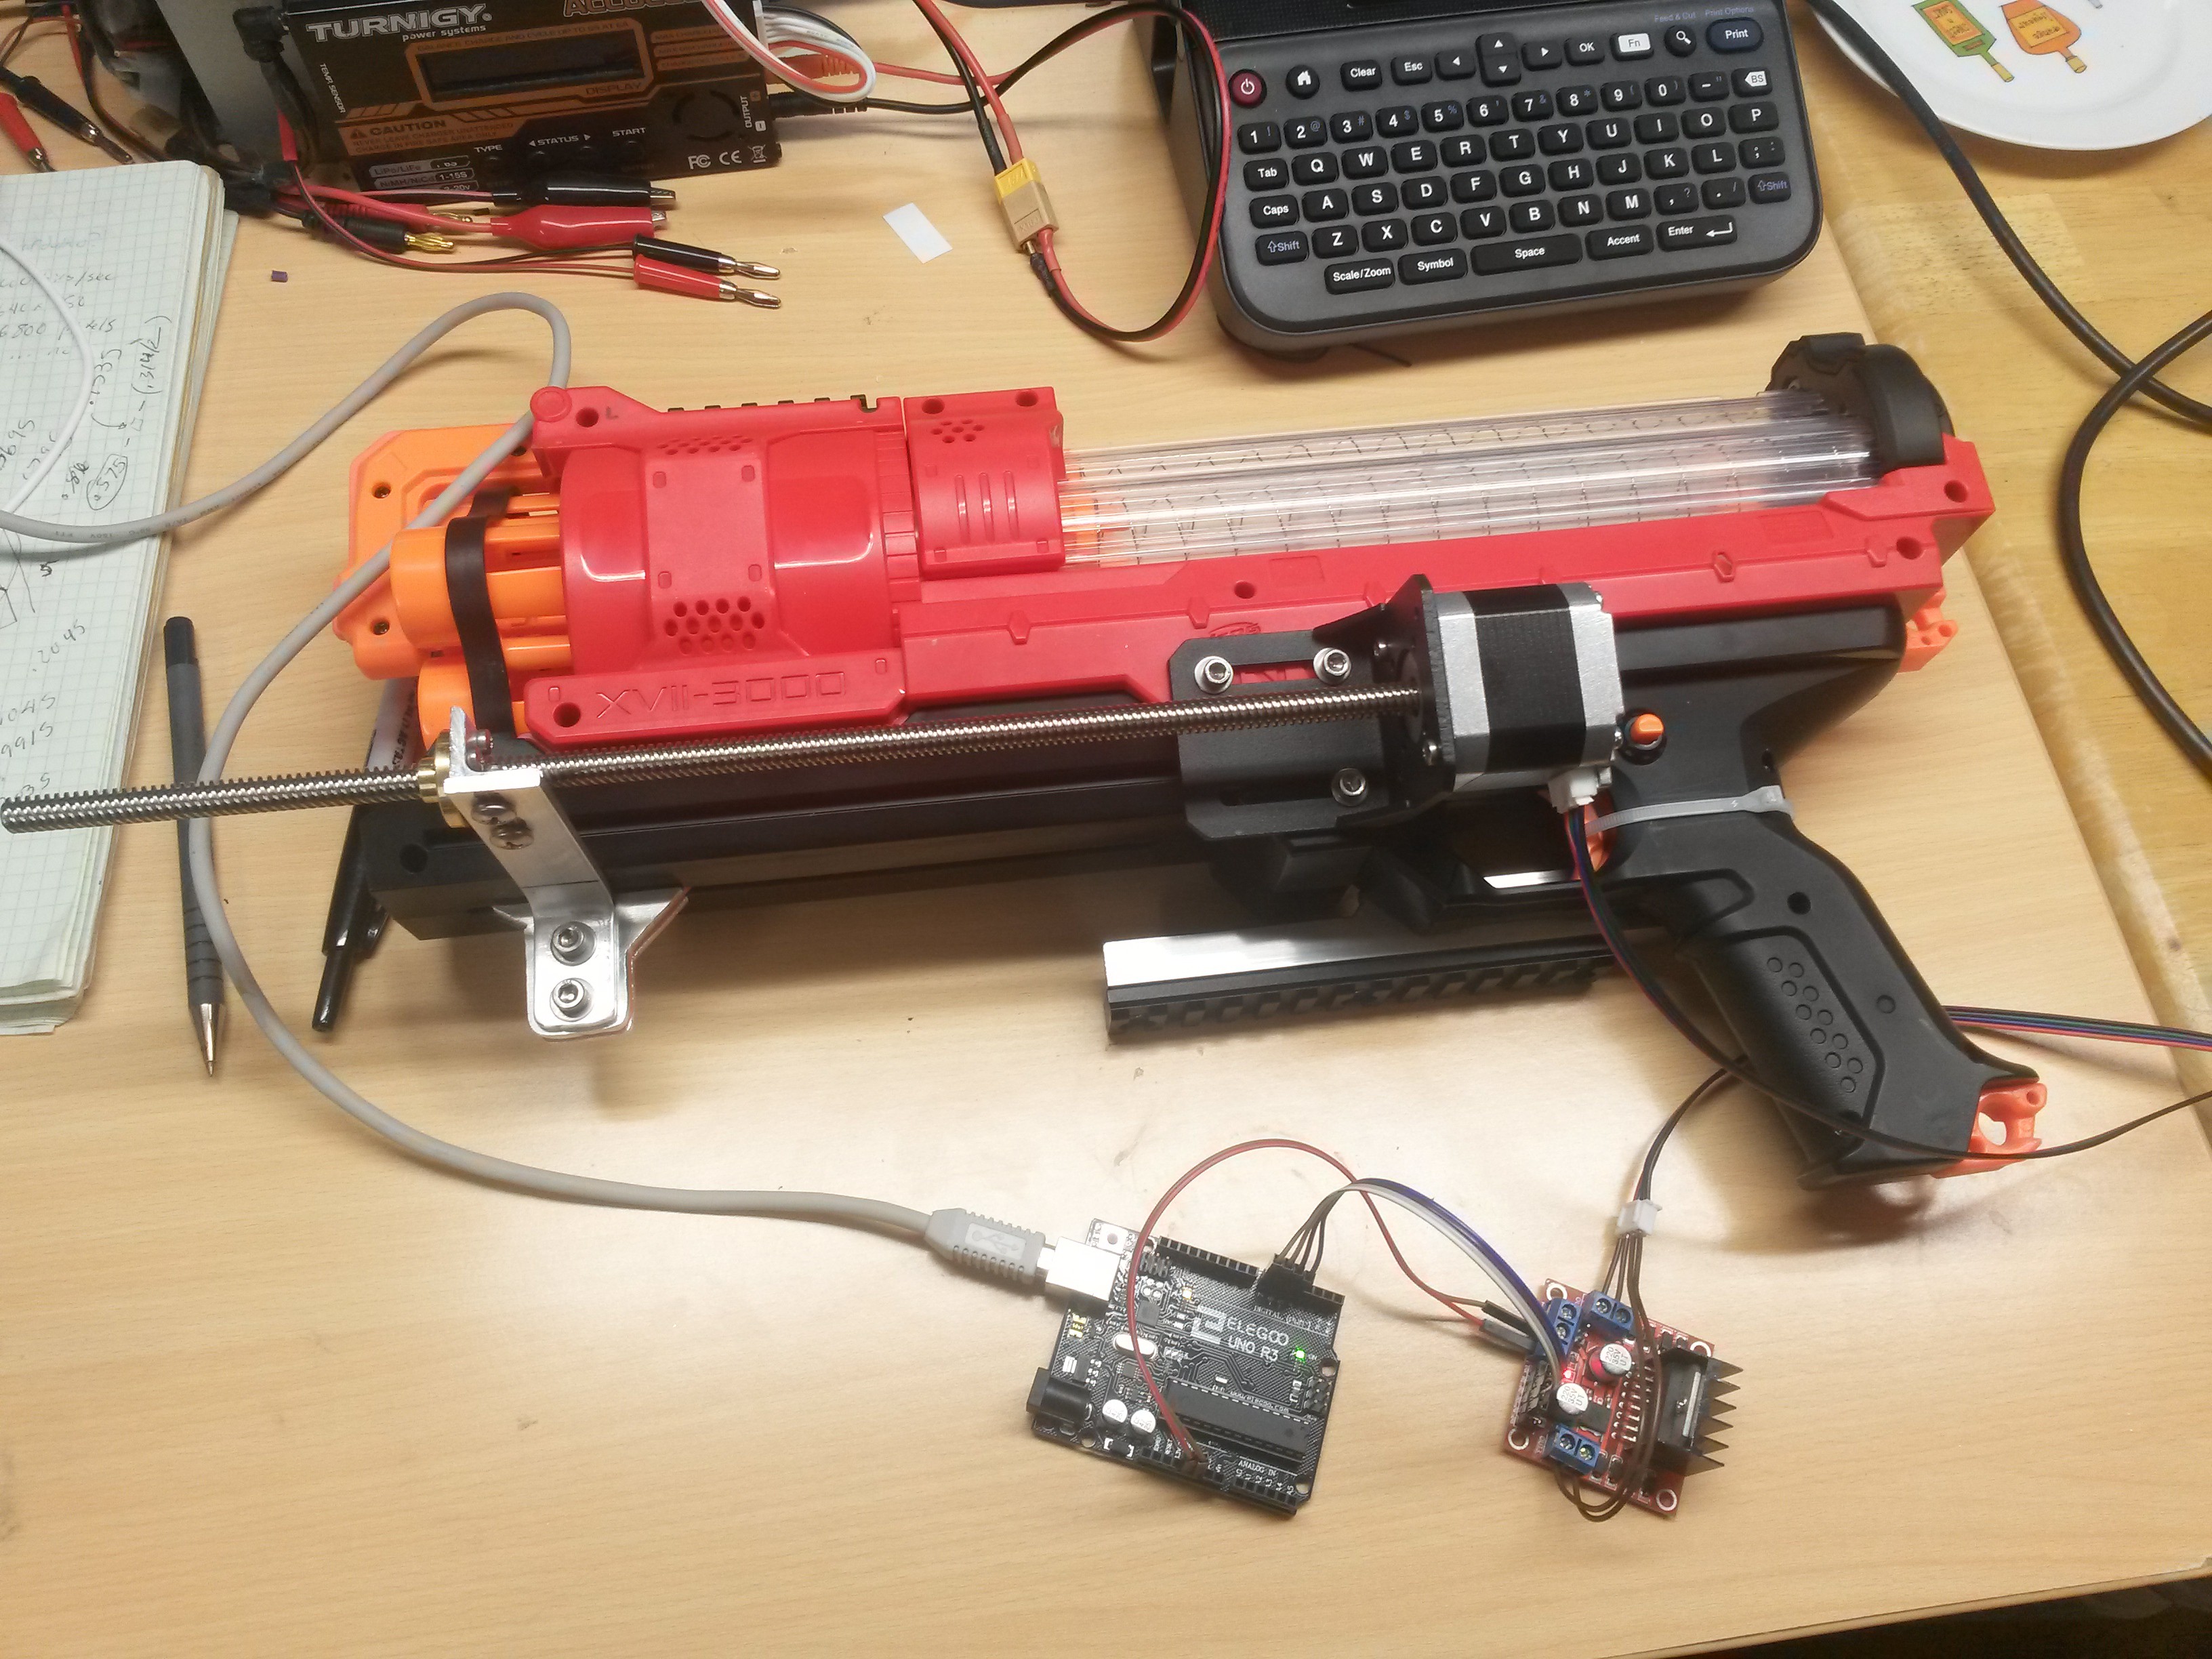
At this point I wrote some arduino code to fire and re-cock the gun whenever the arduino receives an '@' character over serial (more on that later).
I was able to make a few unexpected design simplifications.
- I thought I was going to need a second actuator for the trigger, but it turns out this gun has a slamfire feature, where if you hold the trigger it fires automatically at the end of the cocking action. To utilize this, I simply made the actuator stop short of a full stroke, then move the last bit to fire.
- I was planning on attaching some limit switches, but it turns out that it's not hard to keep the system aligned with some judicious crashing into the ends of travel.
Here's the system in action:
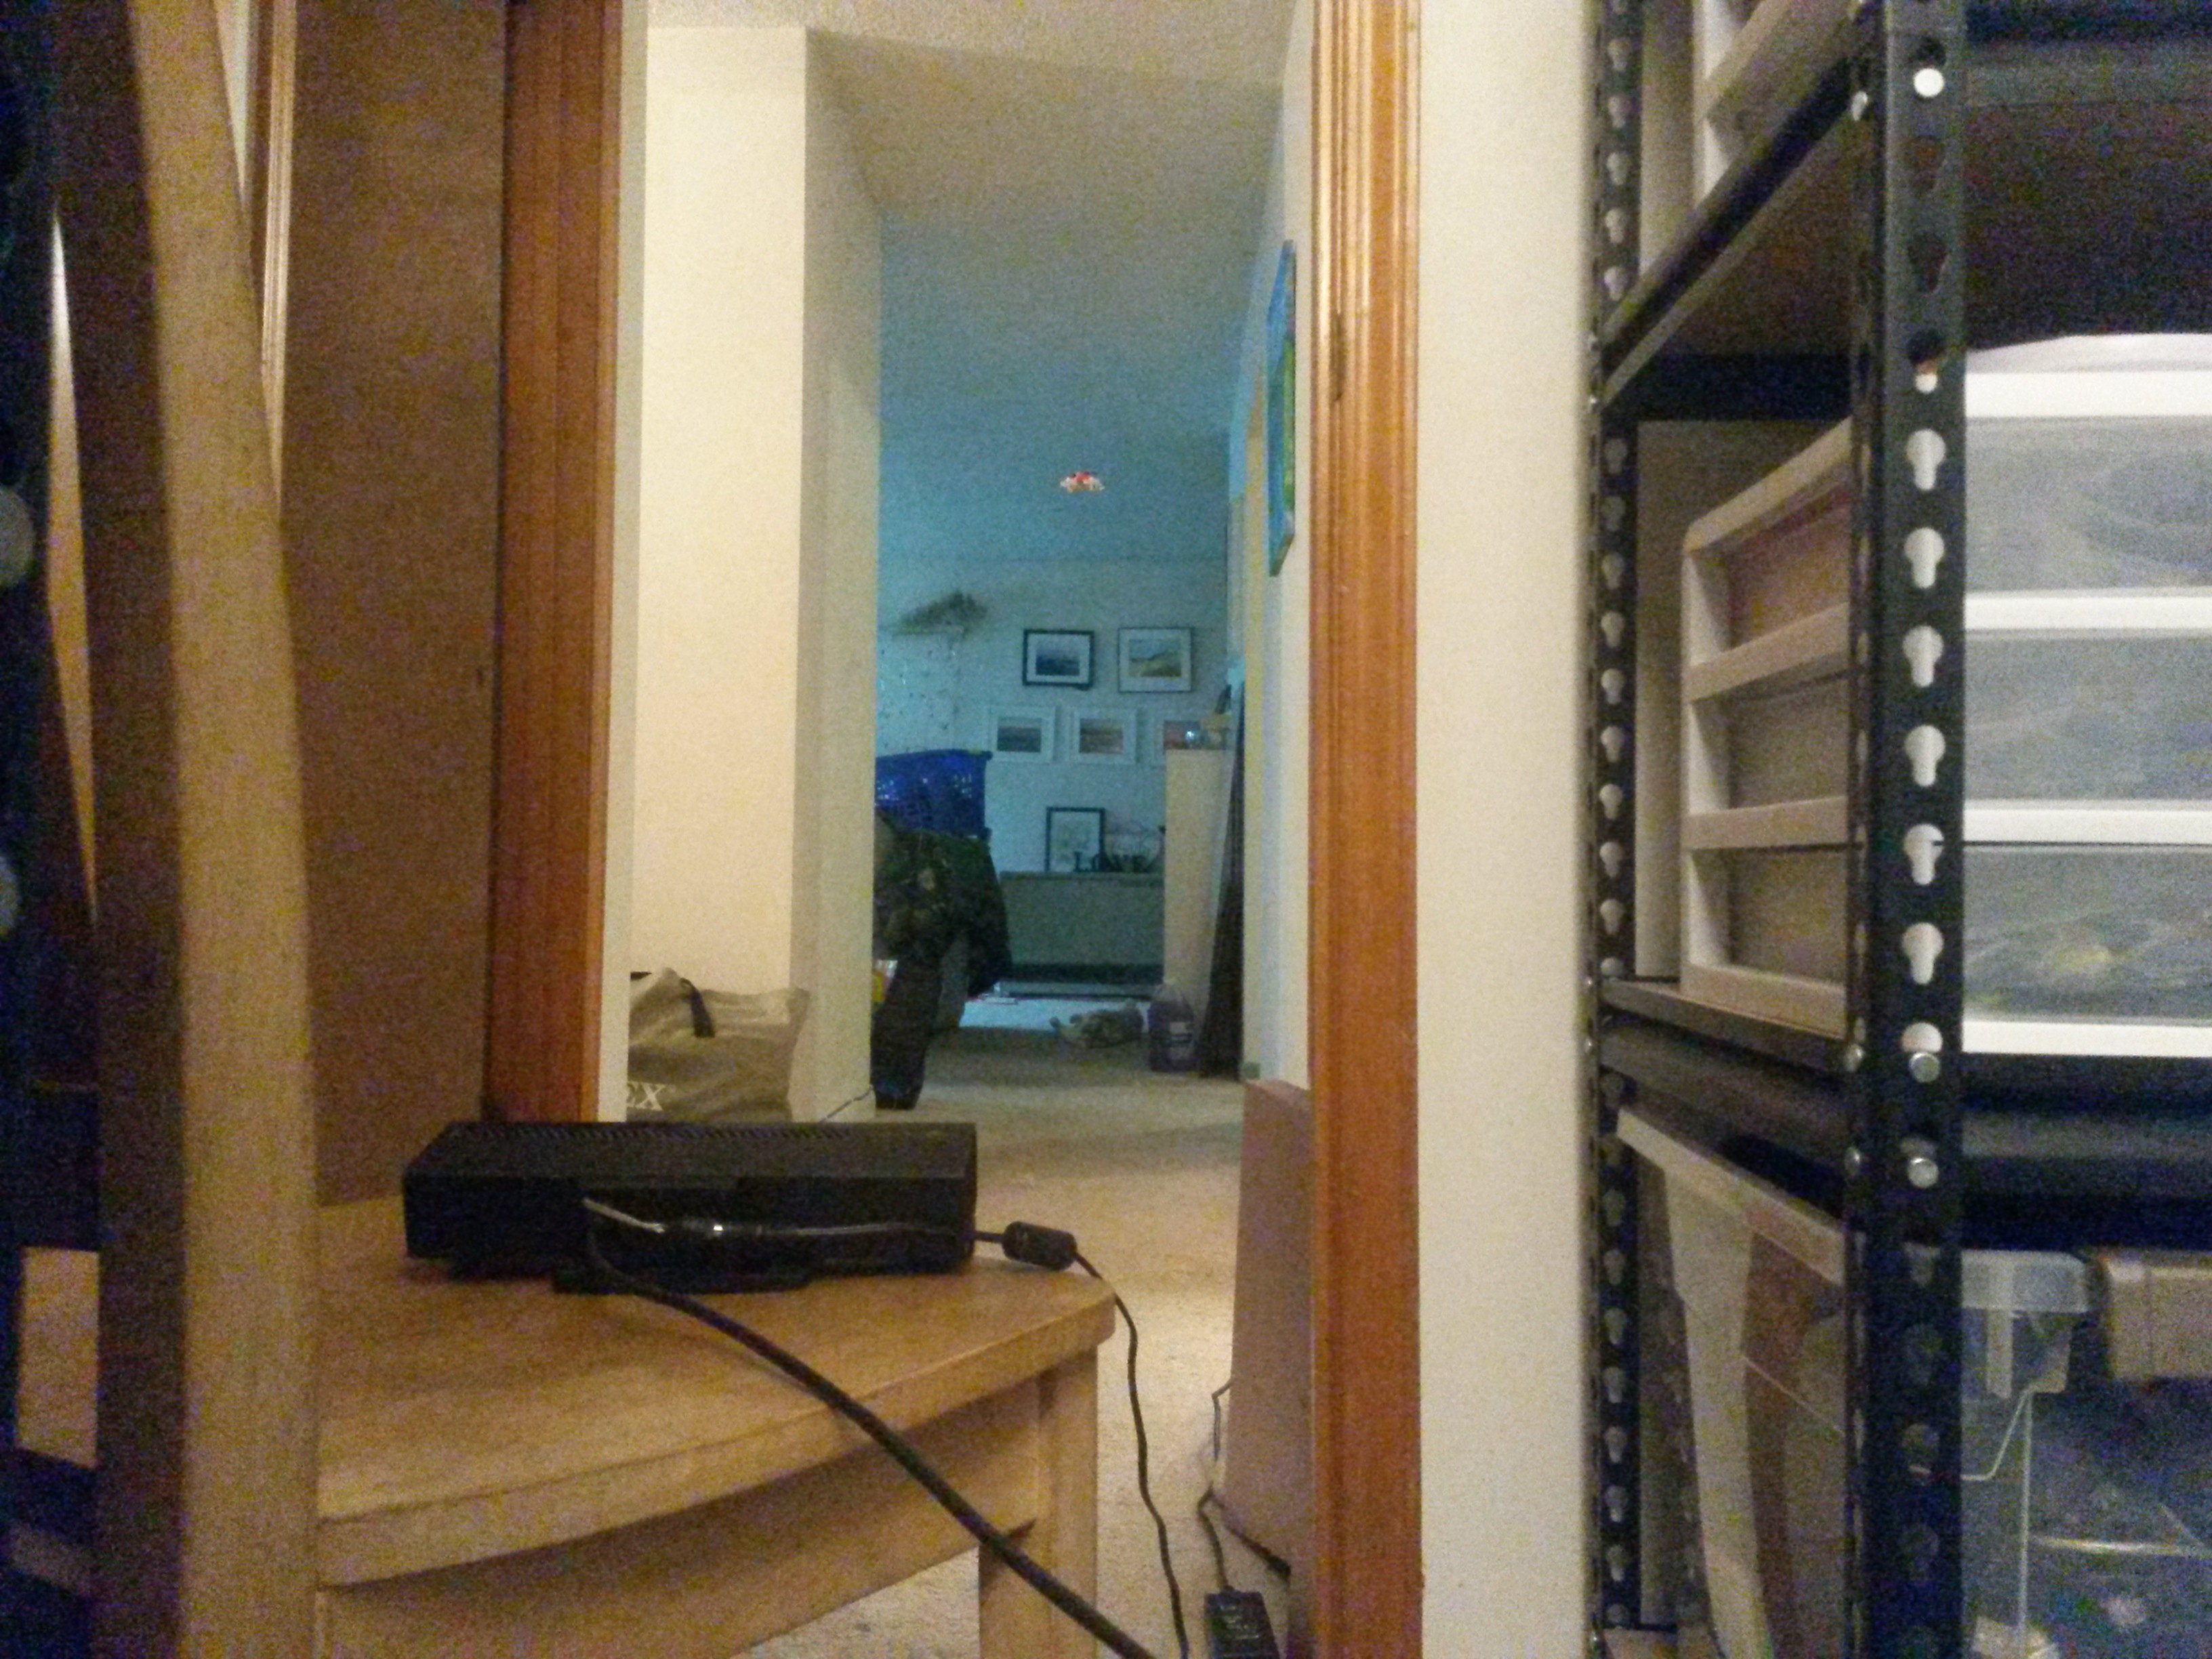
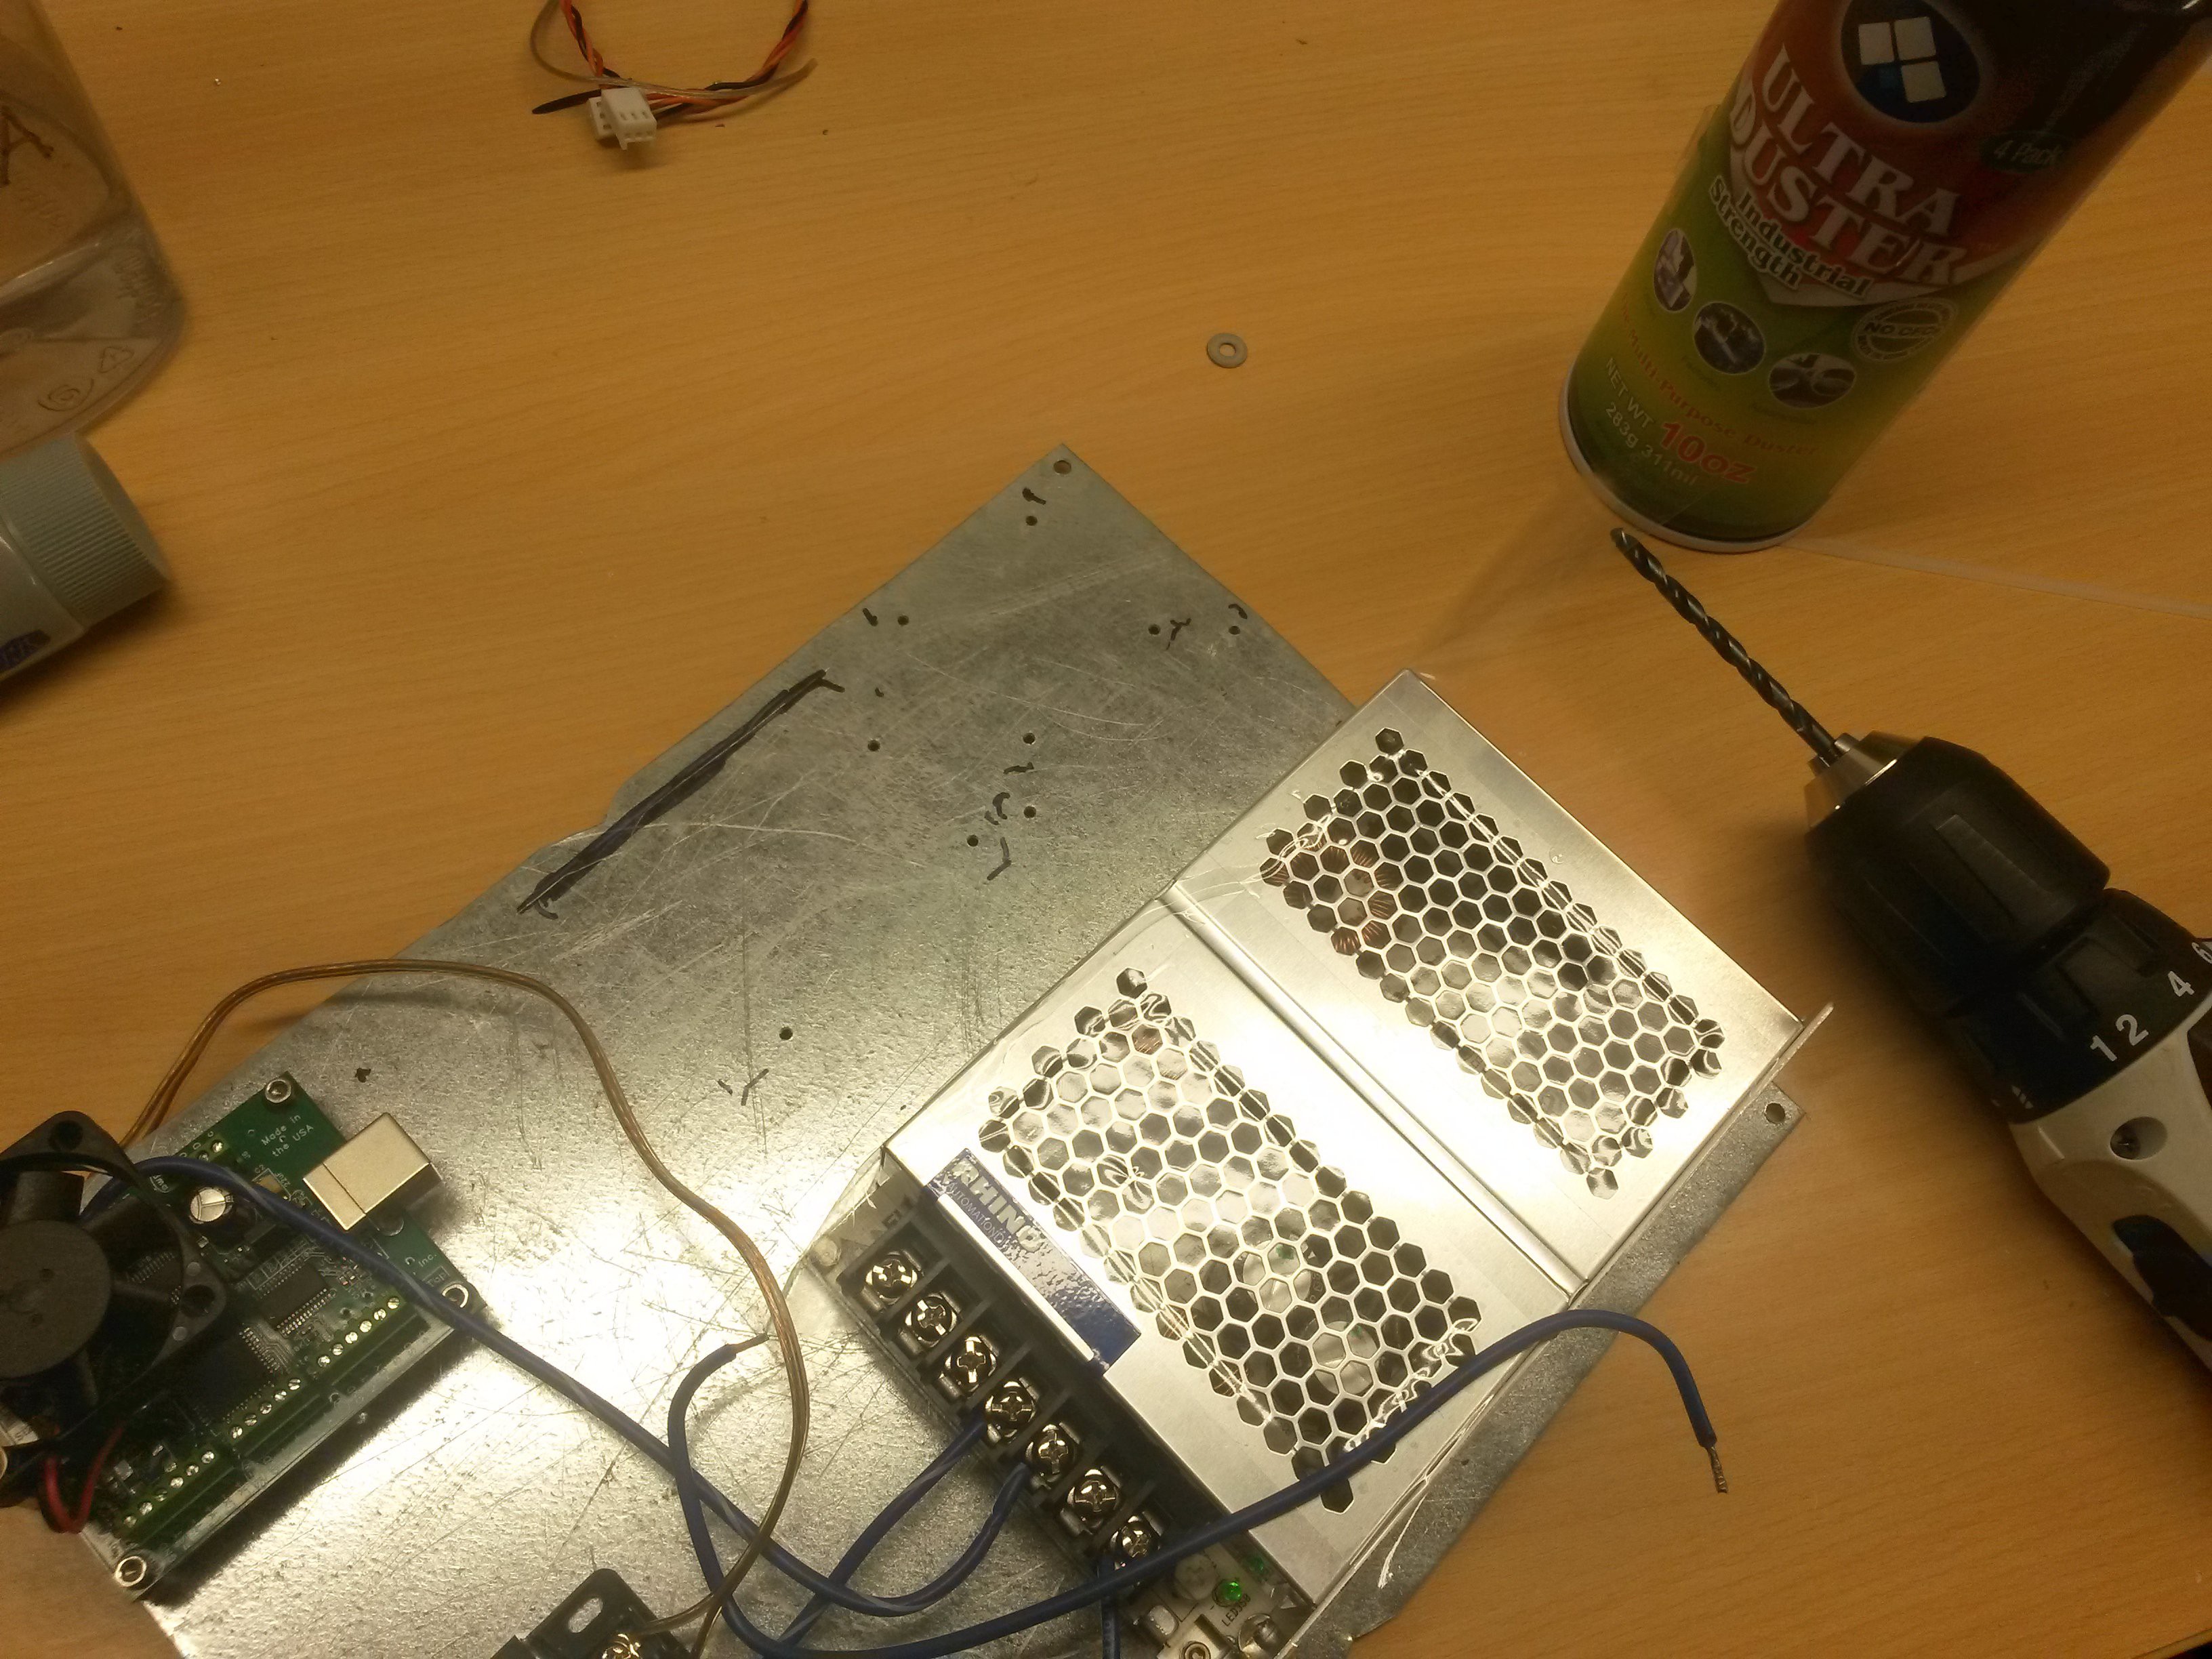
I didn't make space for these electronics ahead of time, but it looked like I could fit them in the original control box, so I crammed them in there.
I had to be super careful while drilling more holes in the panel not to get metal chips into any of the circuit boards. I often use plastic panels these days for just this reason.
 Here's the box re-assembled with the new parts:
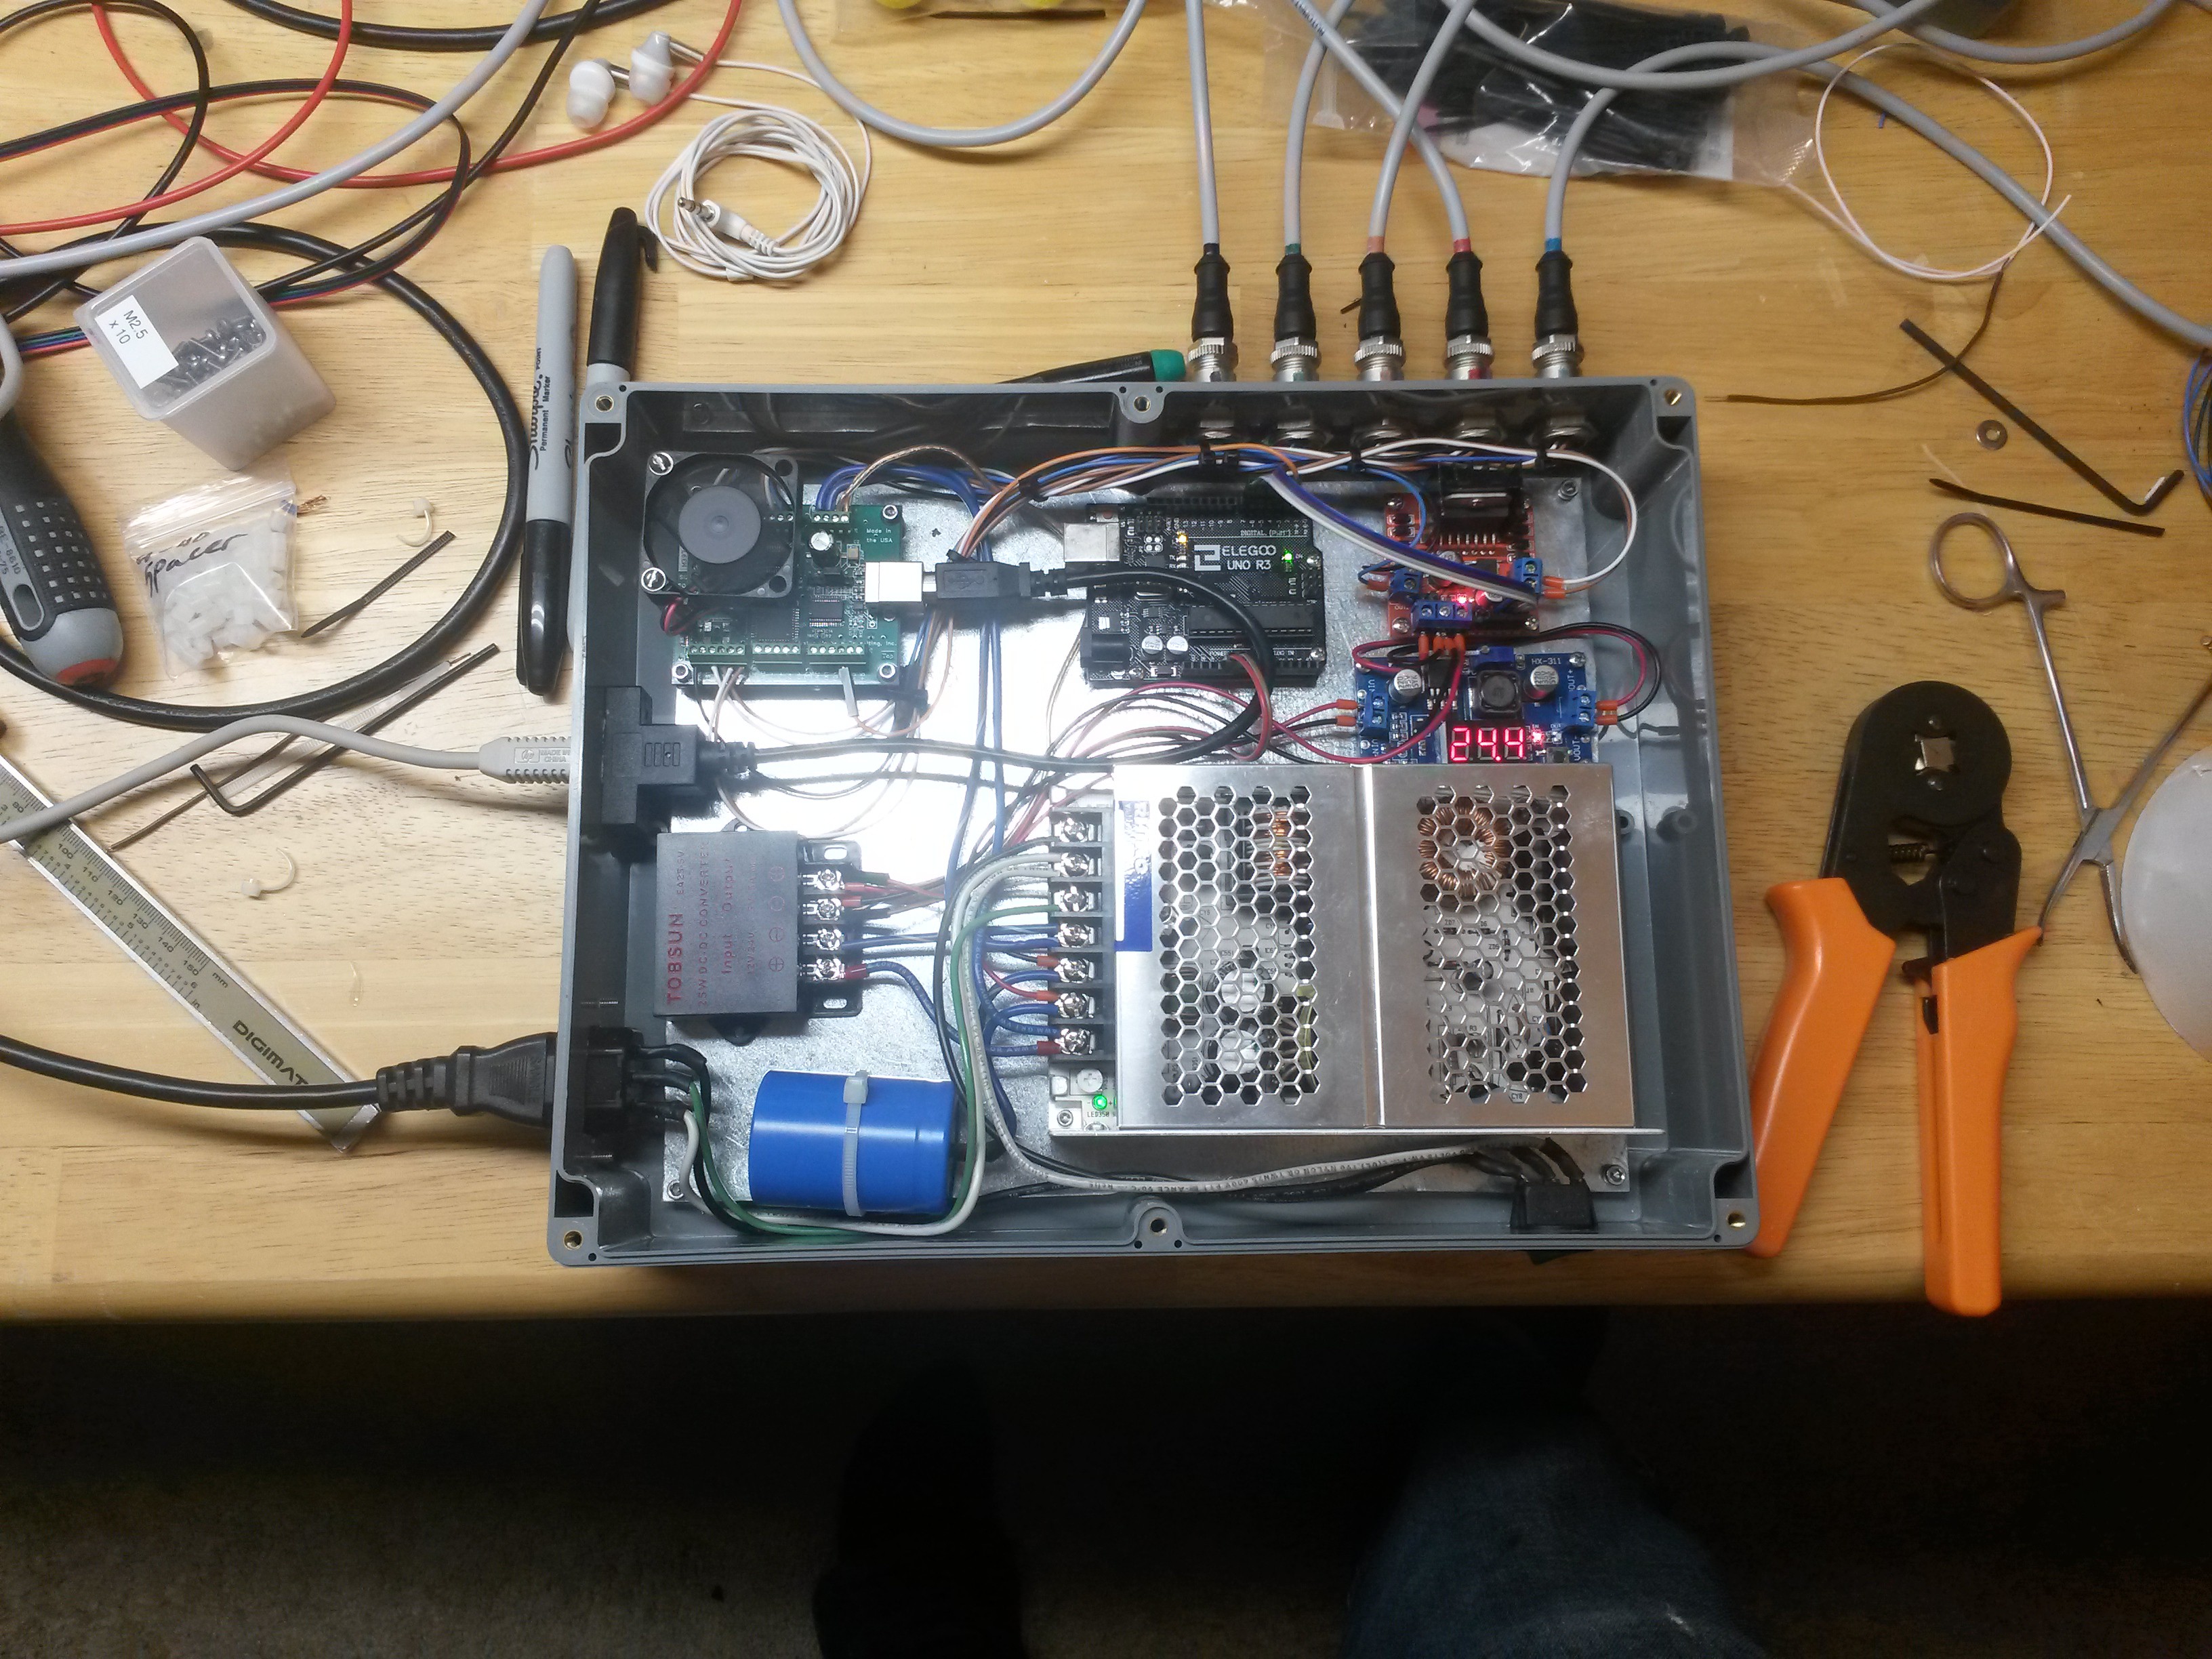
I didn't want to add an additional USB serial port just for a simple "fire" signal, so I looked through the stepper controller datasheet, and found a character it would ignore. I then wired the arduino up to "eavesdrop" on the serial stream from the PC to the stepper controller. Last, I modified my motion control system to insert the fire character ('@') into the gimbal control stream when appropriate.
And it works!
That's the last piece of the puzzle! Time to try shooting down a whoop...
Discussions
Become a Hackaday.io Member
Create an account to leave a comment. Already have an account? Log In.