 arturo182
Yesterday I streamed the creation of the schematic for this project. I was also thinking aloud about what could work and what might not. You can watch the stream here:
There were some initial problems because I was using KiCad nightly, I had to stop the stream and go back to stable, the stream above is after that.
But let's talk about the actual project, so far I only have a basic schematic, let's have a look at it:
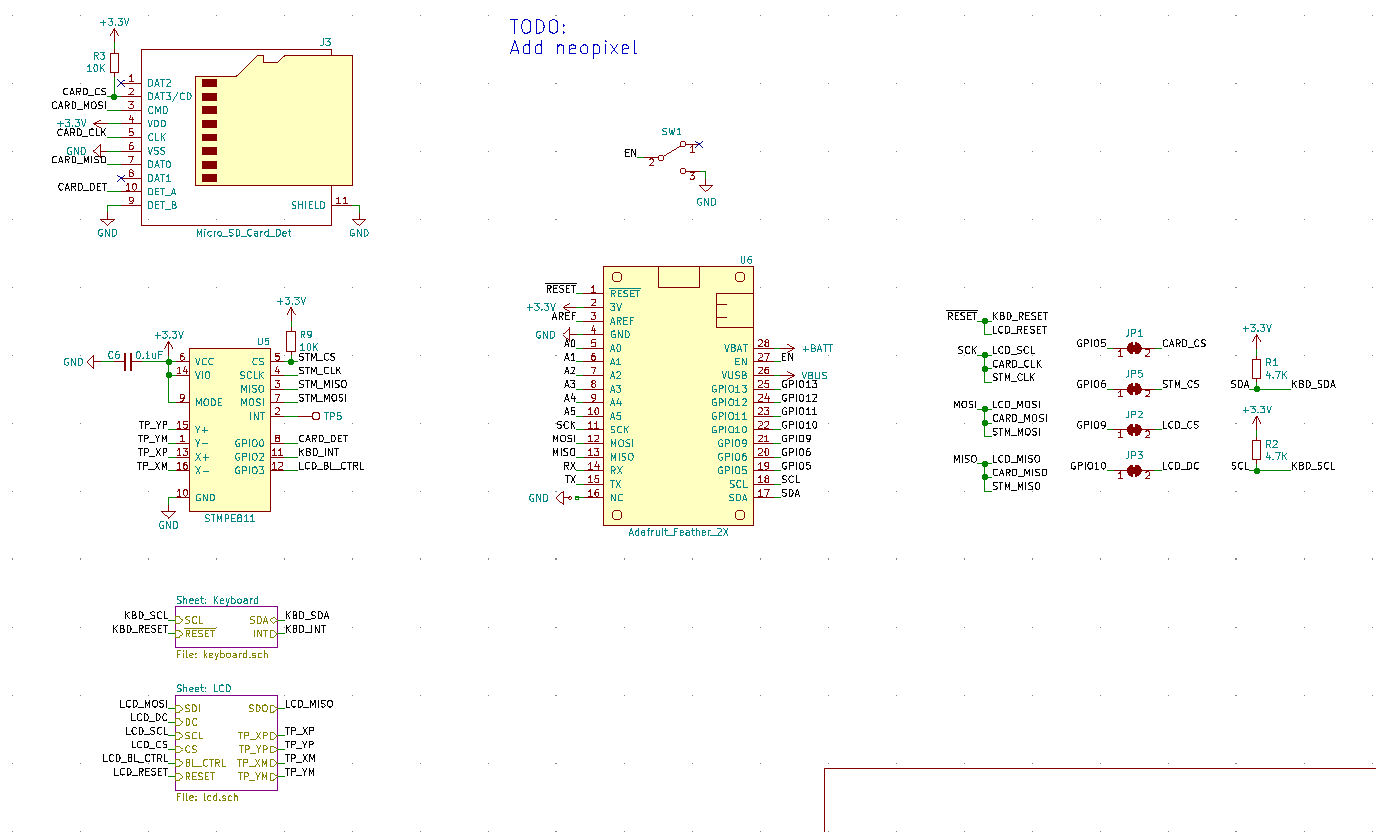
We have the Feather in the middle, I created a symbol for a special double-rowed footprint that I'll create later too, I want to copy the way the Adafruit TFT FeatherWing does it, which is having an extra row of headers next to the Feather, allowing for easy pin access.
On the right we have some boring stuff like connecting all SPI and I2C lines together, what's worth noting is that all the GPIOs used can be disconnected so they could be reused by the Feather, just need to cut the jumper.
At the top, we have an ENable switch so we can easily turn off the device.
Then on the left, from the top, a microSD card, I think it can be useful for holding images for the display, log data, etc.
I have been also considering adding an SPI Flash, but unsure if there is value in that, some of the Feathers already have those that they use for storage of Python scripts.
Next, we have the STMPE811 GPIO Expander with Resistive Touch Controller, the LCD used has an option to include a Resistive Touch Panel, so this will be useful. We also use the 3 GPIOs for some extra pins, I didn't want to use too many extra pins on the Feather, it already has so few available.
Next, we have the keyboard, it's in a sub-sheet, available here:
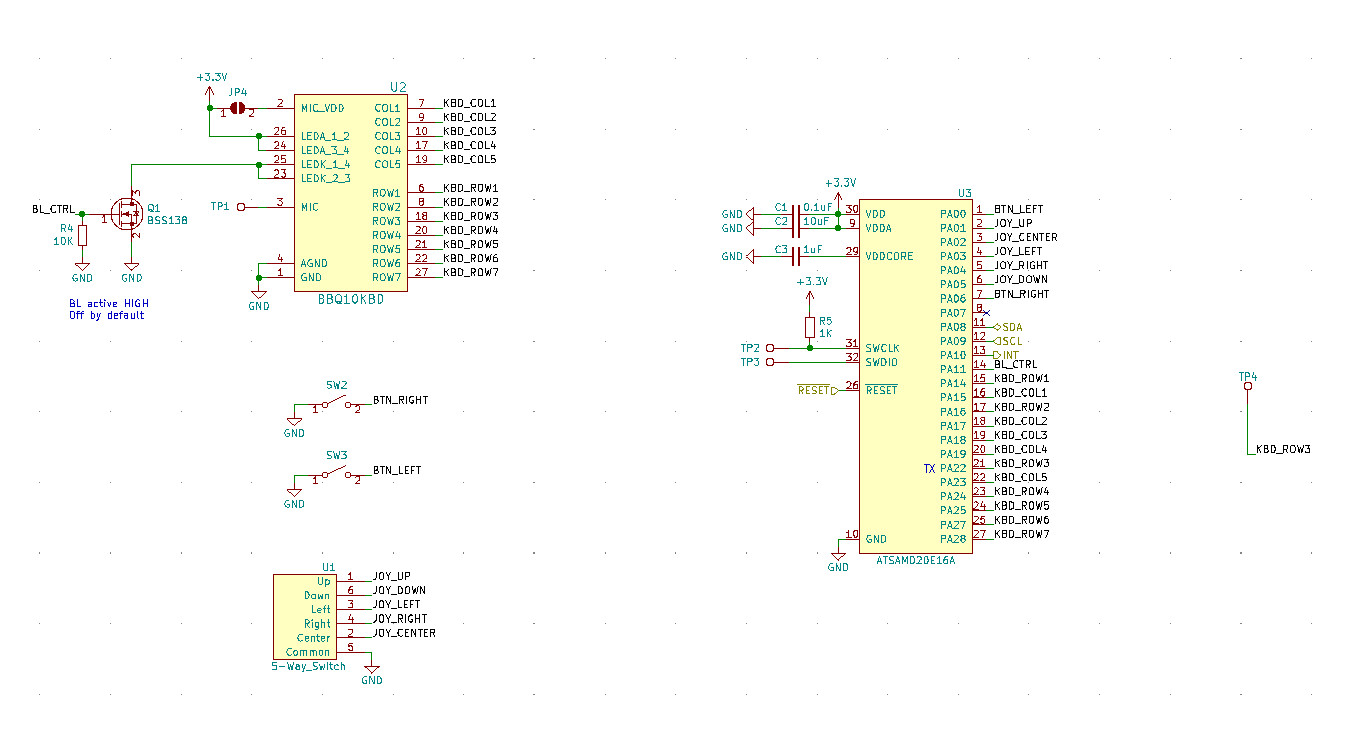
The keyboard used is a Blackberry Q10 keyboard, it's configured as a key matrix, has 4 LED backlight and a microphone. For now, I decided to put the microphone on a test pad but on second thought I might connect it to one of the analog inputs and just have it as a solder bridge open by default. For the backlight I use a simple MOSFET config, we can easily PWM it. The backlight is off by default.
For the actual keyboard functionality, I use a separate chip, this is because it would take too many Feather GPIOs to interface the keyboard. The chip used is a SAMD20, it takes in the keyboard matrix, polls it at specified intervals and allows reading out the key FIFO over I2C. This way we only use 2 Feather pins and they can be reused anyway since it's I2C. The benefit here is that the 2 extra buttons and the 5-way button are also processed by the SAMD20 in a way that is transparent to the Feather.
There are also 2 regular buttons and a 5-way button that will be placed between the keyboard and the LCD, this will make it easy to navigate menus and GUIs.
Now we can go back and into the LCD sub-sheet:
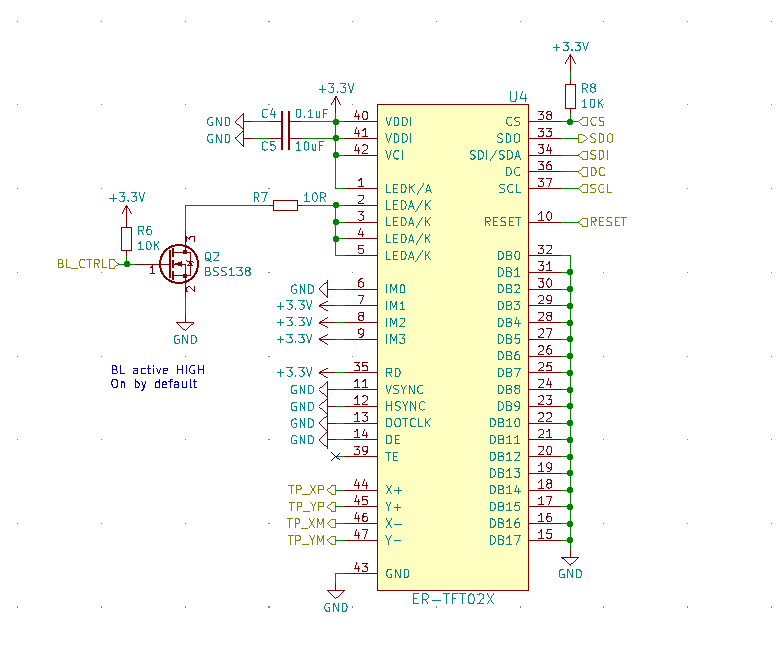
Here the schematic is really simple, we configure the LCD to use an SPI + DC pin interface, we have the touch panel pins, and we have backlight control, also using a MOSFET and can be PWMd. The only difference here is that the backlight is ON by default, this is the same as in the Adafruit TFT FeatherWing.
And that's it, at least for the time being. As you can see, I put a note for myself to add a NeoPixel, I want to put it above the LCD so it can be used as a status LED as some phones have.
As for additional functionality, it depends on space left on the board after I add these components, but I think there should be quite some space left. So the question is, what should we do with it? Can't just let it go to waste ;)
I was thinking of possibly adding a speaker, it would complement the microphone nicely. Additionally, an accel/gyro might be nice to have, for detecting the board's orientation. Another thing that might be useful is an Ambient Light Sensor, the backlight could be controlled based on it, to save some battery.
I'm also considering a PMOD connector for extra ways to expand the board.
That's it for this update, I will continue to work on this project on Monday, May 13th, I will stream it on my YT channel, you might also want to keep your eye on my Twitter account, I am quite active there.
Discussions
Become a Hackaday.io Member
Create an account to leave a comment. Already have an account? Log In.