 Adam Redfern
Project
In this project I will show you how I made a robotic gripper that is controlled by a Arduino and is fully 3D printable. The project is based of the open source robotic arm that jjshortcut posted on instructables over 8 years ago you can check his project out here.
3D print
All the parts used are 3D printed I took the open source projects DXF file and opened it in ink scape. I then separated all the individual parts and deleted the once I didn't need I then saved each part individually and used a online SVG to STL converter. Once converted I set the height to 5mm for all the parts apart from the main grippers that I set at a 10mm height.
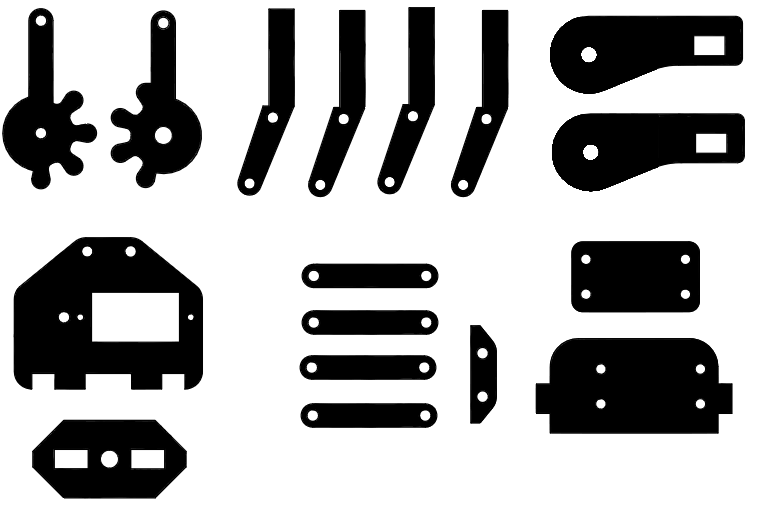
I Then opened the STL files in Cura and saved it to the SD card and printed all the parts.
Assembly
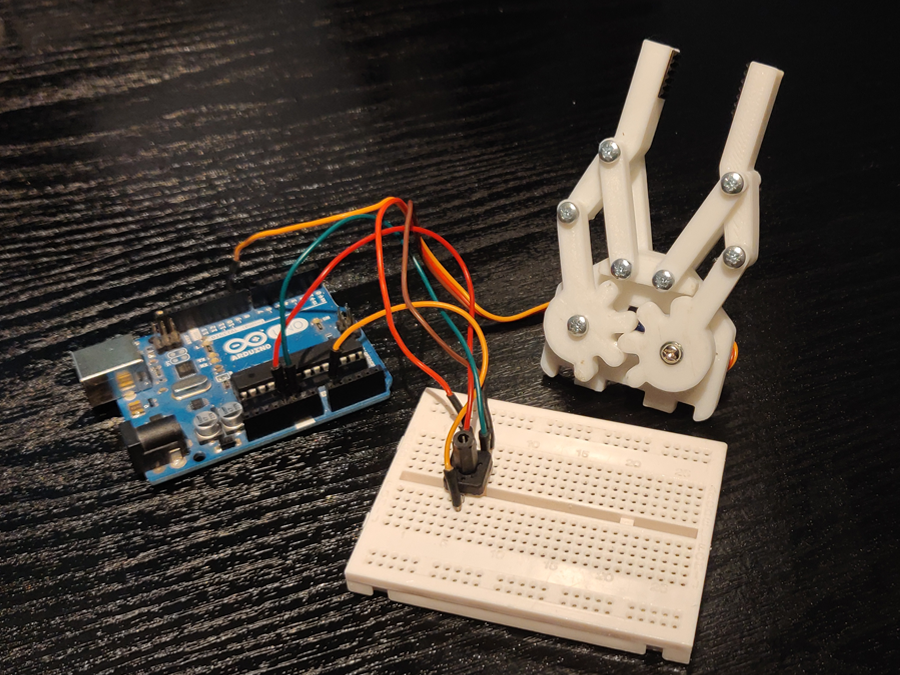
Once all the parts were printed I then used a 3mm drill to enlarge the holes in the parts as they were slightly under size. I then had to file some of the slots to make all the parts fit together will.
I used M3 bolts and M3 nyloc nuts to attach the parts together. I attached the servo to the 3D print using really small self tapping screws. I then attached the 3D print to the end of the servo motor also using small self tapping screws.
I also used double sided tape to stick some rubber belt to the end of the gripper so that it has more grip when picking up things.

The controller
I decided to use a Arduino UNO to control the servo. The circuit is very simple just connect the positive of the servo to 5v and the negative to ground then the signal wire to pin 9.
Once the servo is connected connect a potentiometer to analogue pin 0 then once side of the potentiometer to ground and the other side to 5v.
Then I uploaded the code by connecting the Arduino to the computer and compiling then uploading it to the Arduino. I have included the code below.
#include <Servo.h>

Servo myservo;  // create servo object to control a servo

int potpin = 0;  // analog pin used to connect the potentiometer
int val;    // variable to read the value from the analog pin

void setup() {
  myservo.attach(9);  // attaches the servo on pin 9 to the servo object
}

void loop() {
  val = analogRead(potpin);            // reads the value of the potentiometer (value between 0 and 1023)
  val = map(val, 0, 1023, 0, 180);     // scale it to use it with the servo (value between 0 and 180)
  myservo.write(val);                  // sets the servo position according to the scaled value
  delay(15);                           // waits for the servo to get there
}
Now that everything is connected and programmed when you turn the potentiometer knob the gripper will open and close. This gripper could be attached to a robot arm to make it pick things up.
Acknowledgement
I thank LCSC Electronics for the partnership.
LCSC Electronics Is China's leading Electronic Components Distributor. LCSC sells a wide variety of high quality electronic components at low prices. With over 150, 000 parts in stock they should have the components you need for your next project. Sign up today and get $8 off on your first order.
Website
Check out more of my other projects on my website.

 Jackson Miller
 engineerkid1
 dannyvandenheuvel
 Robotic Arm&Hand