Close
0%
0%

rPi bare metal vGuitar rig

An attempt to create a working live guitar rig that includes effects, midi synthesizers, loopers, controllers, and user feedback systems.

Public Chat
Similar projects worth following
The project consists of nothing less than re-envisioning, and implementing, in bare metal, the interface between a person with a guitar, and the systems they use to modify and/or add to the sound of the guitar. It includes guitar effects, a usb midi synthesizer, and a sophisticated looper. It accepts input from usb midi instruments and existing controllers, mice and keyboards, touch screens, existing analog controllers, custom built controllers using serial, I2c, and rfcomm over BT or other protocols and transports to interface to custom built or existing apps on remote devices like phones and tablets. It provides feedback through HDMI, LCD, and LED displays, usb midi output and serial ports, as well as communications with custom built or existing apps on remote devices. It intends to result in a robust and compact system for heavy road use which minimizes the amount of equipment to transport and the complexity, and time, for setup and teardown.

HISTORY

Please see My Embedded Project History page for a history of the projects that led up to this vGuitar rig.

MOTIVATION


I've been a gigging guitar player for over 40 years.  I've been a professional software engineer for the same amount of time.   Over the years my "rig" has evolved from a few foot pedals, to multi-effect pedals and loopers, to most recently, an iPad based system that includes an FTP Triple Play guitar synthesizer with SampleTank, ToneStack, and Quantiloop pro running in an AudioBus framework, with IO provided by an iRigHD usb audio device for guitar sound input and final sound output.   I use a variety of controllers including 4 analog volume pedals, a SoftStep II foot pedal, and a MPD218 that I put on the floor as a foot switch.


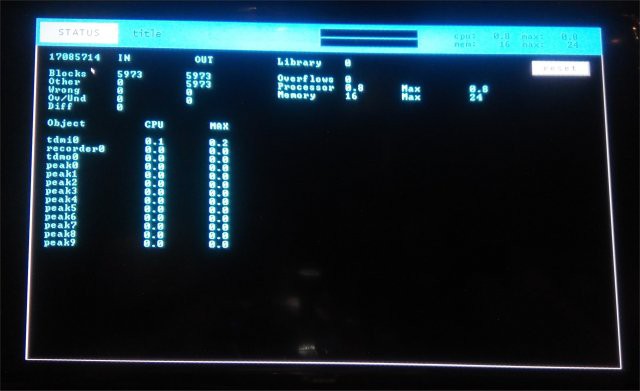
The basic problem with the iPad setup is latency.  I have measured 38ms of latency from the time I pluck the guitar until the sound from the guitar makes it up through the iRig into the iPad, gets through the Audiobus framework, and is returned as a line output by the iRig.   This is independent of the particular apps (effects) I am using.   And it even appears to be independent from Audiobus itself.   This appears to mostly be latency caused by conversion to USB, and the sound making it's way up the USB stack into the iPad sound architecture and back out to the iRig.

Another major issue is the complexity, and the resultant fragility, of the setup.  There are no less than 21 connectors, including a 7 port USB hub, and a dozen or more cables, where a failure of any one of them can basically fail the entire system .... live and in real-time ... in the middle of a song while I am onstage.

Another factor is related to the fact that I am using a general purpose device (the iPad) for a very specific function, and it is not optimized for that.   This manifests itself in many ways. 

IOS, and the whole apple world, are notoriously closed and proprietary.   You can't even write an app for it without apple's approval.   I'm not talking about this whole generation of "served" apps, where you have to connect to the "cloud" or a web-server and are really running a JavaScript app.   These frameworks are prolific, but, not appropriate for what I'm trying to do.  A served app won't do for a live gig rig.  I'm talking about native apps only.  Like you would expect from a professional setup.

You have to accept the architecture IOS provides (Core Midi) and the way the apps that you purchase interact with it. In turn, each app is it's own closed, proprietary architecture.

For example, SampleTank cannot be made to respond to a specific MIDI device.  It accepts any midi device, all glommed together by Core Midi, and the only way you can differentiate devices is by using the precious midi channel numbers, 1 through 16.   Of course, in full blown mode, the FTP pickup uses no less than 14 of those 16 channels, due to it's own bogus setup (it uses channels 1-6 for the strings, and then duplicates them again on channels 11-16, while also using two or three channels for mysterious proprietary messages).    

Don't get me started on the FTP itself!    It outputs so many midi messages, including sysex, during a gig, that often I think the whole system just crashes because of overload.    I have spent a LOT of time reverse engineering the FTP usb pickup.   Part of my project will be to isolate, and filter it, so that it presents the correct set of midi events that I want to see, and not millions of other messages that clog up the system downstream.

Anyways,  please understand that I absolutely LOVED the the iPad rig when I first got it.   Mostly because for the first time I personally could add bass, organ, piano, violin, or spacey synth sounds, to my onstage repetoire.   And Quantiloop...

Read more »

  • 1 × Motivated Engineer an engineer who is also a musician, vast programming skills, obsession with actualizing things
  • 5 × Arduino Uno gotta start someplace, so there are at least two components, then next thing you know you have 5 of em
  • 1 × General Architecture Document hmm ... or that a "File" ... a component of any good software project is a good architecture document!
  • 12392912 × other little pieces not counting resistors

  • About what I'm about to post ...

    Patrick09/12/2020 at 14:46 1 comment

    PREFACE TO POSTING SOME NEW PROJECTS


    OK, it's been a long time since I updated this project log.   Once again, THIS "rPi bare metal vGuitar" project is the overall project that encompasses all the other projects that I have on hackaday.  Even if it's not immediately apparent to the casual reader how they all relate, the other projects, including the 3D printer, synth box, experiments with accelerometers, and even the ws2812B switch array, are all related to my efforts to produce an rPi based, bare metal, vGuitar rig.

    In my last log, from Nov 2019, I said I needed to create a "proof of concept" Looper based on the rPi/circle bare metal code that I have labored on.   Now, 10 months later, I have very nearly done that to a level that is demonstrable, and hope, in the next few weeks, to not only post that to Hackaday, but to also record a song (make a youtube "performance" video), along with a "making of" video, that will show some of the various pieces of this super-project "put together" in a working floor rig.

    But before I do that, I will need to post a couple of (at least one) other sub-project(s) that have taken place since my last Log entry, and the reason for this entry is to provide some context for those projects, and to "tell the story" behind them.


    A WORD ON THE DEVELOPMENT ENVIRONMENT

    I think the purport of this project may get lost sometimes.  The point is that others can, if they wish, build these projects.   But to do that, you need to at least briefly understand the development environment.

    The Circle and additional code that I have developed for the Raspberry Pi is a bare metal development environment loosely based on the Arduino development environment.  I do all of my development on a Windows based machine.   Windows 10 at this time.  You don't have to, and this code should work on Linux, for example, but I use Windows.

    I assume that the reader can install the Arduino devenv, and add the publicly available Teensy support.   With that, and the gnu arm-none-eabi compiler, and perhaps a particular version of gnu make, basically you should be able to build my example Circle projects, and worst case, stick the resulting kernel7.img onto a bootable rPi SD card and boot up the app.

    Everyone has their own preferences and development environments.  

    I really don't like the whole world of hyper-integrated IDE's that we have grown into, like the MS Visual Development Environment or the Android IDE.   They are slow, and klunky, and force unimaginably complex architectures and directory structures on the projects and development thought processes.  I don't want to run Linux on my "main" personal machine, which is also (always going to be) my main development machine.   I didn't even want to run Linux on the project platform lol ... the whole point of the "bare metal" approach is to get away from "do everything for everybody" operating systems, and the complexity involved with them, and get back to something where it is somewhat reasonable for a single person to understand the entire deployment environment, as well as to be able to build it in seconds, versus hours.  I don't want to do linux builds, or friggin learn how to write a general purpose driver for the whole world.  I just want the sound card to work in my dedicated audio application, lol, and I wanna know HOW it is working.

    Don't even get me started on Apple.   You can't even develop and test an IOS app without years worth of systems growth, subscribing to services, buying a MacBook, submitting your app for approval, and somehow getting it ONTO a frigging iPad.   If it was easier, perhaps this whole project would not be taking place.   But Apple is the worst of em when it comes to proprietary black box dependencies and complexities.  And most "mobile" apps these days absolutely suck in terms of learnability.  ...

    Read more »

  • So, I need to build a simple “proof of concept” looper at this point

    Patrick11/05/2019 at 19:30 0 comments

    I spend a lot of time writing documents to myself.    I have several "object oriented" design and architecture documents in the works, that i've started, around this general project.  

    The main problem is that the project domain extends in so many directions, on so many dimensions, at the same time, that it has become difficult to manage, and that has somewhat affected my motivation to keep pressing forward.

    The last few months have seen me mostly playing with 3d printing, and most recently, blowing the dust off of my existing rig in the Synthbox 1 project.  In doing so I've been practicing with the old rig, using Quantiloop Pro on the iPad as my looper.  In this configuration I keep running into the limitations in that software regarding switching between sequential and parallel looping between songs and adding and controlling layers in sequential loops.

    So, I think the next push will be to make a simple proof of concept Looper.   This looper *should* be as functional as the existing Quantiloop program and steer away from introducing new paradigms for control and layering except to address the actual issues I am experiencing using said software in actual live gigs.

    I envision a 4x4 (four sequences with upto four layers per sequence) looper, possibly with a dedicated designed and printed foot contorller.

    Even so, architecturally, from a software perpective, this next step in the project is challenging. 

    I never said my goals were modest **, and the result is that I have bitten off a tremendous amount to chew.   This bare metal v-guitar project, as it stands, has expanded outwards in many different dimensions, and frankly, is becoming difficult to manage.   Here are some of my main feelings at this point:

    • The "arduino" framework for static initialization of the audio system is an artifice that does not blend well with Circle's run-time creation and initialization of the Kernel.   There's a fair chunk of complexity solely related to orchestrating run-time initialization of statically declared objects that could be removed.   This paradigm also constricts the ability to create more flexible audio configurations at run time.   While appropriate for the Arduino, pre-defining all of the audio connections and routing at compile time may not be the best way to go, moving forward, for this project.
    • The goal of creating an event driven windowing system, though fine as it is, and workable for simple applications, itself needs a lot of effort.  Additional types of controls (sliders, knobs, and the all important vu-meter) need to be created.   Secondly, although I think not a show stopper for dedicated applications, the implementation is not a completely generalized windowing system with regards to clip regions and underlying window updating.    It works fine as long as there is only one window, and possibly a dialog up over that, but does not implement clipping and real-time updating of hidden or partially obscured windows.  So, for instance, a vu-meter, without kludges, implemented in it, will stop updating if a dialog window is popped up over it, partially obscuring it.   A real-world example application might reveal how important, or not, this is.  It is an area of the code that I really don't enjoy working on, and I do have concerns that a robust implementation will have performance effects, especially on non-optimized display hardware like cheap touch screens or LED arrays.
    • Since I started the project, RST has released another 3rd party add-on UI library that is far better looking than mine or the previously available UGUI.   However it suffers both from the same structural flaws as the other Circle provided UI libraries (it is linked directly to the rPi screen and Circle USB mouse/touch devices and is not well generalized to other displays and input devices).  ...
    Read more »

  • Moved source to Github ...

    Patrick09/05/2019 at 00:26 0 comments

    2019-09-04


    I have moved the source code for my modifications of Circle to Github.   

    This is after updating, today, to the latest Circle source which supports the rPi 4.

    I re-forked the Circle source and re-applied my changes for better upwards compatibility with future releases by rsta.

    --------------------------------------------------------------

    There are two Github repositories:

    https://github.com/phorton1/circle contains my Fork of Circle, with as few changes as I could make to get my stuff to compile and work.

    You should be able to clone and build the above completely separately from any of my specific changes, below.

    https://github.com/phorton1/circle-prh contains my Additions to Circle.  This repository gets cloned to a folder called "_prh" within the above repository. 

    This change minimizes the amount of work I have to do as rsta provides new updates to Circle.

    The previous repository at Bitbucktet has been eliminated.

    - Patrick

  • Back to it ...

    Patrick09/03/2019 at 00:25 0 comments

    Getting back to the project after a month of playing with 3D printing.

    I have cleaned up slightly, recompiled and somewhat tested all the example test programs.

    This *might* be an opportunity to grab a copy of this *preliminary* source code.

    The "ui" branch and the "4 track recorder" are broken (and obsolete as is).

    The next things I want (need) to work on is basically the integration of the UI and Audio systems along with MIDI.

    This "triangle" is fundamental.   The UI reflects and modifies the state of the audio devices (vu meters, volume controls, etc).  As well, The UI should be able to create  a generalized MIDI control and the audio devices themselves should react to, and possibly generate MIDI events.  I am struggling a bit with "who is in charge" and how to best compartmentalize and factor this functionality.

    It also plays into the linking of things.

    Although interesting at first, the emulation of the static initialization of the Teensy Library objects (and the Arduino like setup() and loop() methods) is proving to be awkward and constraining.   Circle dynamically allocates the kernel, and static initialization of major objects does not fit well with it's model.   Furthermore statically creating audio objects means that they cannot be deleted consistently at run-time. This is particularly bad for AudioConnections, but relevant for all the audio objects.   A better model, going forward, is that things like connections between audio devices, as well as the audio devices themselves, are entirely created at runtime, allowing for the configuration (audio routing) to be modified more consistently.  

    Finally, the UI System (wsWindows) is so-so as it is.  I have been struggling to avoid the complexity of a true windowing system with a zOrder for all windows objects, with appropriate clipping, so that windows are "updated" and the visible portions are redrawn as necessary even when other windows are popped up over them.  It's really complicated to implement and I can't decide how important that behvior is.   It is expected from a full blown windowing system, but perhaps may not be needed for this targeted use of the rPI.

    So as I get the AudioDevice-MIDI-UI triangle sorted out a bit, I am going to try to rework my old "4 track recorder" example into the new wsWindows environment and see how it feels.

    Anyways, just wanted to let you know I'm back on it ...

    - Patrick

  • First UI and bare-metal multi-core

    Patrick06/28/2019 at 04:18 0 comments

    I have checked in a very rudimentary example-only four track audio recorder based on my versions of the bare metal Circle and ported Teensy Audio libraries.   I hacked my way through the Circle addon UGUI library, starting with the Tiny Oscilloscope example, and then adding my own C++ classes, to get a nominally workable windowing system.  For the first time I started testing the audio system in conjunction with some sort-of real world capabilities, namely a mouse and HDMI output.

    I need to emphasize that this is a very early preliminary proof-of-concept of a small part of what the system can/will do.  Most of the code is actually throw-away, as, for example, I will probably write my own event driven windowing system from the ground up.  I will not be, on the other hand, hopefully, re-writing the USB stack, which, thanks to rst, seems to work pretty good at this stage.

    I spent some time evaluating available GUI’s that I could port to Circle and came away deciding to write my own because of the same reasons I am doing this project in the first place.  Yes, it *might* be possible to port GLUT to the OpenGL 3 work that rst has already done, and then to port GTK on top of that, and then to port a windowing system on top of that, yawn.  But part of the whole raison d’etre for this project is to get away from huge stacks of complicated arcane software into a simpler C++ framework that a person can easily understand.  Linux is what, 3 million lines of code and takes hours and hours to compile.   This program, and Circle, are probably on the order of 50,000 lines and compile in less than a minute.

    That being said, the UGUI addon is nice and works well for this simple demo, but I realize that I want to build a complete audio oriented event driven windowing system … with things like MIDI and Audio device control messages built in from the ground up, so this code is more or less, as I said, merely a proof of concept and to test things for a while going forwards.

    There were a couple of other personal “firsts” in this foray.  The bare metal code is capable of running on a single core or on multiple cores.  In multiple-core “mode” it runs the audio and USB interrupts on core 0, the audio processing tasks on core 1, and the UI on core 2.   It’s nice to know that there is some horsepower in the barn in case I need it (which I will) in the future, even though in single core mode the simple recorder, even with 4 tracks simultaneously, is using less than 1% of the processor time by certain measurements.

    This project also allowed me to delve into visualization of the audio … which came in handy, actually, in finding a bug in one of the audio devices (the “tdm” device I use with the Octo).  Sometimes it is hard to deal with zillions of bytes flying by on the wire, but a picture immediately shows you glitch.  

    So there’s that too …

    (p.s. sorry for the image quality ... its a photo of my television taken with my phone ... no hdmi capture at this time).

    In any case, I feel like I am now nearly in a position to begin designing the actual system.   I have a few different Audio cards working and a basic audio library that can efficiently process sound.  There are some audio objects and effects that are workable, including reverb, a sine-wave generator, four channel mixer, and so on, that I can play with.  I have a rudimentary UI capability and some understanding of how the real windowing system will work.   I believe (and will be proving that) I can hook up a variety of different touch screens, from the official 7” rpi screen down to a 2.5” screen that I got.  I have a slew of Teensys and Arduinos with which to develop interesting controllers, and I believe that the USB midi is likely to work “out of the box”.

    There's obviously still some stuff...

    Read more »

  • Pi Circle to Teensy Audio Shield and Quad Audio device

    Patrick06/19/2019 at 03:12 0 comments

    I added the AudioControlSGTL5000 object to my port of the Teensy Audio Library.  Please see the page at:

    https://hackaday.io/page/6335-pi-circle-to-teensy-audio-shield-and-quad-audio-device

  • Circle Fork Source Code

    Patrick06/16/2019 at 18:06 0 comments

    Without further ado, here is a link my Fork of the Circle source code including the work-in-progress on the Circle Teensy Audio Library and my Circle rPi Bootloader, among other things.

    https://bitbucket.org/phorton1/src-circle/src/master/

    Sorry it's in bitbucket.  At some point I will need to move everything to github.

  • Initial Latency Benchmarks

    Patrick06/16/2019 at 18:02 0 comments

    I did some initial benchmarks of the latency of the Circle Teensy Audio Library with the Octo 6-in 8 out sound card.   At first I was disappointed.   With the standard settings of 44.1khz sampling and a 128 sample buffer, the latency was about 9 ms (milliseconds).   Though way better than the 38ms I was getting from the iPad setup, I was hoping it would be quicker.   I then tried a few things.

    • default setup (44.1khz, 128 sample buffer) - 9 ms
    • "short circuit" input buffer to output buffer - 6ms
    • decrease buffer size to 32 samples - 3 ms
    • increase sample rate to 88.2 khs - approx 1.5 ms

    The initial measurement represents the output buffer being 3 full buffers behind the input buffer.  This sort of makes sense, but I was hoping it would be 6ms.

    The first thing I tried was to short circuit my code, using the same buffers for input and output DMA.  I had noticed, due to a bug, before, that this worked, though I'm not sure why.  By using the same DMA buffers, data is being read into the buffers FROM the sound card simultaneously as it is being transmitted TO the sound card.  It just happens to work, I think, because of the order in which I start the DMA's.  It is not a valid measurement, because the system is unusable, basically, with no access to the data in this configuration, but it gives me a rough idea of the minimum latency possible at a given sample rate and buffer size.  Since each buffer takes about 3ms to transfer, 6ms means that the transmit buffer is 2 full buffers behind the input buffer. 

    So, I then decreased the buffer size to 32 samples. with a resultant measured latency of 3 ms.  I'm not sure if the reverbs will work, but straight through sound worked ok.  By the way, the Octo sounds pretty darned good.  I cannot hear any artifacts or distortion at any reasonable listening levels.  When I decreased the buffer to 32 samples, it continued to work, but, even without short circuiting. The buffers ARE going through the Teensy Audio Library transmit() and update() processes, so this is a usable configuration. 

    I then tried upping the sample rate to 88.2 khz - which means BCLK is running at 22.4Mhz and LRCLK at abut 704kHz, and it still worked!  I was surprised.   I'll have to see how it works with real code (i.e. the reverbs), but this brought the latency down to a respectable 1.5 ms.

    In my experience anything under about 2ms and we humans think of it as real-time.  Although most folks seem to accept "under 10ms" as functional, I am afraid, particularly early in development, about assuming that is sufficient.   So I want to ensure that, in the future, if I need to, that the system can be built to a lower latency specification.

  • Audio Injector Octo working with Circle port of Teensy Audio Library

    Patrick06/13/2019 at 13:58 0 comments

    Got the 6-in, 8-out, Audio Injector Octo sound card working with my bare metal Circle port of the Teensy Audio Library !!   Here's a link to the Audio Injector Forum:  forum

    (this log entry has been edited to add a picture of the Octo sound card in-vivo, below):

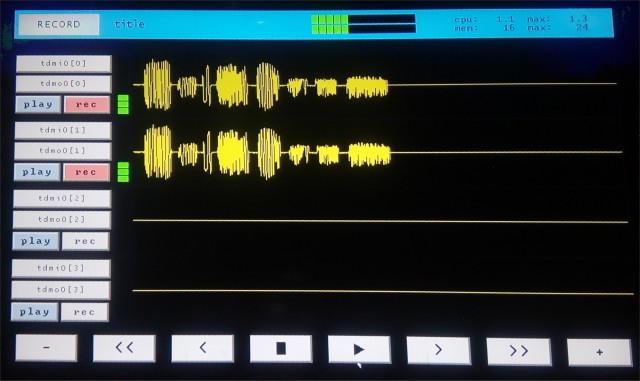
    The source code is posted here, but there's a caveat:  It's in a high state of flux, so I don't currently recommend branching it.  However if you are looking for those 3 lines of code that do something that I might have already done, it's there.

    After much consideration, I finally decided about two weeks ago to port Paul's Teensy Audio Library to work with RST's bare metal Circle framework on the rPi.   I retain my desire to avoid using linux and the complicated driver layers it presents,  His library is far simpler, easier to understand and port, and provides a good basic starting point for doing sound projects.

    The initial steps of the port, using the Audio Injector Stereo soundcard, went well as I already had a working bi-directional Circle i2s device written from previous experiments. Within an evening I had the three most basic classes working: AudioInputI2s, AudioOutputI2s, and AudioControlWm8731.  After that It only took a few hours to port a couple more interesting example classes including the Mixer and Reverbs.   The Mixer ported directly, in 5 minutes, with no source level mods !  To get the reverbs to compile I had to dig up and add some arm-math libraries to Circle, but even that only took a few hours, but they also basically compiled without source level mods.. 

    I even created an arduino-like framework for running the programs within Circle, so the following working source code will look familiar to anyone who has worked with the Teensy Audio Library before.  But please understand that the following program is not an Arduino sketch.  It runs on an rPI within the Circel bare metal framework!

    //-----------------------------------------------------------
    // reverb_test.cpp
    
    #include <Arduino.h>
         // Arduino.h is not needed but it is fun to list it
         // here as if it were a real arduino program 
    
    #include <audio\Audio.h>
    
    #define I2S_MASTER  0
    
    #if I2S_MASTER
         AudioInputI2S input;
    #else
         AudioInputI2Sslave input;
    #endif
    
    AudioEffectReverb   reverb1;
    AudioEffectReverb   reverb2;
    AudioMixer4         mixer1;
    AudioMixer4         mixer2;
    
    #if I2S_MASTER
         AudioOutputI2S output;
         AudioControlWM8731 control;
    #else
         AudioOutputI2Sslave output;
         AudioControlWM8731master control;
    #endif
    
    
    AudioConnection  c3(input,   0, mixer1, 0);
    AudioConnection  c4(reverb1, 0, mixer1, 1);
    AudioConnection  c5(input,   1, mixer2, 0);
    AudioConnection  c6(reverb2, 0, mixer2, 1);
    AudioConnection  c7(mixer1,  0, output, 0);
    AudioConnection  c8(mixer2,  0, output, 1);
    
    
    void setup()
    {
         printf("reverb_test::setup()\n");
    
         reverb1.reverbTime(0.6);
         reverb2.reverbTime(0.6);
    
         AudioMemory(20);
    
         control.enable();
         control.inputSelect(AUDIO_INPUT_LINEIN);
         control.inputLevel(1.0);
         control.volume(1.0);
    
         mixer1.gain(0, 0.6);
         mixer1.gain(1, 0.3);
         mixer2.gain(0, 0.6);
         mixer2.gain(1, 0.3);
    
         printf("reverb_test::setup() finished\n");
    }
    
    
    void loop()
    {
    }

    I figured it would then be pretty easy to implement the Audio Injector Octo, as Paul already had a ControlCS42448 class in the library.

    However, it turns out that the Octo is not really a "standard" CS42448.  Flatmax has implemented an FPGA on the board that becomes the BCLK and LRCLK master for both the cs42448 and the rpi i2s (which are both slaves), and it took some digging to figure out how to initialize it and get it working.  For better or worse, Flatmax used an additional FIVE gpio pins to communicate with the fpga.  One for a reset signal, and four to set a 4 bit sample rate.    Although I'm not terribly thrilled with the extra gpio pin usage, and wonder why he did not perhaps just piggyback the fpga control as an additional i2c device on the existing bus, by...

    Read more »

  • prh - my first Log Entry

    Patrick05/24/2019 at 18:58 1 comment

    This is my first project log entry.  

    (1) Started Hackaday.io pages.

    There!   That's it.   Not really, there's ton's of backdated log entries I want to make, but I'm just getting started with Hackaday and learning to use it.   I don;t think the "MOTIVATION" section from my initial "Details" should go here in the Log, but maybe that's a way to get started.  All I know is that I have made my first log entry, and this is it.

    pressing "Publish" ...

View all 10 project logs

  • 1
    1. Spend nearly 50 years playing the guitar and writing code​

    A prerequisite for reproducing this project from scratch.   Probably will be an actual set of steps to build a box, but for now, I'm just playing around.

  • 2
    2. Retire comfortably to a sailboat in Panama

    Otherwise, how could you have the time to do all this?

  • 3
    3. Pick the guitar rig of your dreams

    Since I live on a sailboat and have to transport everything by dinghy, small and robust is important to me.   The guitar rig this is intended to replace is an iPad running SampleTank, Quantiloop, and Tonestack within an Audiobus environtment, using an iRigHD usb audio device for guitar input and line out.  My main guitar is a Rainsong carbon fiber acousitic guitar with an added FTP Fishman Triple Play midii pickup that communicates with a USB dongle.   On the floor are 4 analog pedals connected to an analog-to-usb dohickey that is basically a teensy on the inside, along with a SoftstepII usb midi switch padal, and an akai MPD218 that I use as a foot switch array.    I also have one of the few ACPADs, that is like a midi-guitar-wing, that *could* provide a variety of midi controls over BTLE, but I don't think I'm gonna use it.   It looks cool though and has a bunch of leds, drum pads, and slider things that go on the face of the guitar.

View all 6 instructions

Enjoy this project?

Share

Discussions

rahealy wrote 09/15/2019 at 23:18 point

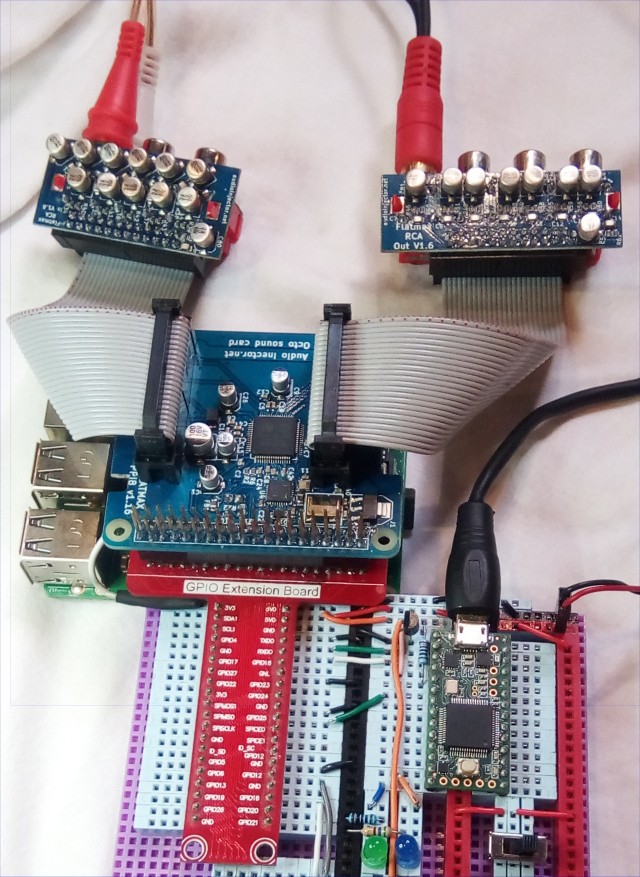
I'm working on a similar project using the rust programming language with the Audio Injector Ultra 2 sound card:

https://github.com/rahealy/rpi3fxproc

In your rig it appears that the Octo is the i2s master and the RPi is the i2s slave.

The Ultra2 I'm using also runs as i2s master.

I'm having some difficulties troubleshooting my i2s code.  Did you find that you had to enable the PCM clock on the RPi even though the RPi was the i2s slave?

  Are you sure? yes | no

Patrick wrote 01/05/2020 at 14:27 point

No, I just reviewed my code to be sure, but to be sure, when I initialize the PCM in slave mode, it does NOT start the PCM clock.

I know it's not your language of choice, but here's a link to my "bcm_pcm.cpp" file, that is the basic framework for all I2S audio devices in my system (the audioinjector octo & stereo, the teensy SGTL5000 based sound card, etc)

https://github.com/phorton1/circle-prh/blob/master/audio/bcm_pcm.cpp

I noticed from a brief glance at your github page that you are looking at the bcm/pcm DMA scheme.  I believe that DMA is critical to any worthwhile implementation of I2S and that there are some quirks in the usage of it's DMA that I've had to struggle with.   I'll try to say something useful here, but there's really a bit of "voo-doo" here, a grey area that is not conclusively documented or consistently implemented regarding the bcm/pcm and DMA.

Most notably, I think, is that there is an implication in most implementations (i.e. the linux drivers) that the setup for input, and output, i2s is "symmetrical"  ... that, to some degree or another, you initialize the PCM for output kind of just like you do for input, but with a few changes to the parameters you send during initialization.

The weird key problem I ran into is that symmetry seems to break when you get to the level of the DMA interrupts.   If you code everything with a pair of interrupt handlers, one for input, and one for output, I think you will find that only one of the two interrupts gets triggered, that in fact, there is only ONE interrupt associated with the BCM ..... I don't know quite how to state this clearly.

So, in my DMA interrupt handlers, you may notice that at the top, there is a check to see if the interrupt is intended for "input" or "output", and if I receive, for example, an "input" interrupt in the outputIRQ handler, I call the inputIRQ handler FROM the outputIRQ handler (and vice versa).

This "weirdness" took me the longest time to (sort of) figure out.   That even though you register two separate DMA interrupt handlers (one for input and one for output), that it seems as only perhaps the "last one wins" and all the DMA interrupts (seem to) call one routine,

As long as I go with that theoretical axiom, the system seems to work well for input, output, or both.  And no other thing I could figure out worked with "both".

As I mentioned to you privately, I'll have to take a look at rust sometime.  My project is getting out of hand already :-) with exponential growth and linear time availability, so I have some hard choices to make going forward.  

But I wanted to at least answer your question, to the best of my ability, in public, for posterities sake.

Cheers!

- Patrick

  Are you sure? yes | no

Similar Projects

Does this project spark your interest?

Become a member to follow this project and never miss any updates