This small clock is actually my second project; it was started and finished while I was intermittently programming another larger clock made with a 16x16 NeoPixel matrix. Apparently clocks are my thing (for now) because I wanted to build useful things and its pretty easy to read a RTC and display the time.
I was inspired by Mohit Bhoite's electronic sculpture projects, particularly this one featuring a 7-segment display. I don't have that caliber of soldering or programming skills, but Adafruit's CircuitPython looked like a good way to quickly program a small project and the ItsyBitsy M0 Express had capacitive touch capability to easily provide inputs. I used the RTC+SD Featherwing as the middle layer between the ItsyBitsy and the 7-segment display because it has a double row of headers and the inner set of headers just happened to match the width of the headers on the ItsyBitsy M0. I made 1:1 scale drawings of the boards to plan the bends in the brass rods, and actually used the lines on the page to get the bends to the correct angle to hold up the 7-segment display. The build came together almost exactly how I envisioned it. After I started testing the display I found that the LED segments were hard to see, so I put a sheet of dark acrylic in front to cut the glare.
I used Adafruit's CircuitPython guides for the ItsyBitsy, capacitive touch, 7-segment display and RTC to get each component working and writing output to the console log and later the display. I remembered seeing in the Arduino section of their 7-segment display guide that "If you want even more control, you can call writeDigitRaw(location,bitmask) to draw a raw 8-bit mask..." and eventually found a useful thread on Adafruit's customer support forum about what an 8-bit mask is. Unfortunately, the CircuitPython library doesn't offer this functionality (that I could find), so I had to DIY a solution.
I found hex 8-bit masks for 0-9 and A-F in segments.mpy under the HT16K33 library, so I replaced A-F and added what I needed for the face animations in a copy of the library. I used a Google Sheet to calculate the hex values for the shapes from a mockup of the 7 segments. Here's an example showing 0-9 and the upper ring for an eye:

I made modifications to my copy of the segments library in two places. First, adding the 8-bit masks in hex to the NUMBERS tuple (I don't think I used all of these):
NUMBERS = (
    0x3F, # 0
    0x06, # 1
    0x5B, # 2
    0x4F, # 3
    0x66, # 4
    0x6D, # 5
    0x7D, # 6
    0x07, # 7
    0x7F, # 8
    0x6F, # 9
    0x63, # a - upper ring/eye
    0x01, # b - upper line
    0x40, # c - middle line
    0x08, # d - lower line
    0x1C, # e - u smile
    0x54, # f - n frown
    0x60, # g - lower left corner of eye
    0x42, # h - lower right corner of eye
    0x03, # i - upper right corner of eye
    0x21, # j - upper left corner of eye
    0x5C, # k - lower ring
    0x30, # l - left hand side (opposite of 1)
    0x0C, # m - bottom right corner (smirk)
    0x18, # n - bottom left corner
    0x62, # o - u eye
)
And second, adding the new characters to the _put function of the Seg7x4 class (see list of chars that runs a through o):
    def _put(self, char, index=0):
        """Put a character at the specified place."""
        if not 0 <= index <= 3:
            return
        char = char.lower()
        index = self.POSITIONS[index]
        if char == '.':
            self._set_buffer(index, self._get_buffer(index) | 0b10000000)
            return
        elif char in 'abcdefghijklmno':
            character = ord(char) - 97 + 10
        elif char in '0123456789':
            character = ord(char) - 48
        elif char == ' ':
            self._set_buffer(index, 0x00)
            return
        elif char == ':':
            self._set_buffer(4, 0x02)
            return
        elif char == ';':
            self._set_buffer(4, 0x00)
            return
        else:
            return
        self._set_buffer(index, NUMBERS[character])
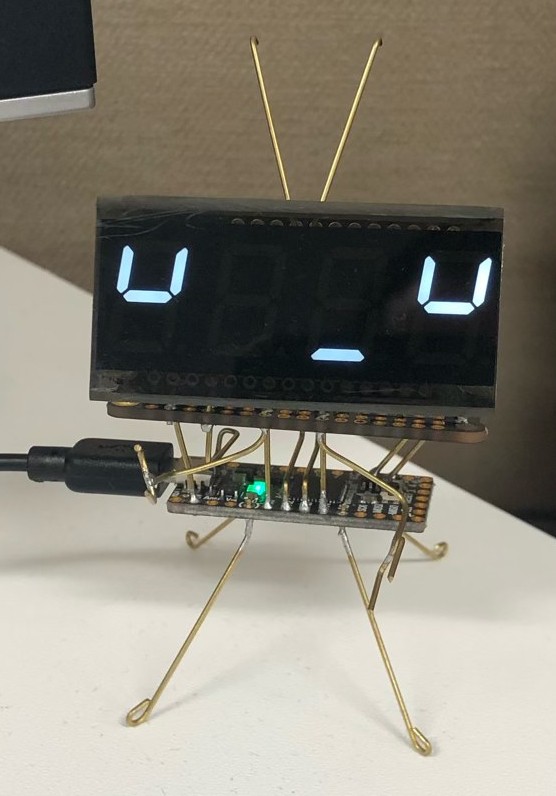
From there displaying the faces is a print statement to turn off the colon and another print statement with odd combinations of letters and spaces in it. This one:
        display.print(";")
        display.print("o do")
        time.sleep(1.5)
Yields this:
Coding the rest was straightforward, though I think the ItsyBitsy M0 is nearly running out of RAM - I can't add any other interactions besides the two antenna touches and a time setting mode (I haven't tried compiling my modified library to a .mpy). At one point I tried starting over in Arduino, but I wasn't able to find good documentation of the board's capacitive touch capabilities when programmed in Arduino. An ItsyBitsy M4 board would have more RAM, but those don't have capacitive touch inputs built-in. I'd like to add more interaction to the clock, but as it stands it has all the functionality I want.
Discussions
Become a Hackaday.io Member
Create an account to leave a comment. Already have an account? Log In.