Barnabas Robotics ArduBlock Upgrade
An upgrade for ArduBlock
An upgrade for ArduBlock
To make the experience fit your profile, pick a username and tell us what interests you.
We found and based on your interests.
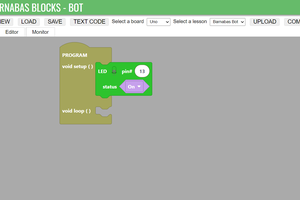
As a part of our plan to re-launch Barnabas-bot next month, I've been making some big changes to the ways that kids and parents experience programming at home when using Ardublock.
The biggest change I wanted to tackle was to allow Ardublock to run without needing to first launch the Arduino IDE. After a several weeks of playing with different libraries, I have a build that's working!
Basically, the java code calls the arduino-cli executable to both compile and upload.
The project is still in process, but I feel that it's at a stage now where I can share it. Check it out!
Fork for project here...
https://github.com/edwardbarnabas/Ardublock-standalone
I created installers, which can be found in the "bundler" folder. It should seamlessly install (I hope) on Windows (.exe) and Mac (.pkg). I'm still working on a Linux installer, but that shouldn't be too much of an issue.
ardublock.xml
- add block genus
The block genus "initializes" the block. It determines the block's physical form and what it can connect to.
The four options, CW, CCW, ISTOP and RSTOP are all their own block as well which must be added.
- add block family
Since CW, CCW, ISTOP and RSTOP are related options, they must be placed in the same block family. This allows them to be included together in the same drop down menu as shown above.
- add block genus to block drawer
The blocks should be added to the corresponding block drawer. This is the "folder" the blocks are located within arduBlock.
-----------------
- connect block genus to path of block java file
-----------------
- add block label
bg.CW=CW
bg.CCW=CCW
bg.IStop=ISTOP
bg.RStop=RSTOP
- add block description
bg.DCMotor.description=DC motor control
bg.CW.description=Turns motor clockwise
bg.CCW.description=Turns motor counter-clockwise
bg.IStop.description=Instantly stops motor
bg.RStop.description=Gradually stops motor
-----------------
This is the java file: DCMotorBlock.java
package com.ardublock.translator.block;

import com.ardublock.translator.Translator;
import com.ardublock.translator.block.exception.SocketNullException;
import com.ardublock.translator.block.exception.SubroutineNotDeclaredException;

public class DCMotorBlock extends TranslatorBlock
{
    public DCMotorBlock(Long blockId, Translator translator, String codePrefix,    String codeSuffix, String label)
    {
        super(blockId, translator, codePrefix, codeSuffix, label);
    }

  @Override
    public String toCode() throws SocketNullException, SubroutineNotDeclaredException
    {
      TranslatorBlock pinBlock0 = this.getRequiredTranslatorBlockAtSocket(0);
      NumberBlock pinNumberBlock0 = (NumberBlock)pinBlock0;

      String pinNumber0 = pinNumberBlock0.toCode();
      translator.addSetupCommand("pinMode(" + pinNumber0 + ", OUTPUT);");

      TranslatorBlock pinBlock1 = this.getRequiredTranslatorBlockAtSocket(1);
      NumberBlock pinNumberBlock1 = (NumberBlock)pinBlock1;

      String pinNumber1 = pinNumberBlock1.toCode();
      translator.addSetupCommand("pinMode(" + pinNumber1 + ", OUTPUT);");

  		TranslatorBlock rotation = this.getRequiredTranslatorBlockAtSocket(2);

      String pinControl = rotation.toCode();

      String ret;

      if (pinControl.equals("CW") == true)
      {
        ret = "\tdigitalWrite(" + pinBlock0.toCode() + ", HIGH); \n\tdigitalWrite(" + pinBlock1.toCode() + ", LOW); \n";
      }
      else if (pinControl.equals("CCW") == true)
      {
        ret = "\tdigitalWrite(" + pinBlock0.toCode() + ", LOW); \n\tdigitalWrite(" + pinBlock1.toCode() + ", HIGH); \n";
      }
      else if (pinControl.equals("IStop") == true)
      {
        ret = "\tdigitalWrite(" + pinBlock0.toCode() + ", HIGH); \n\tdigitalWrite(" + pinBlock1.toCode() + ", HIGH); \n";
      }
      else
      {
        ret = "\tdigitalWrite(" + pinBlock0.toCode() + ", LOW); \n\tdigitalWrite(" + pinBlock1.toCode() + ", LOW); \n";
      }

      return ret;
    }

}
The idea is to read in the clockwise, counter-clockwise, instant stop, or ramp stop parameter and set the pins accordingly. Each parameter corresponds to a unique combination of 2 pins being on or off (4 total combinations).
Output and what the block looks like:
void setup()
{
  pinMode(1, OUTPUT);
  pinMode(2, OUTPUT);
}

void loop()
{
  digitalWrite(1, HIGH);
  digitalWrite(2, LOW);
}
Today I fixed the bash file I started last session. I needed to create a change of directory to the current directory using the cd below.
After fixing that, I uploaded the .jar, bash, and NewPing library to a bin folder in our GitHub. Then, I used git commands to change the folders of the NewPing branch:
git clone https://github.com/BarnabasRobotics/BarnabasRoboticsArdublock-2019.git
cd BarnabasRoboticsArdublock-2019
git checkout NewPing
mkdir src
git mv  src/
git add --all
git commit -am "NewPing changes"
git push origin NewPing
And again used git commands to merge the NewPing branch to the master:
git checkout master
git merge NewPing
git add --all
git commit -am "Merging NewPing to master branch"
git push origin master
Next, Ed asked me to create a Continuous Servo Block that rotates continuously clockwise (angle=180), counterclockwise (angle=0), or stays stopped (angle=90). I've started changing the ardublock.xml, block-mapping.properties, and ardublock.properties files, as well as creating the new java file.
I think I will need to create new STOP, CLOCKWISE, and COUNTERCLOCKWISE blocks, create a family for those options, and continue to change the java file to finalize all blocks.
-C
Today we found that the NewPing library cannot automatically download with the rest of the Arduino libraries, so we are working on a download called NewPingDownload that contains the NewPing library, ardublock-all-withNewPing.jar file, and a bash file that when pressed will move the first two files to their correct files in the Arduino directory.
NewPing >> /libraries
ardublock.jar >> /tool
I am pretty close to perfecting the executable, but I just learned how to use bash today.
Those were my closest!
-C
To add a physical UI button that has no function, there are two files to be edited.
OpenBlocksFrame.java must be edited in two places. The first adds your button as a JButton while also calling ardublock.properties to obtain the text that will appear on the button. The second adds it to "buttons" which is a location on the JPanel.
ardublock.properties simply defines visible text.
The current objective is to add a button that will change the board type. To do this, a new listener must be added which will be called by OpenBlocksFrame.java and run its task. The other listeners call functions in OpenBlocksFrame.java and all run without seeming to communicate with arduino. They appear self sufficient with just ardublock.
Today I continued off from last time where I worked on making a button that would allow one to set the Arduino port directly from Ardublock instead of using the Arduino menu. I did a bunch of internet searching, and found a website with a Java-Arduino interaction library with methods that would allow me to achieve this goal. I started to write some code in a PortButtonListener.java file, but my Java knowledge is a little rusty, so I'll probably have to troubleshoot it quite a bit before it starts working.
I'm a little confused on how I would create a new instance of the downloaded Arduino class, and how I would be able to get the port description, but I'll work on being able to do so.
I modified the ardublock.xml, ardublock.properties, and block-mapping.properties files to include an ultrasonic ping block, then created the UltrasonicPingBlock.java file for functionality.
Then, I generated a new .jar file to send to Ed, but it would not work on his laptop, so I uploaded the files to the shared GitHub, but on the MASTER. The rest of my day consisted of Ed and I figuring out how to undo commits to the master branch -_-
I had to download Git, clone the project repository to my library, then use the 'hard reset HEAD' and 'push origin' commands to delete the last two commits. There was a whole thing with my GitHub login that I had to fix which took longer than it should have, unfortunately.
All in all, we still have to find a way to download the NewPing library with Arduino and settle the .jar issue.
-C
Today I worked on making a clickable button from the top of the workspace that would allow the user to get the Arduino board information. The end goal is to allow the user to set the board directly from the workspace. I added a ui button in ardublock.properties. Then I went to OpenBlocksFrame.java and added a new JButton for this button. It successfully showed on the workspace upon running the code, but did not have any functionality.
I tried reading through a bunch of the files in Ardublock and even the Arduino code, but I couldn't find a connection yet on how I could code this button. I did notice that the SerialMonitor button didn't have a listener file, which could give some useful information on how to implement this board info button, but I'll have to look further into it.
Video here: https://photos.app.goo.gl/V9CAFfuhXz2TA8Cs6
Created a project using the new button block!
Video here: https://photos.app.goo.gl/V9CAFfuhXz2TA8Cs6
Created a project using the new button block!
Some versions of MacOSx come with Maven installed. To check, in the terminal, enter:
mvn -version
If Maven isn't installed, download it here. Unzip the file and place the folder in the desired location.
Next, you will need to update (or create) a file using vim (programming language).
In the terminal, enter:
vim ~/.bash_profile
This window should pop up. The first line contains the path for wherever you placed the maven folder. The second line should be the same as in the screenshot.
-----
Some necessary vim commands:
i - insert mode, press esc when finished editing
:wq - save changes and quit vim (press enter afterwards)
:q! - force quit vim without saving changes (press enter afterwards)
-----
Restart terminal and to verify installation, once again enter:
mvn -version
Tutorial here for reference.
Download ArduBlock here.
In the ardublock-all folder, run the install_openblocks executable which installs OpenBlocks.
Once completed, in the terminal, enter:
mvn validate
This command installs arduino's pde.jar file into the local repository. You should be all set to complile.
In terminal, set the directory with the cd command.
cd /Users/Nate/arduproject/BarnabasRoboticsArdublock-master/ardublock-all
To compile ardublock use the following command:
mvn compile exec:java -Dexec.mainClass="com.ardublock.Main"
To create a .jar file for the program Arduino itself to run, enter the following:
mvn clean package
The .jar file is created in:
/ardublock-all/target
Copy this file to:
/Users/[your username]/Documents/Arduino/tools/ArduBlockTool/tool
Arduino will now run your version of the program.
Create an account to leave a comment. Already have an account? Log In.
Become a member to follow this project and never miss any updates

 Edward Li
 Nathan
 Dylan Turner
 luweicong