Close
0%
0%

Exhaust Fan Controller for Range Hood

Automate your existing range hood exhaust fan, ramping the fan up as-needed based on both temperature above the range and smoke levels.

Similar projects worth following
While watching our roommate and my wife cooking, I noticed that they frequently didn’t think to turn on the exhaust fan until the kitchen started getting fairly smoky or hot (in the summer). The particular model of range hood we have (IKEA LUFTIG, however when I purchased it I noticed that nearly every major brand had the EXACT same looking model within a few dollars of each other) has 4 buttons (light, fan on/low, fan medium, fan high). Seemed like a very straight-forward fix via a microcontroller, some sensors and relays. I’m partial to Particle Photons and they happen to make a Particle Relay Shield that has 4 relays built-on, so it was a perfect fit. The temp sensor was an easy solution, however smoke proved harder than initially expected.

Sources:
blog.dzl.dk/2012/01/02/hacked-smoke-detector/
Dzl

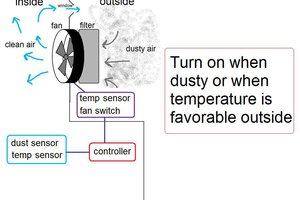
I started with a MQ-2 gas sensor as it seemed to be what I was after (multiple sources I found referenced using it for detecting smoke). While it technically worked, the readings it gave tended to drift quite a bit (it frequently would start giving readings indicative of a lot of smoke for no particular reason) and of particular issue was the fact that it was sensitive to specific gases in addition to smoke. Of particular interest was LPG, which happens to be the propellant for the cooking spray I frequently used. This would result in the fan ramping to high every time I used the spray, even if I was quite a distance away.

After having disabled the smoke sensor and only using the temperature sensor (which didn’t prove to be enough of an indicator by itself), I finally stumbled upon Dzl’s post in regards to getting analog smoke readings from most any residential smoke alarm. I ultimately bought one (~$10) at the local hardware store and after some time carefully taking it apart (mine had more electrical components hiding the chip than his did) was able to get to the chip and solder a wire to the pin he referred to. After wiring up the power wires to run off of the 5V from the Particle Photon, and cutting the wires to the buzzer I was able to get the analog readings without any issues.

After some initial calibration in my garage I was able to get some rough values. I subsequently soldered everything up and 3D-printed some enclosures for both the Particle Photon Relay Shield and my Sensors. I ran one test seasoning a cast-iron pan to generate smoke and have been happy with the calibration values I arrived at, although I may tweak it over time if warranted.

Exhaust Hood Controller Boxes.f3d

The original Fusion 360 File I used

fusion - 5.08 MB - 07/17/2019 at 17:03

Download

Exhaust Hood Controller Boxes.step

A STEP version of the project

step - 5.92 MB - 07/17/2019 at 17:03

Download

Enclosure.stl

Enclosure STL File

Standard Tesselated Geometry - 3.98 MB - 07/17/2019 at 17:03

Download

Lid.stl

Enclosure Lid STL File

Standard Tesselated Geometry - 29.57 kB - 07/17/2019 at 17:03

Download

Sensor Enclosure.stl

Sensor Enclosure STL File

Standard Tesselated Geometry - 204.28 kB - 07/17/2019 at 17:03

Download

View all 6 files

  • 1 × Particle Photon
  • 1 × Particle Relay Shield
  • 1 × 3D-Printed Component: Main Enclosure Lid
  • 1 × 3D-Printed Component: Sensor Enclosure very custom to my specific smoke alarm circuit board, so this may not work with yours.
  • 1 × 3D-Printed Component: Sensor Enclosure Lid

View all 13 components

  • 3 Years On

    Ben Brooks02/23/2022 at 18:07 0 comments

    Looks like it's been close to 3 years since I finished this project and it's been working like a champ the whole time. No noticeable differences in response times, etc. so it appears that neither the smoke nor temperature sensors are bothered by the grease that they are regularly exposed to.

  • Project Update

    Ben Brooks11/13/2019 at 17:44 0 comments

    Been using this project in it's current configuration for ~6 months now without any issues. Definitely had some concern that there would be drift or complete failure of the smoke detector sensor due to the high-grease environment, but nothing yet. I haven't even needed to adjust my parameters for controlling the fan based on temperature or smoke levels, which was surprising.

    Been one of those rare projects where it just works! I've been very happy with the responsiveness whenever any cooking begins, it's ramp-up as conditions worsen and with how long it runs after cooking stops. An absolute improvement over manual control of the exhaust fan.

View all 2 project logs

  • 1
    WARNING!

    The first thing you need to know is this is dangerous; proceed at your own risk. The fan is directly wired to 120V and you will be working with this, so be careful and flip the breaker that it is on while you work. If you aren’t comfortable or qualified to work on line voltage, don’t.

  • 2
    Identify your setup

    With that out of the way, proceed with identifying how your fan is controlled using a multi-meter. In my case, power is ran through the switches and toggling them simply completes various circuits (the circuits ultimately being the various windings in the motor allowing it to be multi-speed). The actual wires were connected to the switch terminals with spade connectors, so it was quite easy to unplug them (remembering which wires go where). Ultimately, I bought similar connectors (though not quite the same size) at a local hardware store and crimped these to a piece of copper wire for connection to the relays (taking care to use heat shrink tubing to ensure nothing jostles loose). I then connected another set of wires to the buttons using the bought connectors as well. Additionally, I had to splice off the common wire so that each relay could be connected to it (as evidence by the red twist-on wire connector).

  • 3
    Make the board

    Beyond printing the components, the only other time-consuming part is soldering up the board. My skills are less-than-great and I didn’t run into any issues. While not the prettiest thing I’ve made, just follow the wiring diagram I made below.

View all 6 instructions

Enjoy this project?

Share

Discussions

morganxaf wrote 09/15/2022 at 23:34 point

May want to you please tell me greater statistics about the vacuum pumps and silicone vape used for this? Specifically, the sort of pumps and wherein you ordered them from?

  Are you sure? yes | no

by7yisliwcg wrote 05/25/2022 at 19:28 point

Very Cool little robotic you've got there Ian! How are you powering it? I can see a nine volt battery. 9 Volts batteries can get pulled down with the aid of power hungry DC automobiles in rangefinder.

  Are you sure? yes | no

m38326558 wrote 12/17/2021 at 14:45 point

this is an amazing article and very inspiring. I just love your project idea about an exhaust fan controller for the range hood. I am also working on a cooking website you can check here http://cookinggearlab.com/

  Are you sure? yes | no

rengesole wrote 10/07/2021 at 08:39 point

This is very impressive range hood project I appreciate your work. You can visit rangehoodpoint to learn more about it.

  Are you sure? yes | no

Mark wrote 03/27/2021 at 05:04 point

This is a cool project. Automating the fan makes it one less thing to think about when you're busy cooking up a large meal for the family.

  Are you sure? yes | no

Russell wrote 10/15/2020 at 04:26 point

I'd like to add that the controller should at no time turn on during a real fire. And possibly you could add a 433mhz transmitter on another fire alarm within your house.  Then subsequently a 433mhz reciever on your range vent. Monitor the transmitter for a value of 0 for no fire or 1 for fire. Reference the value before turning the system on. 

  Are you sure? yes | no

Ben Brooks wrote 12/07/2020 at 15:20 point

Just saw this comment; not a bad thought! Unfortunately, the way it's currently setup/used there isn't anyway for the system to distinguish between a fire and normal cooking (they both create smoke).

Additionally, I think having it operate during a fire would actually be a potential benefit (however slight) as it would help remove smoke from the space. My understanding of fire codes is that shutting down air-moving equipment is almost exclusively to avoid spreading smoke into other areas of the building where there isn't a fire. Exhausting smoke outside the building obviously wouldn't be contributing to this.

  Are you sure? yes | no

Similar Projects

Does this project spark your interest?

Become a member to follow this project and never miss any updates