Close
0%
0%

CNC pen plotter

A multi axes (XY) CNC pen plotter machine

Similar projects worth following
A simple two linear axes plotter controlled with an Arduino and a CNC shield. The X axis is controlled by two Nema 17 stepper motors and the Y axis is controlled by another Nema 17 stepper motor.

The commands are sent via the “Universal GCode sender” and the GCode is generated with an Inkscape plugin.

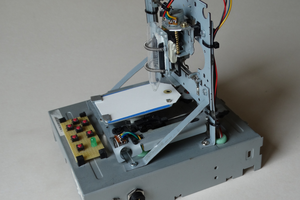
On the hardware side, this machine possesses two degrees of freedom (X and Y directions). Take into account that as this CNC machine doesn’t have a Z axis, the pen will continuously touch the paper, so it is recommended for continuous line art projects, such as this. You can also replace the pen with a laser to convert this machine into a laser engraver/cutter, although this last modification will require some small modifications on the electronics side as well.  

On the software side, this machine uses “Universal Gcode Sender” and the “GRBL” for the Gcode sending and parsing steps, respectively. For generating amazing continuous line art, I recommend the following “StippleGen” program, which generates TSP art and that can be converted into Gcode commands via Inkscape program.

Base_Y.stl

Moving plate (Y direction)

Standard Tesselated Geometry - 290.66 kB - 07/30/2019 at 17:03

Download

Base_X_right.stl

Moving plate (X direction, right side)

Standard Tesselated Geometry - 219.54 kB - 07/30/2019 at 17:03

Download

Base_X_left.stl

Moving plate (X direction, right side)

Standard Tesselated Geometry - 244.09 kB - 07/30/2019 at 17:03

Download

Clamp_X.stl

Plate to attach the belts into

Standard Tesselated Geometry - 80.39 kB - 07/30/2019 at 17:03

Download

pen_holder_lower_part.stl

The lower part of the pen holder

Standard Tesselated Geometry - 154.42 kB - 07/26/2019 at 16:36

Download

View all 9 files

  • 1 × Microcontroller Arduino UNO
  • 1 × CNC shield CNC Shield V3.0
  • 8 × Shaft holders Shaft holders: 8mm
  • 4 × Stepper motor driver Model: A4988
  • 3 × Motor Nema 17

View all 11 components

  • Future improvements

    Daniel07/25/2019 at 17:50 0 comments

    As this is an ongoing project there is still some things I want to add/improve:

    • Replace the Y axis shafts for shorter ones.
    • Place an easy to install/remove base to hold the work paper.
    • Redesign the penholder to make it stiffer.
    • Add a fan to decrease the motor drivers’ temperatures.
    • Replace the wooden movable pieces for acrylic ones (or at least paint them).
    • Tidy up the wiring.

View project log

  • 1
    Software
    • Install the GRBL into your Arduino. Find here some useful instructions on how to do this.
    • Download and install “Universal Gcode Sender” for sending Gcode commands to the Arduino. You can download this program here.
    • Open Universal Gcode Sender and connect to the Arduino.
      •  Make sure that the belts are not connected.
      •  Test each motor’s rotation direction by sending the G0 X0 or G0 Y0 command. Change the wiring if needed to make the motors work as intended.
      •  Load a Gcode file. Make sure that the Gcode won’t make your CNC collide with your borders.
      • Run the Gcode file.
  • 2
    Hardware

    The assembly process is quite straightforward:

    1. Assembly the pulleys and pulley holders (3 in total).
    2. Assembly the pulleys, the motors and the motor holders (3 in total).
    3. Assembly the X shafts and the X shaft holders (2 in total).
    4. Assembly the movable left side base.

    Assembly of the movable left base


      5. Assembly the movable right side base.

    Assembly of the movable middle base


      6. Assembly the movable middle base.

    Assembly of the movable right base


      7. Assembly all the bases and shafts accordingly.

    Complete assembly photo 1 Complete assembly photo 2 Complete assembly photo 3


      8. Place the belts and make sure to tighten them up.

      9. Manually move the X and Y bases to check for uneven movements or noises. Try loosing/tightening the screws and adjusting the different elements to make the movements as smooth as possible.

  • 3
    Electronics

    Before proceeding with the electronics, I really recommend checking that all the components work properly. Pay special attention to A4988 modules, as they need to be tuned before being used. Find a nice tutorial about tuning them here.

    After ensuring that all the components work properly follow next diagram to setup your electronics. Don't forget to connect the X.STEPS/DIR pins so the commands in the A axis are the same as the ones in the X axis (remember that the X direction is controlled by two motors!).

View all 3 instructions

Enjoy this project?

Share

Discussions

Carter Brown wrote 10/18/2020 at 07:39 point

Recommend shaft drive stepper motor, Nema17, 59Ncm, high quality.
https://www.motiongoo.com/index.php?route=product/product&product_id=73&search=17HT19S4200C1

  Are you sure? yes | no

Similar Projects

Does this project spark your interest?

Become a member to follow this project and never miss any updates