I made two iterations on this project. The first one is based on an Enviro pHat
First iteration: Enviro pHat
Hardware
The sensing part is done by a Raspberry Pi Zero W and an Enviro pHAT, which provides temperature, pressure and light sensors. As all HATs for the Raspberry Pi, the Enviro pHAT is meant to be connected directly on top of the Pi. However, this means that the temperature reading will be wrong due to the Pis heat emission. I thus added a ribbon cable to move the temperature sensor away from the Pi CPU.
The list of materials is thus the following:
Next step is to solder the headers on both the Pi and the pHAT. You can use the ribbon cable to hold the header pins while you solder them. Make sure the ribbon cable will not pass over the sensors once connected on the pHat.
Software - Initial setup
If you bought a kit like me, there’s a good chance that you also have an SD card with Raspbian already installed. I didn’t have a monitor+keyboard to set up the Raspberry, so I followed these instructions on how to enable SSH and WiFi right from the start by modifying files on the SD card.
Software: Pi setup
Once connected to SSH, configure /etc/wpa_supplicant/wpa_supplicant.conf to connect to the local WiFi network. Note that the Raspberry Pi Zero uses 2.4 GHz WiFi only and not 5 GHz.
I wanted to use the Pi on a WiFi network does not allow inbound connections, even to other devices connected to the same network. To still be able to manage the Pi, I set up a VPN with an external server. I used WireGuard for this, which is surprisingly easy to set up compared to behemoths like OpenVPN. Full instructions for compiling and setup are on GitHub. Don’t forget to have the VPN started upon boot.
We now need to make the actual measures. The source code is linked on the project page. The Enviro pHAT comes with a Python library, which we are going to use. We are going to send the data using the MQTT protocol, because why use simple HTTP when we can use something more complicated? Install python 3 and the corresponding python3.X-dev package, then run setup.sh to install the two libraries.
The python script is sensors.py. It connects to the MQTT broker through the WireGuard tunnel, and makes measurements in a 10s loop, formatting them as the server expects (more on that below).
To run and monitor the script, we use supervisor. You can install it using apt, and then put the configuration file in /etc/supervisor/conf.d/. If you use supervisor, also copy (and maybe adapt) the launch script sensors.sh.
Software: Server
Not everything could be run out of the Pi. First, you can’t connect to it, which is somewhat unfortunate if you want to read the data produced. Hence the use of an external server.
First thing is to also install WireGuard on the server, and configure it to accept the connection request from the Pi.
The next thing is to have the server receive the data, store it, process it and display it. I wanted to have the system be easy to deploy and move, so I went to Docker, with a time series database, InfluxDB (actually, I used the full TICK stack). The configuration files to deploy using Docker Compose are in the server/ directory of the GitHub repo. Interesting points are:
- A MQTT broker is started and made to listen on the VPN interface;
- Telegraf subscribes to the broker to get data, and pushes it to InfluxDB;
- InfluxDB holds all the data
- I set up two “retention policies”: one that retains high definition data for 90 days, and another for averaged data that retains it indefinitely.
- Kapacitor is meant to do processing and alerting. I haven’t configured it yet.
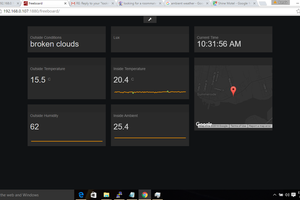
- Chronograf shows the data. Its web server is exposed to the localhost interface.
To expose the Chronograf data, I added a local site to my nginx configuration with a custom subdomain, a LetsEncrypt certificate and a basic auth password.

 Brenda Armour
 Asep Bagja Priandana
 Dmitry