Close
0%
0%

ESP8266 Publish Data to ThingSpeak without Wi-Fi

This project shows how to connect the ESP-12S A9G GPRS GPS Node to the Internet using a SIM card data plan and publish data by MQTT.

Public Chat
Similar projects worth following
This project shows how to connect the ESP-12S A9G GPRS Node to the Internet using a SIM card data plan and publish the DHT11 temperature and humidity to the ThingSpeak via MQTT without using Wi-Fi. We’ll program this board with Arduino IDE.

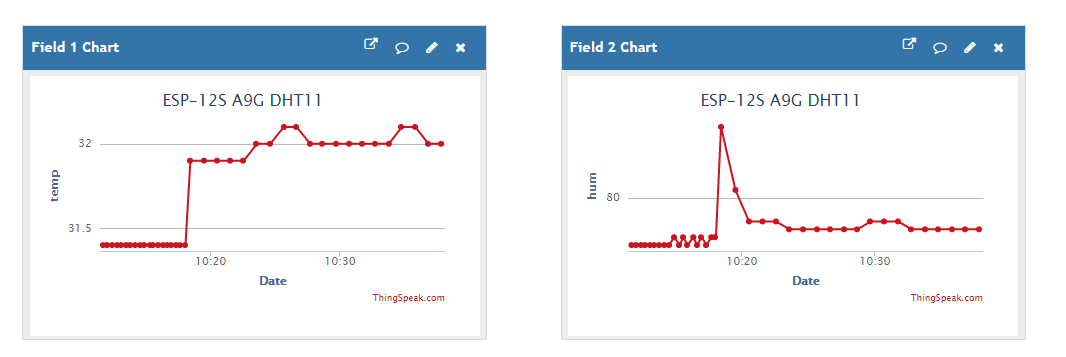
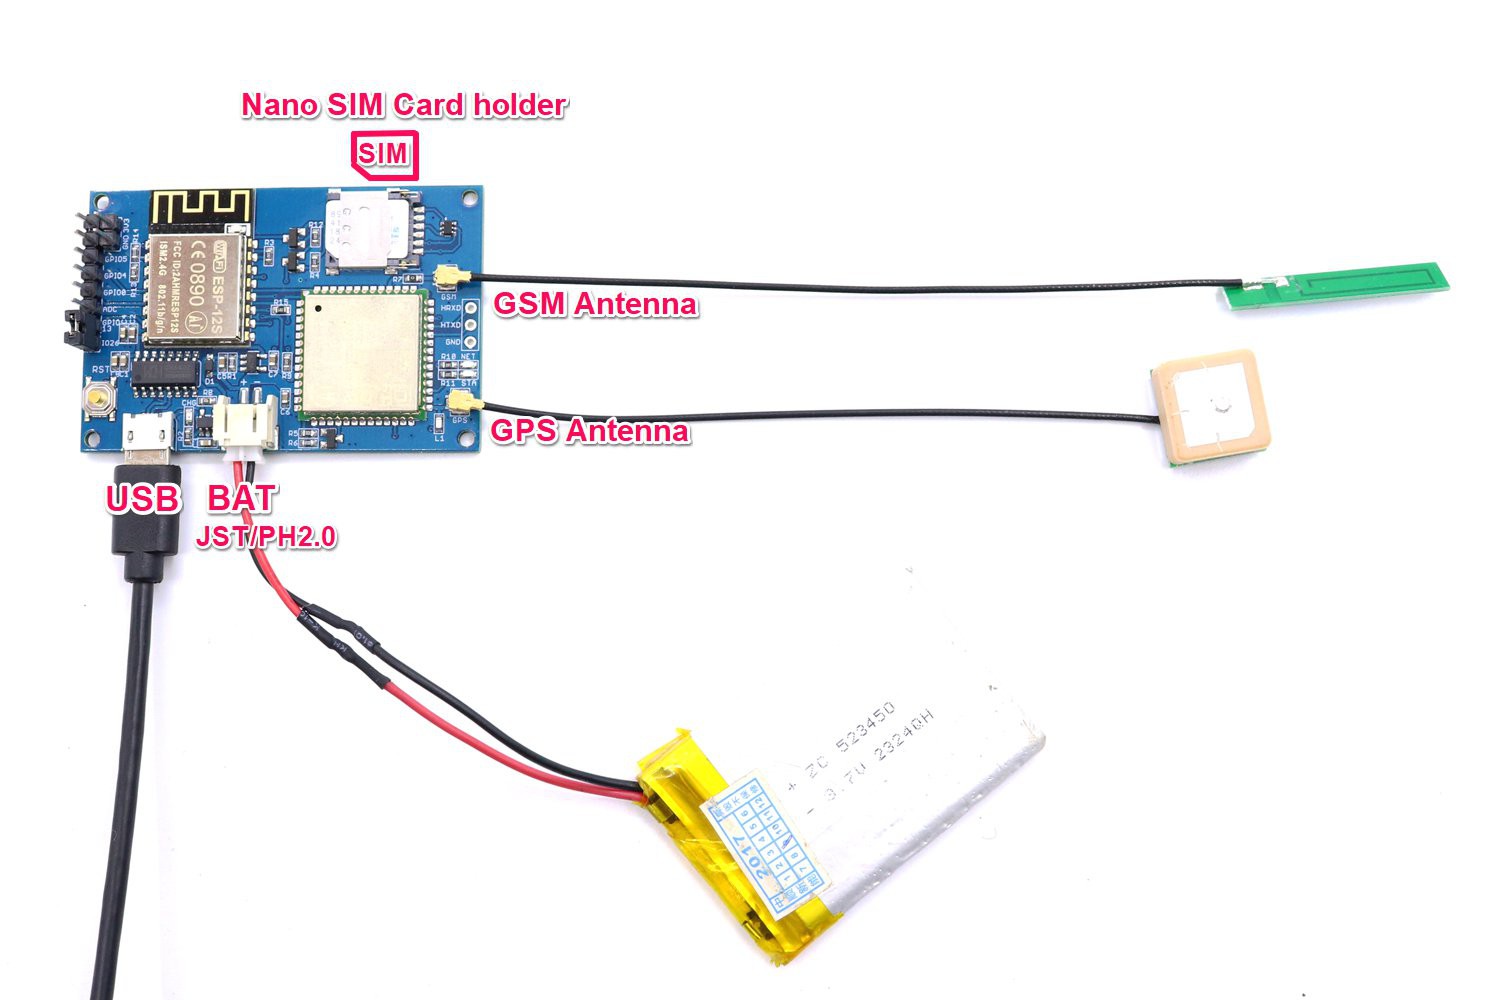
The idea of this project is to publish sensor data from anywhere to any cloud service that you want. The ESP8266 doesn’t need to have access to a router via Wi-Fi, because we’ll connect to the internet using a SIM card data plan.

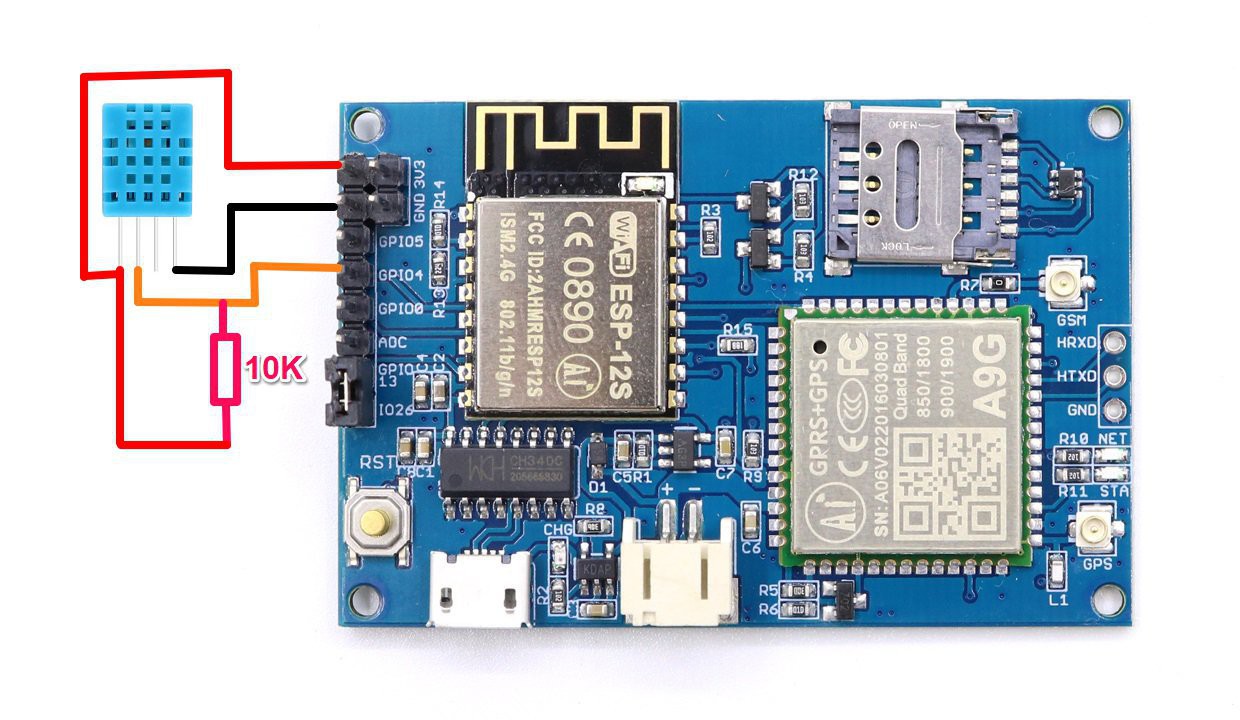
In this project, we will publish the DHT11 temperature and humidity to the ThingSpeak.

ESP-12S_A9G_MQTT.zip

A9G MQTT DEMO CODE.

x-zip-compressed - 1.83 kB - 11/17/2019 at 01:43

Download

Adafruit DHT11 and sensor library.zip

Adafruit DHT11 Library and Adafruit sensor Library.

Zip Archive - 24.26 kB - 09/14/2019 at 14:36

Download

  • 1 × ESP-12S A9G GSM GPRS+GPS IOT Node
  • 1 × DHT11
  • 1 × A 3.7V Lipo battery
  • 1 × Some jumper wires
  • 1 × A micro USB cable

View project log

  • 1
    MQTT AT command of A9/A9G

    1. Overview of AT commands for MQTT

    Command                                  Description

    AT+MQTTCONN           Send MQTT connection packet

    AT+MQTTSUB               Send MQTT subscribe packet

    AT+MQTTPUB               Send MQTT publish packet

    AT+MQTTDISCONN      Disconnect MQTT

    2. Detailed Descriptions of AT Commands

    2.1 AT+MQTTCONN       Send MQTT connection packet

    AT+MQTTCONN=<host>,<port>,<clientid>,<aliveSeconds>,<cleansession>,<username>,<password>

    Response :

    success            OK

    failure               +CME ERROR:<err>

    Parameters:     

    <host>                   MQTT server name or server IP address                

    <port>                   MQTT server port

    <clientid>              Client ID, should be unique

    <aliveSeconds>    Keep alive interval

    <cleansession>     Cean session, can be 0 or 1

    <username>          User name (option)

    <password>          Password (option)

    Example:

    1.Not enter username and password

    AT+MQTTCONN="www.mqtt-dashboard.com",1883,"12345",120,0

    OK

    2. Enter username and password

    AT+MQTTCONN="www.mqtt-dashboard.com",1883,"12345",120,0,"Ai-thinker","123456"

    OK

    2.2 AT+MQTTSUB               Send MQTT subscribe packet

    AT+MQTTSIN=<topic>,<sub>,<qos>

    Response :

    success            OK

    failure               +CME ERROR:<err>

    Parameters:     

    <topic>                   Topic of subscribe message                

    <sub>                      Subscribe flag, can be 0 or 1

    <qos>                      Message QoS, can be 0, 1 or 2.

    Example:

    AT+MQTTSUB="test",1,0

    +MQTTPUBLISH:1,app, 10,1234567890
    OK

    2.3 AT+MQTTPUB               Send MQTT publish packet

    AT+MQTTPUB=<topic>,<payload>,<qos>,<dup>,<remain>

    Response :

    success            OK

    failure               +CME ERROR:<err>

    Parameters:     

    <topic>                   Topic of subscribe message 

    <payload>              Publish message

    <dub>                     Duplicate flag, can be 0 or 1

    <qos>                     Message QoS, can be 0, 1 or 2.

    <remain>                Retained flag, can be 0 or 1.

    Example:

    AT+MQTTPUB="test","123456",0,0,0

    OK

    AT+MQTTPUB=<topic>,<payloadlength>,<payload>,<qos>,<dup>,<remain>

    Response :

    success            OK

    failure               +CME ERROR:<err>

    Parameters:     

    <topic>                   Topic of subscribe message 

    <payloadlength>    Publish message length

    <payload>              Publish message

    <dub>                     Duplicate flag, can be 0 or 1

    <qos>                     Message QoS, can be 0, 1 or 2.

    <remain>                Retained flag, can be 0 or 1.

    Example:

    AT+MQTTPUB="test",5,0,0,0

    >12345

    OK

    2.4 AT+MQTTDISCONN      Disconnect MQTT

    Response :

    success            OK

    failure               +CME ERROR:<err>

    2.5 Example of the A9 A9G MQTT

    AT+ CGATT=1     //connect to the network

    OK

    AT+CGDCONT=1,"IP","CMNET"  // Set PDP Parameters

    OK

    AT+CGACT=1,1    //Active the PDP

    OK

    AT+MQTTCONN="www.anthinkerwx.com",1883,"12345",120,0,”ai-thinker”,”123456”      //Client connect to the mqtt server

    OK

    AT+MQTTPUB="test","124563",0,0,0   //Publish a massage

    OK

    AT+MQTTSUB="test",1,0   //Send MQTT subscribe packet

    OK

    AT+MQTTDISCONNN    // Disconnect the mqtt server

    OK

  • 2
    Hardware connection​

    Wire the DHT11 to the ESP-12S A9G GPRS GPS Node as shown in the following schematic diagram.

    Also install the Noao SIM card and Plug the Lipo battery and USB.

  • 3
    ThingSpeak

    ThingSpeak is where we are going to store the data collected by our thing and where we can see the data that we collected. Visit ThingSpeak.com and Sign Up for an account. This will just take a minute and user accounts are free. Once you have a user account, you need to create a channel. ThingSpeak channels are where data gets stored. Create a new channel by selecting ChannelsMy Channels, and then New Channel. Name the channel, “ESP-12S A9G DHT11” and name Field 1, “temp”, Field 2:"hum".Click “Save Channel” at the bottom to finish the process.

View all 6 instructions

Enjoy this project?

Share

Discussions

Franklin Bonfim wrote 04/06/2021 at 11:45 point

Following this example I am not able to publish on Thingspeak.

  Are you sure? yes | no

Similar Projects

Does this project spark your interest?

Become a member to follow this project and never miss any updates