 hIOTron
Working of Automatic Water Level Controller
We have used the Ultrasonic sensor module which sends the sound waves in the water tank and identifies the reflection of sound waves that is ECHO. First of all, we need to trigger the ultrasonic sensor module to transfer signals by using Arduino and then wait to get ECHO.
Basically Arduino indicates the time between triggering and received ECHO. We know that the speed of sound is around 340 m/s.
so we can estimate the distance by using the given formula:
Distance= (travel time/2) * speed of sound
Where the speed of sound is approximately 340m per second.
By using this method we get distance from the sensor to the water surface. After it, we need to measure the water level.
Then we need to estimate the total length of the water tank. As we know the length of the water tank then we can determine the water level by subtracting the resulting distance coming from ultrasonic from the total length of the tank. And we will get the water level distance. Now we can convert this water level into the percent of water and can display it on LCD.
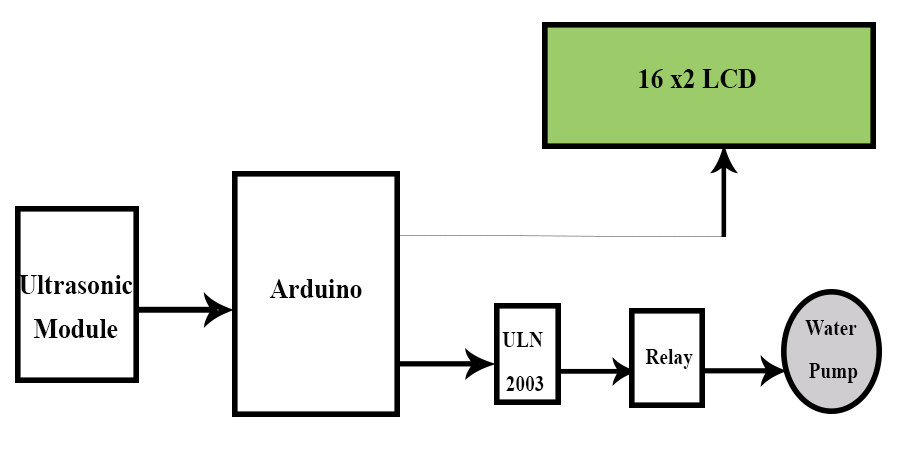
As shown in the water level controller circuit given below, the Ultrasonic sensor module’s “trigger” and “echo” pins are directly connected to pin 10 and 11 of Arduino. A 16x2 LCD is connected with Arduino in 4-bit mode.
Control pin RS, RW and En are directly connected to Arduino pin 7, GND and 6. And data pin D4-D7 is connected to 5, 4, 3 and 2 of Arduino, and the buzzer is attached at pin 12. 6 Volt relay is also connected at pin 8 of Arduino through ULN2003 for turning on or turning off the water motor pump.
A voltage regulator 7805 is also used for providing 5 volts to relay and to the remaining circuit.
In this circuit, the Ultrasonic sensor module is situated at the top of the bucket (water tank) for demonstration. This sensor module will read the distance between the sensor module and water surface and it will determine the distance on the LCD screen with the message “Water Space in Tank is:”. It means we are here showing an empty place of distance or volume for water instead of water level. Because of this functionality, we can utilize this system in any water tank.
When the empty water level carries a distance of about 30 cm then Arduino turns ON the water pump by pushing the relay. And now LCD will show “LOW Water Level” “Motor turned ON”, and Relay status LED will start glowing.
Now if the empty space touches at a distance about 12 cm Arduino turns OFF the relay and LCD will show “Tank is full” “Motor Turned OFF”. Buzzer also beeps for some time and relay status LED will be turned OFF.
Learn more about IoT Training in Pune and Mumbai which will help you to build an essential End-To-End IoT Solutions
 Jan Neumann
 Jasmeet Singh
 Lithium ION
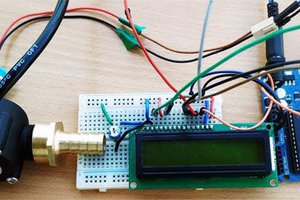
 electronicsworkshops