-
Log Entry::Lack of progress
03/09/2020 at 00:55 • 0 commentsWell, I put this project on hold as I took some other work that is filling my freetime.
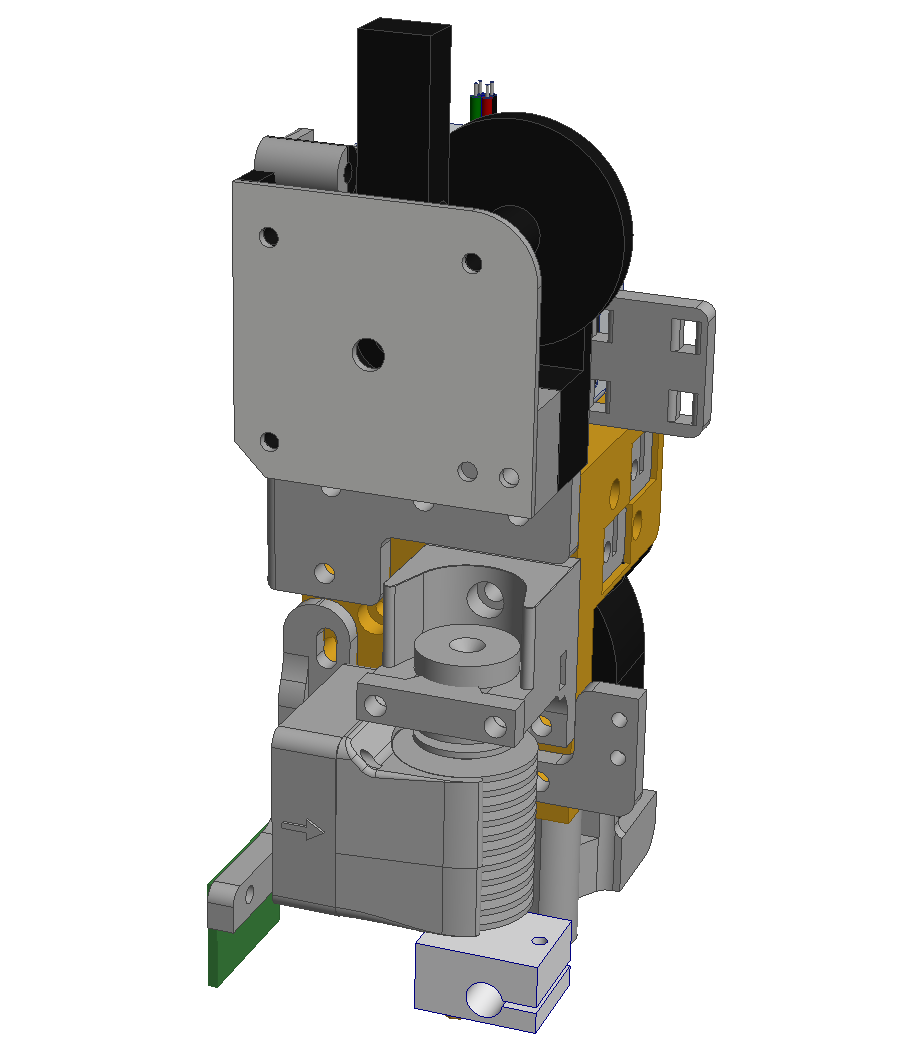
For anyone interested in my full assembly, exported as STEP, see https://github.com/mechatroniks-git/mechacore/tree/master/step_export
It is not complete, but I'm making it available for those who wish to reference it or continue on.
-
CoreXY Halo - Study
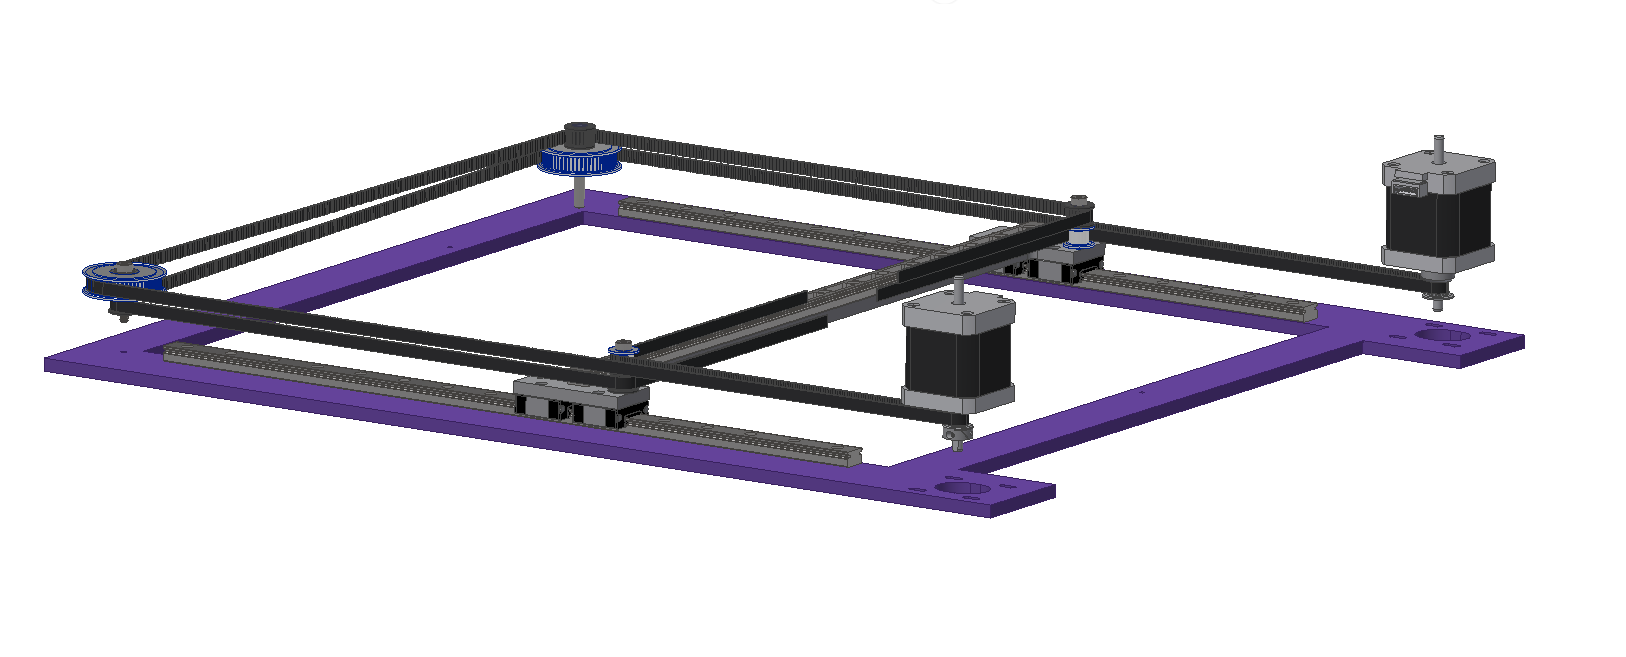
12/14/2019 at 19:18 • 1 commentI kept asking myself, what if I put the entire XY setup on the halo and use a Y spar. So I wanted to see what it looks like before I moved on.
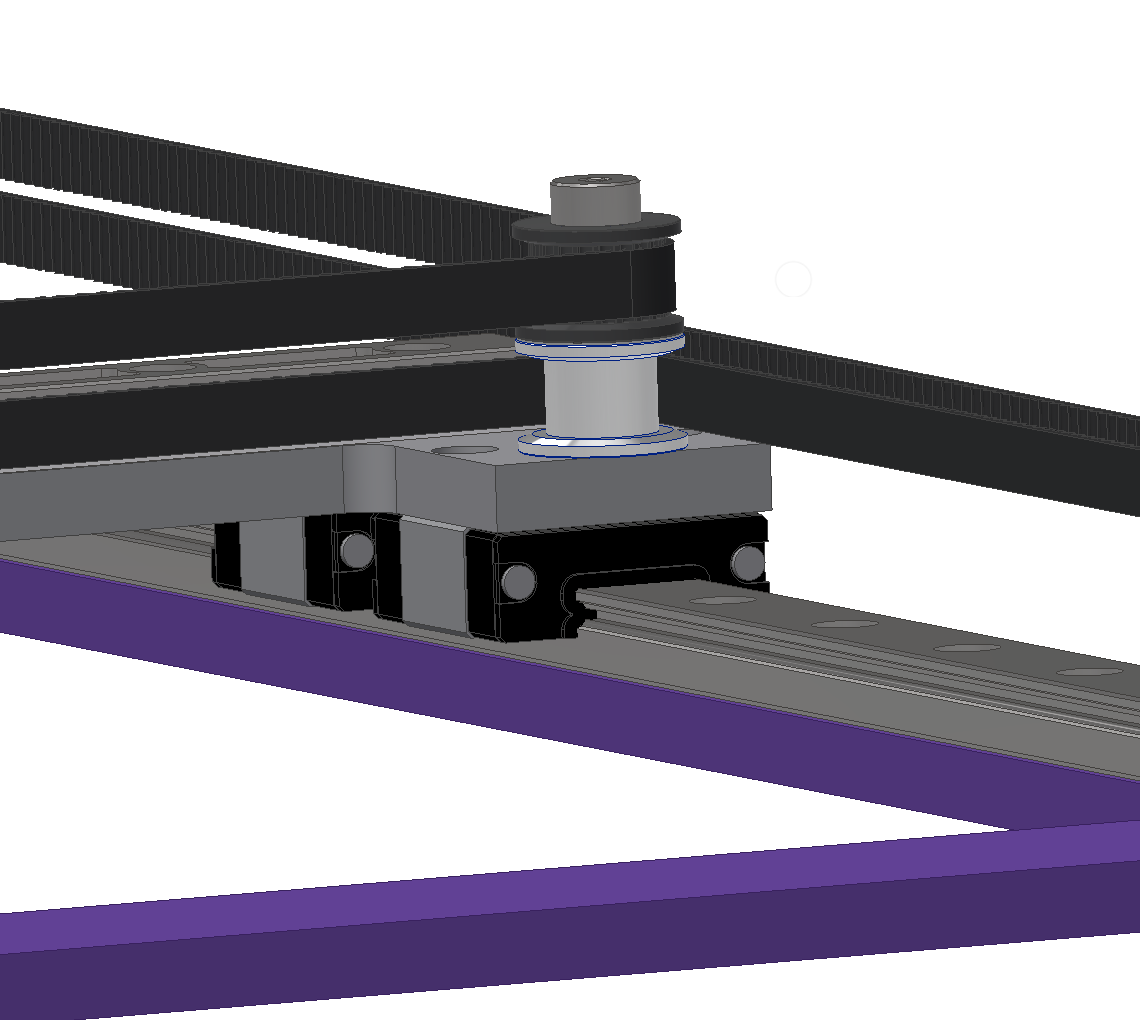
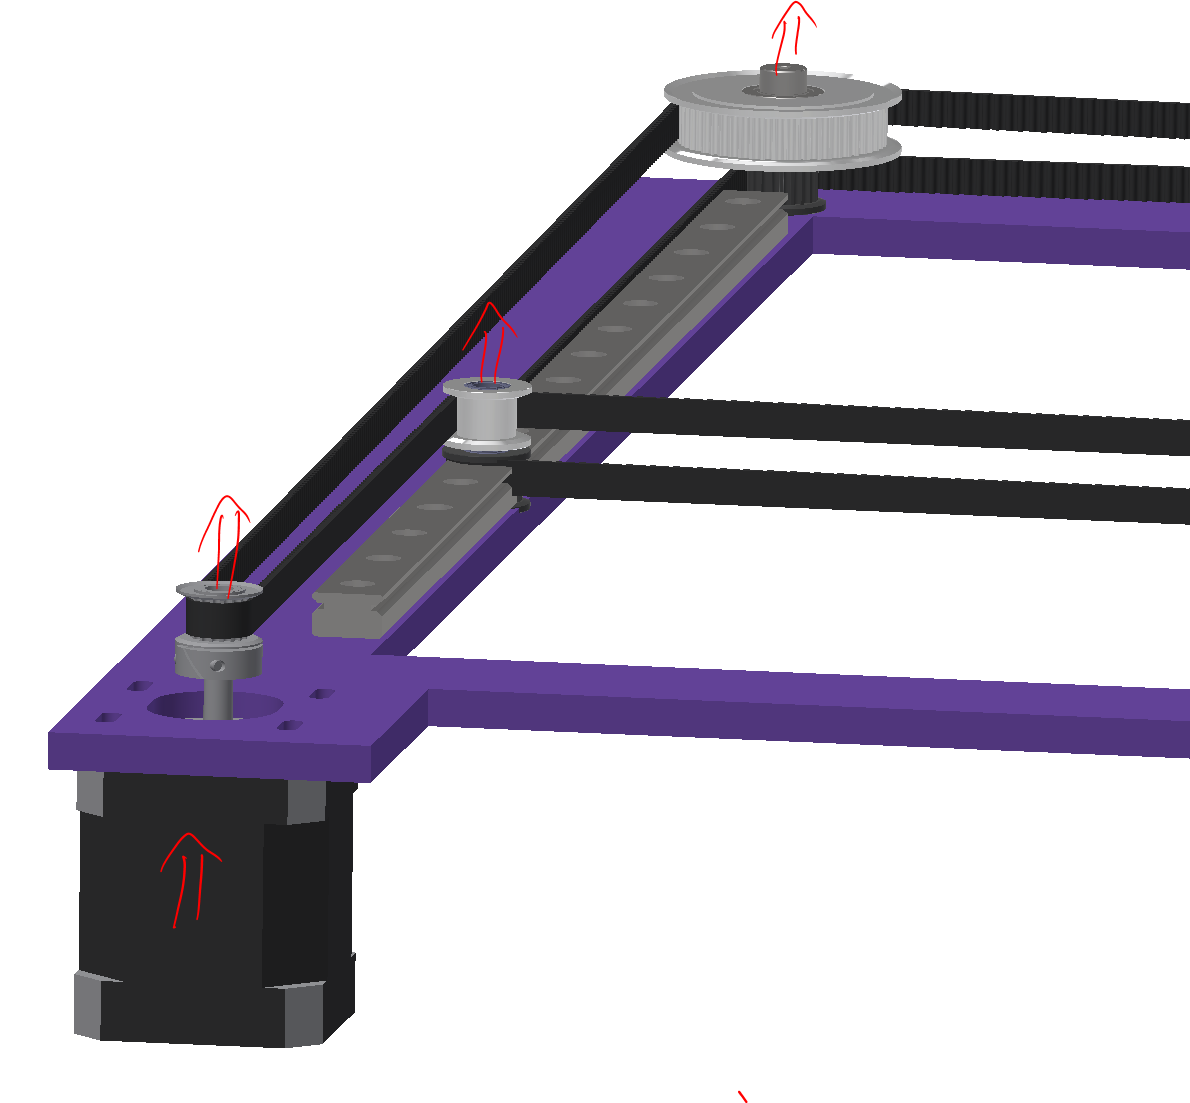
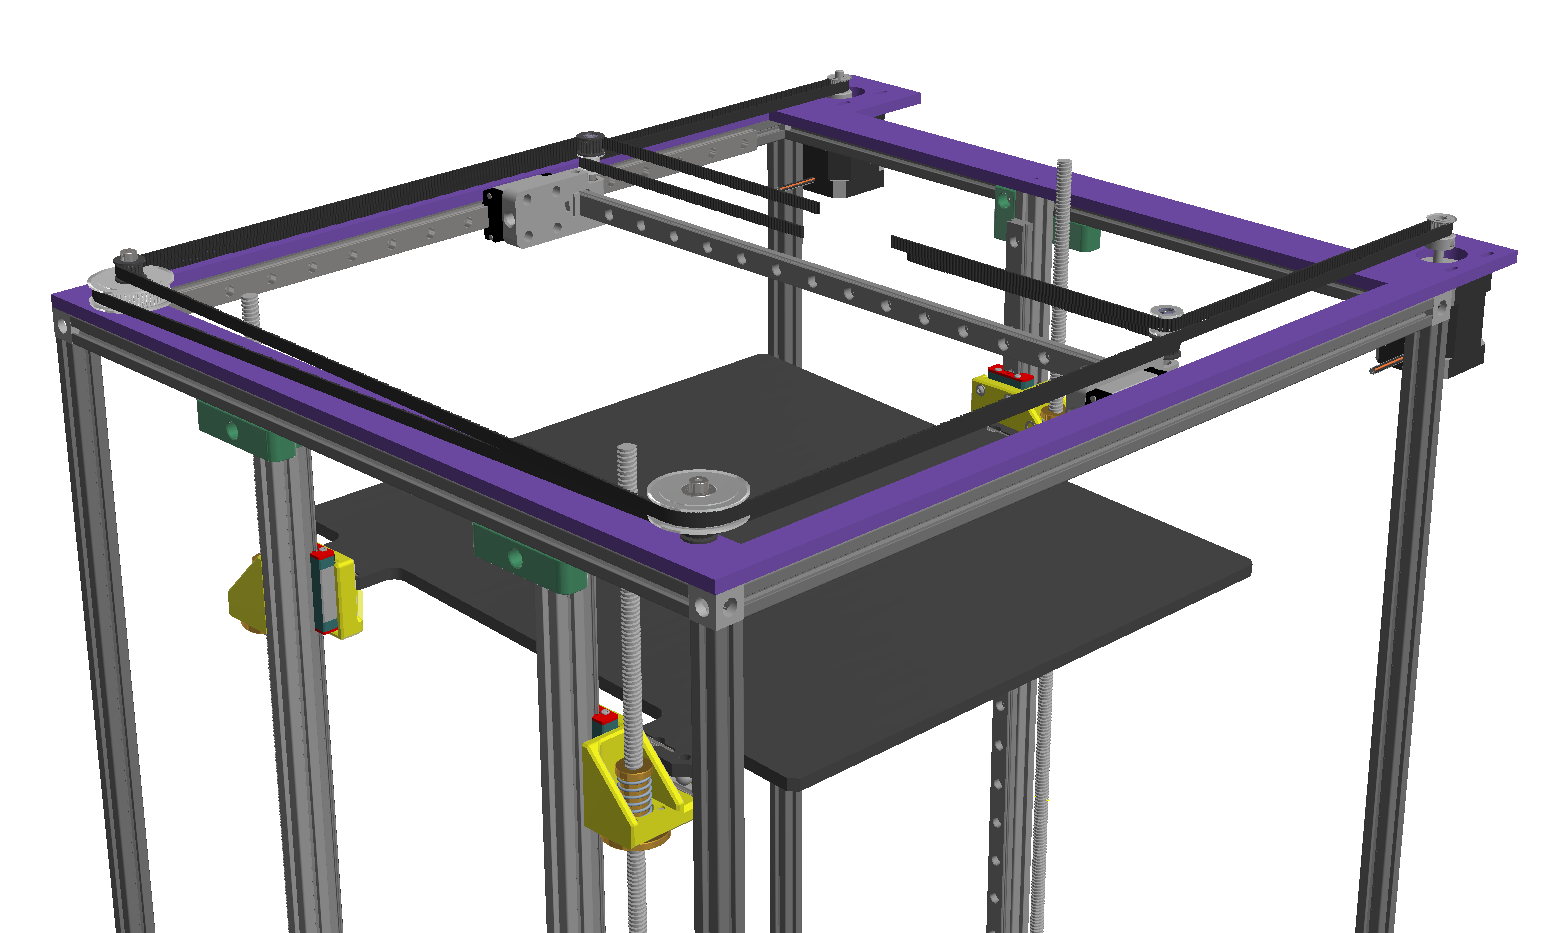
The quick option of adding a spar and putting the rails on top of the halo resulted in an elevated height for the belt, due to the stackup of the linear rails.
The belts being elevated moves the motors an pulleys way above the halo. Not ideal.
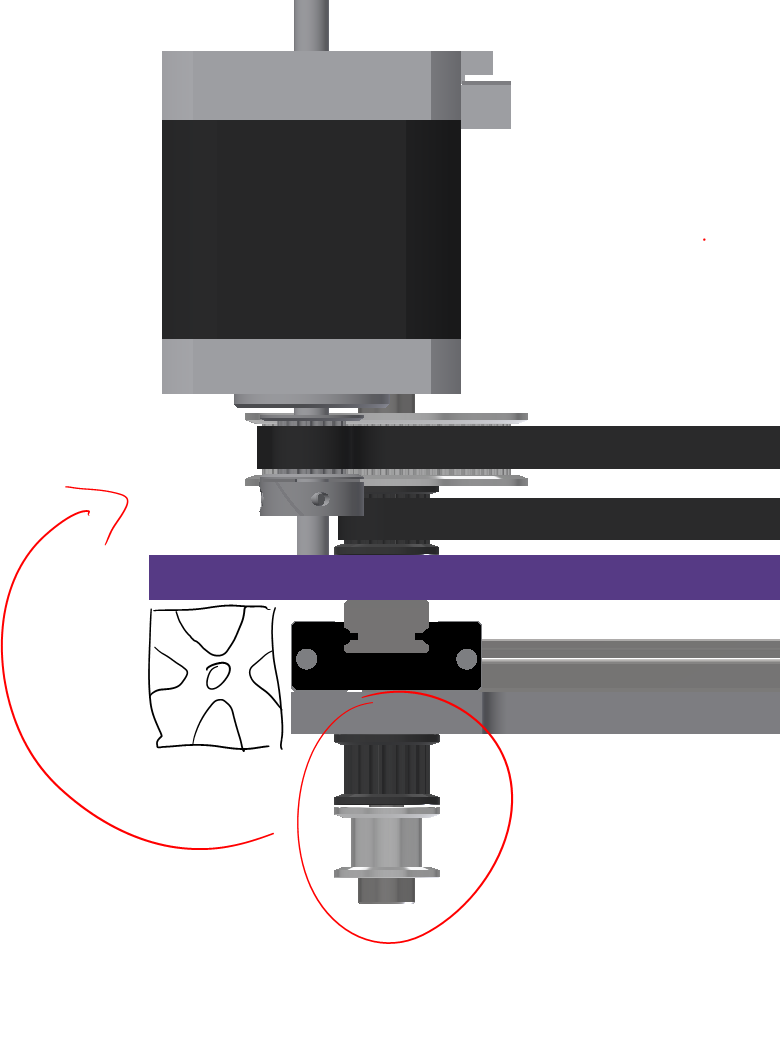
So then I try to do an under/over on the halo, putting the linear rails underneath, but the challenge is keeping the traveling pulleys up top. To do that, I'd have to push the linear rails out, about 15mm, which makes the machine 30mm wider. Alternatively, I could move the stepper motors inward, but that reduces the Y travel.
There is no clear, clean solution here. Something has to give to pull this off. Back to letting this incubate for now.
-
The X/Y carriage rails
12/06/2019 at 04:29 • 0 commentsThe 3 rails that make up the RailCore X/Y stage are minimalistic, but still have their challenges. The challenges here are as follows
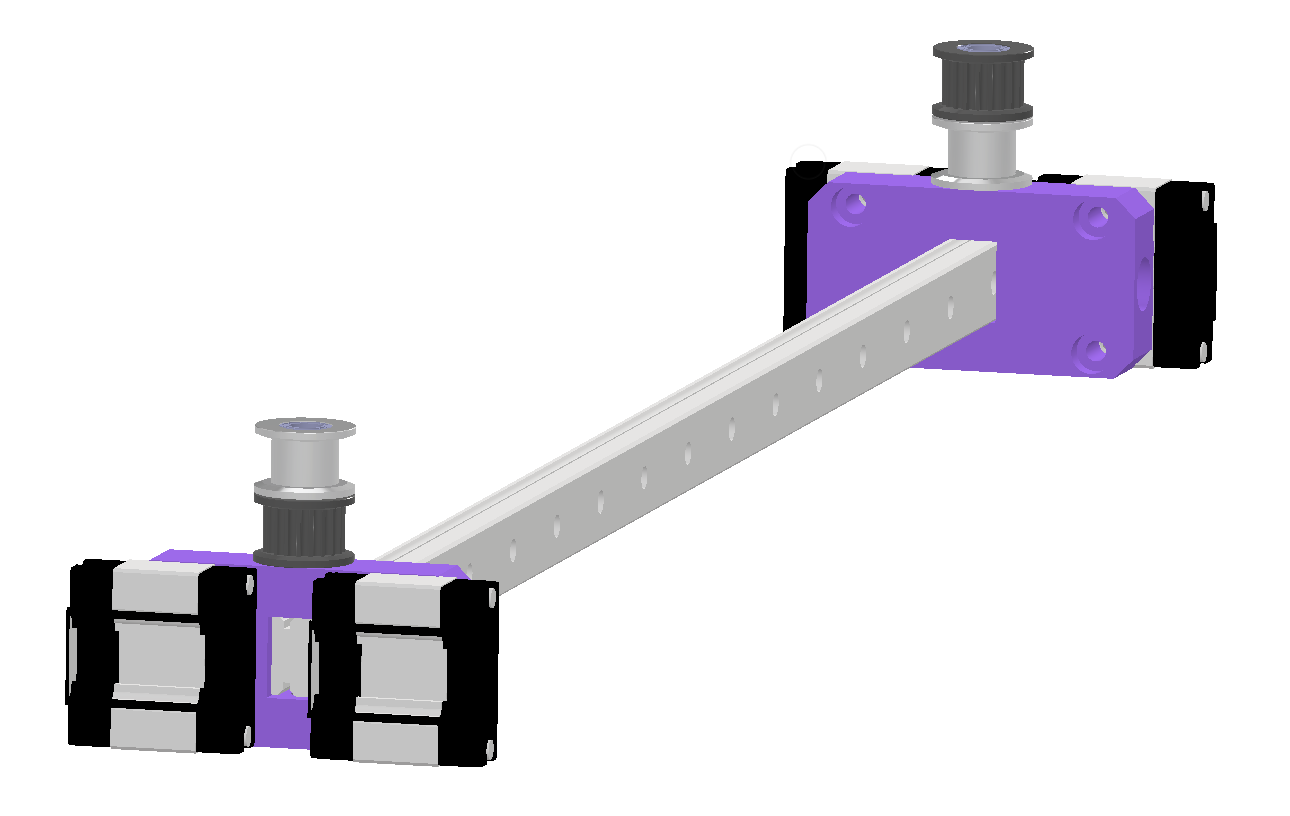
- The dual X rails are mounted directly on the frame extrusions. Getting them to be both parallel and planer can be a challenge. A square frame is critical, but there is slop in the screws that hold the rails to the extrusions.
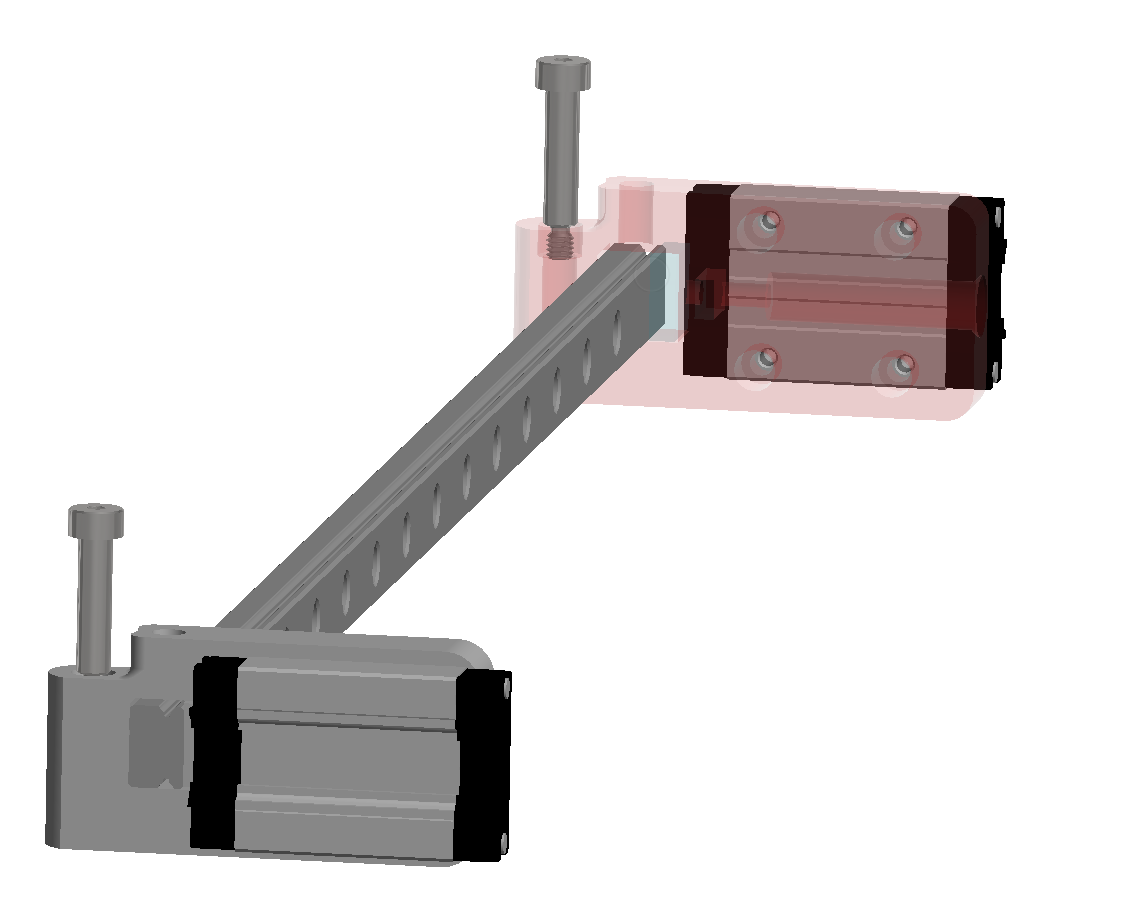
- The Y rail is simply constrained at the 2 ends by the X rail carriage blocks. The belts help to maintain the rails perpendicular to each other, so it doesn't take much here.
I've considered putting the X rails on top of the Halo. The challenge is all the belt pulleys would have to lift off the halo to clear everything. Not a big deal, except the stepper motor won't really work being mounted on the halo, as the motor shaft is too short and you don't really want to put that much of a cantilever'd load on the motor shaft.
Railcore gets away with a single block on each X rail. They do use the long block.
One idea I'm considering is using 2 short blocks on each X rail. This would add about $40 to the total build cost (Misumi high-temp SSE2BST13-395).
Alas, no decisions yet. At this point, I have things I want to consider, but will be moving on to the Y Carriage.Lots of decisions to make here, which extruder, hot end, height sensor, etc.
-
XY Stage - Part 2
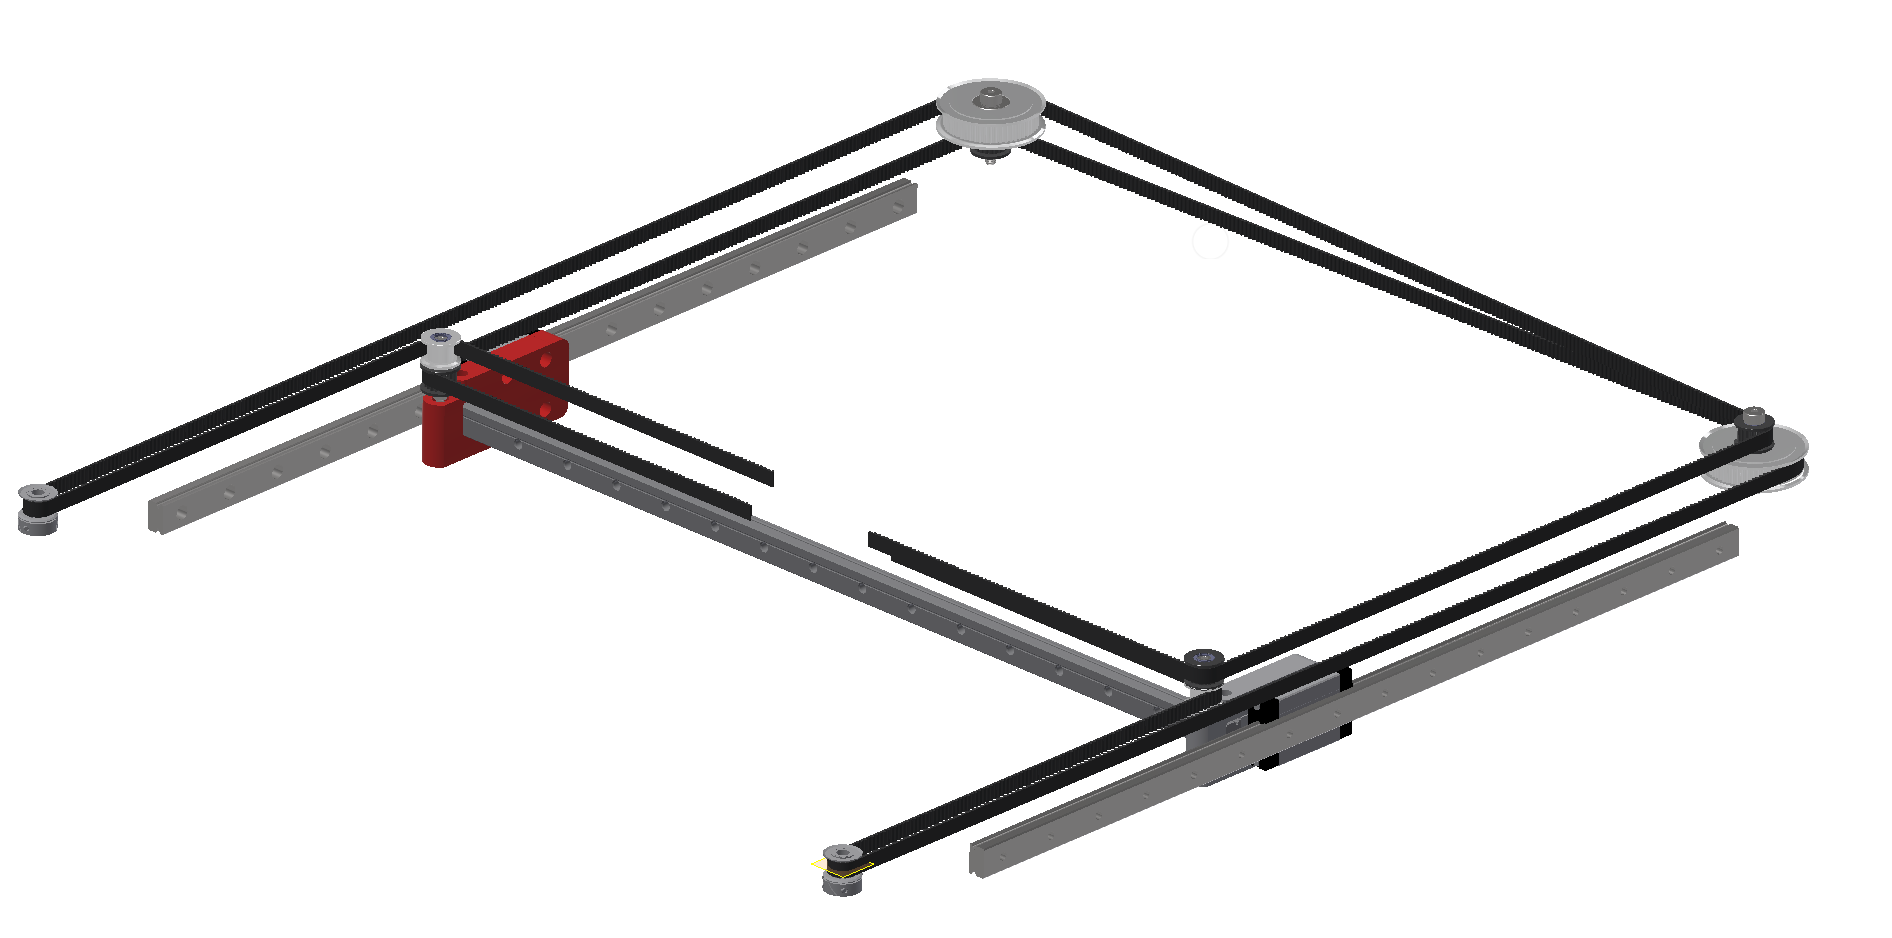
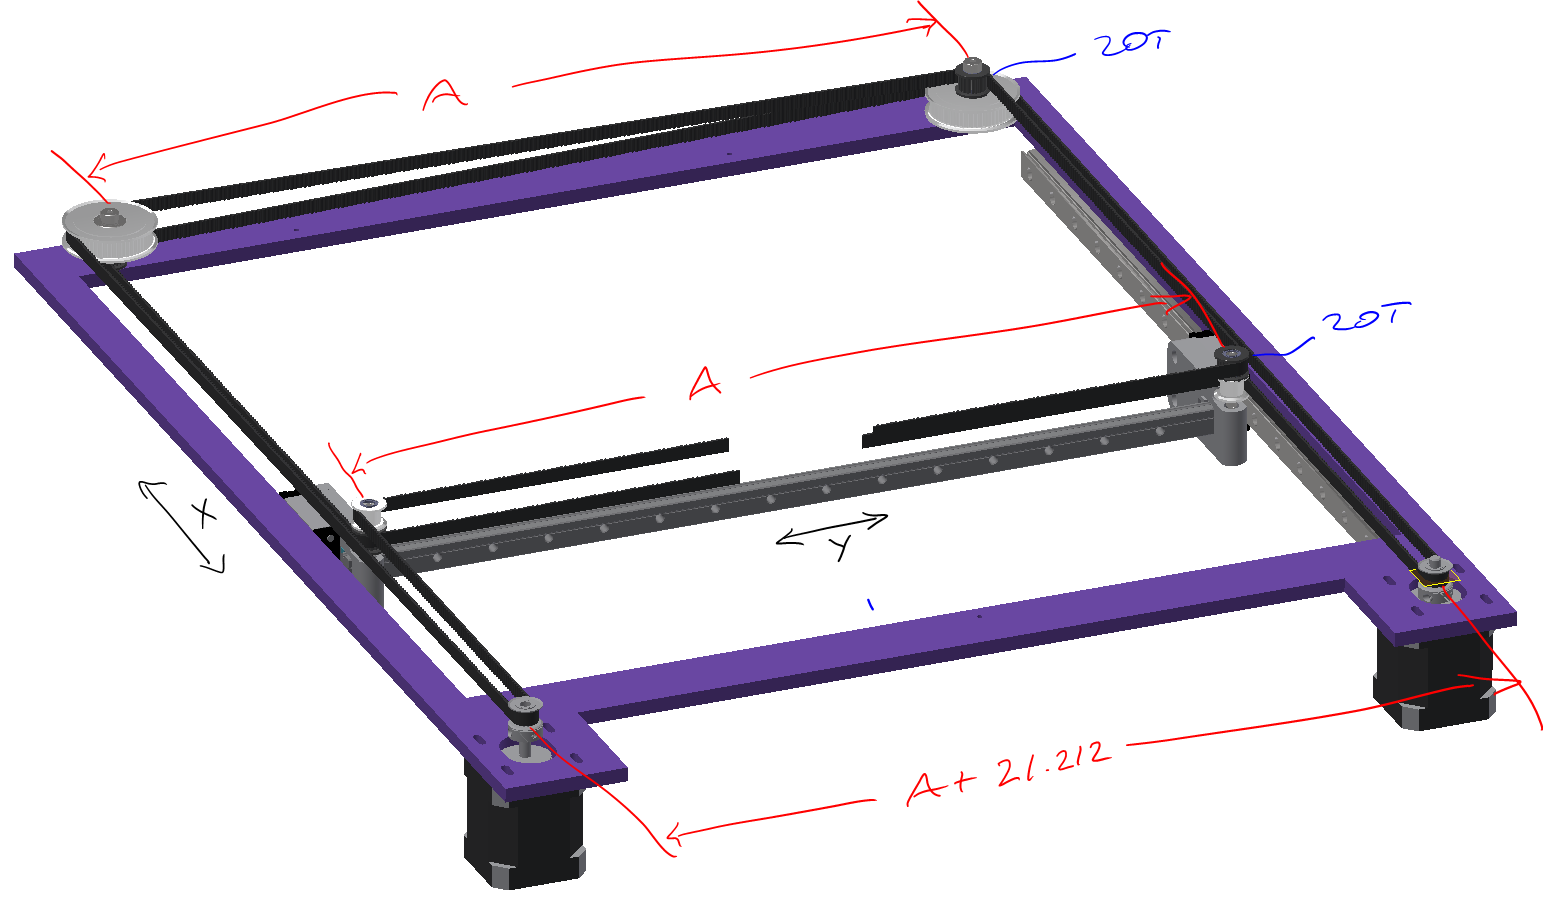
12/01/2019 at 07:18 • 0 commentsNow that I have the pitch diameters for the drive pulley and the OTS idlers, I am able to create a belt path that keeps true to the belt pitch line of all the known parts, while maintaining belt profiles parallel to the axis.
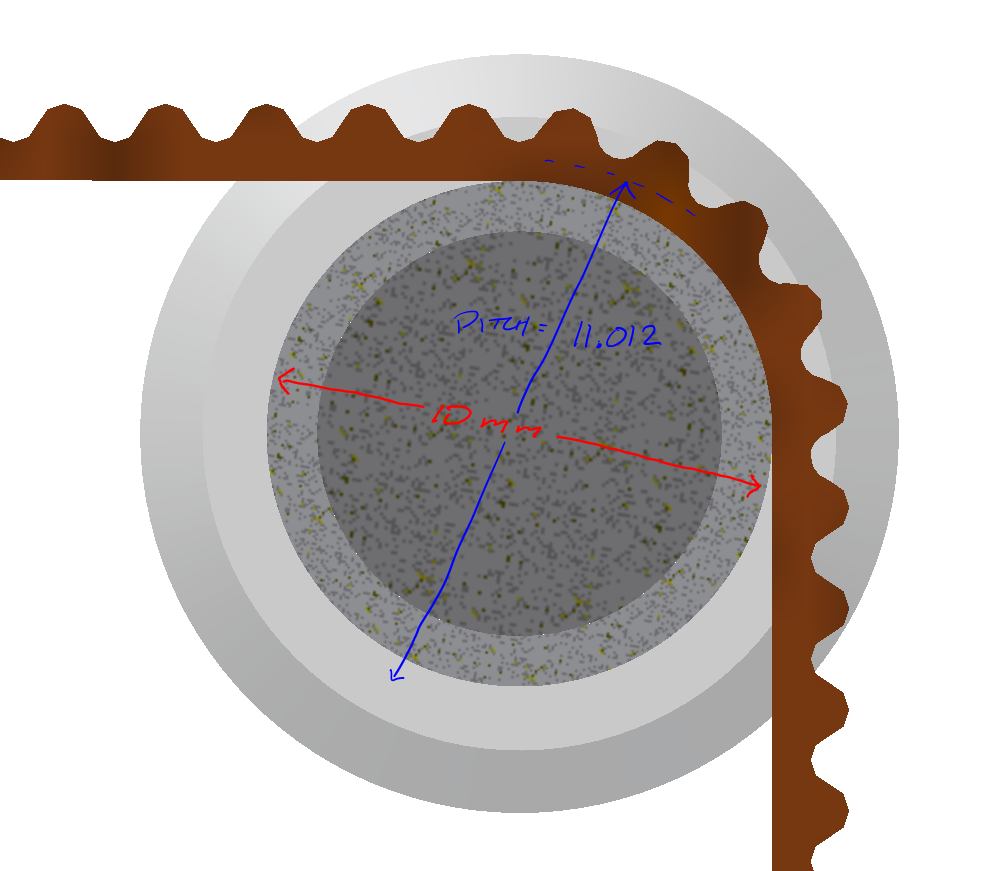
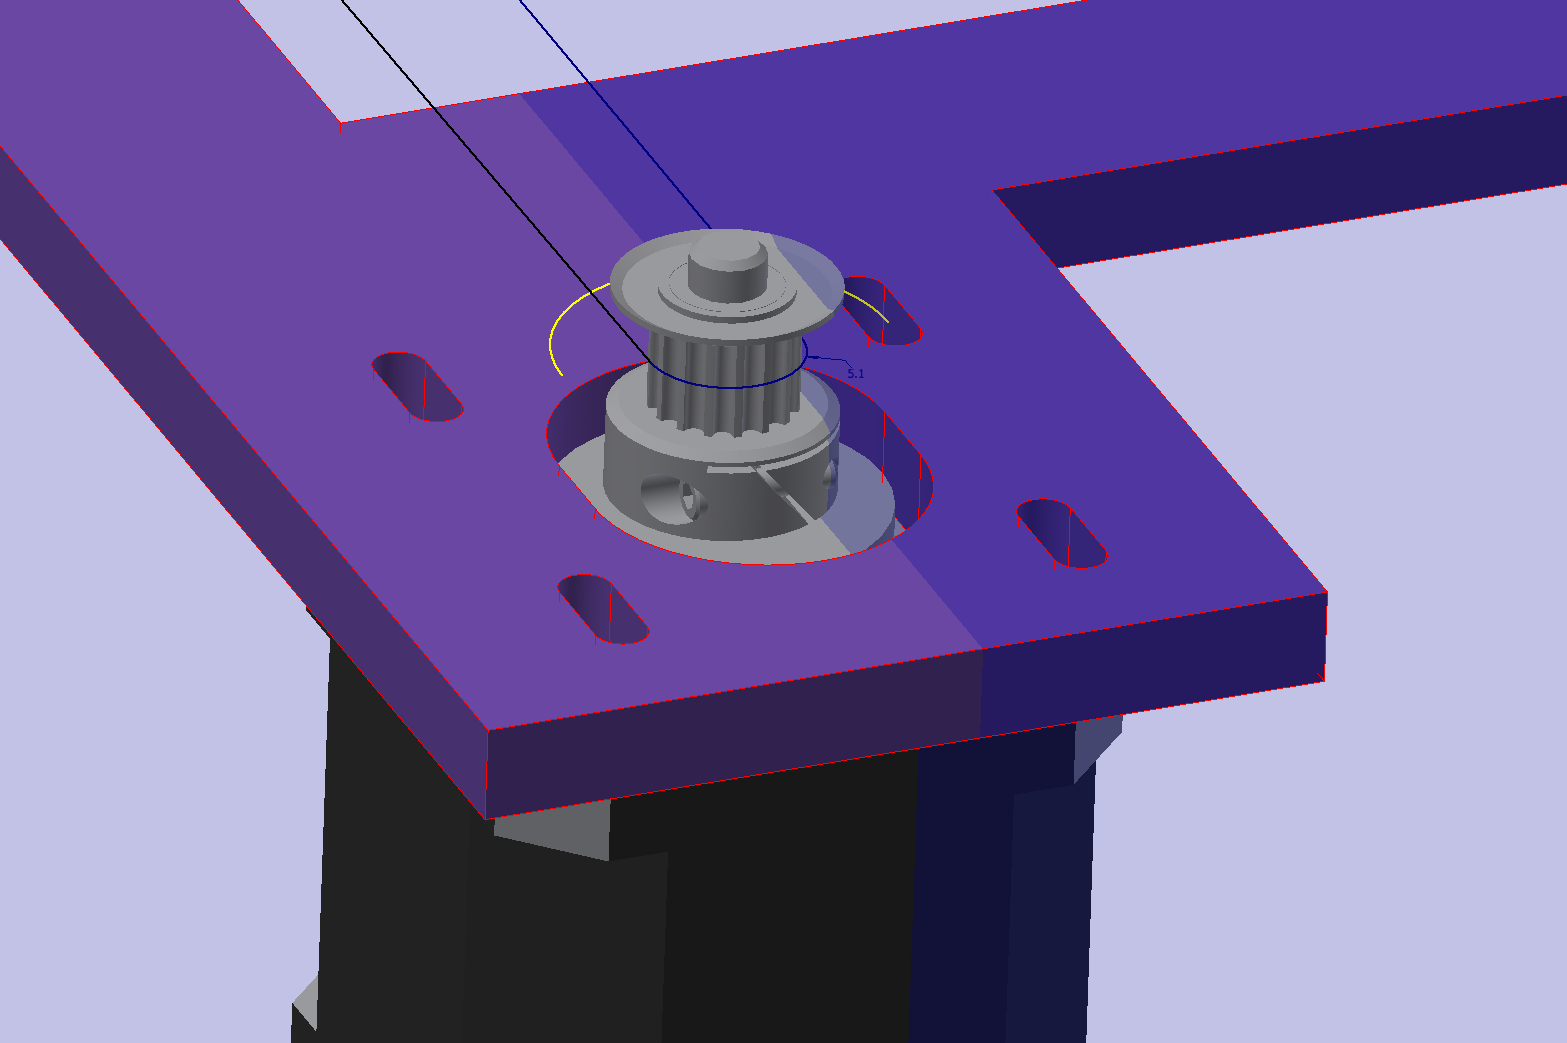
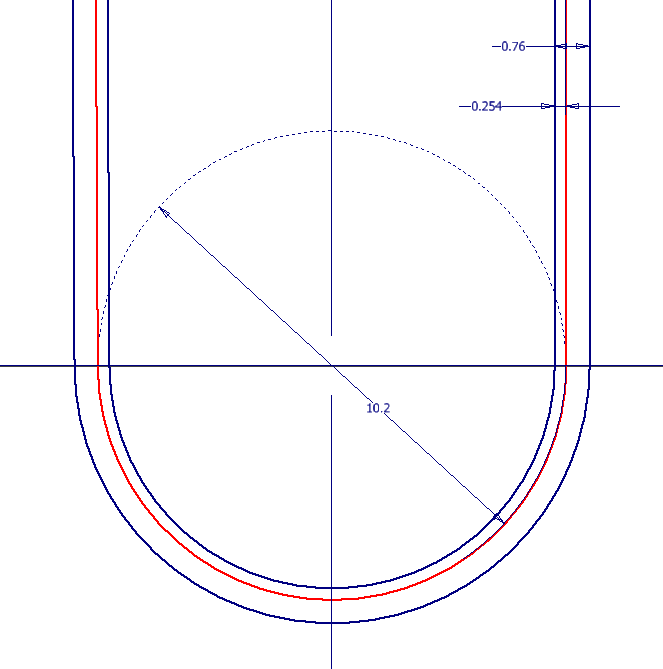
For example, here is the stepper motor drive pulley, 10.2mm on the pitch diameter, and the belt PLD is .254mm
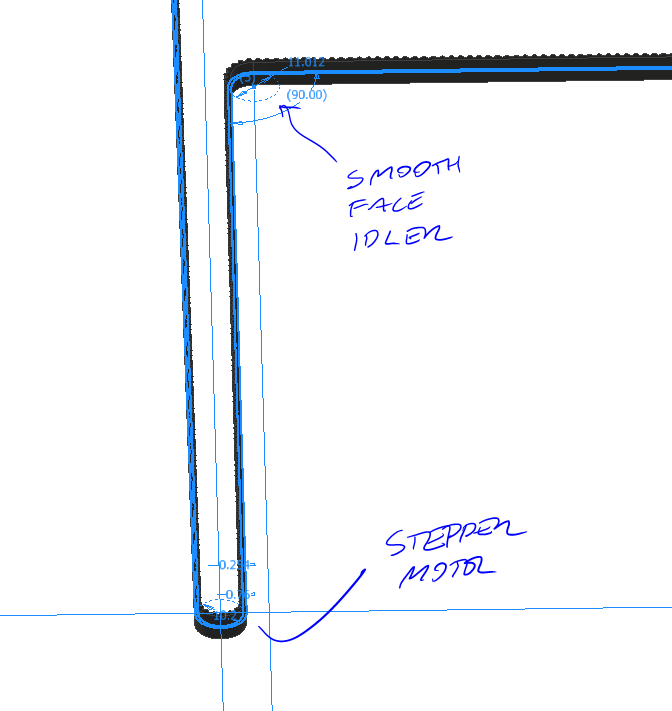
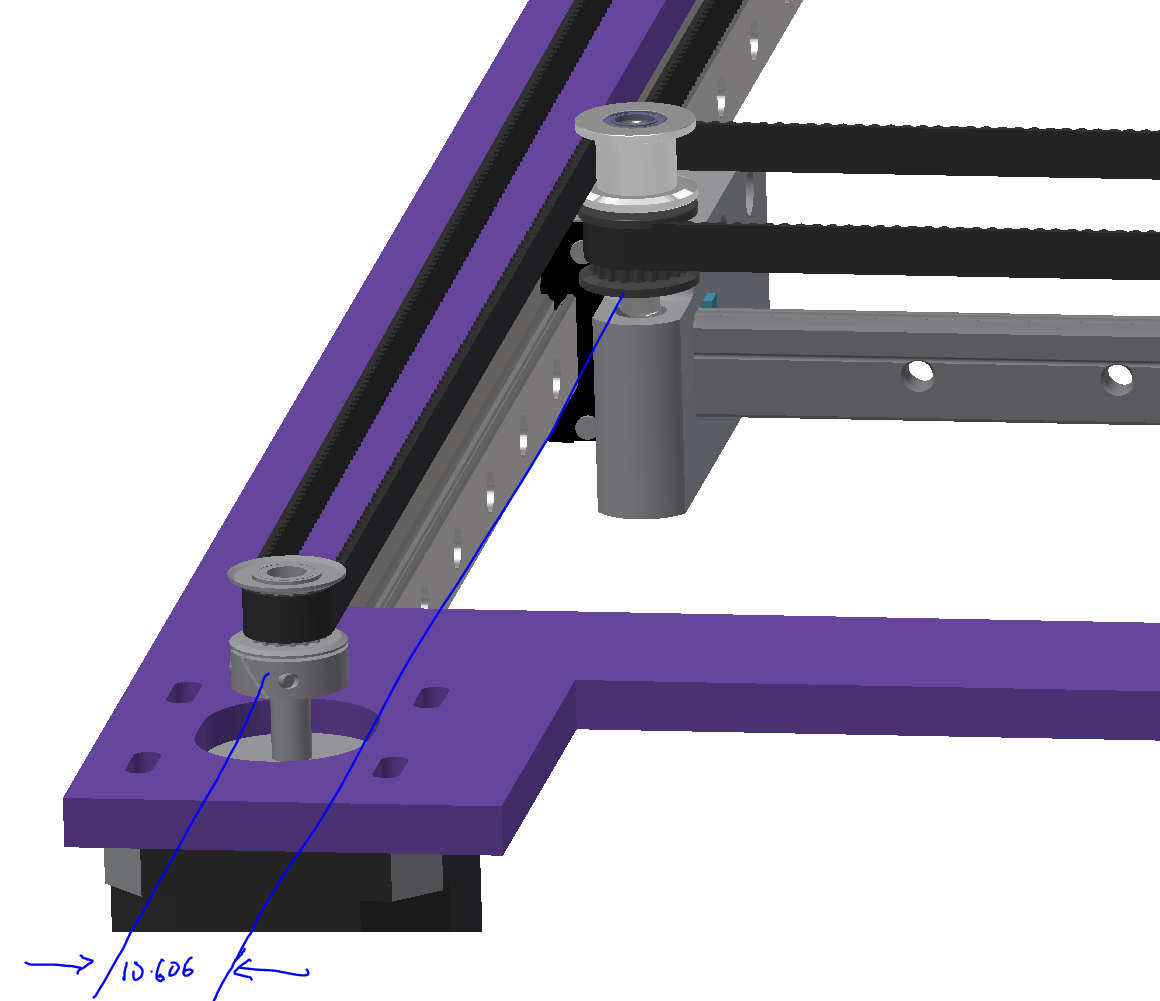
Here is the stepper to the smooth face idler. This combination of pullys and idler determine the distance from the Y stepper stack to be 10.606mm.
Keeping these at this distance will ensure the belt is parallel to the axis. So whatever the Y axis idler stack distance is, the rear corner pulley stack will be the same distance and the stepper motors will be that distance plus 2 x 10.606mm (21.212mm).
Since there are 2 x 20 tooth pulleys on the idler corner to the Y axis, the distance between those pulleys must be same to keep the belt parallel. So the idler spacing A is the same for both sets of idlers.
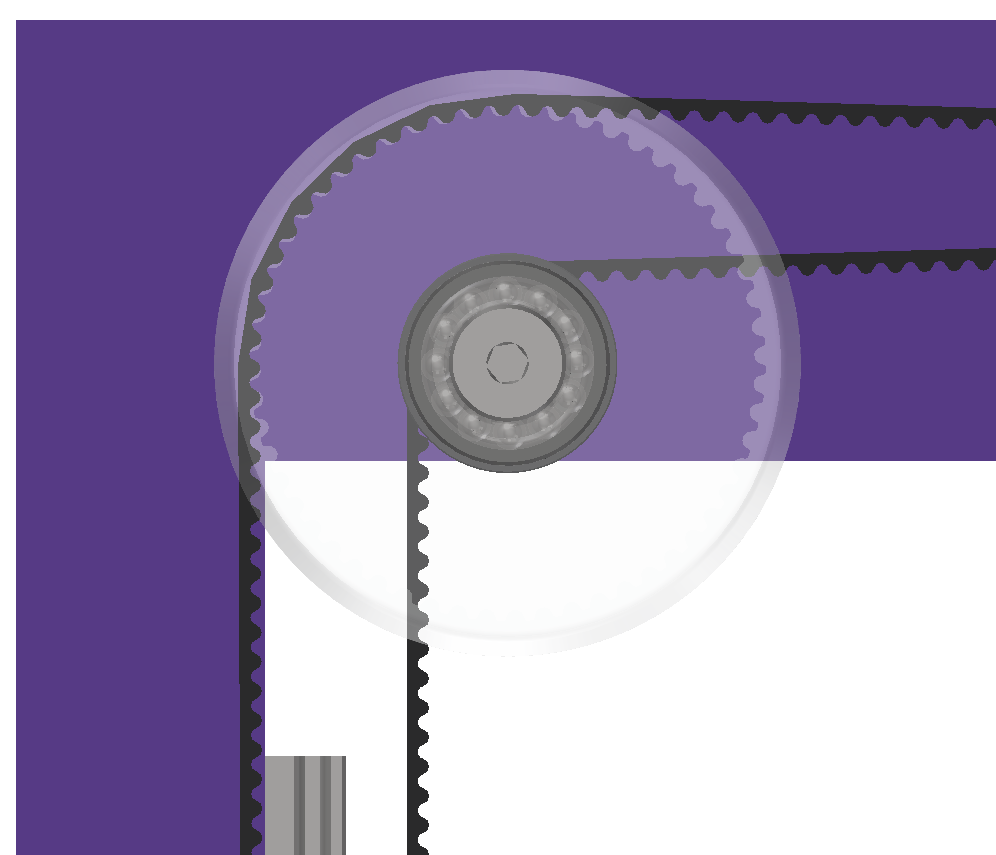
The last idler I need to determine is the rear large diameter idler. This one is not part of a critical parallel path, so it just needs to be large enough to position the belt just past parallel, so it doesn't hit the Y axis carriage.
I don't like the idea of using a smooth idler on the tooth side of the belts, so it's basically a GT2 sprocket with bearings to make the idler. Here a 56 tooth pulley will position the belt just past parallel by 0.25°. At this point, this is a custom made part or a modified OTS (off-the-shelf) part. TBD.
Now that I know the belt path, next steps are to add a few more details to the halo and keep working inwards to the print head. I'm not ready to make final design decisions yet, I'll leave it rough for now until I get closer to a final design. Once I have everything rough, I'll bounce back outwards from the print head and refine everything.
The main goal is to get at least 300mm x 300mm of print travel, would like to see if I can get more, an extra 5mm will get me 305mm x 305mm, then I can make 12" x 12" parts.
-
XY Stage - Part 1
11/28/2019 at 08:05 • 0 commentsThe Z stage is not yet finalized, but it's time to look at the XY stage, because we may need to backtrack to the Z once we do a pass on the XY.
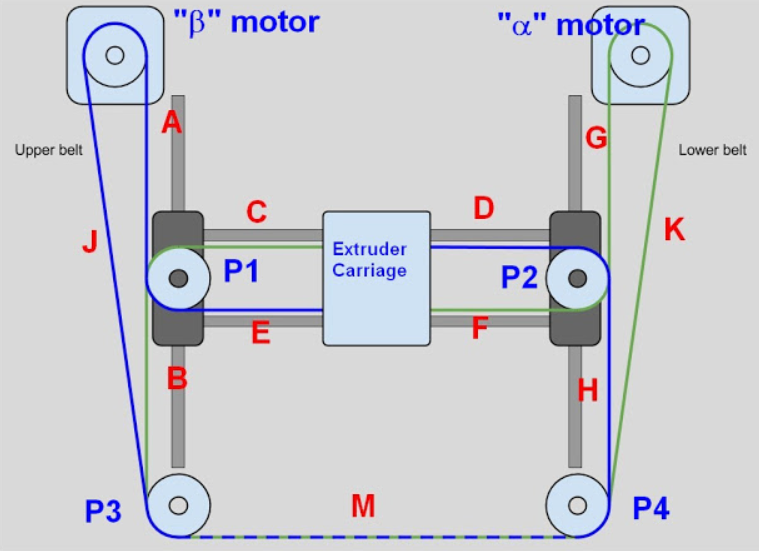
First we will look at the belt path. Here were using Gates PowerGrip GT 2 2mm pitch belts, 6mm tall. That seems to be the going setup. The GT 2 belt profile is considered oneThis is from The Digital Dentist on RepRap.org. The key here is you want belts A thru H to be parallel to the X or Y axis. To accomplish that, you need to place the motors and the pulleys at the right locations. So I'm going to start to look at parametrically defining those locations.
Starting from the bottom-up, let's look at the parts we'll be using.
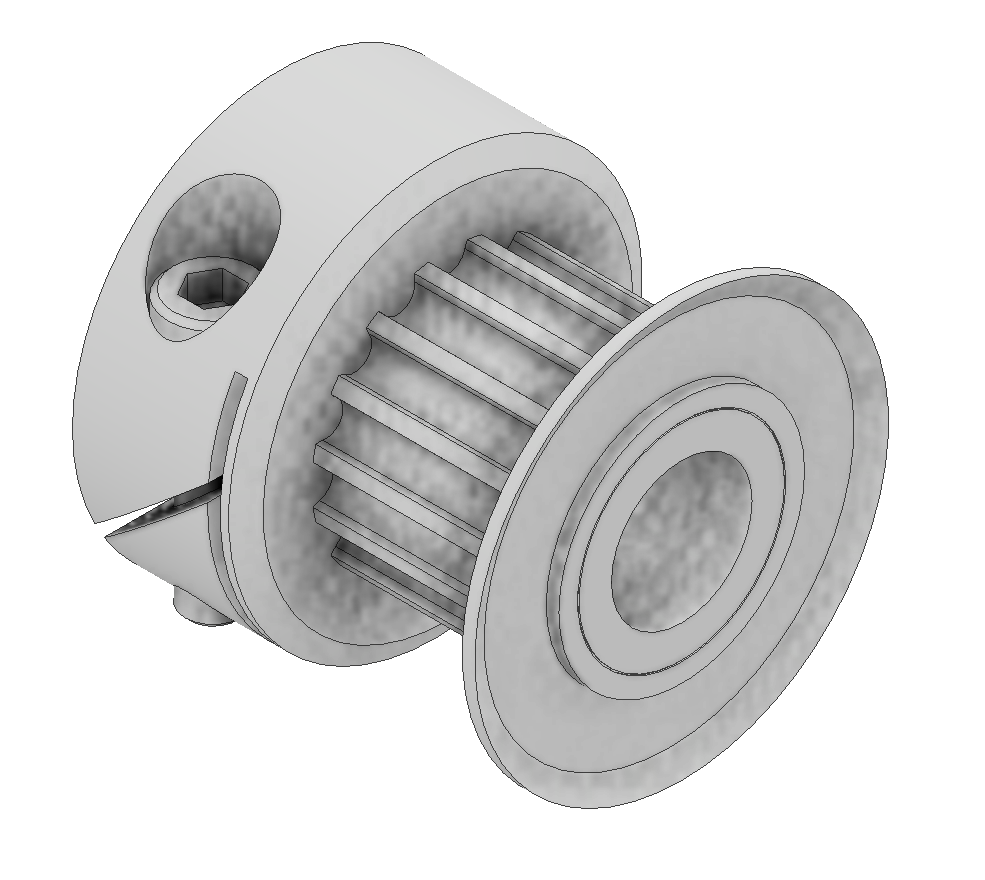
On the stepper motor, I'll be using a 16 tooth GT2 sprocket, this one is a fairloc hub which clamps to the motor shaft. I avoid using a set-screw to attach anything to a shaft. This is a clamping hub, that works really well in a small size. The part is made by Stock Drive Products (SDP-SI) http://shop.sdp-si.com/catalog/product/?id=A_6D51M016DF0605. This part has a pitch diameter of 10.2mm.
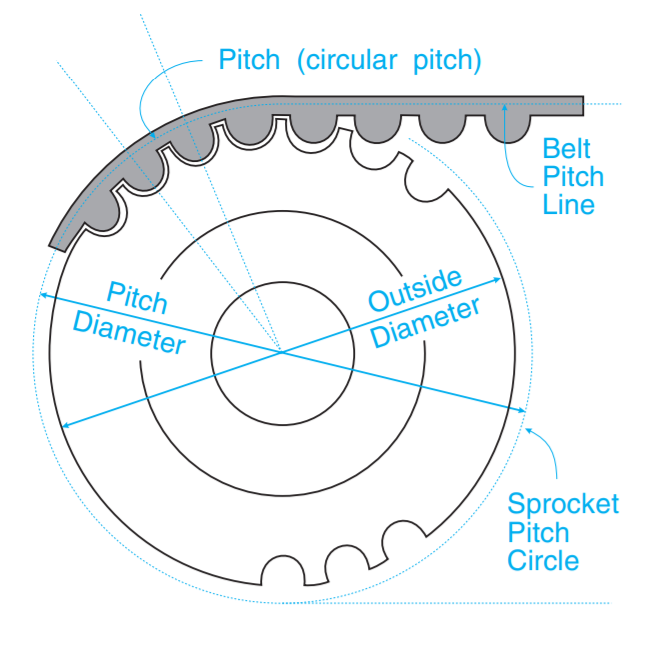
Pitch Diameter will be important for all the pulleys, as they define the belt path.
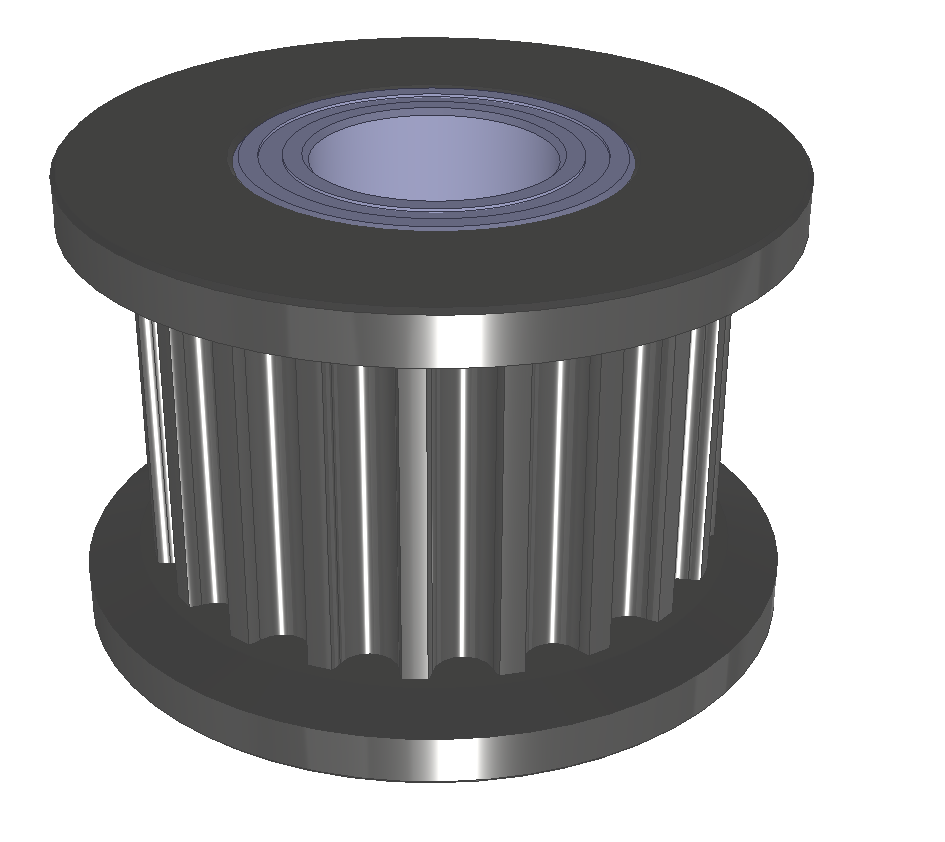
This is a 20 tooth GT2 Idler. It has bearings in the center, fits on a 5mm shaft. https://www.mcmaster.com/3693n11. The Pitch diameter is 12.7mm
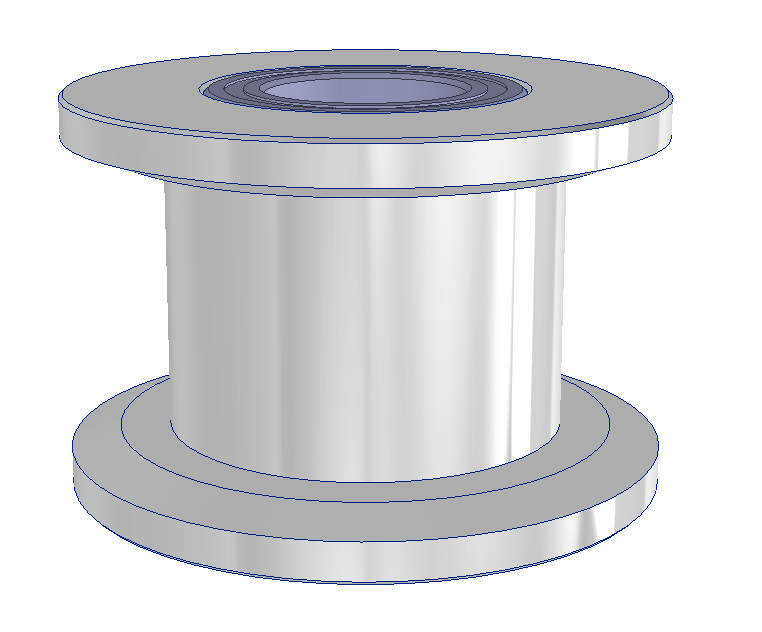
https://www.mcmaster.com/3693n14 This is a belt idler, smooth face, used for running on the back side of the belt. Here the diameter of the pulley is 10mm, which is not the pitch diameter. We need to find that before we go too far.
Both P1 & P2 in the belt path image above are a stacked pulley setup using the 20 tooth idler and the smooth face idler.
P3 & P4 will also be a stacked setup, but I need to determine the larger diameter pulley size. Mandela Rose Works makes a Magnum pulley, but don't publish a mechanical drawing and their parts look a bit rough. I don't like inserting unknowns into my models, so I'll find another way.
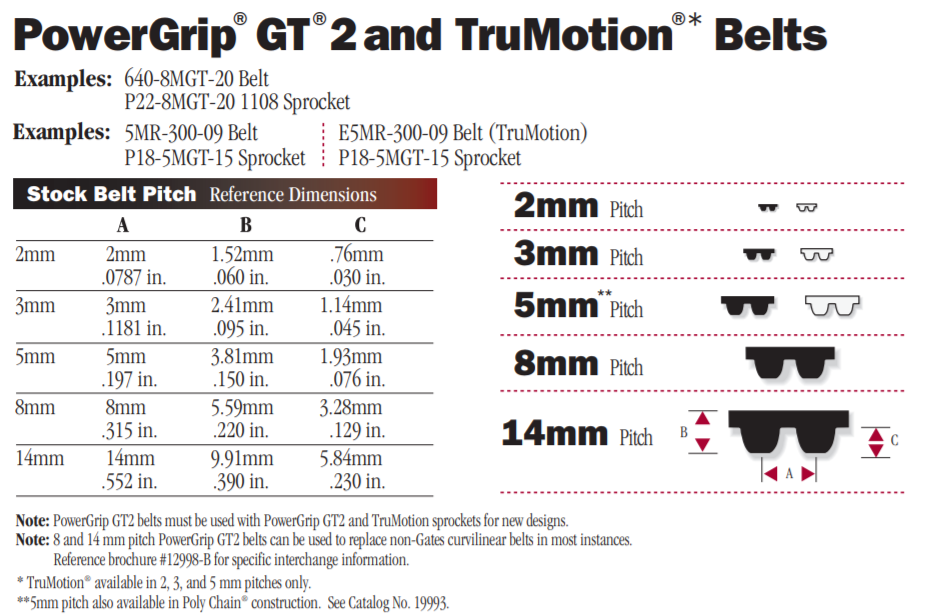
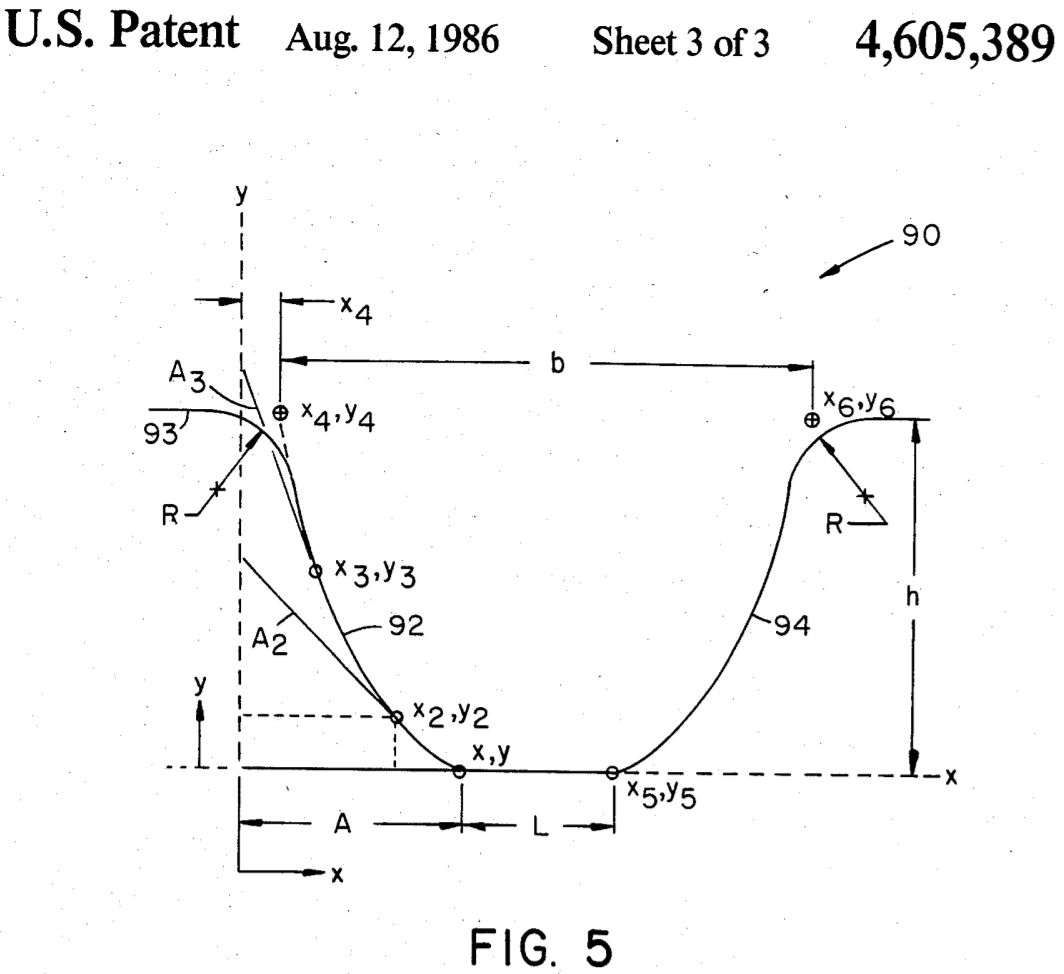
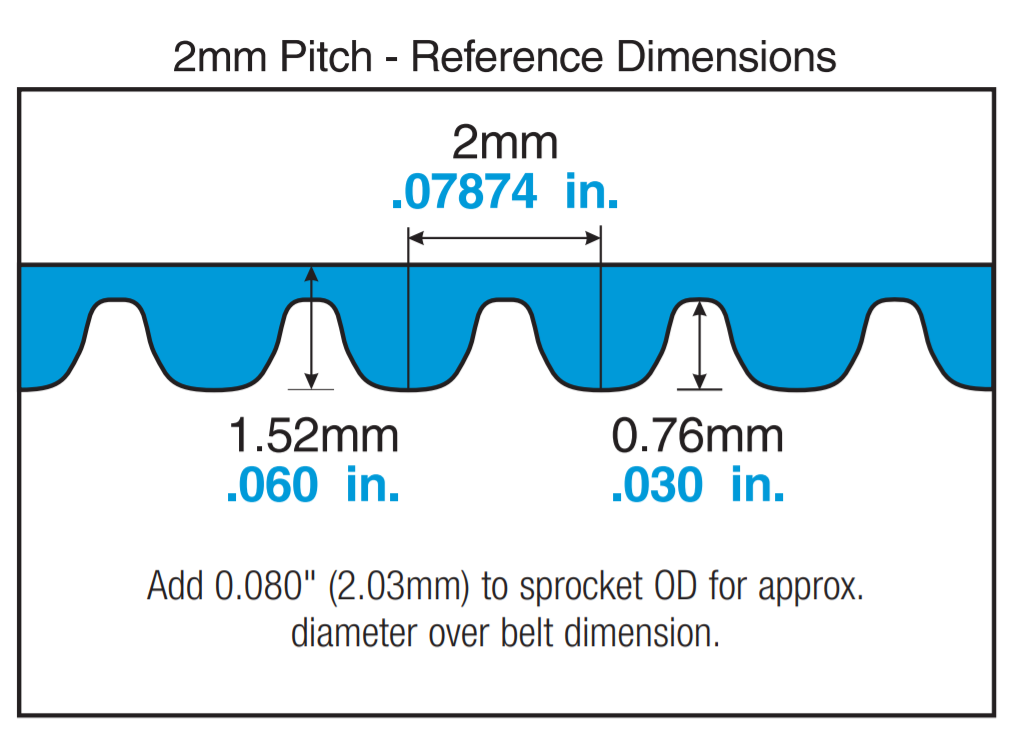
The Gates PowerGrip GT2 belt profile was under patent protection and has since expired. It's a Modified Curvilinear Trapezoidal Timing Belt tooth profile, which makes it a great belt. Detailed info on the belt is difficult to find, there is not much from Gates, except in their patent documents. And it doesn't tell us about the GT2 2mm belt, just the shape of the teeth. Ugh.
This is from Gate's drivedesign_lightpower.pdf
More digging confirms, 1.52mm as the overall belt width, and .76mm as the tooth height.
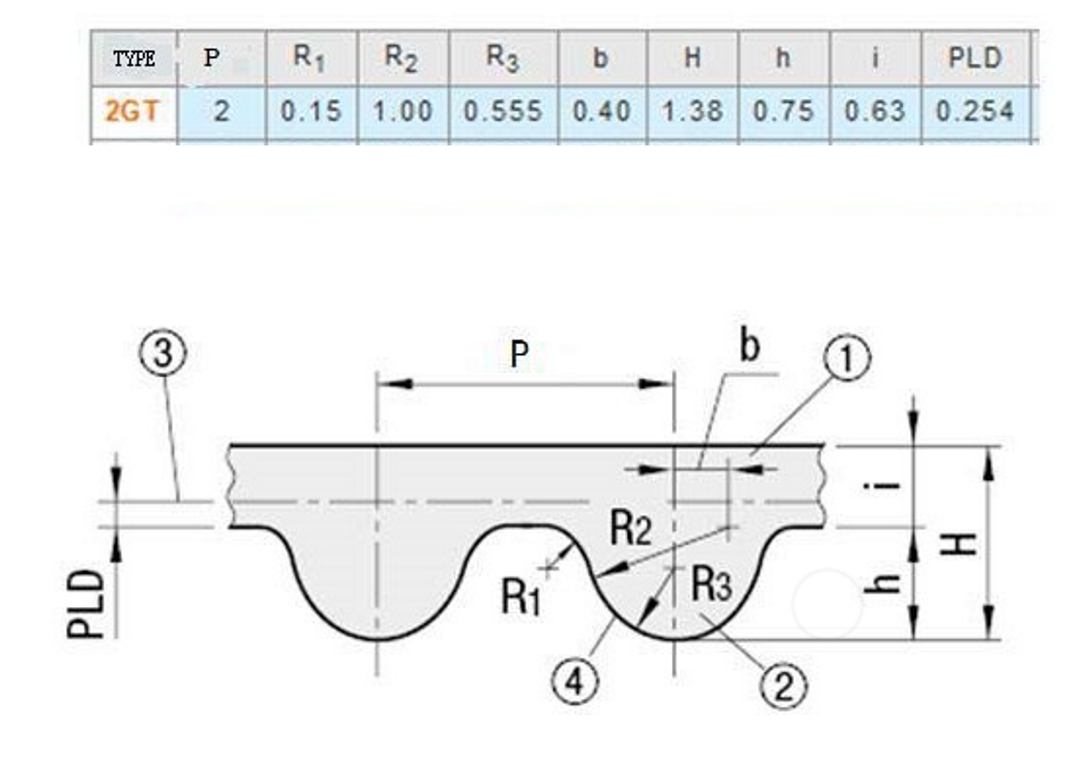
This is from a Gate competitor, someone on Aliexpress I believe. It has more data, but conflicting info compared to the Gates documents.
Specifically, the overall H is 1.38mm here, Gates says its 1.52mm and measuring a worn, but genuine Gates belt, I get 1.48mm. This confirms that I should only use genuine Gates belts.
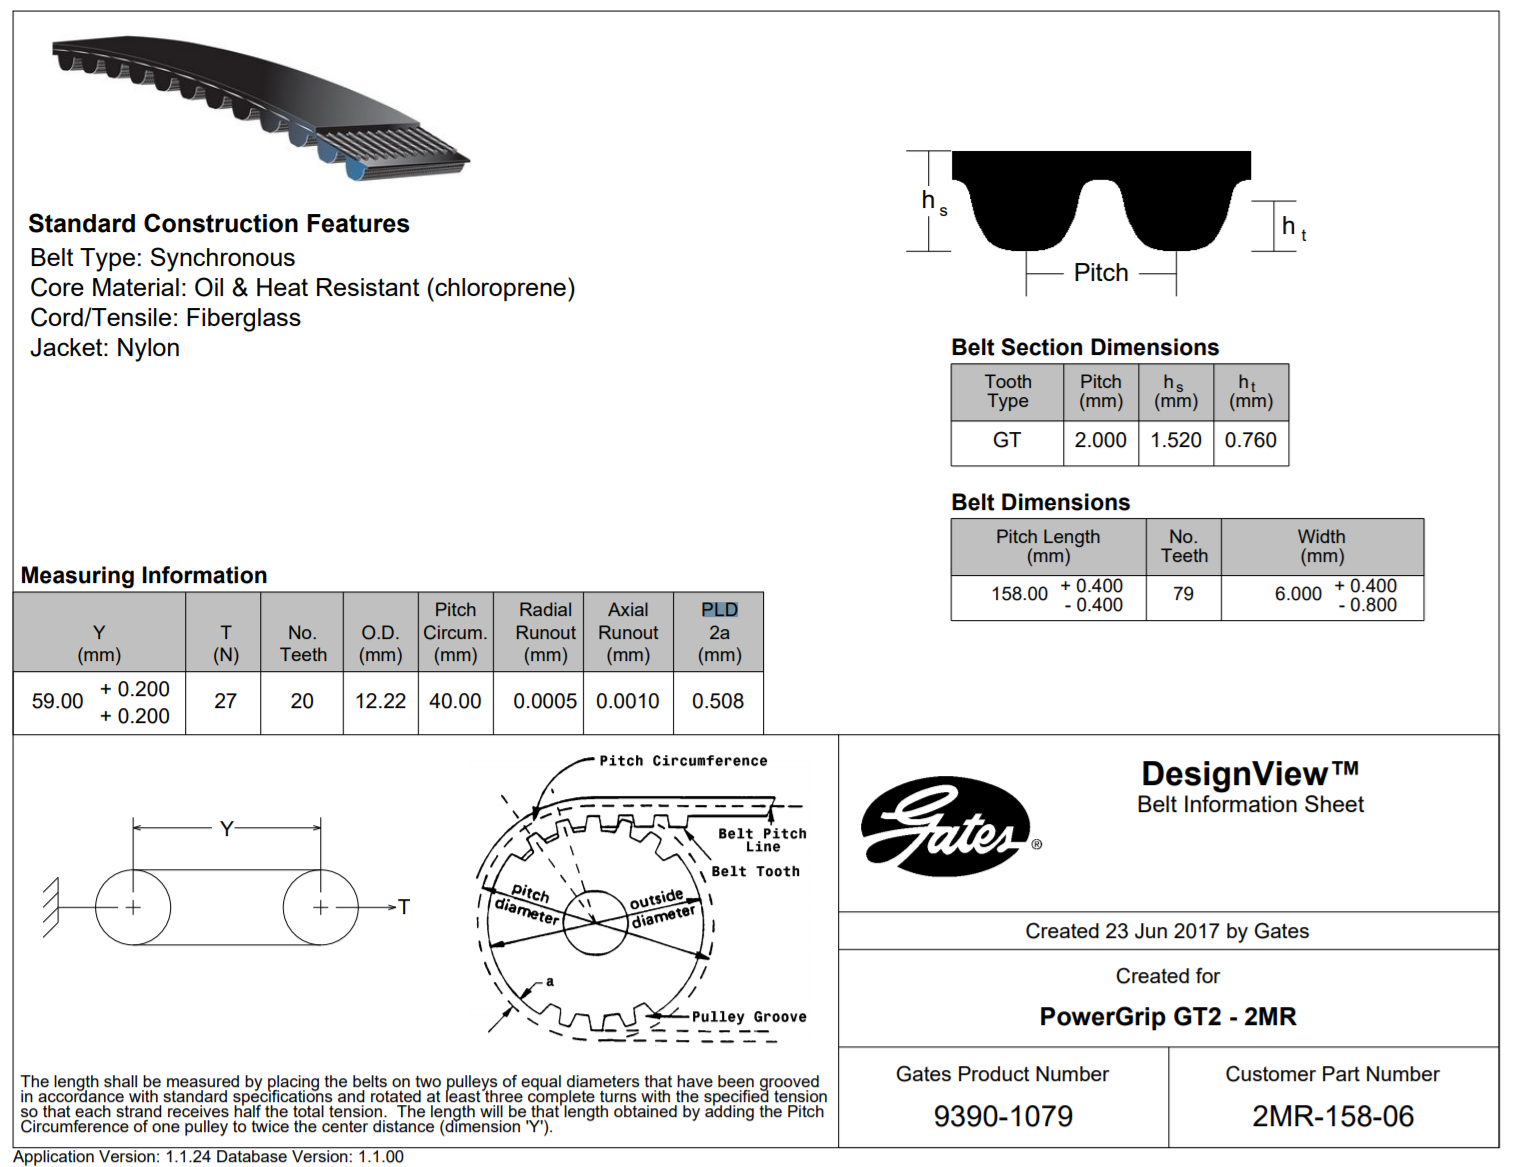
With a bunch of searching, found this document. PLD is .508mm, which I believe is really half that number, .254mm.
Looking at this belt profile, we notice 2 things.
- The dashed line thru the center of the belt is the belt pitch line
- The back face of the belt is offset from the pitch line is:
When it comes to modeling the belt, we will basically just need to define the path of the belt pitch line as it wraps around the pulleys and idlers.
By building the model using the belt pitch line, we can ensure that the belts will be parallel to the axis.
For reference, the PLD is the pitch line differential.
When the belt wraps around a pulley, you simply use the pulley's pitch radius/diameter to determine the path.
On the smooth bore, with the belt teeth away from the idler, the pitch diameter is 11.012 mm. Simply, the pitch radius is = 5mm + (.76-.254), and multiply that by 2.
I'm not yet done with the pitch diameters on the back pulleys, but moving on for now to get something designed.
I roughed up a halo plate, much like the existing one out there. My goal is to be able to fully enclose the MechaCore, so the halo will have to also provide a clean way of boxing in the top. But for now, all I care about is getting the motor and pulley locations defined, with a belt path that is perfectly aligned.
-
Z Stages, Bottom Plate and extruded frame
11/21/2019 at 06:21 • 0 commentsCleaning up a few details on the Z stages
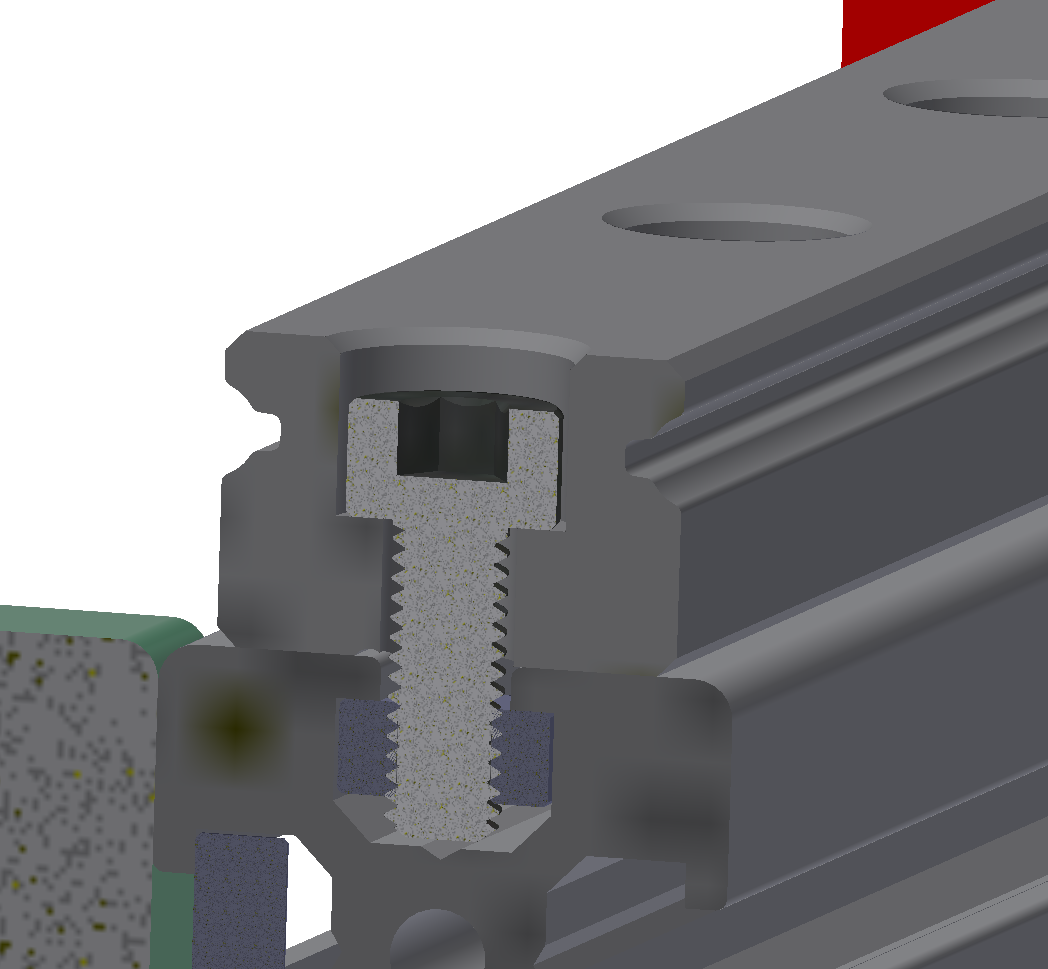
Attaching the linear rail to the Mitsumi 1515 is done with M3x8 SHCS and square nut. The problem is these screws are the only thing constraining the parallelism of the linear rail to the extrusion. The M3 screw (2.95mm OD) in a linear rail hole (3.5mm ID) and a slot in the rail (3.4mm) means the screw can be off center up to 0.5mm. Over a distance of the 2 end holes of 675mm, that equates to a .08° per rail.
Being that the rails should be as parallel as possible, the Z yokes will allow for some misalignment.
My plan is to pin the rail in the top (halo) and bottom (plate) using 2.5mm pins, or I could tap ends and use m3 screws. This will ensure the 3 vertical extrusions are where they need to be, and knowing the linear rail will be paralled to the extrusion, within .08, we should be tightly aligned.
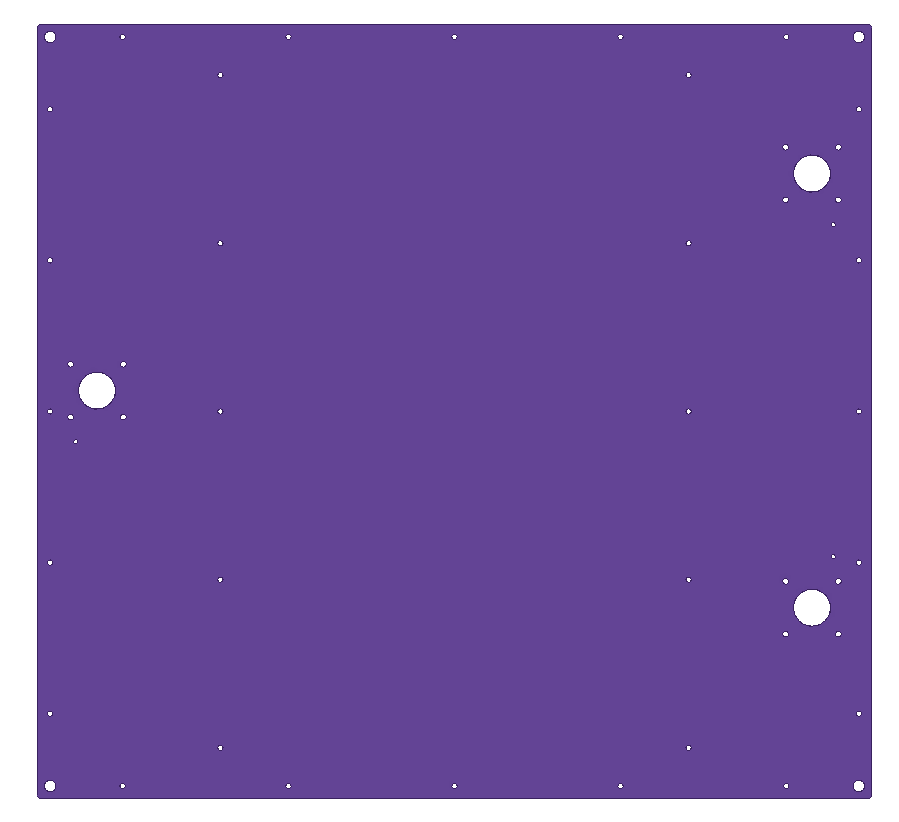
Speaking of the bottom plate, here it is, with a few changes.
- Tighter bore to better align the NEMA17 motor.
- Added holes for the pins on the vertical z-stage extrusions
- Added a set of horizontal bars on the bottom
One thing I noticed is the internal mechanism, and therefore the heated build plate, is not centered in the frame. It's shifted 12.25mm toward the front. I'm sure this will become obvious when I start looking at the XY stage.
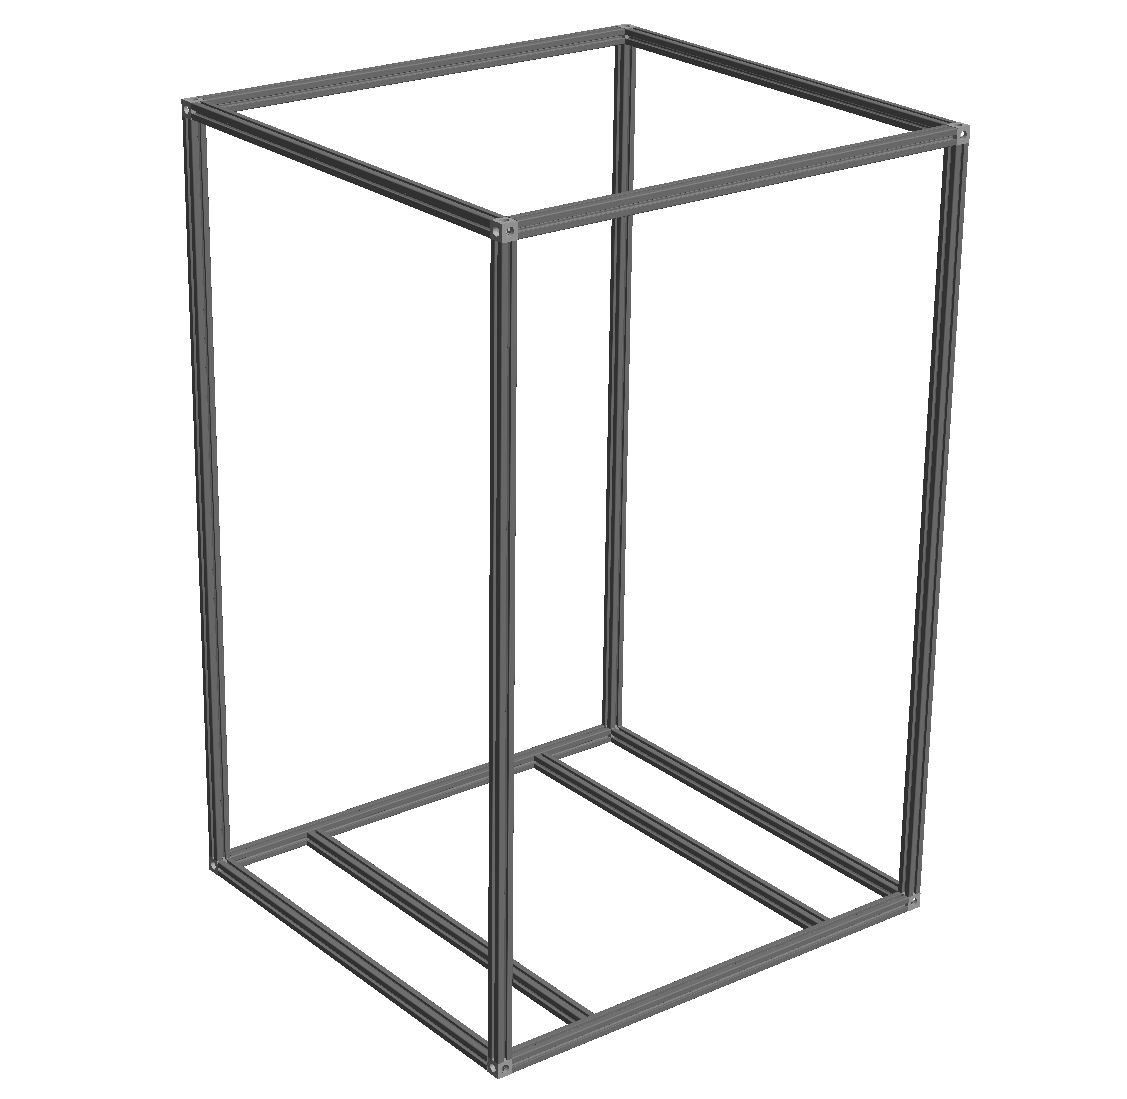
Here's the new internal frame, with the extra 2 extrusions on the bottom.
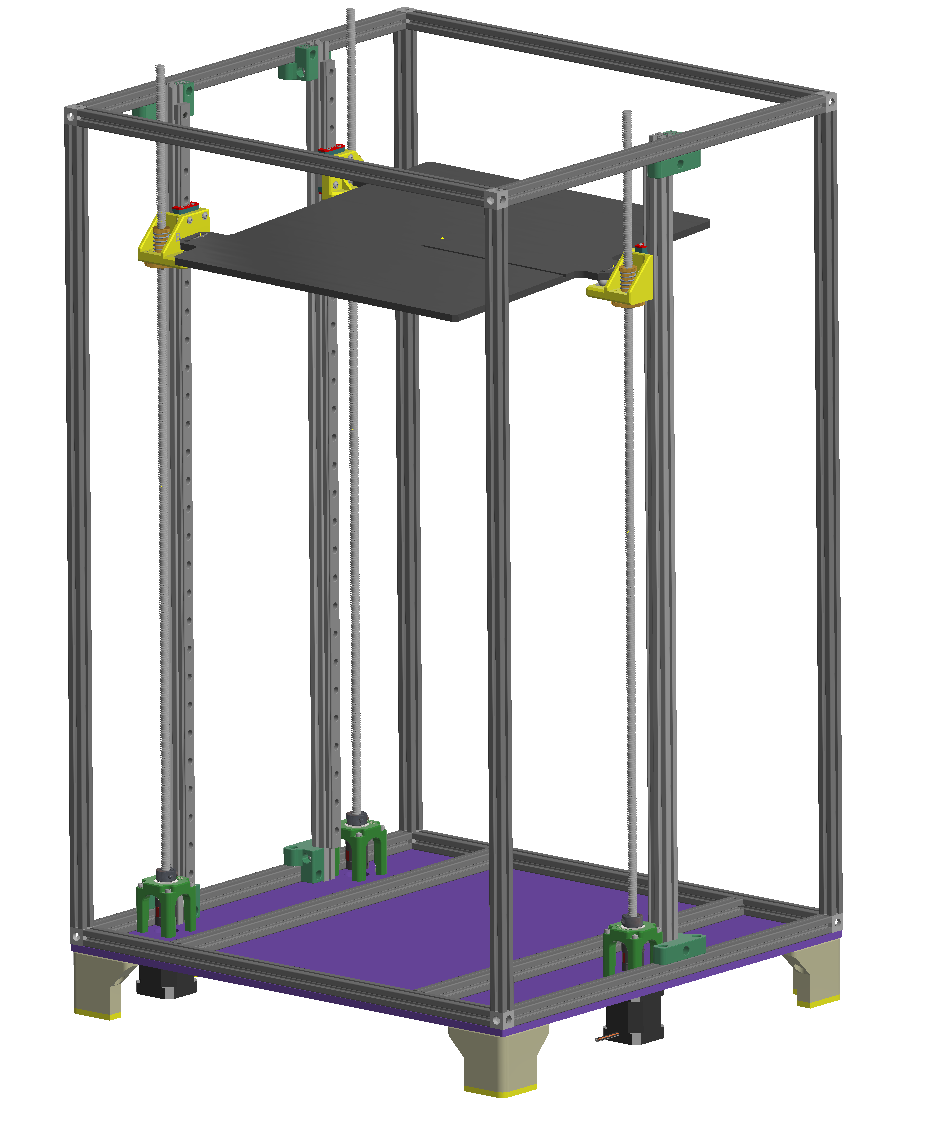
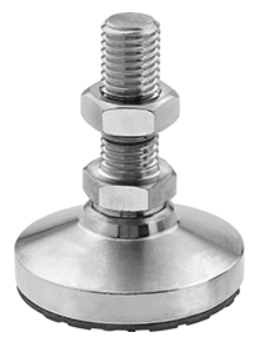
Here's where I am at present. I prefer using leveling when it comes to a 4 point base. You are rarely on flat ground or desk, and the 4 points create a rocking situation.
I'll be looking at something like this, probably M6. I'll defer to that once I get to the outer panels.
-
Kinematic Yokes for Bed - Part 2
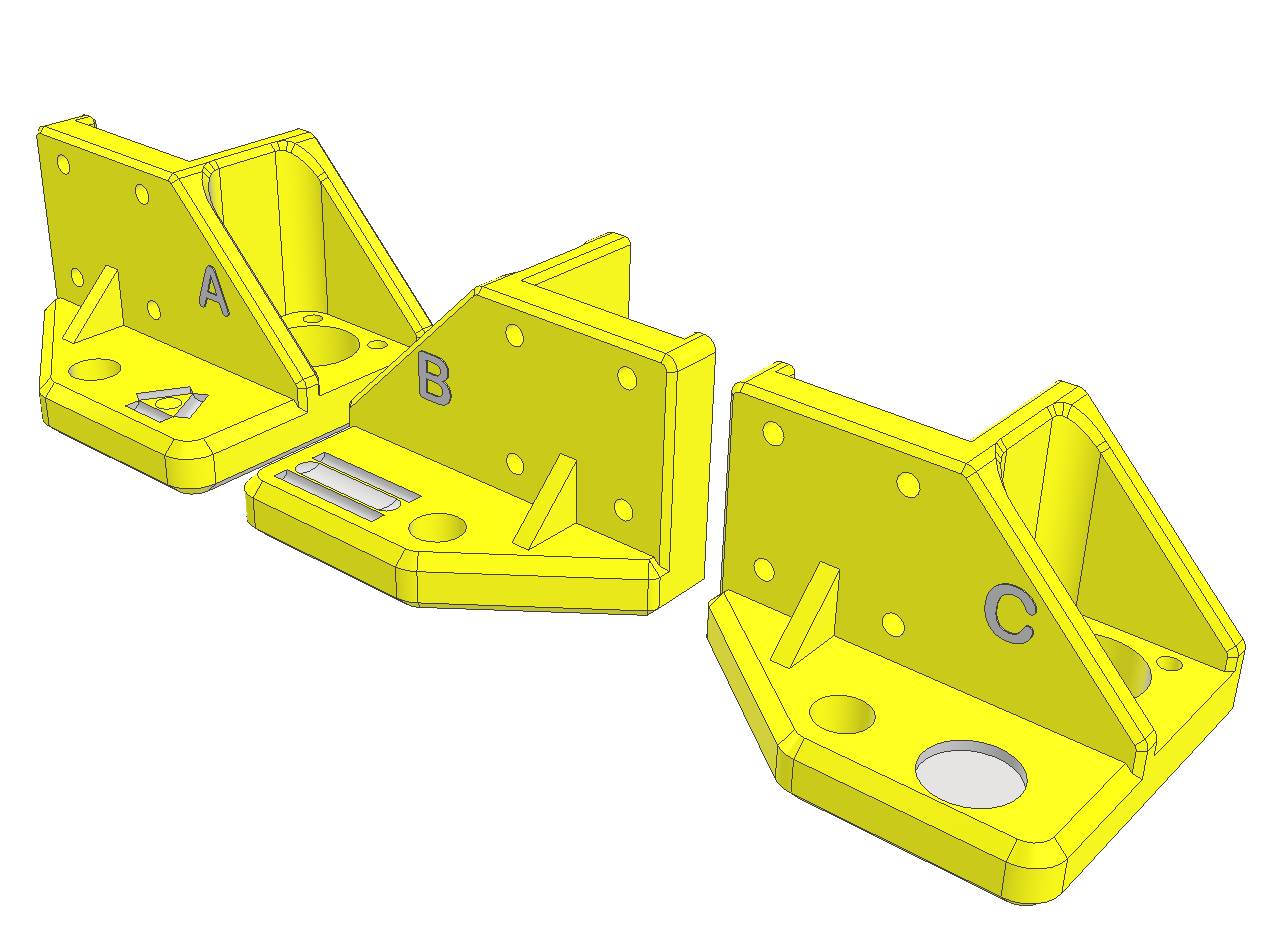
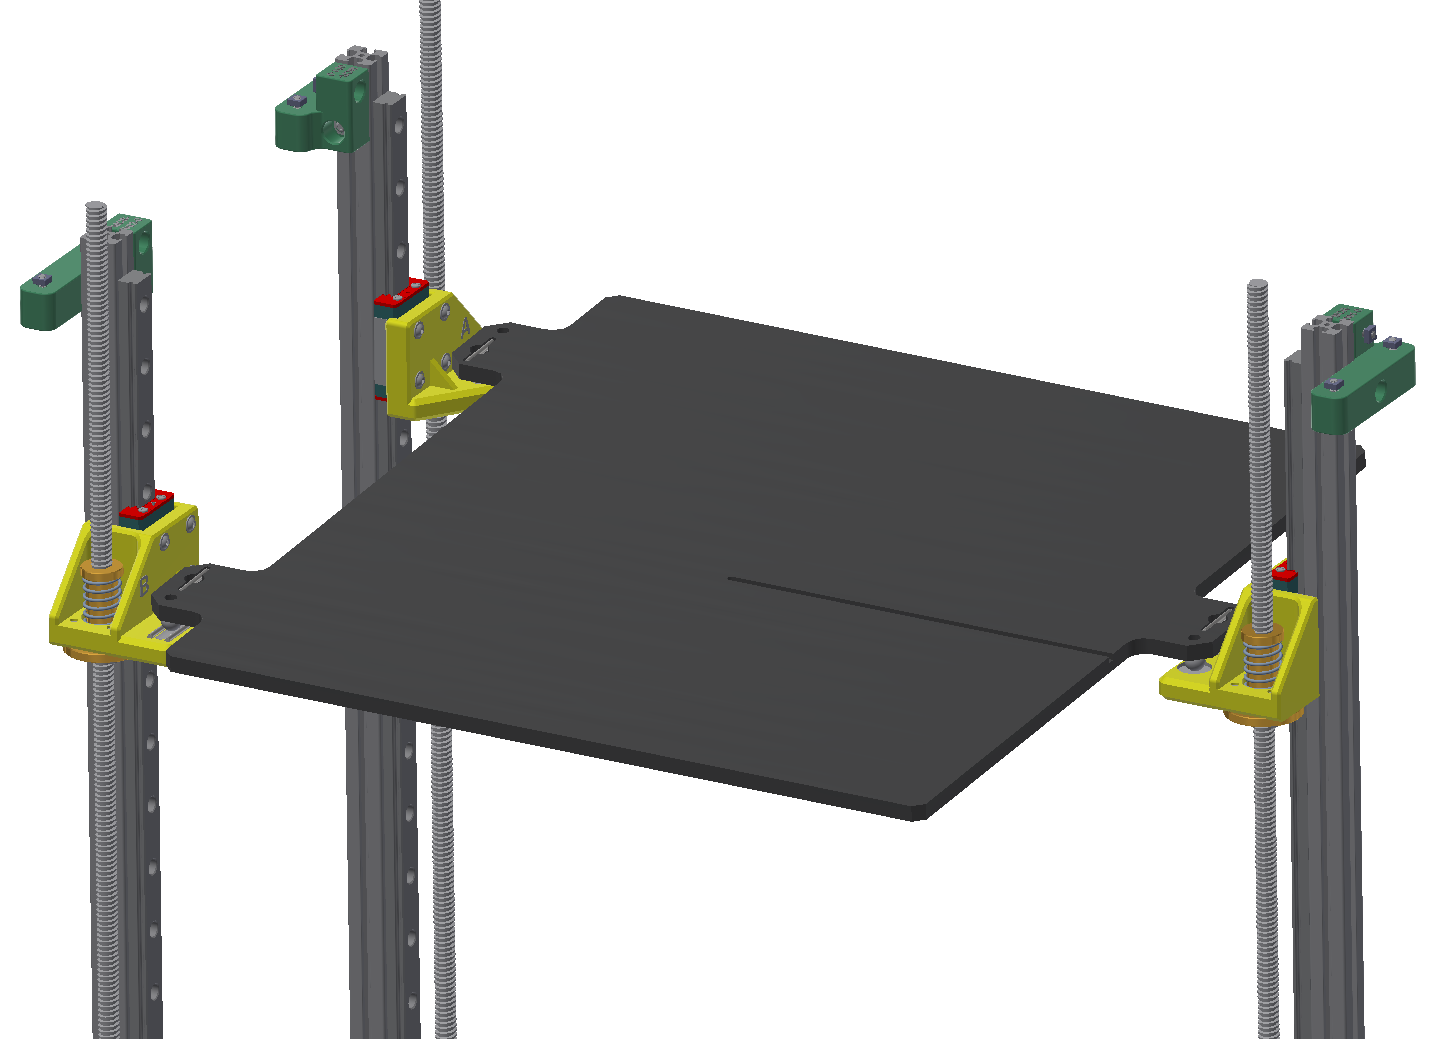
11/19/2019 at 03:06 • 1 commentPicking up with the Kinematic Z Yokes, I've created the 3 versions. I labeled them A, B & C.
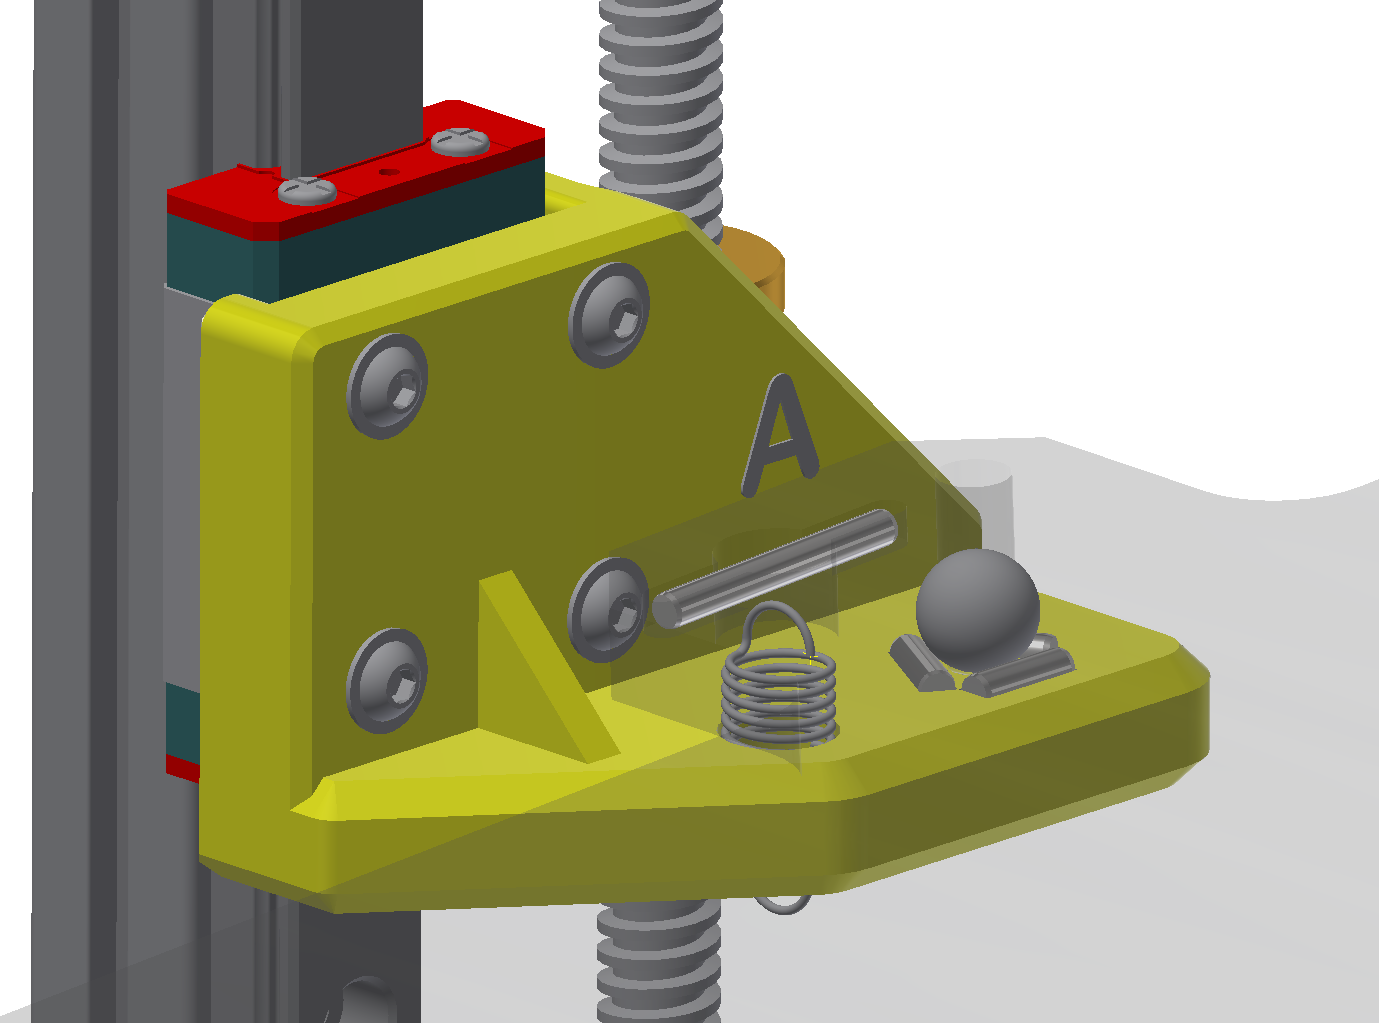
Ball A will pin the bed at the A-corner as the ball rests inside 3 pins
Ball B will be allowed to move linearly in the Y axis as it rests between 3 pins
Ball C will be allowed to translate on X or Y
Above are the 3 Z yokes, all derived from a master version.
The ball would be an 8mm diameter or 5/16 inch. https://www.amazon.com/7-938mm-Silicon-Nitride-Ceramic-Bearing/dp/B07D8VQ2GB/. Ceramic has low thermal conductivity, SiN4 has a thermal conductivity as low as 10 W/m-K. I could go with glass spheres as well.
The pins are all 2.5mm, and either 8mm long or 20mm long.
Here is the assembly, it will tolerate a fair amount of angular misalignment without binding, not really planning on allowing a worst case situation.
Z axis kinematic mount printed in Onyx w/Carbon

-
Z Yoke and kinematic bed mounting - Part 1
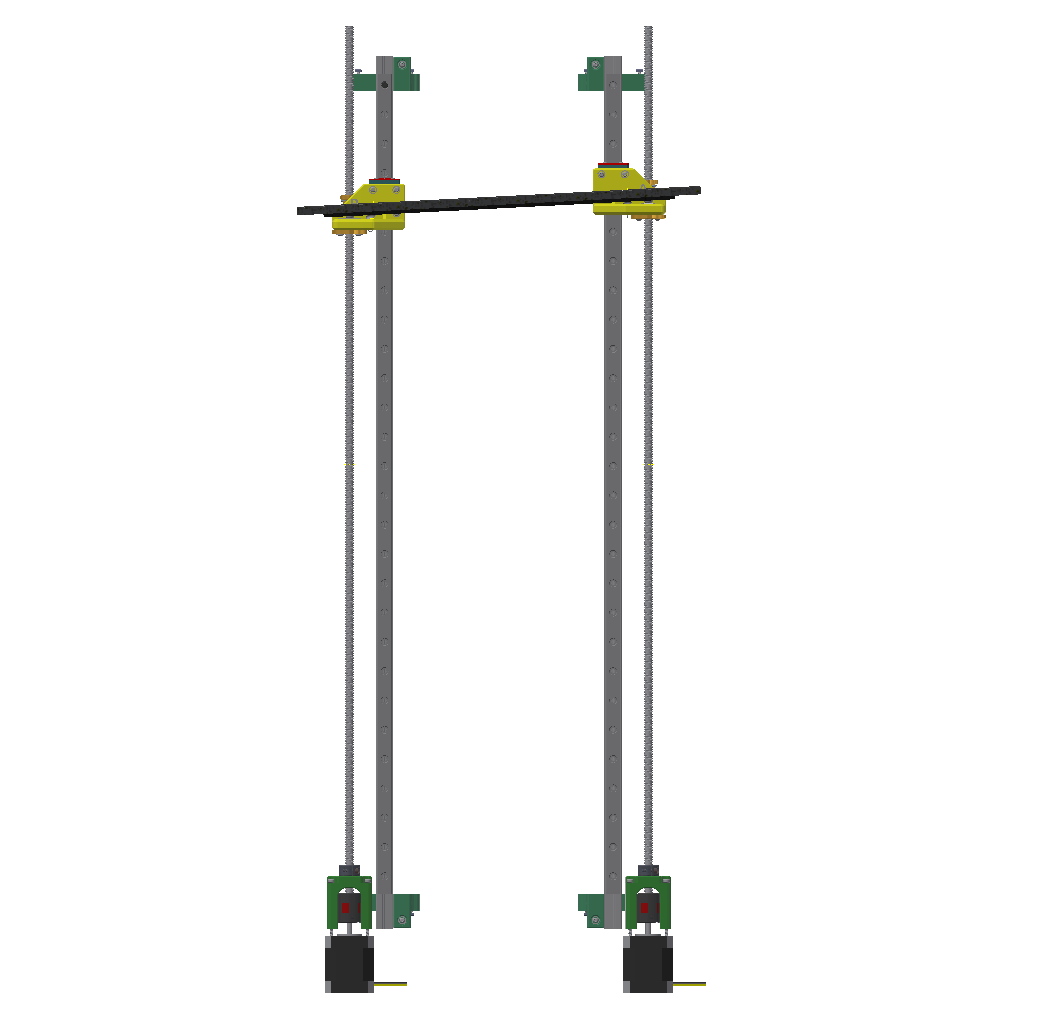
11/13/2019 at 07:54 • 0 commentsSLooking at the Z Yoke design, which is about the same for printed and CNC metal, there is certainly room for improvement.
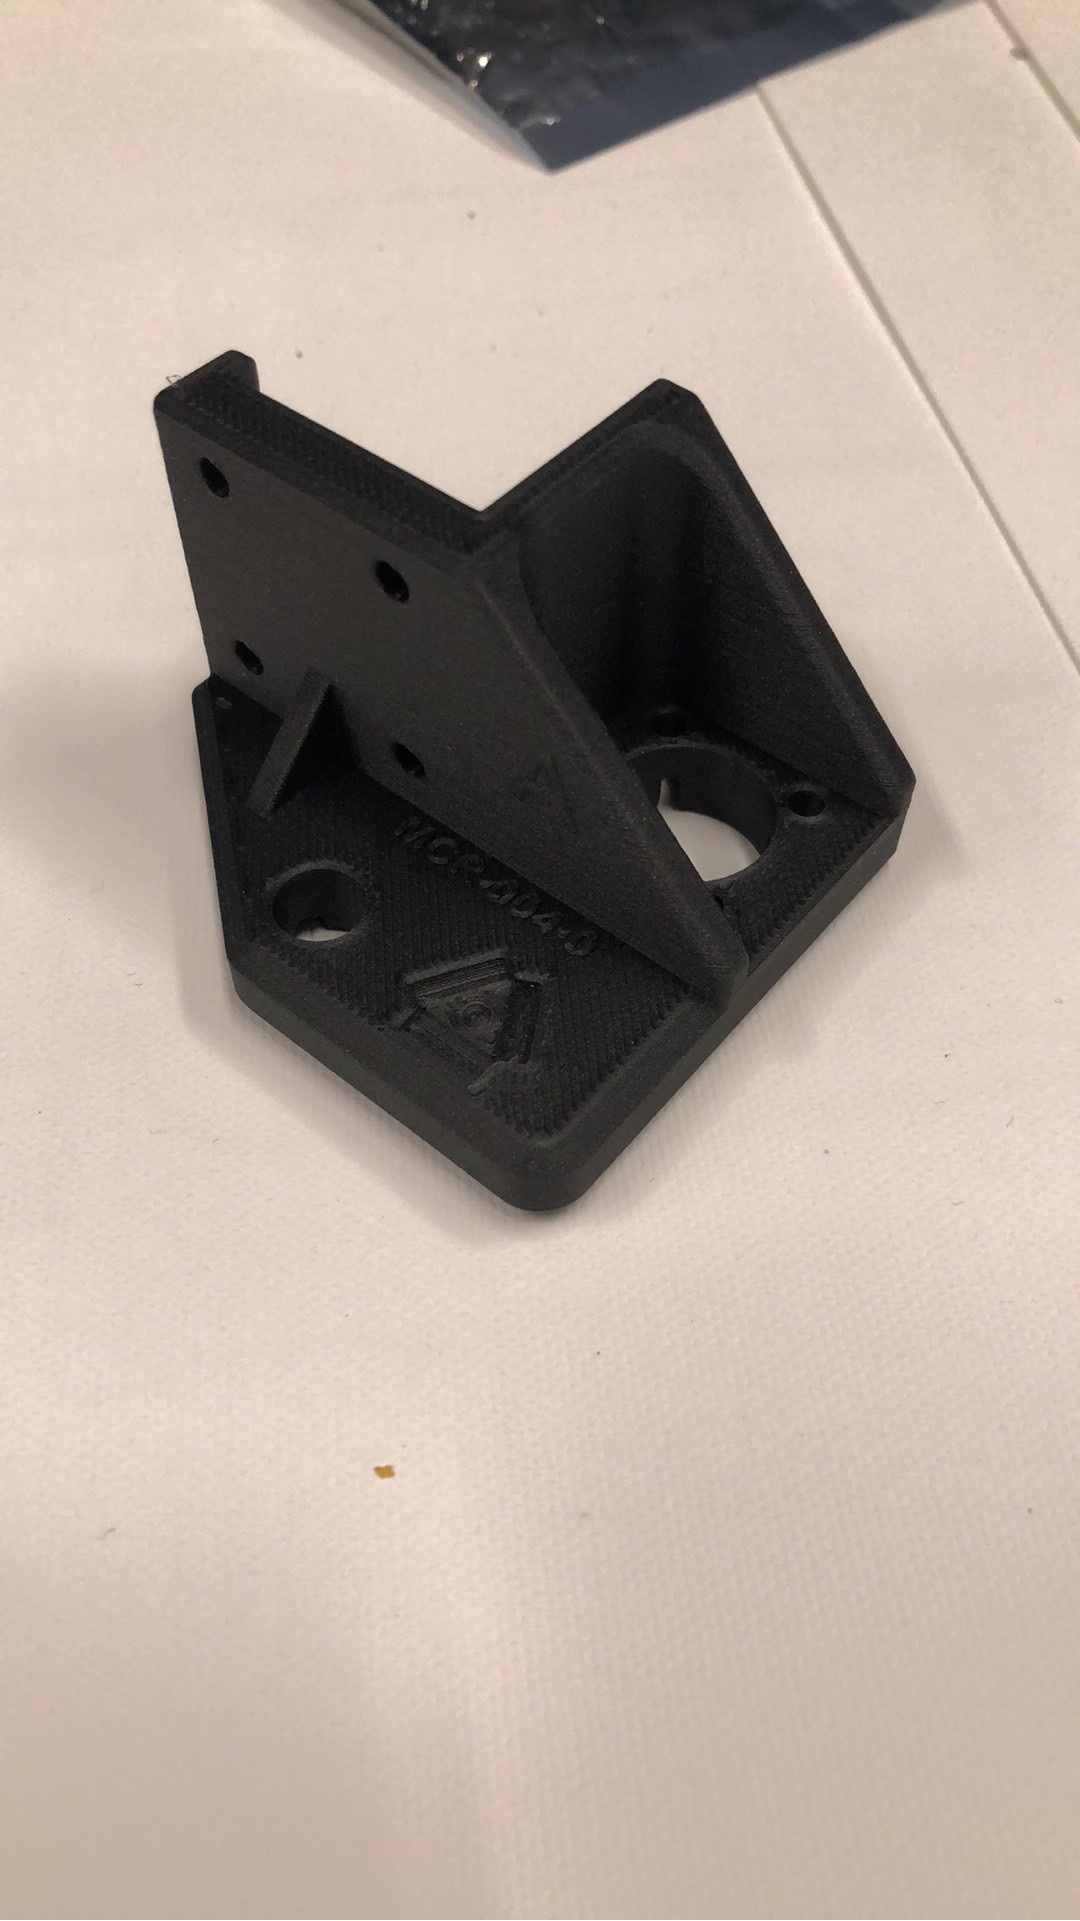
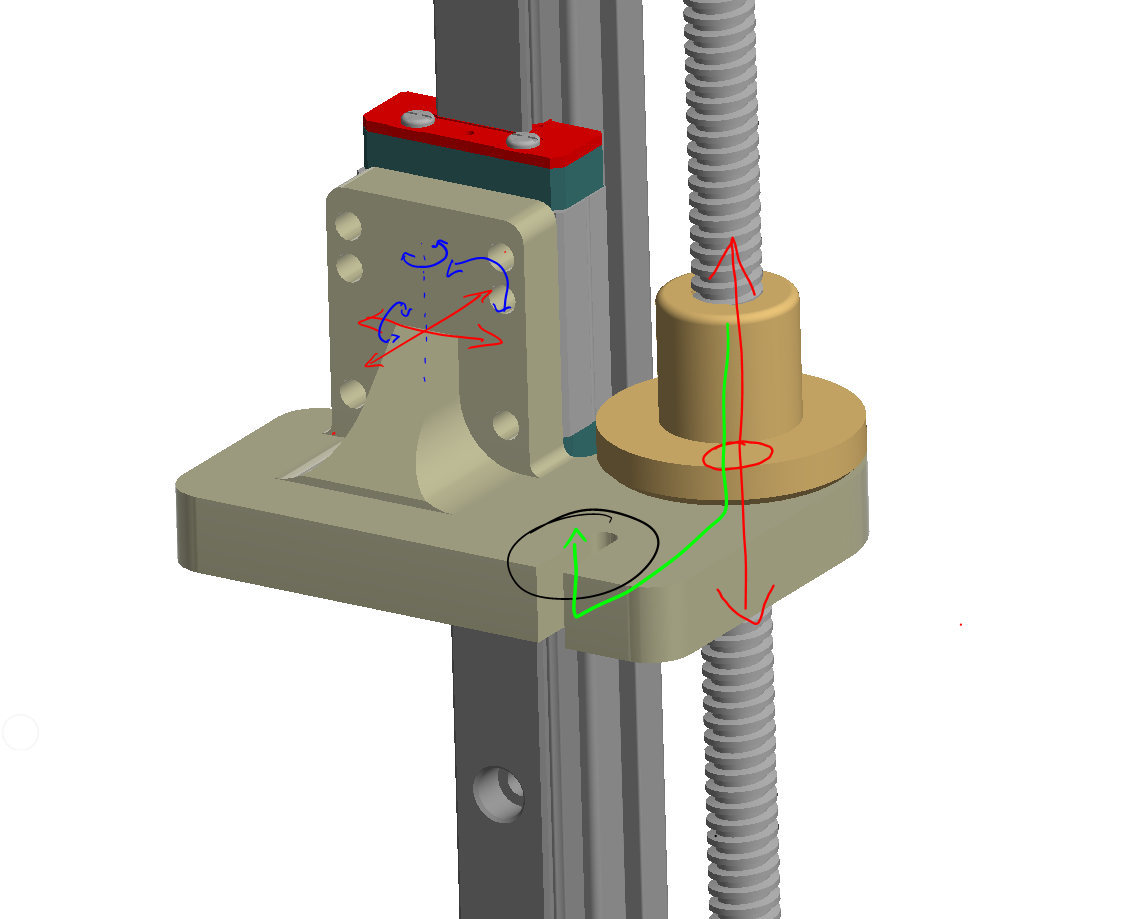
The linear rail car is constrained from any rotation and linear translation in the X & Y, free to move up & down on the Z. The lead screw provides Z positioning. Below shows the linear constraints (red) rotational constraints (blue) and the primary force path from the lead screw nut to the bed holding interface.
The challenges here
- Yoke to linear rail carriage is only positionally constrained by the screws.
- Lifting force from lead screw is loading the lead screw nuts in tension, loose screws will affect the height
- Method of bed mount is sub-optimal, not really allowing for misalignment and will have binding issues unless there is excessive clearance, which could cause bed movement
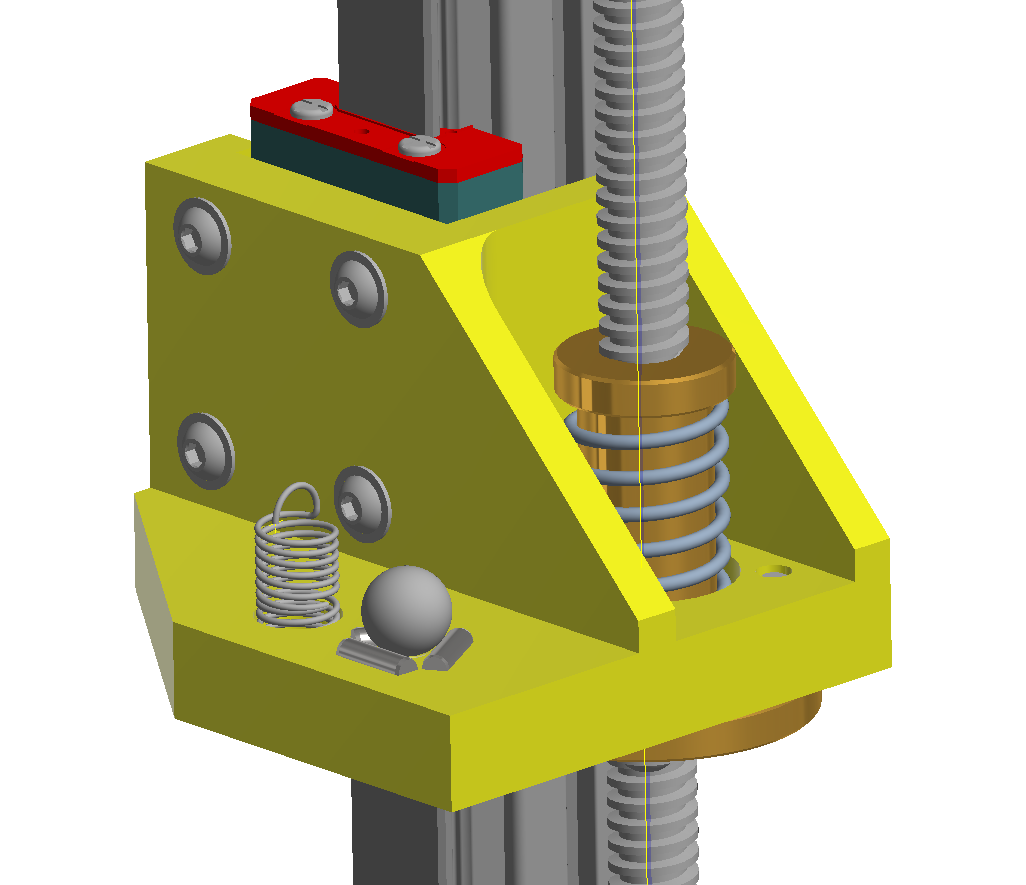
My plan:
- Improve the alignment between the yoke and the rail carriage
- Mount the lead screw nut from underneath, so that weight on yoke is resting on the nut
- Add a simple kinematic mount for the bed
- Shift the mass around so it's working to stiffen up the yoke
This is the direction I'm heading, although this will take a bit longer to get to where I want it to be.
- Kinematic mount for the bed, different parts for each of the 3 yokes
- Left lower corner will capture the ball, point constraint
- Left upper corner will capture the ball on 2 pins (resists rotation on X & Z)
- Right side will provide a flat plane (resists rotation on Y)
- Kinematic mount will use 8mm Si3N4 ceramic balls, which has low thermal conductivity
- I'm unsure if the lead screw nut has clearance holes or they are tapped, so need to determine that.
- Still determining the spring to use here
Concerns I have at the moment
- If I'm going for a heated chamber, the linear rails are not typically rated for above 80°C
- How committed am I to trying to stay with the RailCore design? Will I allow myself to deviate substantially so that I get the design I want without being backwards compatible?
- I'm starting to see things that I don't really like in the RailCore design, but fixing it will stray me far off the path. Or do I look at a clean slate design here? Going to sleep on that one.
-
ZLT Bearing Block, bearing, motor and coupler
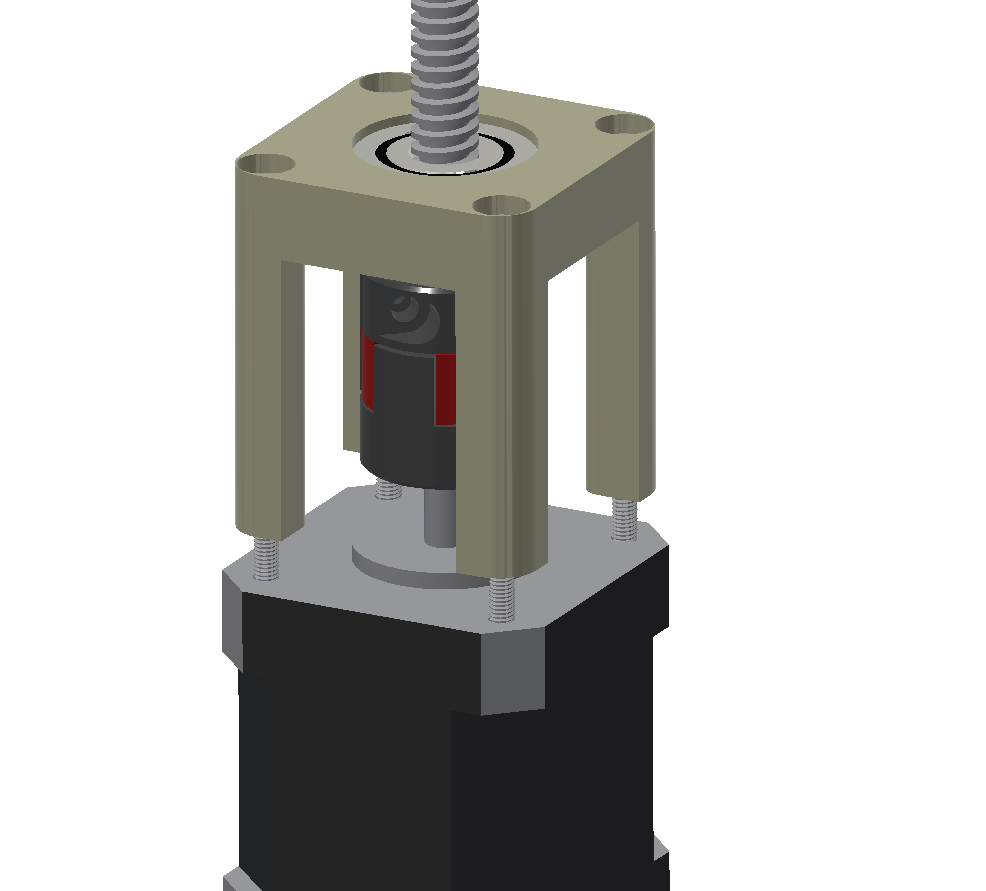
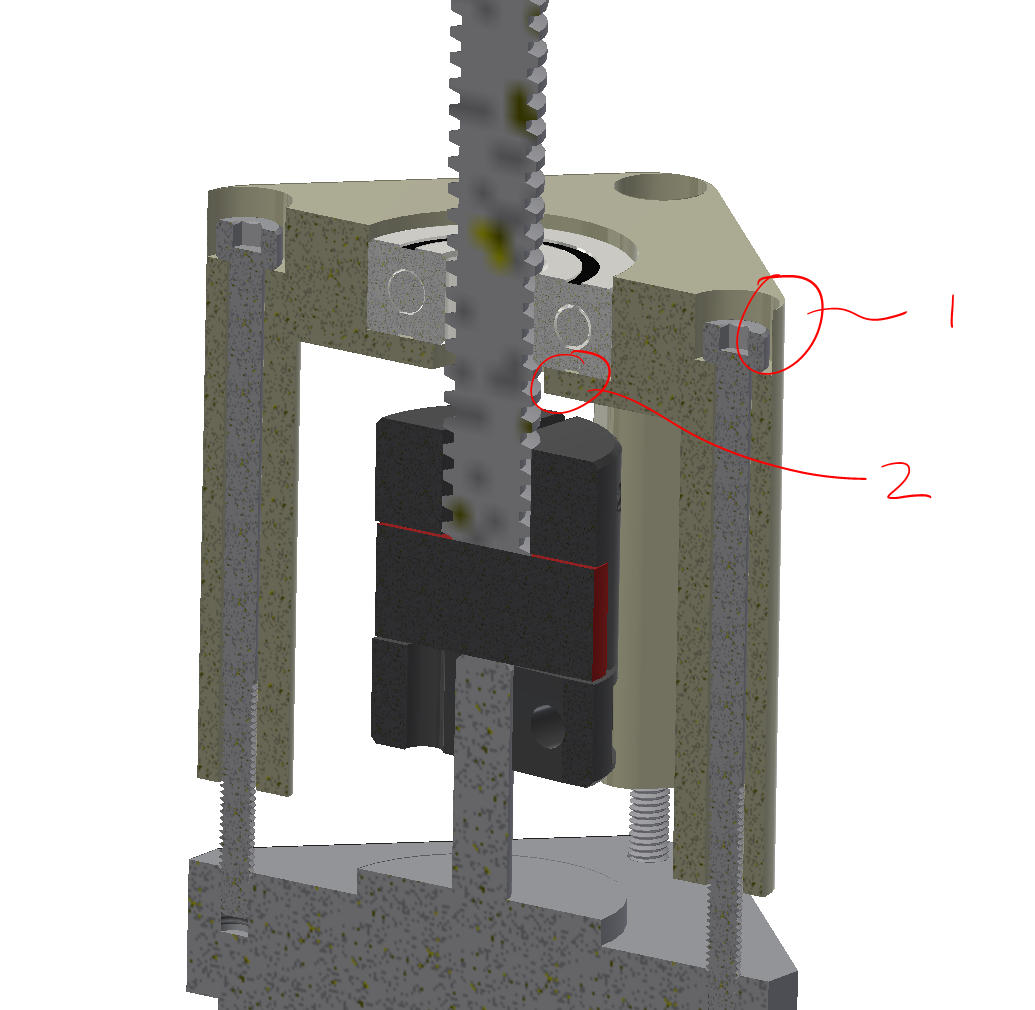
11/12/2019 at 06:02 • 0 commentsHere is the assembly from the Railcore ZLT. What's missing in this view is the bottom plate.
This is what the assembly is accomplishing
- ZLT Bearing Block
- Hold the 608 bearing with clearance for the shaft coupler
- Mounting screws for the block attach to the NEMA17 motor
- Allow access to the shaft coupler
- Bearing
- Provide rotary support/alignment on lead screw
- Shaft Coupler
- Adapt 5mm motor shaft to 8mm lead screw
- Provide compliance for shaft misalignment
- Stepper Motor
- Provide rotary motion
- Support the weight of the lead screw and partial weight of the build plate and build
At first glance, I see three issues with this part
- Thin wall around the socket head counterbore
- Lack of clearance between the rotating part of the bearing and the bearing block
- Reliance on screws to provide concentricity of motor shaft and bearing
1 & 2 are easy to fix, but #3 is a challenge. Ideally the bearing block would mate or reference itself to the round feature on the stepper motor face. This is perfectly concentric with the motor shaft. But this design is relying on the shaft coupler (which is flexible) and the screws/holes to determine the position. This is not ideal.
On top of that, I'd make 2 more changes.
- Make the top of the bearing slightly proud of the bearing block so that a shaft clamp could be used so the vertical force on the lead screw is supported by this shaft. This could be done with a shaft spacer or an extended inner ring bearing, but why eliminate the option?
- Beef up the standoffs a bit
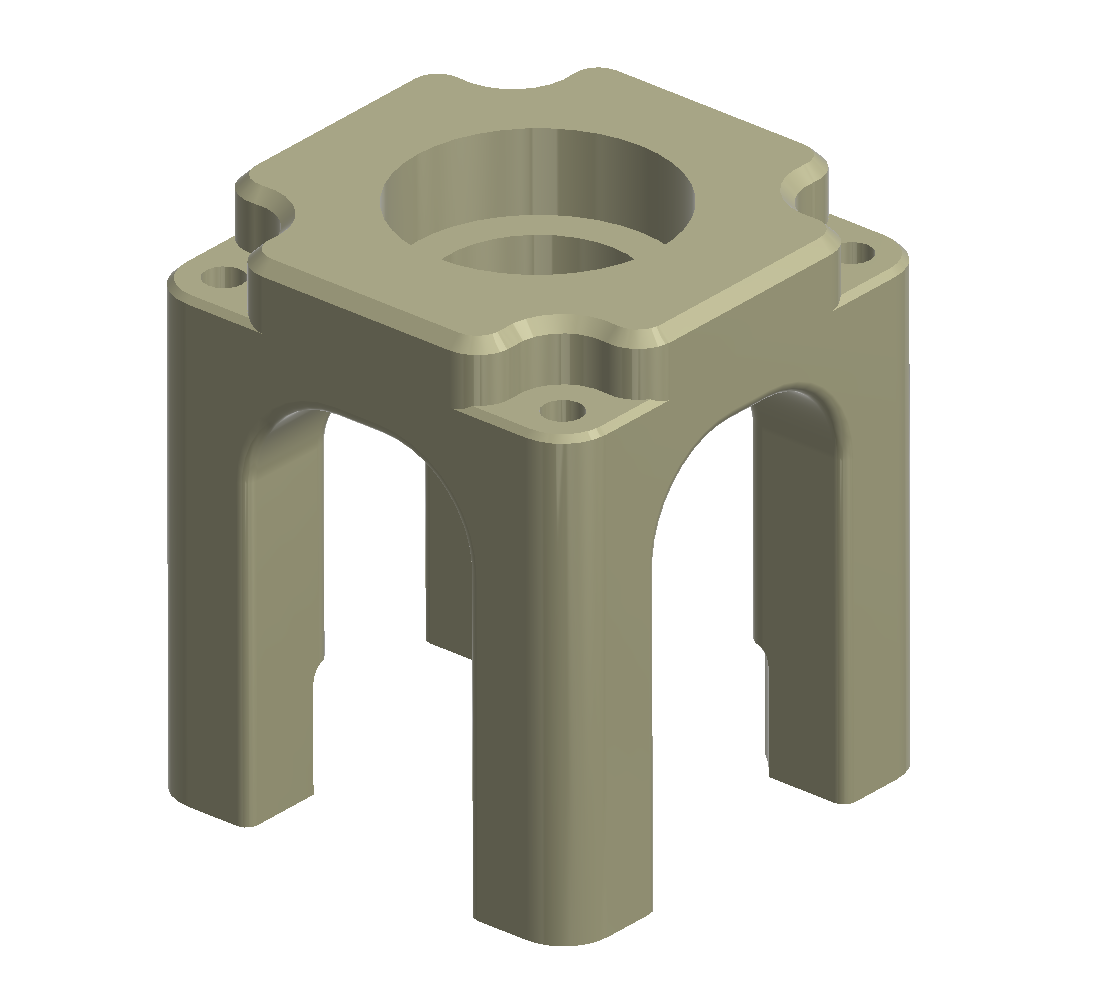
This part addresses most of the issues.
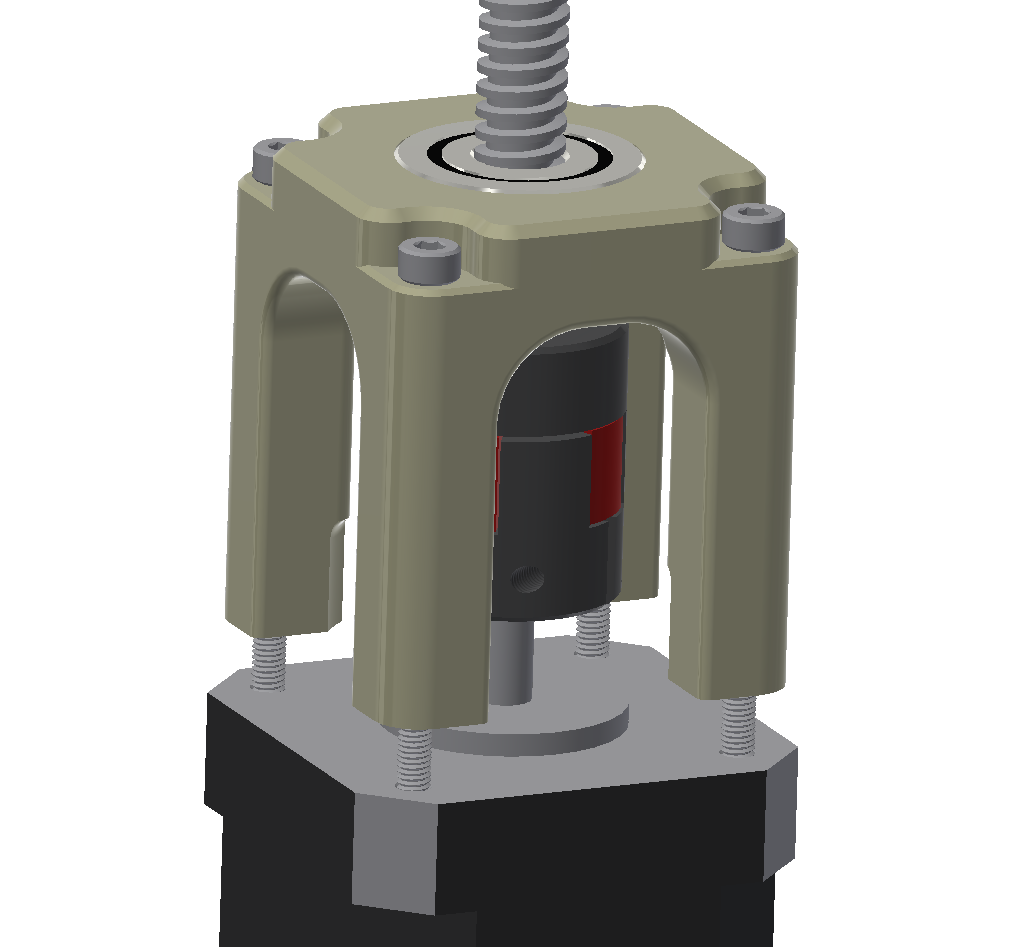
Looks a bit beefier than the part it's replacing. The overall height of the part is the same to allow for using the same hardware. Here, the bearing is sitting a couple of mm higher in the assembly.
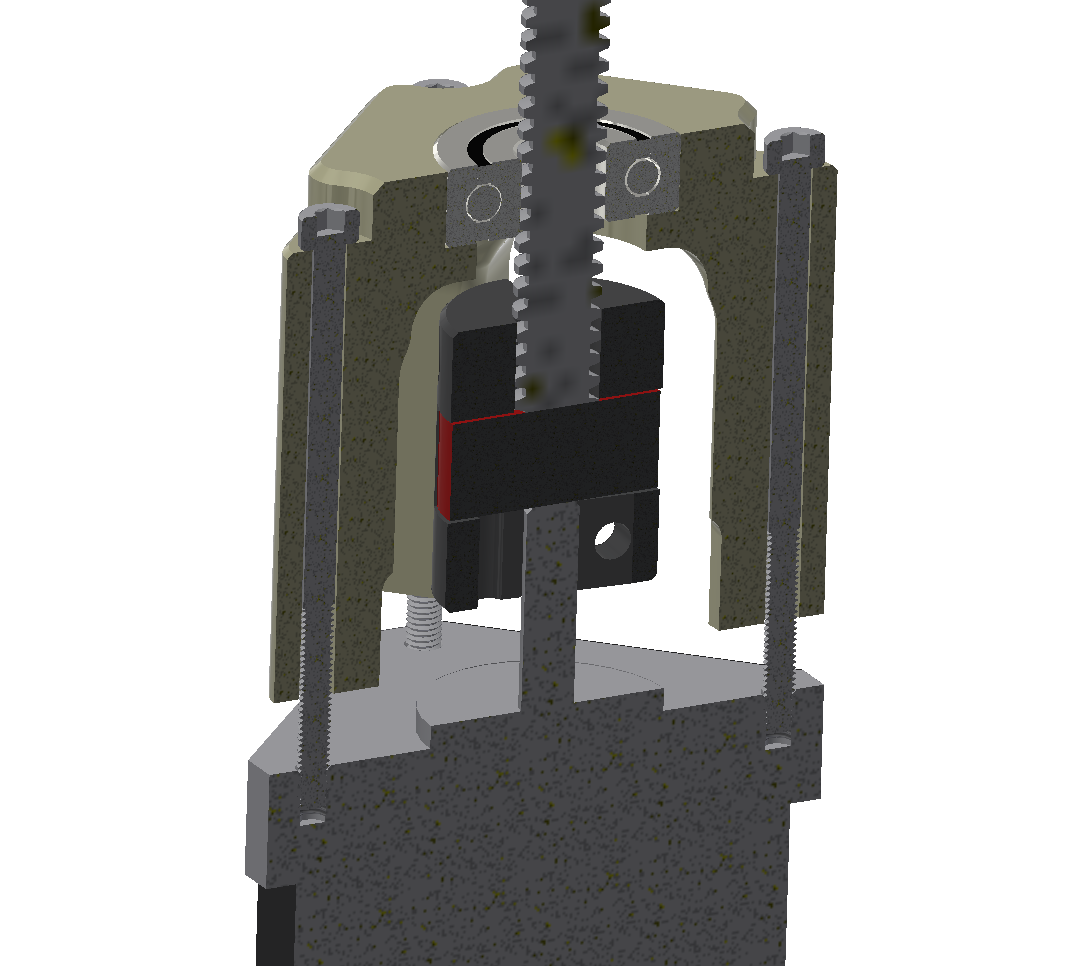
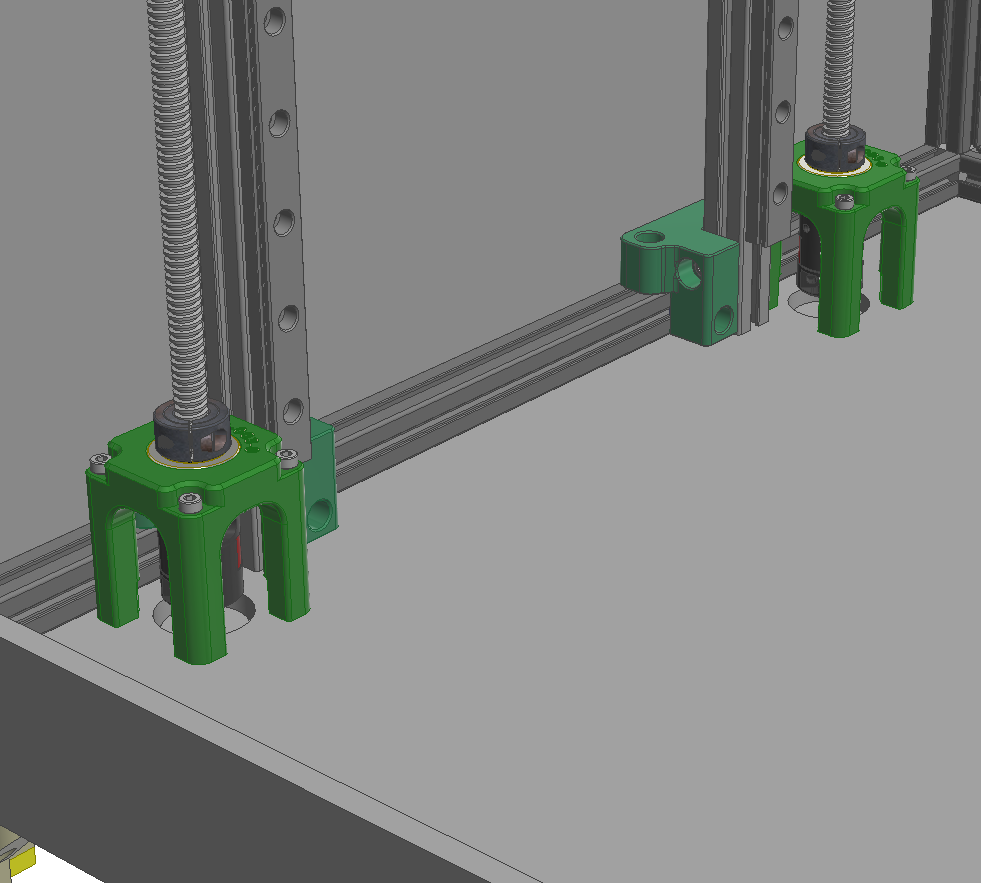
Section view shows a structurally stronger part, which should allow us to support the weight of the lead screw into the bearing block. The bottom of the linear block has a 32mm bore on center, you could use that to align the bearing block to be concentric with the motor.
The choice of shaft coupler, a zero backlash jaw coupling, is fine for this application.
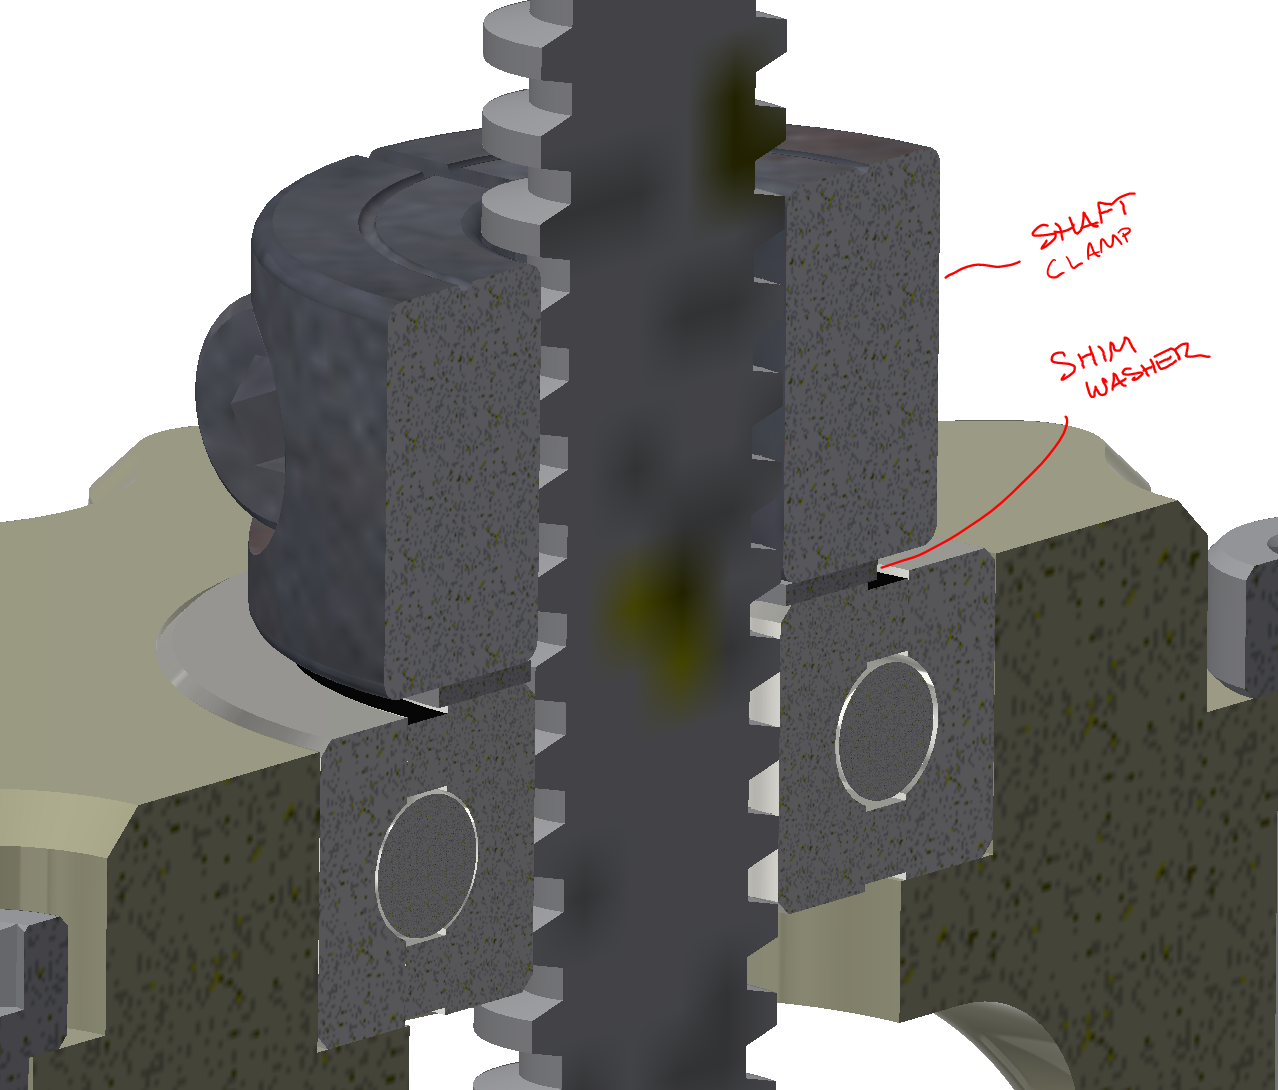
Here you can see the bearing outer race only contacts the bearing block and the inner race contacts the shaft clamp with a shim washer to prevent any parts rubbing. This will eliminate any axial load on the motor shaft and it should maintain a the lead screw at a constant height, without worrying about the shaft coupler introducing any vertical movement while rotating.
It goes without saying, the design relies on gravity, If one was inclined to fully constrain the lead screw, then you would simply capture the bearing and add a shaft spacer between the shaft collar and the bearing.
Now being a printed part, I would recommend testing this configuration and replace the bearing block with an aluminum version if it's not stiff enough. You can determine that by putting a dial indicator or height gauge on top of the shaft clamp and press down on top of the lead screw and see how much deflection you'd see with about 1 or 2 kgf.
Now checking it in the assembly, it's looking pretty good. I'm fairly happy with it. I added part numbers and updated the color. Moving up to the build plate brackets next.
MCR-003-0 - MECHACORE Z BEARING BLOCK
- ZLT Bearing Block
-
Z Brackets
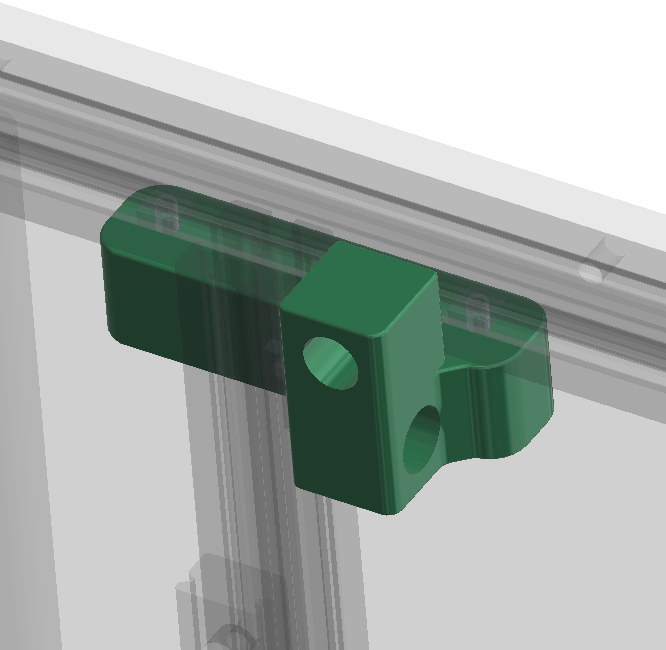
11/10/2019 at 23:26 • 0 commentsLooking at the Z Bracket, there are 6 of them, and you need 3 of them and 3 of a mirrored version.
The available aluminum versions are slightly different, but don't really address the fact that the design is lacking.
I'm guessing the designer's intention/purpose of these brackets are as follows:
- Mount the Z-Tower 1515 extrusion to the upper and lower 1515 extrusions
- Connect to both extrusions with 3 screws into each extrusion (printed version) , metal version is 3 & 2 screws
- Provide enough of a TEE to square up the 1515 extrusions
The reality is, these parts will have little effect on the squareness of the assembly, this is something that needs to be adjusted in the build to get everything square.
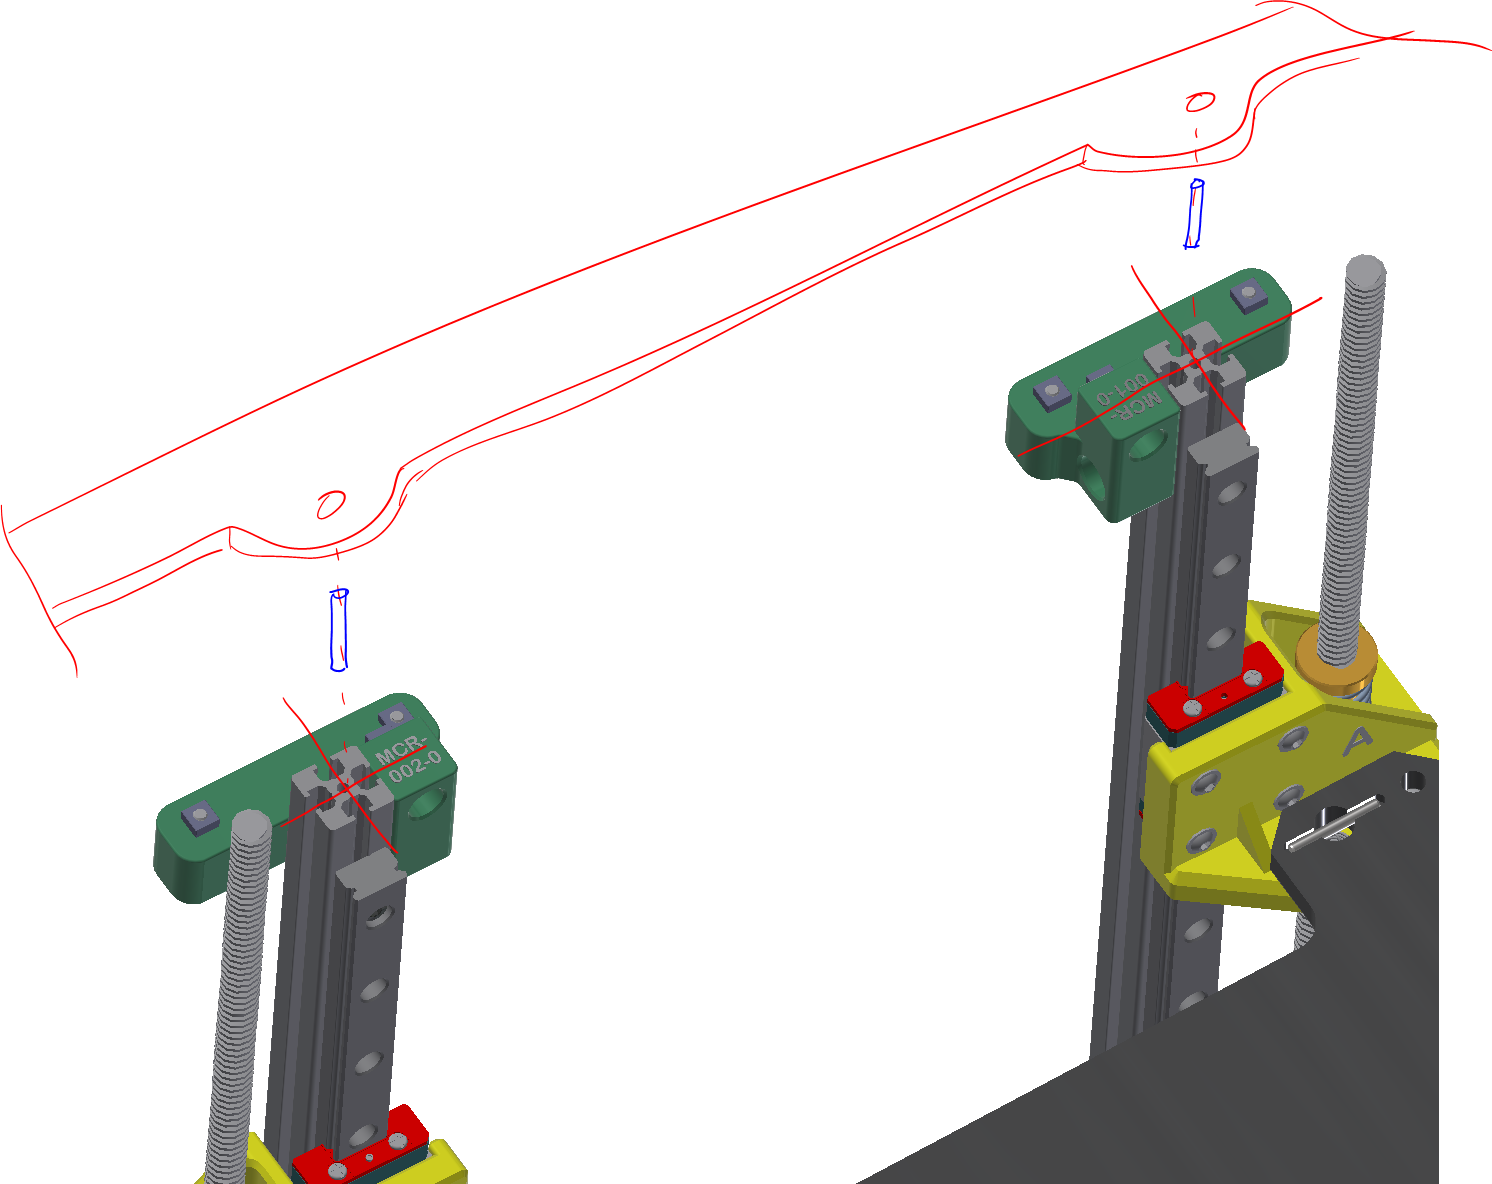
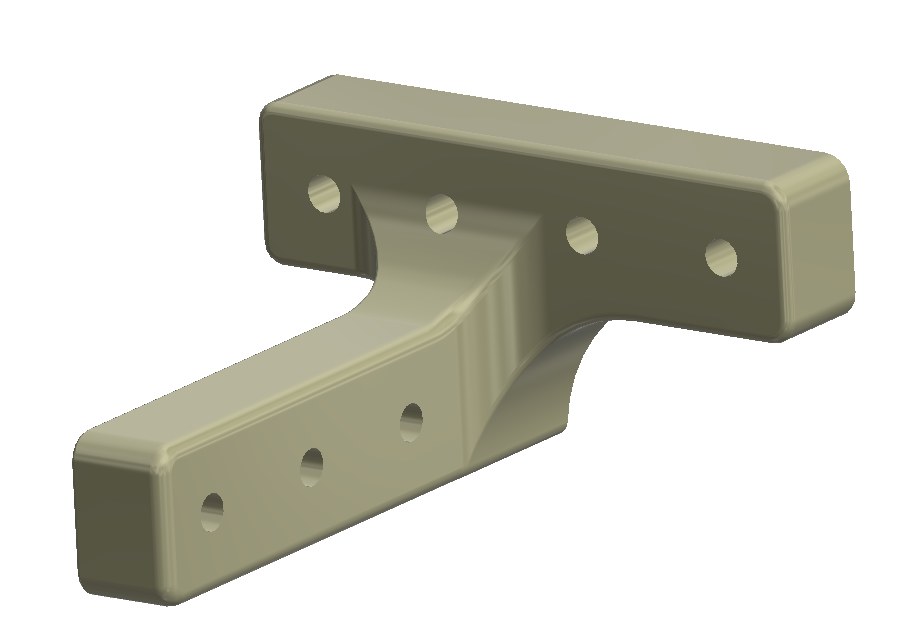
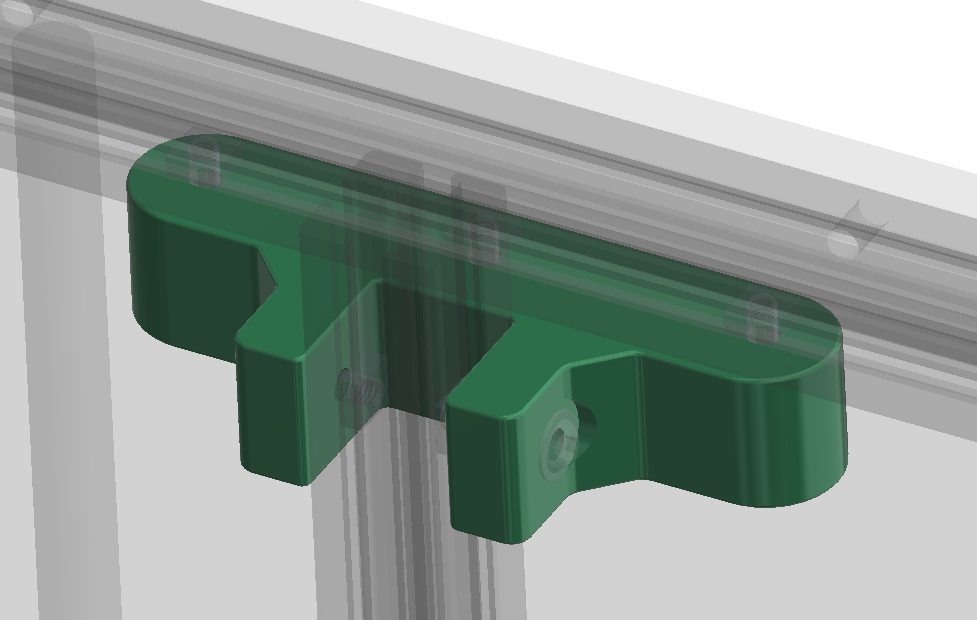
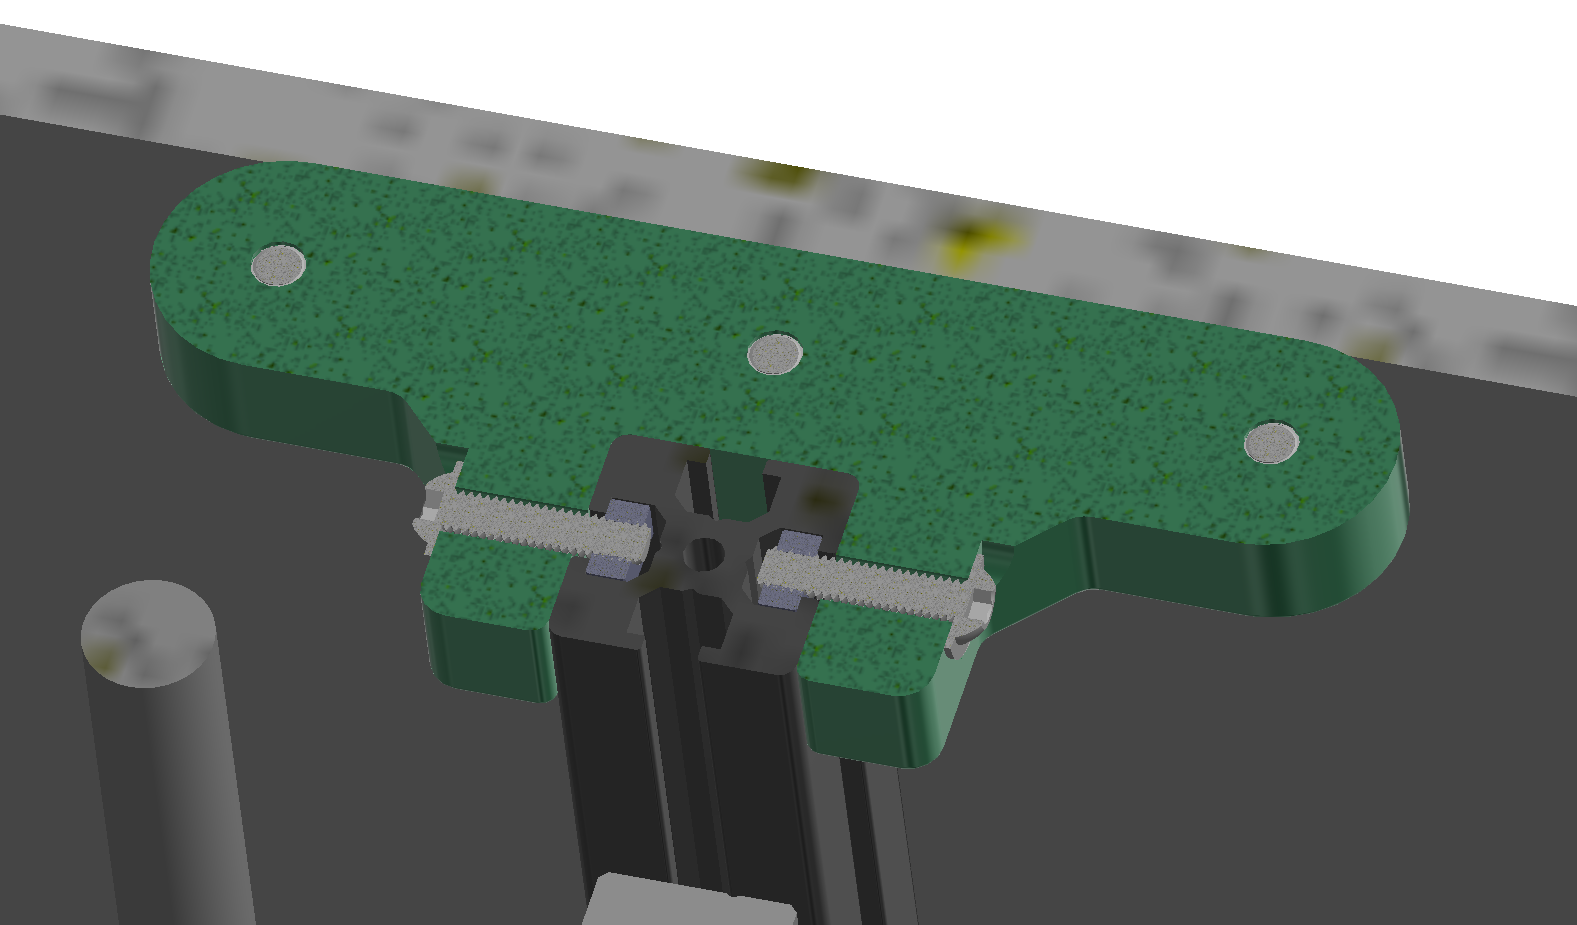
My idea here would be a part like I have below, that connects to the horizontal extrusion and wraps around the vertical. This part will be just as strong as the RailCore design and be easier to make, while being a stronger and more rigid part that can still be left as printed and not need to be made from aluminum.
I would also tap the ends of the vertical extrusions and tie them into the bottom plate
Here's my bracket concept.
Here's the initial design
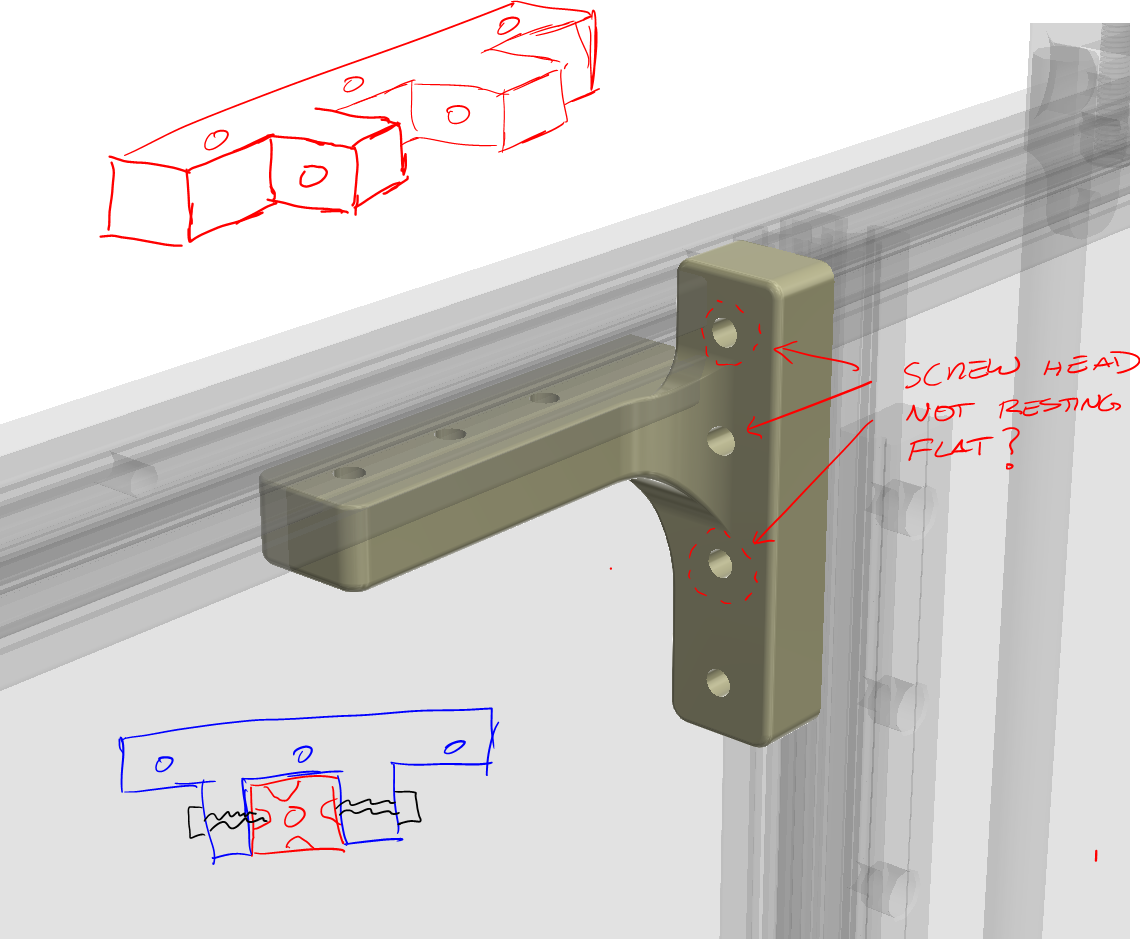
This will work good up top. I'm not digging the middle screw, getting to it will be a bit of a challenge. Maybe it should be deleted. Also, we're capturing the vertical rail fairly well from traveling parallel to the horizontal rail, but there is no screw force keeping the vertical rail in contact with the horizontal rail. So let's keep going for now, we'll think about that and adjust later.
For screws into 3D printed parts, I like big heads. I like the Flanged button head socket cap screws from McMaster-Carr. I generally dislike button heads as the size of the hex is undersized and strips easily, but at the same time, you don't want to be overtorqing screws into plastic. These screws are https://www.mcmaster.com/92137a254 and the nuts are https://us.misumi-ec.com/vona2/detail/110300465710/?HissuCode=HNSQ3-3
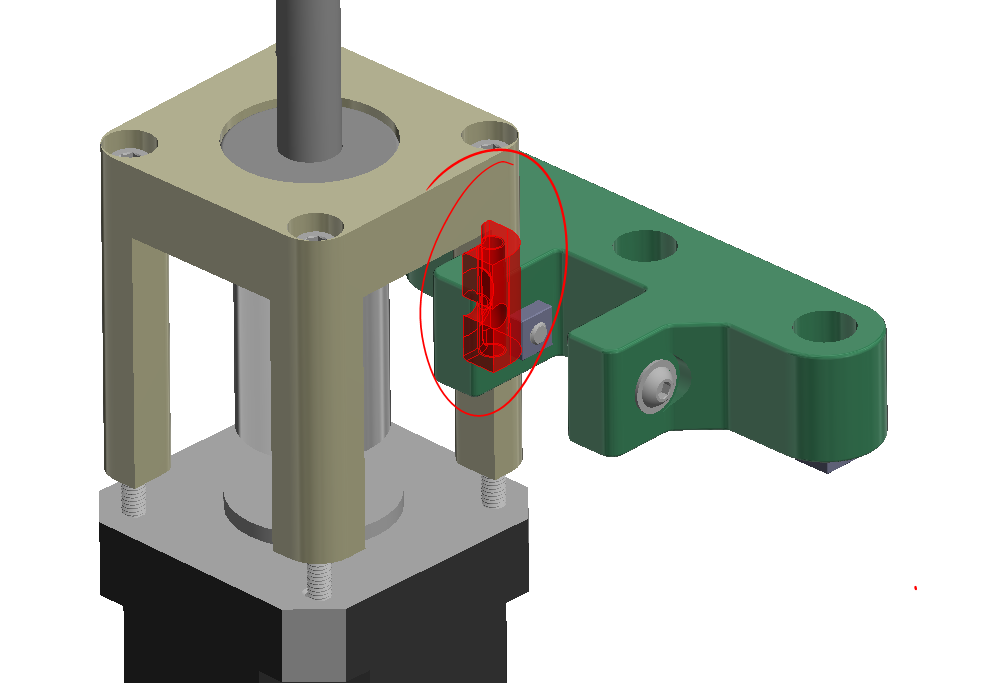
On the lower bracket, different story. The symmetric design hits the motor bearing block, so it will need to be adjusted. We'll have to create 2 parts after all.
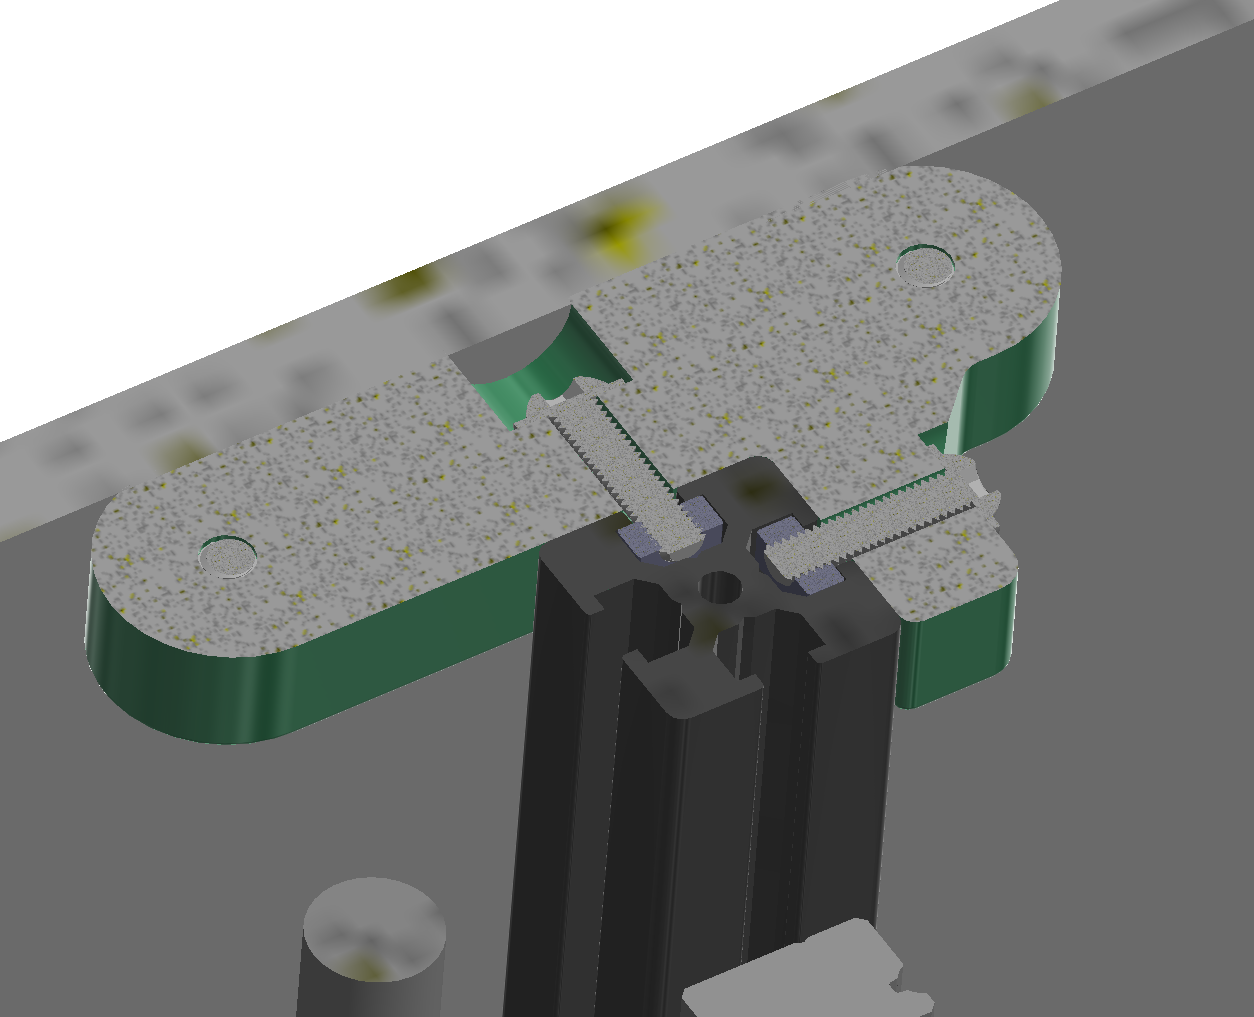
Quick adjustment to the design, I eliminated the U shape, deleted the middle screw into the horizontal rail and added a screw into the vertical. This will securely clamp the vertical in 2 axis. Now we're not really a precision joint here, we're relying on screw clearance to align everything. What's important is the center axis location of the vertical rail and it's angle. The Misumi rail has a 1.25mm diameter hole thru the center, so I'm going to look at pinning that with the bottom plate. I'm also leaning on adding a top plate to the design as well, in which case I'd pin that side as well.
Ideally the clamping force of the screws better hold the 2 intersecting rails together.
So I added a feature that allows me to screw into the vertical face of the horizontal rail. This will ensure the 2 rails are clamped face to face, regardless of the clearances in the screwsCreated a mirrored parts and added embossed part numbers. Ready to slice & print.
I feel pretty good about the part. I think we could shorten it up along the horizontal rail, but then getting to that 2nd screw might be a challenge. We're down to 5 screws from 6, but we're attaching to each extrusion on 2 faces. The part is very printable, but for CNC, it will require at least 3 setups, if you counterbore 2 of the screws on a drill press. Otherwise, it's 5 setups. If I were to make a CNC aluminum version, I'd thin out the walls so that counterbores are not necessary.
The only downside is the one screw that is coming from the backside of the vertical rail, this will be inaccessible when panels are installed, unless there is an access hole in the panel for these.
MCR-001-0 - MECHACORE Z BRACKET
MCR-002-0 - MECHACORE Z BRACKET MIR
MechaCore - Railcore Inspired 3D Printer
I started to build a RailCoreII ZLT printer, but decided to give it a once-over and fix/update everything I don't like, keeping what works.
 Patrick
 This is from Gate's