 Maciej Witkowiak
I chose to use Raspberry Pi 3B with RetroPie as the permanent source of video signal.
There are several reasons for this:
- I have already used it for my large 55" screen
- it should be small enough to fit in the available space (if not, I can switch to RPi Zero)
- it has GPIO that I might need in the future to connect custom controllers (paddles, spinners, etc.)
The analog audio-video signal is available from 4-pole 3,5mm jack. Until I have everything mounted inside I will use a cable with 3.5mm jack on one side and three cinch connectors on the other side.
It's important to buy correct flavour of such cable. You need the one that has its second ring connected to the ground of cinch connectors.
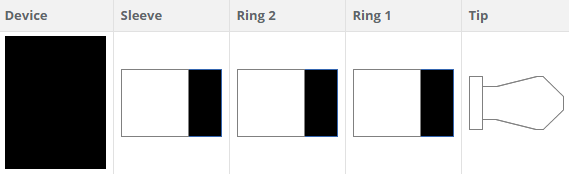
Consult with helpful documentation where each signal should go.
This is not a place to descibe the installation process of RetroPie, it is already done in great detail in RetroPie documentation. However you should do it with keyboard and HDMI display available. There is too much flicker to do anything in the text mode, even in 80x24 mode. There is a 320x240 mode added to /etc/fb.modes:
# added by RetroPie-Setup - 320x240 mode for emulators
mode "320x240"
    geometry 320 240 320 240 16
    timings 0 0 0 0 0 0 0
endmode
And you can turn it on with fbset:
fbset "320x240"This gives you quite stable 40-column screen. It is good enough for quick edits.
For me the most comfortable way was to setup network and SSH early and to everything through remote console.
There are two changes in the boot configuration to be done.
First thing is to enable composite video mode on RPi. I had to add these lines to /boot/config.txt
# this is to center the screen so that leftmost text column is visible
overscan_left=16
#overscan_right=16
#overscan_top=16
#overscan_bottom=16

# uncomment for composite PAL
sdtv_mode=2
# uncomment for monochrome
sdtv_disable_colourburst=1
# uncomment 1=4:3, 2=14:9, 3=16:9
sdvt_aspect=1
The second thing was needed after installing Kodi. It turned out that the analog audio was slowed down and sounded as if wrong sampling frequency was used.
This line was also needed in /boot/config.txt. It fixed all the audio issues.
audio_pwm_mode=2
With this, my first goal was achieved - I was able to run retro games and youtube using nothing more than a cheap USB joypad.
News recordings from deep Cold War (and my kindergarten) times being watched on this device bring so much memories.

Raspberry Pi can run hot when running all these services. The case I'm using has a fan and I wanted it to be sofware-controlled.
This description has the sofware side (script and systemd service) completely covered. Most of the hardware description too. However the ciruit to control the motor there is wrong. It lacks a diode to protect GPIO from currents induced by magnetic fields in the motor. This is the kind of cirtuit you should use. RaspberryPi is no Arduino, but the principle is the same. Just instead of D3 on Arduino connect the transistor's base to GPIO18.

Instead of 2N2222 you can use other NPN transistors, for example S8050.
Some other things to do using raspi-config:
- configure WiFi
- configure SSH server and add your public keys to /home/pi/.ssh/authorized_keys to be able to login remotely without password
- configure autologin to console, RetroPie emulation station will start from there
Some other things to do using retropie_setup.sh:
- update setup script and all emulators
- install kodi from optional packages (nb. they are not in alphabetical order)
- enable or remove usbromservice and/or samba if you need such things
Discussions
Become a Hackaday.io Member
Create an account to leave a comment. Already have an account? Log In.