Close
0%
0%

Digital Tachometer with Arduino for measuring RPM

Measuring the Number of Revolutions of an Object

Similar projects worth following
As measuring the rotational speed of spinning objects is important for various reasons, we designed an IR sensor module to recognize objects for count rotation of any rotating body.

But the things that require to be considered while choosing Tachometer:

1. What is the maximum RPM the instrument will include?
2. What level of accuracy is needed?
3. Does the application require rotational analysis or only rotational speed measurement?

Tachometer

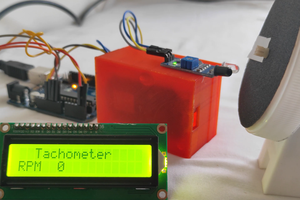
The tachometer is used to measure an RPM counter which counts the number of rotations per minute. The tachometer is divided into two types one mechanical and another one is digital. Here in this project, we are going to design an IR sensor module to recognize objects for count rotation of any rotating body.
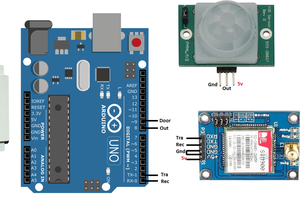
IR Sensor Module

An IR sensor is an electronic instrument that is utilized to genuine certain features of its surroundings by either emitting and/or detecting infrared radiation. Infrared sensors are also able to measure the heat being released by an object and detecting motion.

IR transmits IR rays that return back to the IR receiver and then IR Module creates an output or pulse which is recognized by the Arduino controller when we press the start button. It counts constantly for 5 seconds.

Depends on the intensity of the reception by the IR receiver, the output of the sensor is determined.
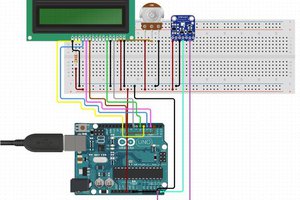
Working Mechanism

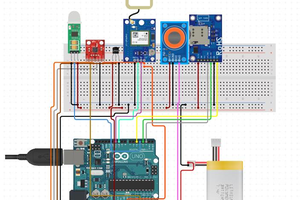
In this circuit, the IR sensor module is interfaced with Arduino to estimate fan rotation speed in RPM. The calculation is done as follows.

After 5 seconds Arduino measures RPM for a minute using the given formula.

RPM= Count x 12 for single object rotating body.

But here we describe this project using a fan which was rated 9V/100mA. So the formula will be:

RPM=count x 12 / objects

Where object = number of the blade in a fan.

hIoTron offers an IoT Training Online which will give you a holistic view of IoT Solutions and applications that you want to know.

JPEG Image - 106.66 kB - 11/29/2019 at 07:49

Preview
Download

  • 1 × Arduino UNO & Genuino UNO
  • 1 × RGB Backlight LCD - 16x2
  • 1 × Tactile Switch, Top Actuated
  • 1 × IR sensor module
  • 1 × Connecting wires

  • Run a Program

    hIOTron11/29/2019 at 07:51 0 comments

    #include <LiquidCrystal.h>
    LiquidCrystal lcd(7, 6, 5, 4, 3, 2);
    #define sensor 9
    #define start 12
    int delay1()
    {
    //unsigned int long k;
    int i,j;
    unsigned int count=0;
    for(i=0;i<1000;i++)
    {
    for(j=0;j<1000;j++)
    {
    if(digitalRead(sensor))
    {
    count++;
    while(digitalRead(sensor));
    }
    }
    }
    return count;
    }
    void setup()
    {
    pinMode(sensor, INPUT);
    pinMode(start, INPUT);
    pinMode(2, OUTPUT);
    lcd.begin(16, 2);
    lcd.print(" Tachometer");
    delay(2000);
    digitalWrite(start, HIGH);
    }
    void loop()
    {
    unsigned int time=0,RPM=0;
    lcd.clear();
    lcd.print(" Please Press ");
    lcd.setCursor(0,1);
    lcd.print("Button to Start ");
    while(digitalRead(start));
    lcd.clear();
    lcd.print("Reading RPM.....");
    time=delay1();
    lcd.clear();
    lcd.print("Please Wait.....");
    RPM=(time*12)/3;
    delay(2000);
    lcd.clear();
    lcd.print("RPM=");
    lcd.print(RPM);
    delay(5000);
    }

View project log

Enjoy this project?

Share

Discussions

Similar Projects

Does this project spark your interest?

Become a member to follow this project and never miss any updates