 Adam
AdamI'm creating a supplemental control panel for playing Kerbal Space Program with a HOTAS joystick, such as a Thrustmaster T.Flight HOTAS X. This is the first of three controllers I'm planing.
My main goals are:
- Dust off my EE skills. It's been several years since I designed a board professionally and I'd like to see what the current state of non-professional tools are.
- Explore the current state of amateur hardware design. Raspberry Pi, PCB prototype shops, and laser cut to order parts.
- Make playing KSP a bit more fun.


 j0z0r pwn4tr0n
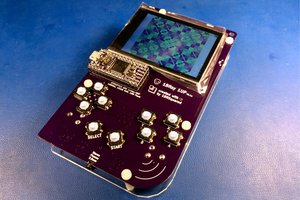
 Piotr Esden-Tempski
 sapir
sapir
 John Adams