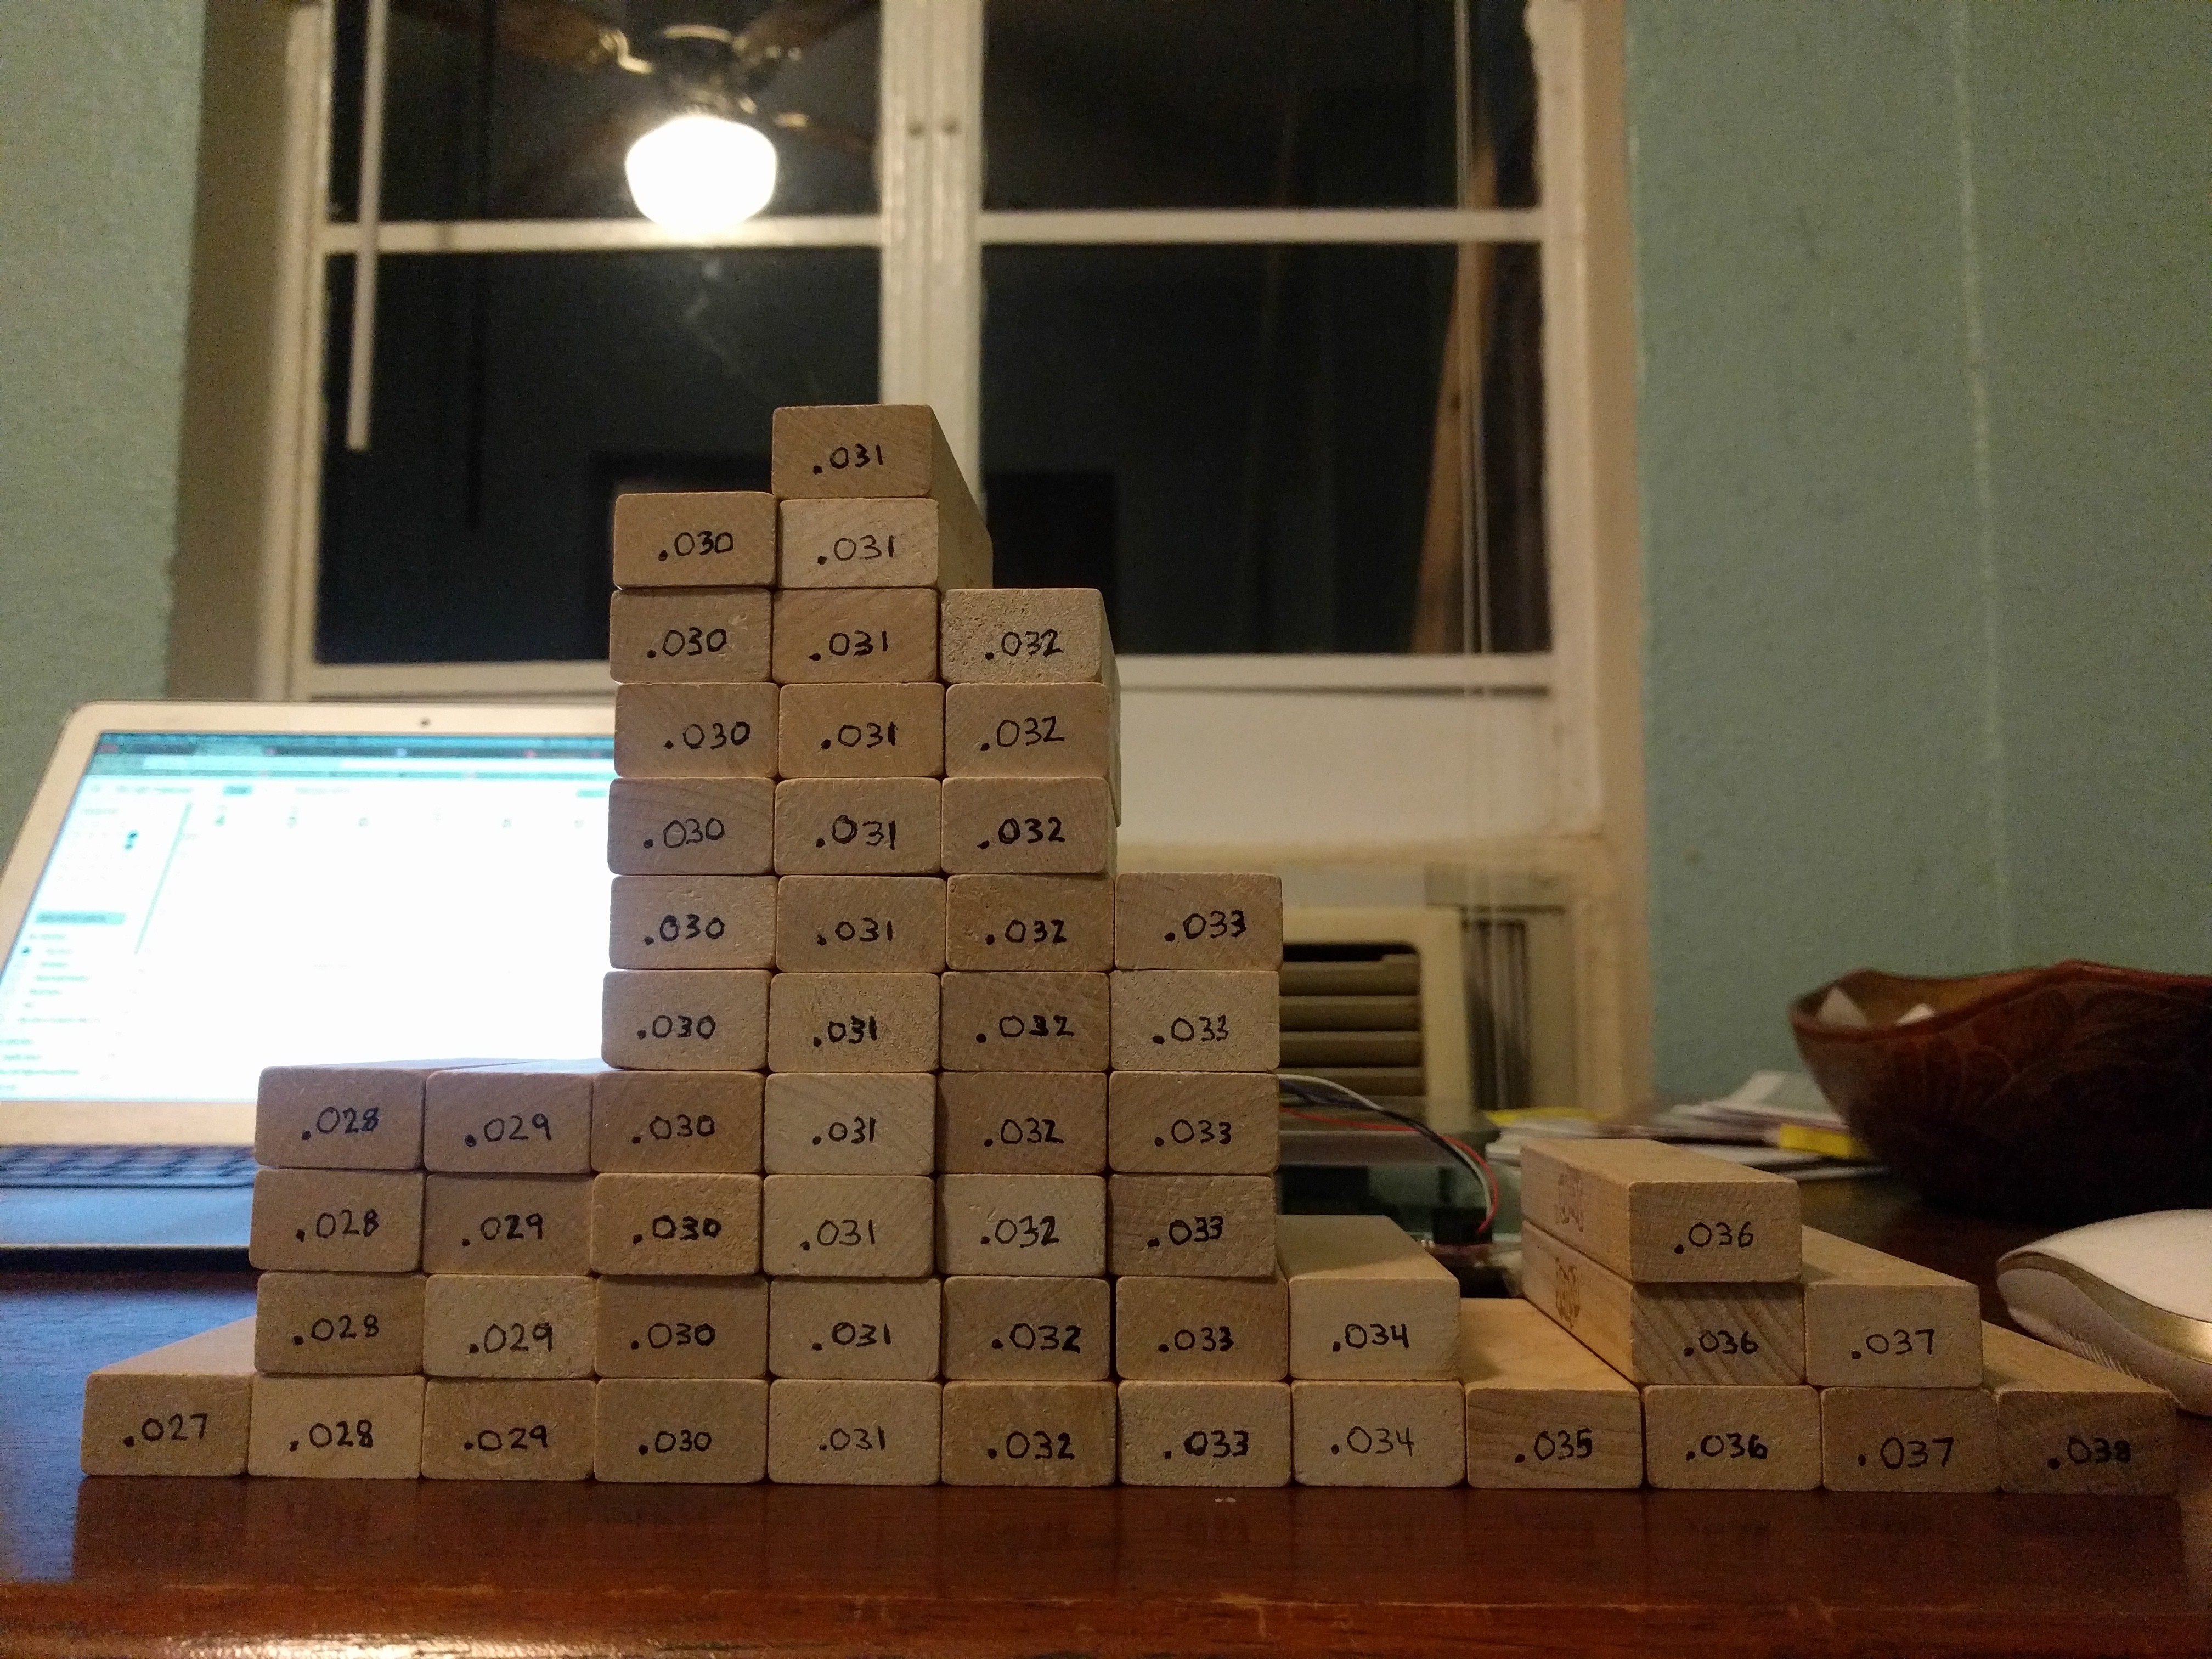
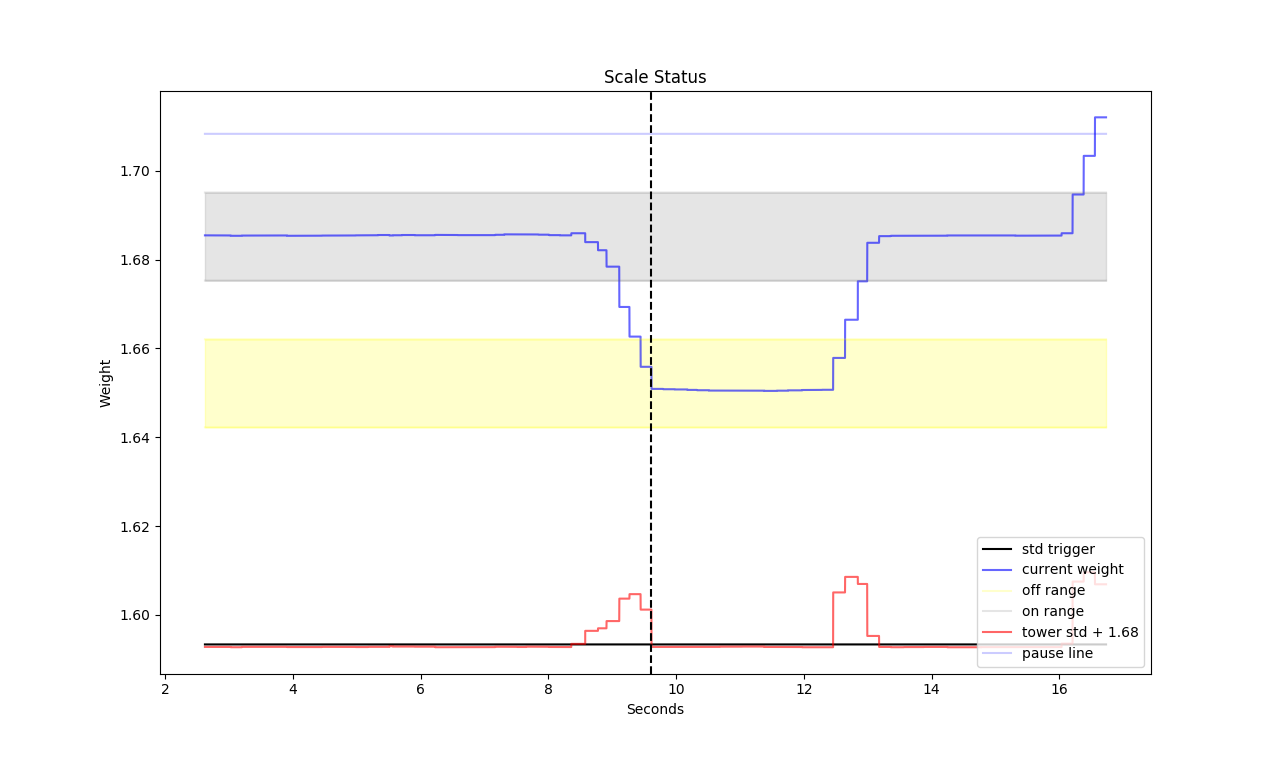
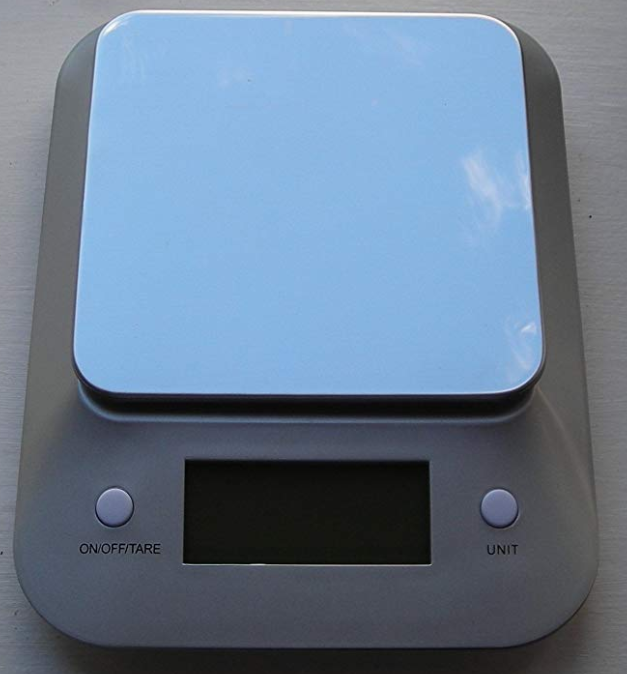
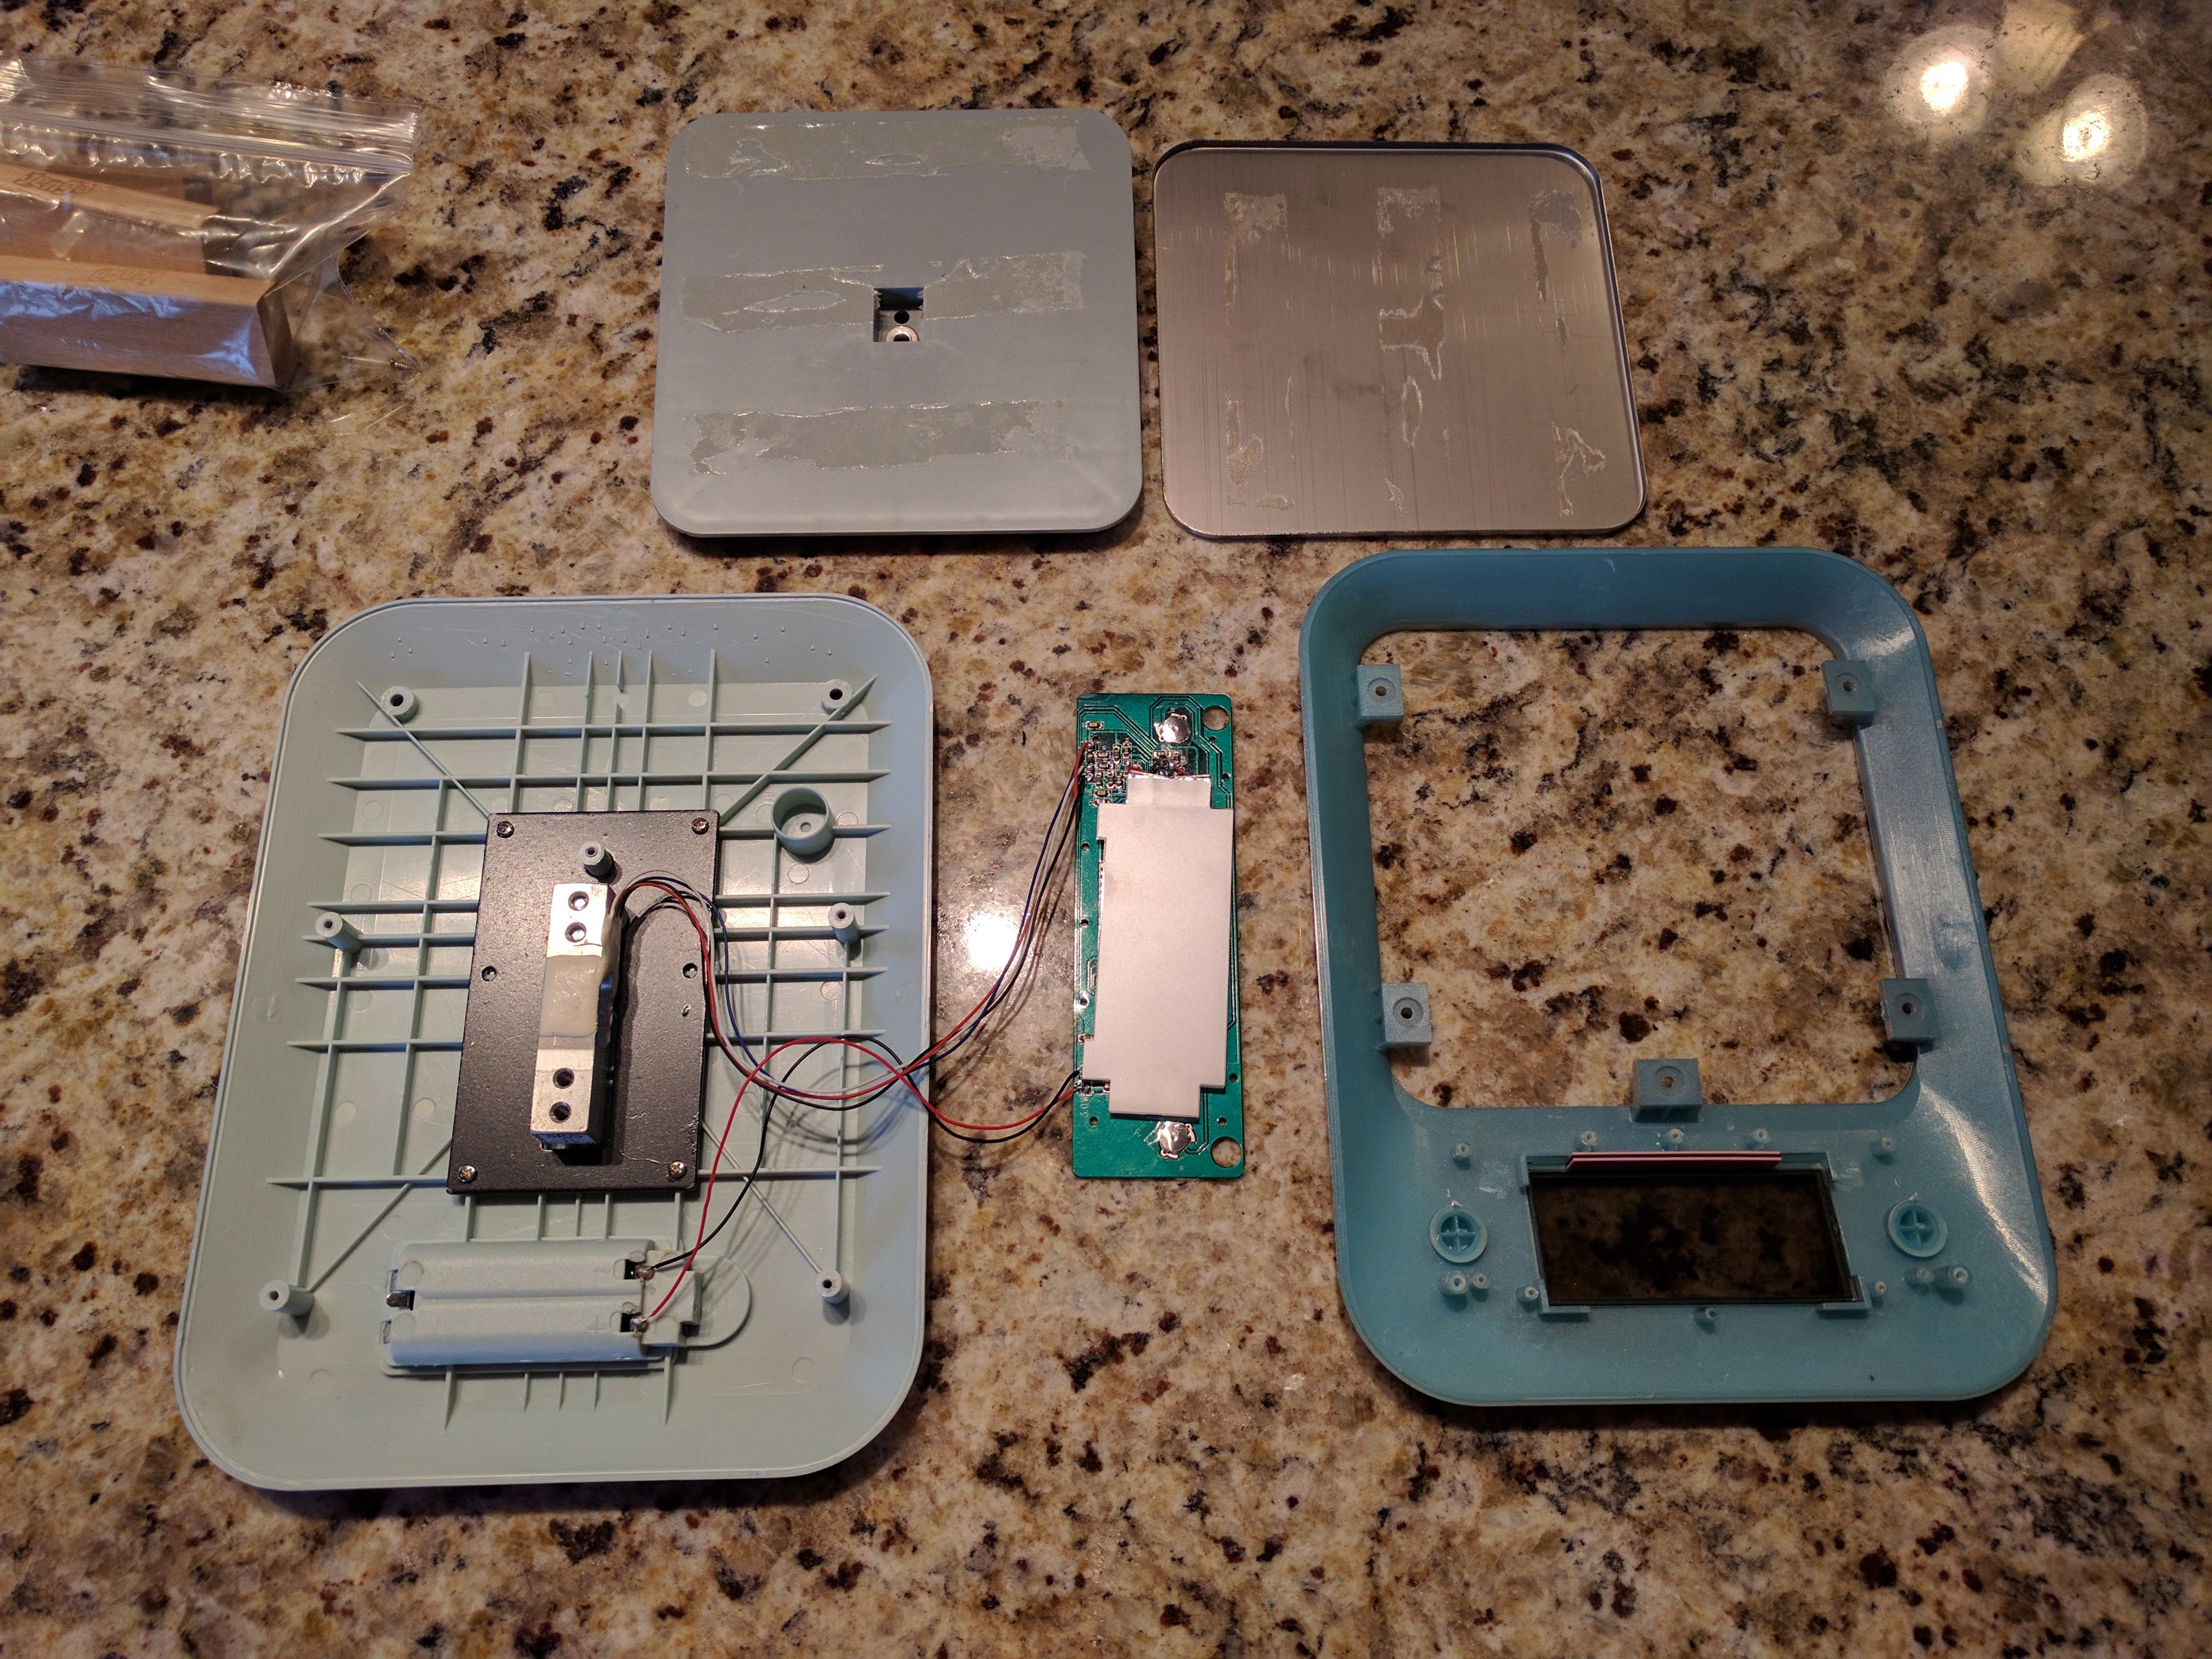
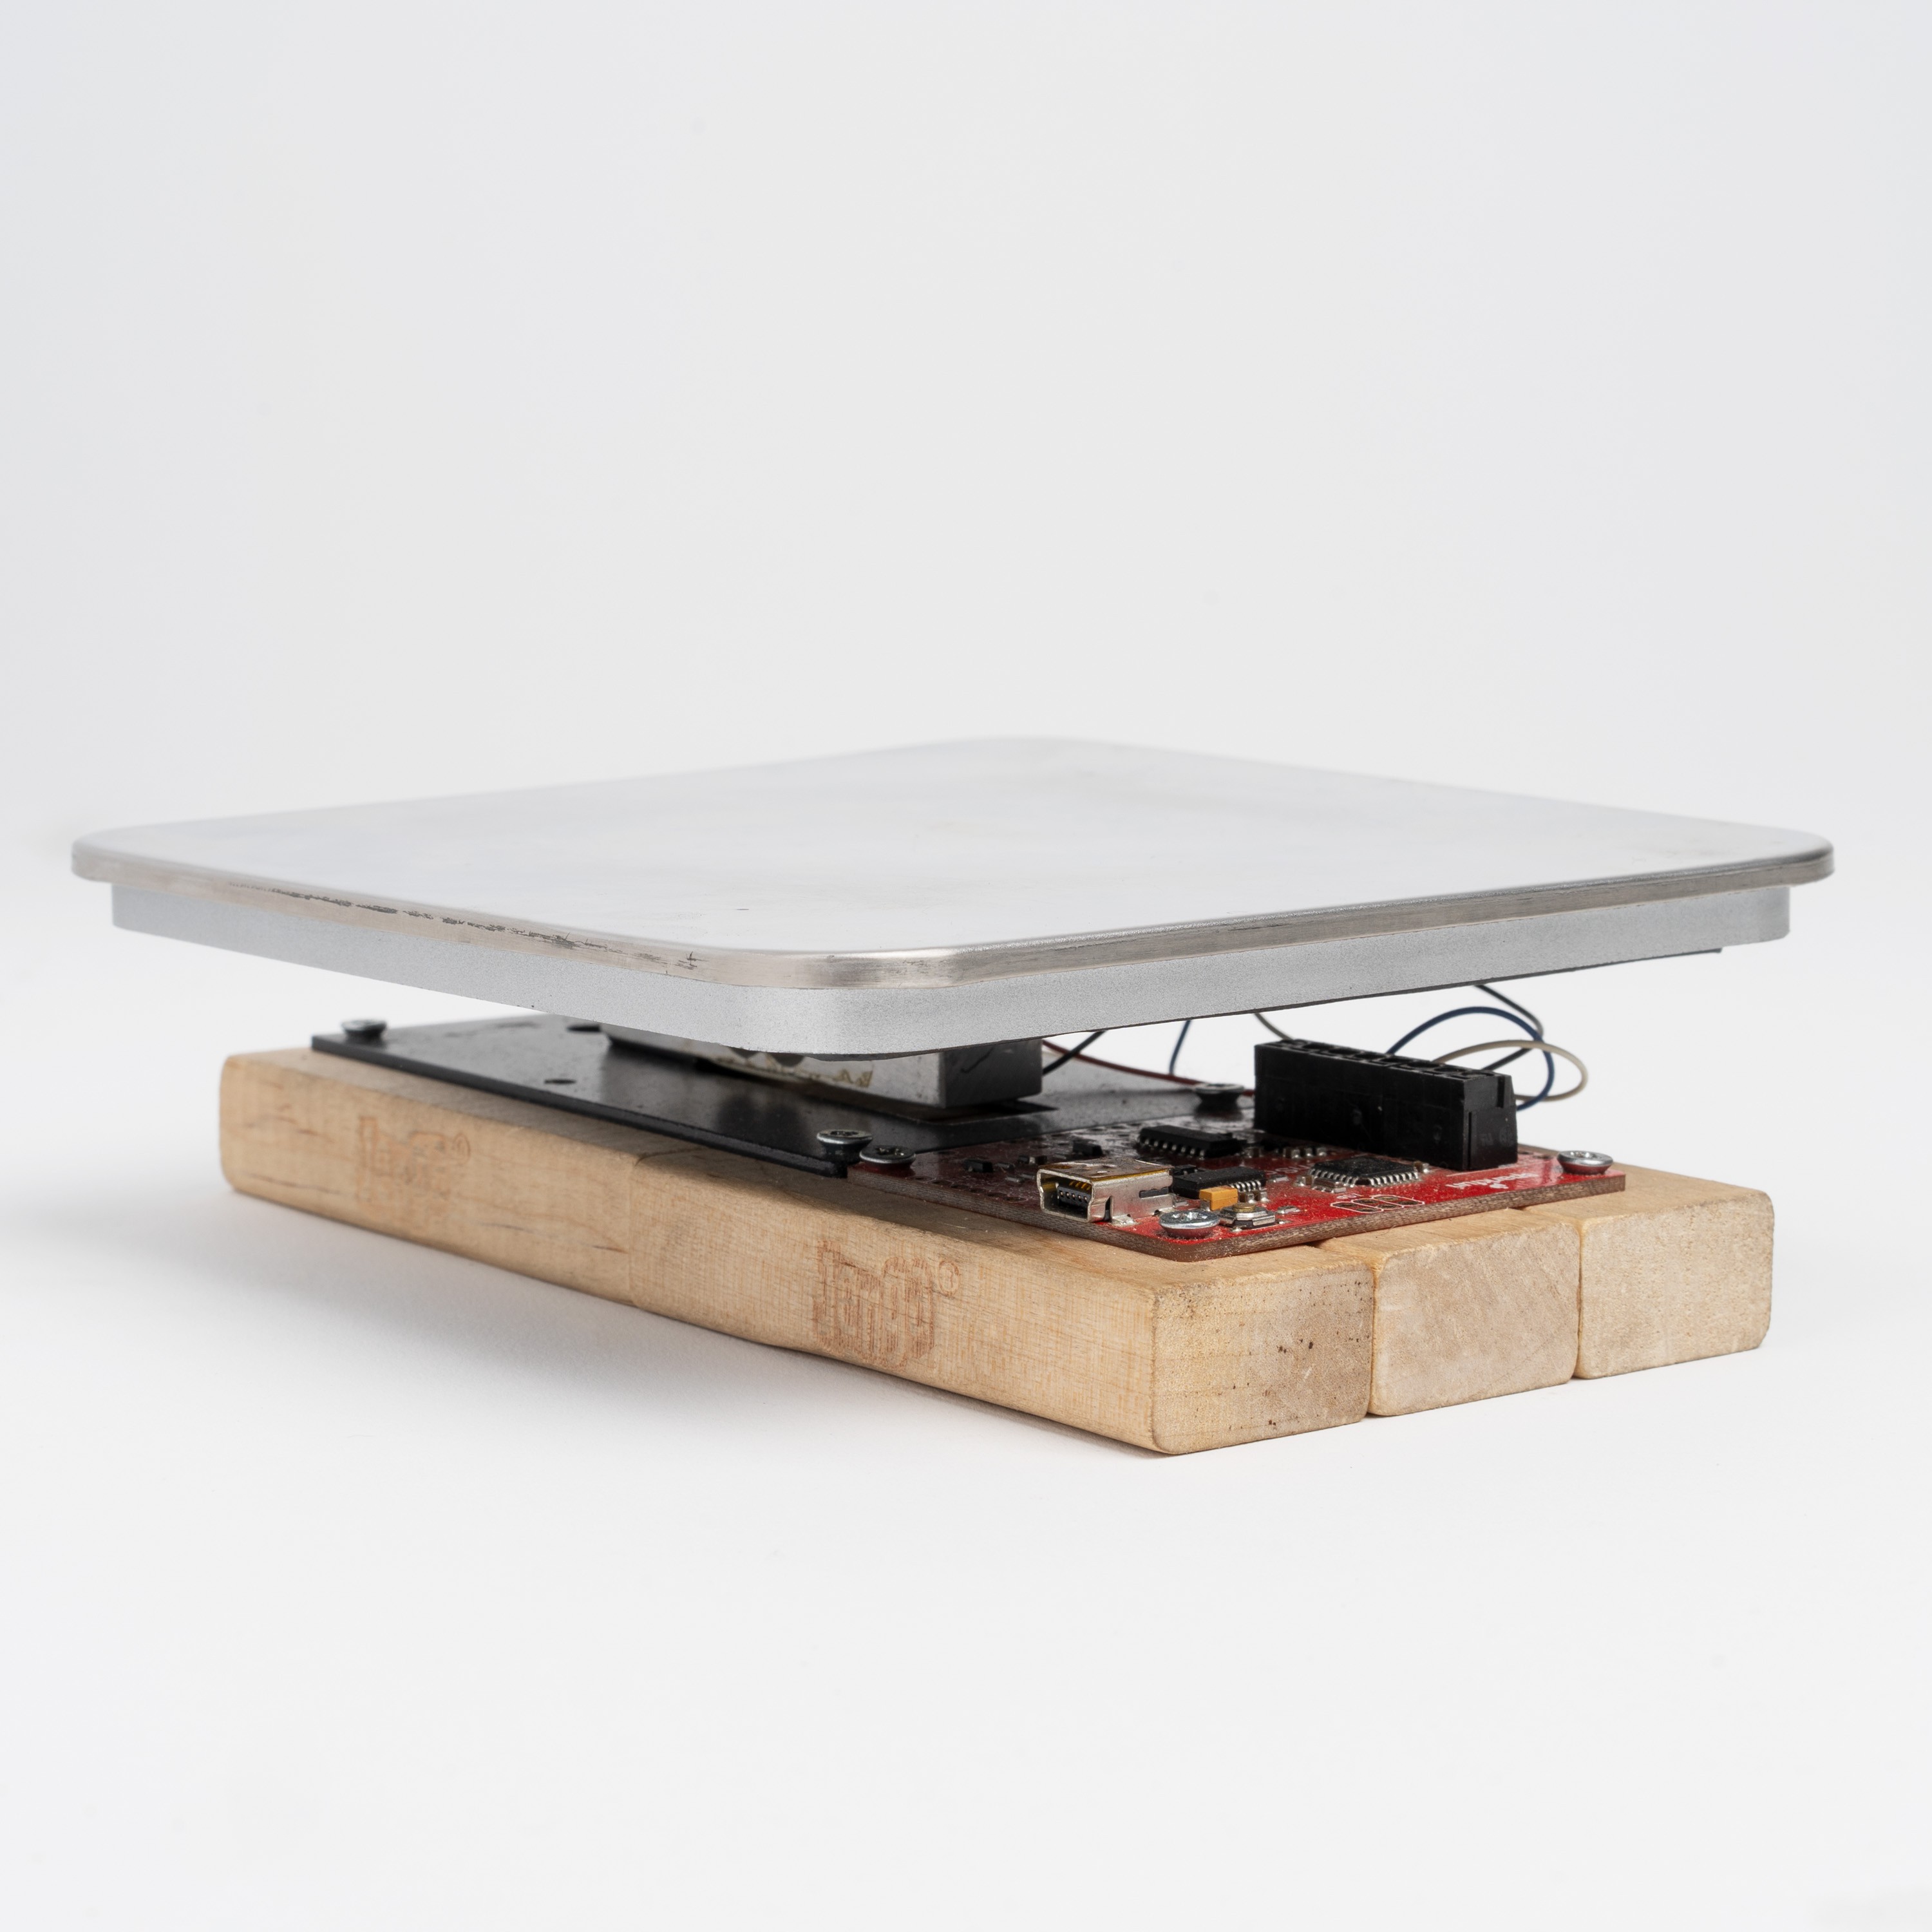
An augmented version of JENGA® utilizing a kitchen scale and game software
To make the experience fit your profile, pick a username and tell us what interests you.
We found and based on your interests.
blueblox_files.zipKiCAD, BOM, and Gerber Filesx-zip-compressed - 154.87 kB - 02/04/2020 at 01:10 |
|
|
blueblox_schematic_rev0.pdfAdobe Portable Document Format - 65.93 kB - 02/04/2020 at 01:06 |
|
|
ScaleJenga Development Hardware Guide.pdfAdobe Portable Document Format - 222.06 kB - 01/13/2020 at 23:59 |
|
|
Speed Jenga Rules.pdfRules of the game.Adobe Portable Document Format - 64.20 kB - 01/11/2020 at 23:27 |
|
|
The OpenScale turned out to be exactly the off-the-shelf product we needed to quickly make a connected Jenga game. It's had some downsides to it, though, that we've been wanting to bypass for a little while now.
These are:
With these problems in mind, I started to make a new development board that would replace the OpenScale. I wanted to run the game code either A) on a Bluetooth connected phone nearby the tower or B) the development board itself. I had little to no familiarity with implementing Bluetooth on micro-controllers and wanted an integrated option to cut down on future BOM size. So, I decided to try out the CC2650 Launchpad and make a booster-pack for it. The booster pack would have some user feedback (piezo-buzzer and LED bar), step-up voltage regulator to run everything off of 3.3V batteries, and a configurable strain gauge amplifier to interface with the scale.
I was mostly familiar with the MSP430 launchpads and thought this would be a good first step. The CC2650 had integrated Bluetooth functionality, is an ARM processor, and utilizes TI-RTOS for real-time applications. Seemed like the perfect fit to cut down on lag.
I made a schematic, laid out a board and assembled. I decided to call it the blueblox (pay no attention to the silkscreen...this is not the constantly evolving project name you're looking for).
Before I tried out the first board (I haven't even powered it up and checked the step-up regulator), I wanted to get familiar with the CC2650 and it's Bluetooth and RTOS features. This is where I stalled out. And, with it, the first custom hardware for Speed Jenga. The TI-RTOS documentation indicated to me that this was a larger departure than expected from the basic embedded C-code I was already familiar with via the MSP430 launchpads. I just got stuck in the mud.
This is not the end for this hardware excursion, but I might take a step back and reconsider how I proceed. I've purchased a Bluetooth serial replacement (BlueSMiRF) and will try that out with the OpenScale first (along with a simple LDO and 9V battery). With the USB cable eliminated, we'll see if setup is any easier. Then, maybe, I'll come back around to the blueblox. For the time being, please check out the hardware documents and the picture below. Hope to get back to it soon!
-- Andrew
Future software updates will be posted in upcoming log entries, but here is a quick summary of how the code base has evolved into what it is now.
Tower State:
The pyserial library made Python an easy choice for reading serial data from a kitchen scale. The core of the gameplay is based on reading the 'state' of the tower at any given moment. There are four different states depending on how many blocks are on the tower: on, off, pause, two off (disqualification), and collapse (see snippet from scale.py).
#set scale status variables
self.on_max = self.tower_wt + (self.avg_block_wt * self.block_variance)
self.on_min = self.tower_wt - (self.avg_block_wt * self.block_variance)
self.off_max = self.tower_wt - self.min_block_wt
self.off_min = self.tower_wt - self.max_block_wt
self.pause = self.tower_wt + self.min_block_wt
self.two_off = self.tower_wt - self.min_block_wt * 2
self.collapse = self.tower_wt - self.min_block_wt * 6
Challenges:
Determining the tower state was challenging since each block varies in weight and the weight of the tower fluctuates as players touch and pull out blocks.
See block weight distribution below in kg:
Changing state:
Matplotlib was helpful for visualizing change in state. To trigger a change in state the tower weight (blue) must fall within a range of state (grey and yellow). Simultaneously, the standard deviation (red) of the most recent data points must fall below the std trigger (black). Adjusting the std trigger changes the responsiveness. Currently it takes about about a half second to confirm a valid change it state.
Below is snapshot of a block being pulled off and placed back on to the tower (analyze.py).
This project has been a work in progress, off and on, for the past few years. It's seen short bursts of work and interest and changed over time. As an attempt to summarize this work and push it forward, Zac and I have decided to publish this project to the Hackaday.io community.
Zac enjoyed the pacing and challenge of speed chess. He also enjoyed Jenga. When he took the same time keeping pacing and format of speed chess and applied it to the game of Jenga he found it to be an improvement on the original game. It was just fun. And, it seemed we weren't the only ones that thought so! A brief search online (check out YouTube for some ideas) shows that this is a known and fun way to play Jenga!
Zac started tinkering around in Python and built some game code. His first version managed the turns, kept track of time, and allowed for more than two players at a time. I added a big rocker switch to a Raspberry Pi and we were up and running. It was still fun.
We liked this even more, but hitting the switch every time took away from the fun of the game and was easy to forget. We wanted something more natural. We wanted some intelligence in the tower itself to know when we took a block off and when we placed it back on. We threw around ideas, like RFID tags in each block, individual electrical contacts running up and through the tower. Those ideas seemed too complex and not really feasible. Then we added the OpenScale.
With the OpenScale, we had easily readable data of the tower weight. Zac explains in his software log post how we translate that reliably into gameplay data. It worked, was fun, and was the best gameplay experience yet! He added the gameplay mechanic of a pause block to allow more control over tower construction for each player. With multiple players and a time and turn element, each game now had a winner, not only losers.
So, that's where we are now. It's been a bit of a slow burn of a project, but a fun one. Moving forward, we want to make this game more portable, more reliable, easier to use, and more accessible. We'll be posting project updates, logs, past work, gameplay videos, and rules.
Hopefully, there's some others here on this site that also like to game, and can enjoy this particular project as much as we have!
The first step is to modify a cheap kitchen scale. Really, any load cell should do, but it is likely easiest to buy a pre-built kitchen and use the internals.
A pre-built scale is cheap (<$10), has a platform to build the jenga tower on, and already includes the aluminum block load cell.
We used the scale below, most are the same.
Disassemble to remove all of the electronics.
Just keep the platform, strain gauge, and base.
The Sparkfun OpenScale is a great tool for connecting any load cell or scale to a serial port. It has a strain gauge amplifier (HX711), microcontroller, and USB circuitry. It also has 5V power over USB to power the bridge of the load cell connected to the HX711.
Colors may vary for the load cell you purchase, but we're connecting the wheatstone bridge of the load cell to the OpenScale in this step.
Connect the load cell to the following terminals of the OpenScale header. For our scale, the :
Load Cell Wire Color | OpenScale Terminal | Circuit Terminology |
Red | E+ | Vin+ |
Black | E- | Vin- |
White | A- | Vout- |
Blue | A+ | Vout+ |
To support the load cell and the OpenScale, we've gone with a themed platform.
Glue together 6 standard Jenga blocks, pre-drill holes and mount the load cell base and OpenScale directly to the block platform with screws.
Create an account to leave a comment. Already have an account? Log In.
Thanks for idea. I build a modification of it - to play without PC or smartphone (scale only).
Become a member to follow this project and never miss any updates
I've been building a bipedal robot for the past 2 years :-/ It has load cells for toes, so hopefully it'll know where its centre of mass is above.