 Clay Graham
Overview
This guide provides instructions, code and components on how to build a internet enabled home automation system that allows scheduled control of multiple sonoff wifi enabled switches as well as routed control messages over the internet using the FlashLex IoT internet gateway.
Architecture Elements
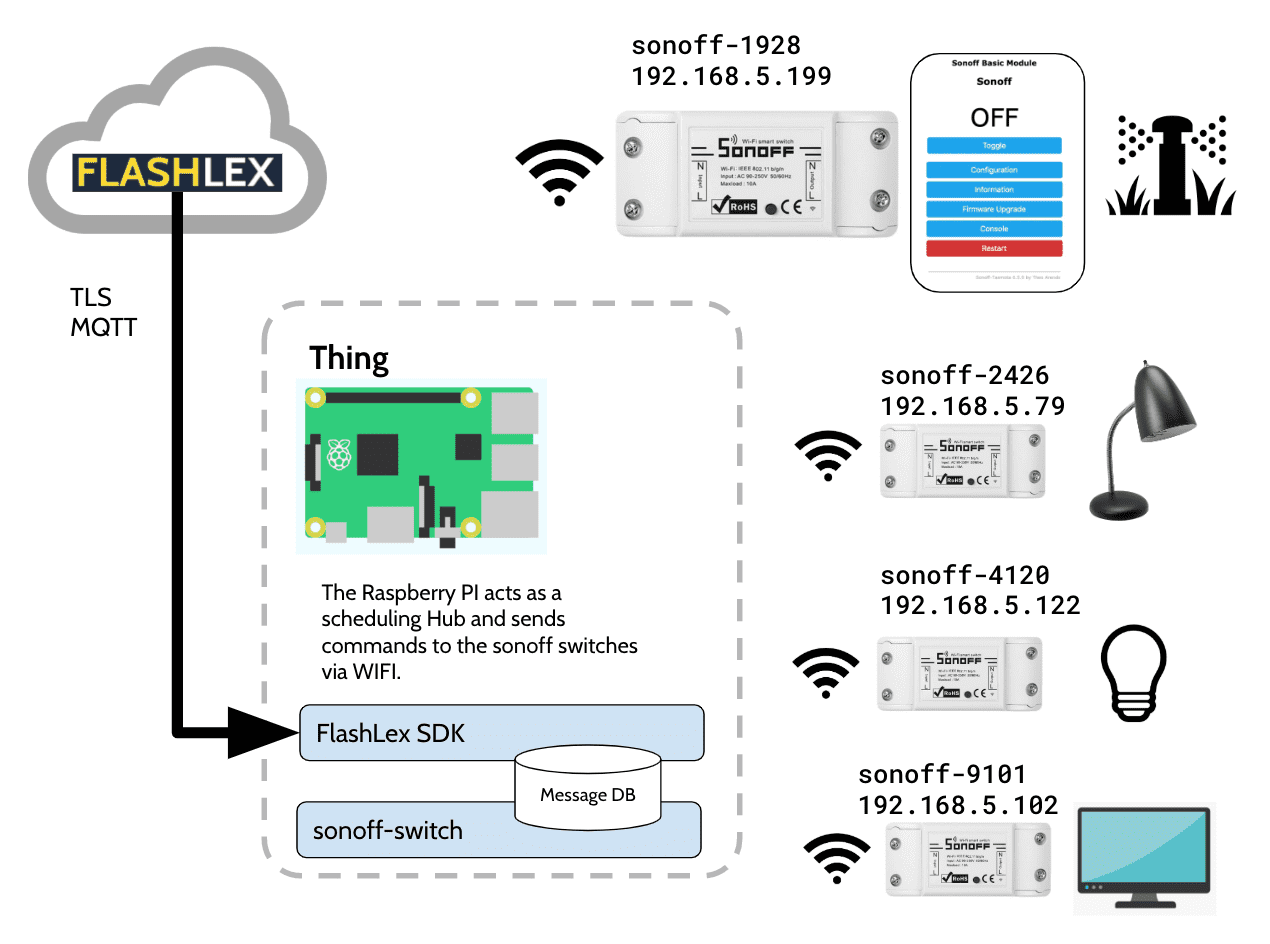
- FlashLex API - Cloud platform to route messages to your thing.
- The Thing - Your Raspberry PI IOT Device
- FlashLex SDK App - Python service that will take messages from the thing's topic and store them locally.
- Sonoff Switch App - Python service that listens to messages and will execute Sonoff commands by device name, also schedules commands to items.
- Sonoff WIFI Switch - Independent In Line switches that are individually addressable on a local wifi network
Steps for Tasmota Installation
This isnt a Tasmota installation tutorial, there are tons of links above to get going on that. This is a cookbook for enableing your home automation hub to be a FlashLex device, so we will limit the instructions to that.
Important Links
- Tasmota Firmware for Sonoff - Alternative firmware for ESP8266 with easy configuration using webUI, OTA updates, automation using timers or rules, expandability and entirely local control over MQTT, HTTP, Serial or KNX
- DrZzs Flashing TASMOTA Firmware on the Sonoff Basic - Original guide to flashing firmware for the Sonoff
- Superhouse Tasmota Installation
- Super House #30 -setup hardware
- Super House #31 - install firmware
- Pinout for the ft232 board to sonoff - Don't use the firmware download instructions on this, it just has the best pinout explanation for the firmware update link to the FT232.
Using esptool to flash Tasmota
Remember to hold the button down on the sonoff to put it in firmware update mode.
python3 -m venv ./venv
source venv/bin/activate
python
pip install esptool
pip install --upgrade pip
esptool.py -h
ls -l /dev/tty.usb*
esptool.py -p /dev/tty.usbserial-A50285BI write_flash -fs 1MB -fm dout 0x0 sonoff_6_6_0.bin
Installing the FlashLex Service
All the FlashLex projects rely on the FashLex SDK, which collects messages from the gateway using a locally running Python service. More information on installing the FlashLex service can be found in the FlashLex Docs.
The Sonoff Scheduler Hub Backend
Devices are managed and scheduled by code on the your FlashLex thing that sends commands to the individual sonoff switches over wifi. Essentially the sonoff switch software both automates scheduling of commands as well as provides a message manager for sending commands to your sonoff switches.
Sonoff Switch Commands
| Message Syntax | Sonoff Syntax | Description |
|---|---|---|
| on | Power%20on | Turn the switch on. |
| off | Power%20off | Turn the switch off. |
| toggle | Power%20TOGGLE | Toggle the switch state. |
Sonoff Scheduler Links
The Scheduler Config
For each switch that your scheduler will control provide an entry and the the schedule as well as the command you would like to send.
devices:
  - name: living-room
    ip: 192.168.8.59
    schedule:
      - time: "17:00"
        command: Power%20on
      - time: "23:41"
        command: Power%20off
      - time: "06:30"
        command: Power%20on
      - time: "07:54"
        command: Power%20off
  - name: bedroom-01-tv
    ip: 192.168.8.199
    schedule:
      - time: "19:30"
        command: Power%20on
      - time: "01:01"
        command: Power%20off
  - name: bedroom-01-lamp
    ip: 192.168.8.66
    schedule:
      - time: "17:00"
        command: Power%20on
      - time: "23:41"
        command: Power%20off
      - time: "06:30"
        command: Power%20on
      - time: "07:54"
        command: Power%20off
Creating the sonoff-switch service
You will want to have your sonoff switch running as a service so that even if your Raspberry Pi restarts it will come back up. To enable your sonoff-switch hub to run as a service install the service file and enable the service with systemctl.
$(pwd)/venv/bin/python3 makeservice.py -d $(pwd) \
   -t sonoff.service.mustache > sonoff.service
Instructions for setting up your service can be found at https://www.raspberrypi-spy.co.uk/2015/10/how-to-autorun-a-python-script-on-boot-using-systemd/
sudo cp sonoff.service /lib/systemd/system/sonoff.service
sudo chmod 644 /lib/systemd/system/sonoff.service
sudo systemctl daemon-reload
sudo systemctl enable sonoff.service
Creating the Scheduler Job
This project uses the python scheduler for automation. This allows for the creation of simple jobs that can send commands to the sonoff switches over HTTP.
    for device in config['devices']:
        for schedule_item in device['schedule']:
            schedule.every().day.at(schedule_item['time']).do(sonoff_job,
                ip_addr=device['ip'], sonoff_command=schedule_item['command'])
https://github.com/claytantor/sonoff-switch/blob/master/app.py#L66
and the job:
def sonoff_job(ip_addr, sonoff_command):
    print("setting {0} to {1}".format(ip_addr, sonoff_command))
    r = requests.get('http://{0}/cm?cmnd={1}'.format(ip_addr, sonoff_command))
https://github.com/claytantor/sonoff-switch/blob/master/app.py#L40
You can learn alot more about how to ticker with the Tasmota/Sonoff on the internet: https://lmgtfy.com/?q=sonoff+tasmota
Creating the FlashLex Listener Job
Now that you have a home automation framework in place, all you need to do is add a job that listens to your thing's MQTT queue and can route control commands to the switches.
def flashlex_job(config):

    lookup = {
        "on": "Power%20on",
        "off": "Power%20off",
        "toggle": "Power%20TOGGLE"
    }

    sdk = FlashlexSDK(config)
    records = sdk.getSubscribedMessages()

    # process new messages
    for record in records:
        #print("record", record)
        #print("payload message", record['message']['payload']['message'])

        payload_message = record['message']['payload']['message']

        ## find the ip address
        result = list(filter(lambda x: (x['name'] == payload_message['device']), config['devices']))


        for device in result:
            ## find the command
            r = requests.get('http://{0}/cm?cmnd={1}'.format(device['ip'], lookup[payload_message['value']]))

        sdk.removeMessageFromStore(record)
https://github.com/claytantor/sonoff-switch/blob/master/app.py#L11
now you can add the scheduled job listener to your automation:
#schedule flashlex to accept commands
schedule.every(10).seconds.do(flashlex_job, config=config)
Creating the sonoff-switch service
You will want to have your sonoff switch running as a service so that even if your Raspberry Pi restarts it will come back up. To enable your sonoff-switch hub to run as a service install the service file and enable the service with systemctl.
$(pwd)/venv/bin/python3 makeservice.py -d $(pwd) \
   -t sonoff.service.mustache > sonoff.service
Instructions for setting up your service can be found at https://www.raspberrypi-spy.co.uk/2015/10/how-to-autorun-a-python-script-on-boot-using-systemd/
sudo cp sonoff.service /lib/systemd/system/sonoff.service
sudo chmod 644 /lib/systemd/system/sonoff.service
sudo systemctl daemon-reload
sudo systemctl enable sonoff.service
Sending Messages with FlashLex
You can use FlashLex to send control messages to your hub devices by name. Just send a message to your FlashLex Enabled device with the message schema.
curl -X POST \
  https://api.flashlex.com/prd/v1/things/5da91b24-28f2-4b55-829e-26528ba7a2eb/publish \
  -H 'Accept: */*' \
  -H 'Accept-Encoding: gzip, deflate' \
  -H 'Authorization: Bearer eyJraWQiOiJvQndJY0pCXONlNGM3ZQQkg5eWl1VTMzbXdKdz0iLCJhbGciOiJSUzI1NiJ9.Bgrx2LCv7fR-44-yb8EbfPZ1vutyPq8WCo8zDrlRjrBi3FNv0G1hIfy5-jJ1TVINdvLwFMpUQ_35LaN6UqU3sP00gYljgm1CydirhoLhvLFhcvomqqX_foCuKy1sGYM8gQFtEZIL7IJVkDiyHgND-DeFl6FDbfiDPBqhmHJE8i5XF-IMuL5jCOR7A610ZxUprg4_mR3TvUlhMTD4lp-prl2R7CNIeiaGfqgNNrey5wchDMpezc9oqmeoDneRtCqHUNBqm_hYSenyt_T_8wNmAV-sXPQ' \
  -H 'Content-Type: application/json' \
  -d '{"device": "bedroom-01-tv", "action": "switch", "value": "toggle"}'
For more information on setting up the FlashLex SDK on your IoT device check out the SDK documentation at: http://docs.flashlex.com.s3-website-us-east-1.amazonaws.com/flashlex-docs/v1.5/sdk/index.html