 UTSOURCE
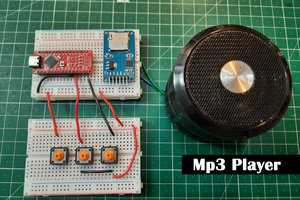
Circuit part : The connections are really simple if you are using 0.5watt speaker then directly connect the +ve pin of speaker to digital pin 11 on Arduino & -ve pin of speaker to gnd & if using 3 watt speaker then use a tip120 transistor & connect the 11 of Arduino to the base of transistor and -ve pin of speaker to the collector of the transistor & emitter of the transistor to the gnd pin on Arduino.
Download Required Files :To do this you will need few files first of all PCM.zip file to play PCM audio from arduino. ThEN we will need Audacity software to convert a normal mp3 audio to a 16bit PCM 8hkz audio & Lastly we need a encoder software to encode that audio into data which we can paste in the code. DOWNLOAD Audacity - https://www.audacityteam.org/download/
Download PCM.ZIP & Encoder software (file named as Arduino MP3.zip) added in file section & github link.
Prepare Audio & Convert It Into Data : The important step is to prepare the audio data. so very first we will need a mp3 file either you record one or get one from anywhere then open that file into Audacity and & click on format then select 16 bit pcm then go down & select frequency of audio to 8000hz & export the audio as mp3.
Then open encode audio software & navigate to the audio file we generated from audacity then you'll get a message audio copied to clipboard successfully.
Coding Part : So the next part is coding part , so as you downloaded the the Arduino_mp3.zip file which contains PCM.zip file so add this PCM.zip file as a library to the arduino & then open the playback example available in the that PCM library , & there in the sketch you have to edit the 2nd line of code in sample[] array which is of programem type you need to remove all the data in that array & paste the data which is copied to the clipboard by the encode audio software. And after that upload the code to Arduino.


 Lithium ION
 Turbyho
 electronicsworkshops
I've done it. it works well. Perfect for what I need. But now i'm stuck at adding a &?&%$&?% simple button to activate the sound. I've tried many ways but no success.
Can someone point me how to mix a button with this playbacksample ?
I know how button works but i just CAN'T edit the code to accept it.
Thanks