Close
0%
0%

Real Time Clock With Arduino

In this project, we will make a clock with the help of the Arduino and RTC module.

Public Chat
Similar projects worth following
In this project, we will make a clock with the help of the Arduino and RTC module. As we know the Arduino can not display the actual time so we will use the RTC module to display the right time on the LCD. Read all the step carefully it will help you a lot to make the clockwork.

The DS3231 Arduino code is like the DS1307 code and it works with both RTC chips.

The Arduino code underneath doesn't utilize any library for the DS3231 RTC, the Wire library is for the correspondence between the Arduino and the DS3231 utilizing the I2C convention.

Yeah! Many electronics engineers depend upon it for their time-based projects but RTC is not completely reliable. It is battery operated and has to be replaced soon or later. Coming to IoT projects it occupies valuable SPI(Serial Peripheral Interface) pins and gets messy with wires tangled around. Solution….Here comes our hero NTP(Network time protocol).NTP is so accurate since it gets time from the RTC module We are going to operate this protocol.

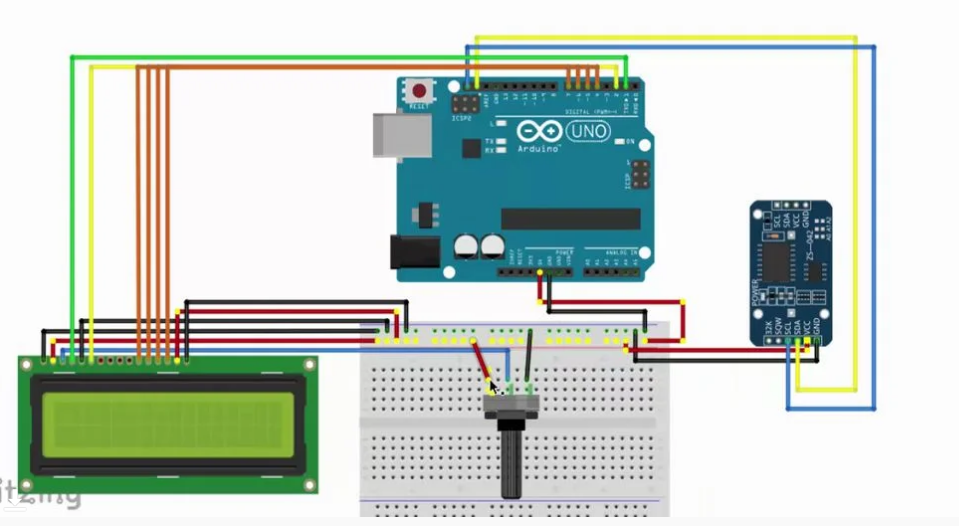
 the process is so simple that our Arduino acts as a client and request to the RTC by Serial communication. In return, the rtc send to the Arduino which parses the data. NTP is the universal time synchronisation protocol. Now let us light up our labs work station

  • 1 × Arduino
  • 1 × RTC module
  • 1 × LCD 16X2

  • 1
    Step 1: Required Components

    • Arduino board
    • DS3231 RTC board
    • 16x2 LCD screen
    • 2 x push button
    • 10K ohm variable resistor (or potentiometer)
    • 330-ohm resistor
    • 3V coin cell battery
    • Breadboard
    • Jumper wires
  • 2
    Step 2: Connection of Arduino Clock

    • Connect SCL pin to RTC module to the Arduino A5
    • Connect SDA pin to RTC module to the Arduino A4
    • Connect VCC TO 5v and GND TO GND
    • Connect a pushbutton to the pin 8
    • Connect another pushbutton to the pin 9
    • Connect RS of LCD to pin 2 of Arduino
    • Connect E of LCD to pin 3 of Arduino
    • Connect D7 of LCD to pin 7 of Arduino
    • Connect D6 of LCD to pin 6 of Arduino
    • Connect D5 of LCD to pin 5 of Arduino
    • Connect D4 of LCD to pin 4 of Arduino
    • Connect VSS & K to the GND
    • Connect VDD & A to the 5v
    • Connect vo to the potentiometer output pin
  • 3
    Code for Arduino Clock With RTC

    The DS3231 works with BCD format only and to convert the BCD to decimal and vise versa I used the 2 lines below (example for minute):// Convert BCD to decimalminute = (minute >> 4) * 10 + (minute & 0x0F);

    // Convert decimal to BCDminute = ((minute / 10) << 4) + (minute % 10); void DS3231_display() : displays time and calendar, before displaying time and calendar data are converted from BCD to decimal format.void blink_parameter() :

View all 3 instructions

Enjoy this project?

Share

Discussions

Similar Projects

Does this project spark your interest?

Become a member to follow this project and never miss any updates