Sponsor Link:
UTSource.net Reviews
It is a trustworthy website for ordering electronic components with cheap price and excellent quality.
Mounting the circuit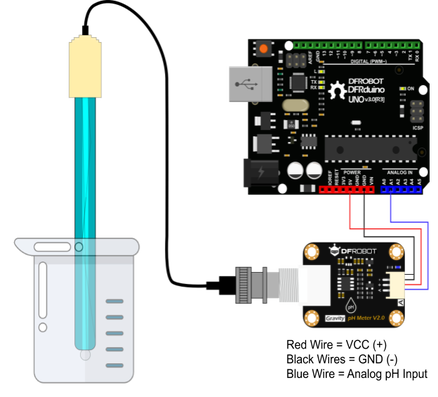
1. Before starting, make sure that no external power is applied to the Arduino board or any of the components involved, as we want to prevent any short circuits from occurring when connecting everything together.
2. Firstly, plug the male BNC connector of the electrode probe to the female BNC connector of the sensor board.
3. After that, use a jumper wire to connect the PO (Analog pH Value) pin of the pH sensor to A0 (analog pin 0) of the Arduino.
4. Then, use two jumper wires to connect the two GND (-) pins of the sensor to GND (-) pins of the Arduino.
5. Lastly, use another jumper wire to connect the VCC (+) pin of the pH sensor to the +5v pin of the Arduino for its power.
6. Now, you can fill the capsule of the pH sensor (the cap covering the tip) with whatever solution which you want to measure and you can power the circuit up.
Arduino Liquid pH0-14 Detection Sensor Project Code
#define SensorPin 0
unsigned long int avgValue;
float b;
int buf[10],temp;

void setup()
{
  pinMode(13,OUTPUT);
  Serial.begin(9600);
}
void loop()
{
  for(int i=0;i<10;i++)
  {
    buf[i]=analogRead(SensorPin);
    delay(10);
  }
  for(int i=0;i<9;i++)
  {
    for(int j=i+1;j<10;j++)
    {
      if(buf[i]>buf[j])
      {
        temp=buf[i];
        buf[i]=buf[j];
        buf[j]=temp;
      }
    }
  }
  avgValue=0;
  for(int i=2;i<8;i++)
    avgValue+=buf[i];
  float phValue=(float)avgValue*5.0/1024/6;
  phValue=3.5*phValue;
  Serial.print("    pH:");
  Serial.print(phValue,2);
  Serial.println(" ");
  digitalWrite(13, HIGH);
  delay(800);
  digitalWrite(13, LOW);

}
Calibrating the sensor
Before using this sensor to measure different solutions in order to gain its pH reading, it is necessary and highly recommended that you calibrate the sensor to be as accurate as possible before starting. This process may seem complex to do but it is simply done by turning the on-board potentiometer either clockwise or anti-clockwise depending on whether its reading is higher or lower than normal. For this test, it is best that you place the pH sensor in a solution which you are already certain of its pH level, then try and match the reading which the sensor outputs to the solution's known measurement. This would ensure that the other solutions tested are also accurate and with this said, it is best that you wash off the tip of the pH sensor after every solution to ensure an accurate reading further-on. The picture below shows how you would calibrate this sensor by turning the potentiometer with a flathead screwdriver: About the code
The code for this project is fairly interesting as it does have some unique structures and commands which you may have not come across before. Firstly, if we start from the top line of the code, we first define the analog pin A0 (called SensorPin) on the Arduino which the pH sensor will feed its data into. Then, we create an integer storage variable, named avgValue, to store the raw data which we will receive from the sensor as this information will be manipulated later for us to use. Next, with the float variable named 'b', we can then have the ability to store integers with a decimal point but with a limited amount of precision, however, this variable is enough for us and is used in the code to store the output values for us to read as explained later. On the next line, we declare an integer array/buffer array, called buf[10], composed of 10 separate integer samples (buf1, buf2, buf3, etc). The temp variable in the buffer array is used later to store certain elements in the array for later, where certain elements will be placed into this variable for us to get information out of. Now, moving on to the void setup section of the code, we start by triggering the Arduino's on-board LED to indicate that the LED blinks whenever it is receiving signals from the sensor and setting the serial communication baud rate to 9600 bauds. For our void loop section, we start with a for loop stating that: for 10 elements (spaces) of the buffer array, gather a value for each element from the sensor and wait for 10 milliseconds. This means that 10 sample values will be gathered from the sensor to start with. After that, we have two consecutive for loops, which essentially sorts each of these sample values from smallest to largest in order by saying that: for 9 sample values which has been gathered, variable j is the sample value number in the array plus one, with this applying to the total of 10 original sample values gathered. Therefore, we then move onto an if statement where if the values in the variable j array are larger than values in the variable i array, which is true, variable temp is now in charge of storing the variable i array, the variable i array is now equal to the variable j array and the variable j array is now variable temp. Now, the arrays and its values are ordered from smallest to largest accordingly. We then start by setting the average value variable, named avgValue, to zero before changing it depending on the data set later. For our final for statement, we take six of our sample values from the original ten and average it out to get one value which will be used next. Then, we create a float variable, named pHValue, to store our final pH measurements after it has been processed through many calculations taken as raw data will be then converted to a readable pH value. To first convert the Arduino analog's values (0 - 1023) to millivolts, we multiply the analog value from the Arduino by 5.0 divided by 1024 divided by 6. From there, we convert the data in millivolts to a readable pH value by multiplying it by 3.5 to get pH values ranging from 1 to 14. On the last line, we print it to the serial monitor for us to view all the information comfortably, wrapping up our code.
Amazing opportunities
Also, be sure to check out PCBWay, a leading manufacturer and distributor in PCB design and manufacturing. They have amazing prices and excellent quality in their services, so don't miss out on them! Plus, PCBWay has an amazing website, online Gerber viewer function and a gift shop so make sure to check out their links below:
PCBWay Free Online Gerber Viewer Function: https://www.pcbway.com/project/OnlineGerberViewer.html
PCBWay Gift Shop: https://www.pcbway.com/projects/gifts.html
Make sure you check out the review for this module by clicking here.
Enjoy! Contact us for any inquiries!