 Jithin Sanal
Arduino Motor Shield PCB V1 | 4 Motors at Once
Hey guys, welcome back. In my previous post, I explained what an H Bridge Circuit is, L293D motor driver IC and piggybacking L293D Motor driver IC for driving high current motor drivers. In this post, I will show you how you can design and make your own L293D motor Driver Board, that can control upto 4 high current DC motors independently and get your own Arduino Motor Shield PCB done using JLCPCB.
Introduction to Arduino Motor Shield
H Bridge
H Bridge is simply a circuit that allows a voltage to be applied across a load in either direction. They are commonly used for controlling DC motor in moving parts of robots. The advantage of using DC motor is thathttps://rootsaid.com/arduino-gesture-controller/, we can reverse the polarity of applied voltage across the load without modifying the circuit.
If you want to know more about this H Bridge circuit, check out this link.
L293D
L293D is a compact form of H Bridge circuit in the form of an IC that employs the above mentioned circuit. It is an IC with 8 pins on each side (16 pins in total) which contains 2 independent H Bridge circuits, which means, we can control two motors independently using a Single IC.
L293D is a typical Motor driver or Motor Driver IC which allows DC motor to drive on either direction. L293D is a 16-pin IC which can control a set of two DC motors simultaneously in any direction. It means that you can control two DC motor with a single L293D IC.
Learn more about L293D IC
Piggybacking L293D
L293D piggyback configuration is an Easy Way to Double (or in my case triple) The Current as well as the power of L293D Motor Driver IC to drive high torque/ high current motor/ high resistance load. (This strategy should work for any L293D chips). L293D Piggyback is a speedy and simple technique to double the current output to the motor.
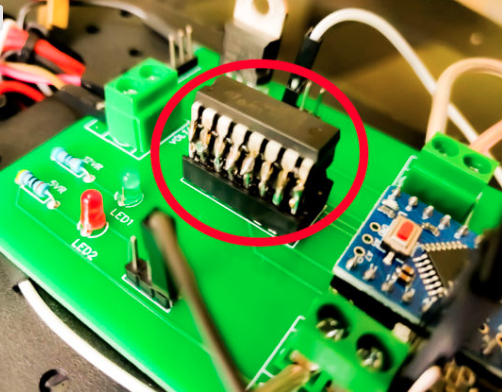
So the entire thought is to solder another L293D chip straightforwardly over the present one. Pin to Pin. This puts the two chips in parallel mode so the voltage will remain the same as before but the current increases. These chips are evaluated at about 600ma constant or up to 1.2A for a brief period. After piggybacking two of them together, they will provide output with 1.2A persistent current and 2.4A for brief periods.
Arduino Pro Mini
This teeny tiny board was developed for applications and projects where space is premium and installations are made permanent.
Small, available in 3.3 V and 5 V versions, powered by ATmega328. Due to its small size, in this project we will be using this board to control Arduino Based Motor Driver Board.
Online PCB Manufacturer – JLCPCB
JLCPCB is one of the best Online PCB manufacturing company from where you can order PCBs online without any hassle. The company works 24 hours a day, 7 days a week nonstop. With their high tech machinery and automated work stream, they can manufacture huge quantities of high-class PCBs within hours.
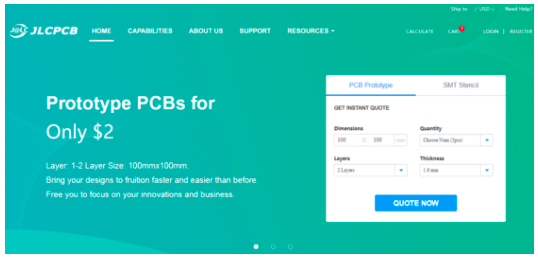
JLCPCB can develop PCBs of various complexity. They develop Simple and cheap PCBs with Single layer board for hobbyists and enthusiasts as well as complex multi layer board for high standard industrial applications. JLC works with large product manufacturers and may be the PCB of devices you are using such as laptop or mobile phones were made at this factory.
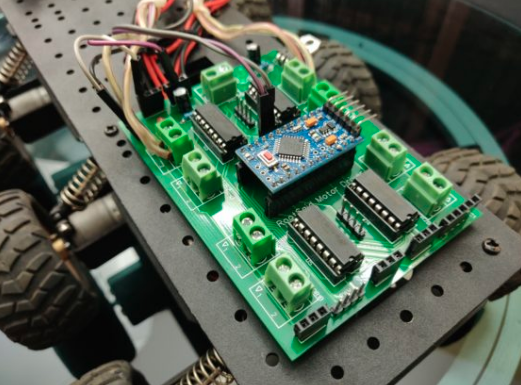
Arduino Motor Shield Board Explained
Features of RootSaid Arduino Motor Shield
- Controls 4 Motors Independently at a time
- Independent Speed Control
- Headers for Connecting Analog/Digital Sensors
- 5 V, 12 V and Gnd Headers for extra components
- Piggybacking without soldering
- Support HC12 Wireless Module
Now let us take a look at the circuit of our motor driver board.
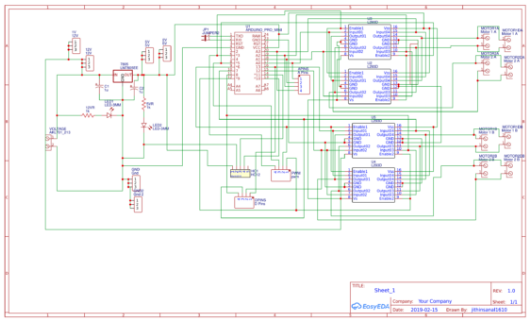
Looks a bit messy? Don’t worry, I will explain it for you.
The Regulator
The input power is connected to a 7805 regulator. 7805 is a 5V regulator which will convert an input voltage of 7- 32V to a steady 5V DC supply. 5 V supply is connected...
Read more »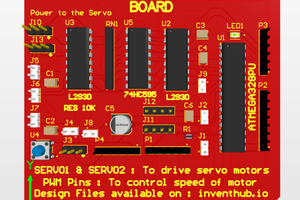
 Arshmah Shahkar

 Mrinnovative