Close
0%
0%

Restoring an Asus Chromebox CN60

Free computer if I can get it working

Similar projects worth following
I found an Asus Chromebox CN60 in an e-waste bin with a sticky on it saying Dead. I decided to see if I could make it work.

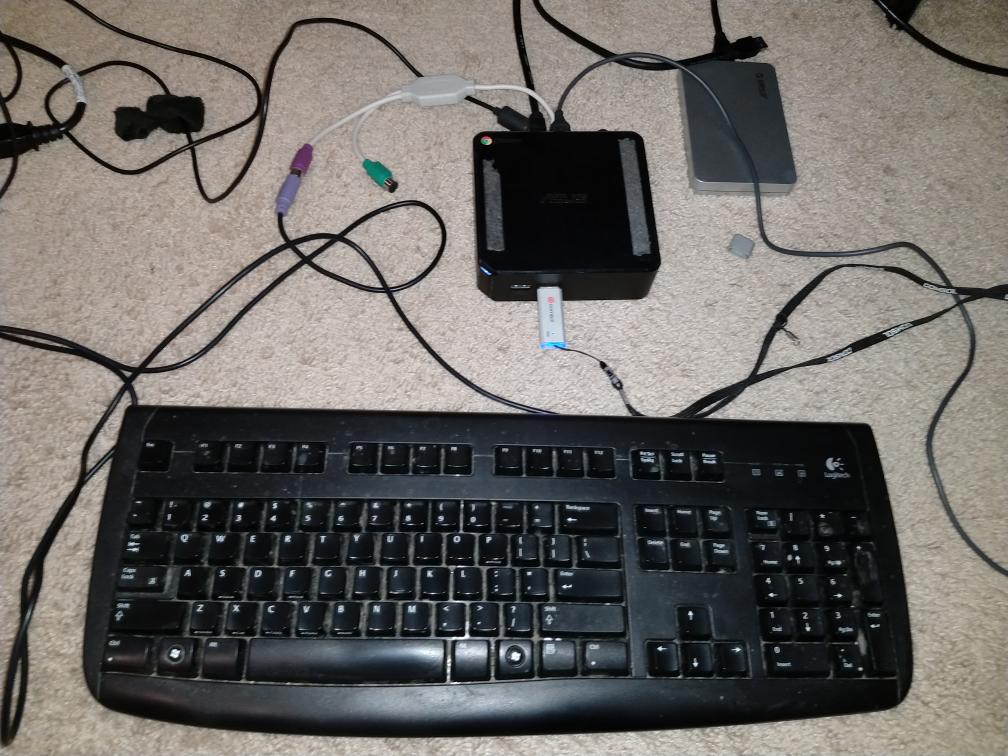
It all started when I found an Asus Chromebox CN60 in an e-waste bin. This small computer follows the Intel NUC form factor. The main difference is that the NUC is not designed specifically for a particular OS, but the Chromebox is intended to run ChromeOS. But we all know that ChromeOS is just Linux underneath so in principle it should be possible to run a standard Linux distro on it.

This project is actually a series of logs recording what I did and the results I got. I'm writing this up so that I can point friends to it instead of telling the story over and over, and also to help anybody trying to get the CN60 working with Linux.

  • Upgraded to the max

    Ken Yap10/01/2020 at 23:06 0 comments

    Getting tired of my current Intel NUC suffering graphics glitches and once in a while locking the screen requiring a couple of Ctrl-Alt-Backspaces to kill the X server (and losing my session). Probably some bug in the X drivers for the Intel video hardware. So I will move my desktop to this Chromebox.

    To that end I bought a 250 GB SSD in M.2 2242 form factor. This is quite a short card, only 42 mm long as the form factor indicates. That's the largest I could easily get but should be adequate for desktop use as most of my files are on a workhorse machine. I also bought a 2x8GB kit to bring the RAM up to 16GB, the max supported. With the i7 CPU this is going to be a powerful machine for the small size. Pretty good outcome for rescued hardware.

    Installed openSUSE Leap 15.2 on it last night and currently burning in.

    A few weeks later: Burn in finished, all stable so I have moved my desktop to this Chromebox. Among other things I also had to transfer the udev rules for various USB devices like the Arduino Uno, STlink dongle, and so forth. Feels smooth and zippy. 😀👍

  • Running openSUSE Leap 15.2

    Ken Yap07/04/2020 at 12:39 0 comments

    Being a slow night here at the cattery, I decided to boot the recently released openSUSE Leap 15.2 on it.

    First I needed to connect up the peripherals. Here is the usual mess:

    I downloaded the live KDE ISO image, wrote to a USB flash stick with imagewriter, and booted to it from the BIOS menu. After a long boot (it was a USB 2 stick), I got a live desktop:

    The time is wrong because the time zone hasn't been set. Not terribly exciting but it shows that Leap 15.2 works fine. I don't expect major problems when I install 15.2 on my soon to arrive new workhorse. Shh, don't tell my old workhorse that, it might go into a huff.

  • No more rubber band

    Ken Yap01/29/2020 at 06:31 0 comments

    Found a power supply in the recycling bin with the correct barrel connector. Now I can ditch the rubber band. 📣😺

  • Marking as completed

    Ken Yap01/19/2020 at 21:44 0 comments

    Marking this project as completed as it's working as well as possible with the hardware on hand. Any modifications in future are of the nature of upgrades (RAM, SSD, BIOS) etc.

  • Going straight into legacy boot

    Ken Yap01/19/2020 at 11:08 0 comments

    Now that ChromeOS is no longer of interest, we want to boot openSUSE as soon as possible after power on without any keystrokes.

    To do this I needed to alter the boot options (GBB flags) as explained by MrChromebox. When I ran the script under openSUSE, the script couldn't read the settings and instructed me to add the kernel parameter iomem=relaxed, or to use a live USB distro. No doubt one layer of kernel protection needs to be bypassed to use this tool. This was fairly easy to do, I just added this option to the end of the GRUB options to the kernel next boot.

    Then when I tried to alter the boot flags, it told me write protection was on. The red [WP] should have alerted me to that. I opened up the box and followed the instructions in the Kodi wiki for disabling the hardware write protect, which is a screw bridge on the motherboard.

    By setting a boot option I was able to select 1 second timeout at the Chrome boot script, then going straight to legacy boot without requiring Ctrl-l. It's still possible to type Ctrl-d or Ctrl-l in that 1 second but I don't expect to need it.

    I also reinstalled the FW_LEGACY firmware to boot the internal SDD first. This can also be interrupted by typing ESC. I discovered that when I had an external USB SDD plugged in, it tried to boot that first.

    So now the machine can boot openSUSE unattended. I'll leave it like this and not install the custom firmware for now as that has a minuscule chance of bricking the box. The other reason not to change to the custom firmware at the moment is that it's a UEFI BIOS which means that the openSUSE will have to be resintalled as UEFI requires a different partition layout.

  • I ditch GalliumOS and pivot to openSUSE

    Ken Yap01/18/2020 at 23:20 0 comments

    GalliumOS works fine, but the desktop is based on Xfce and I prefer a richer desktop environment. I use KDE on my other machines. Since the hardware is actually quite PC compatible I decided to see if I could install openSUSE Leap 15.1 on it, the same version running on my other machines.

    I plugged in a USB stick that had the openSUSE ISO written on it, booted, and it took me through the install process, I accepted most of the defaults, the major change being using ext4 instead of btrfs for the filesystem as the latter is incompatible with boot block in MBR. It all worked including the wired Ethernet.

    I was worried it wouldn't fit on the SSD but in the end it used up about half of the slightly less than 16 GB on the SSD. Of course if I start installing software it will be a different story. Also /home is on the same SSD.

    So at the moment these are things I want to improve:

    • Plug in a spare external SSD from upgrades on other computers that is in a 2.5 inch disk form factor enclosure for /home. Maybe get a bigger M2 SSD in the future.
    • Fix the firmware so that it goes straight to the legacy BIOS on power up. Apparently this is possible by changing the Boot Options (GBB flags) with MrChromebox's firmware script. Or else replace the BIOS with a custom one.
    • Maybe get a proper power supply if I get sick of seeing the rubber band.

  • I get the wired Ethernet working on GalliumOS

    Ken Yap01/18/2020 at 22:51 2 comments

    One oddity is that the wired Ethernet doesn't work under GalliumOS. ifconfig shows no wired interface, only the wireless one. ChromeOS had the wired Ethernet running so it's not a matter of no driver available. A search found a complaint by somebody who got various Linux distros running with a working wired interface, with the exception of Ubuntu. What is it about Ubuntu, which GalliumOS is derived from?

    Most likely the driver is in a package not in the ISO, and this has to be installed separately. lspci shows that the Ethernet chip is a Realtek r8168. apt search r8168 turns up a package called r8168-dkms. DKMS is Dynamic Kernel Module Support. This means the driver contains a binary blob or something which makes it impossible for GPL purists to distribute as a binary package. Instead the driver source files are distributed in a package that recompiles the driver against the current kernel when installed or when the kernel is changed.

    Installing the package still didn't get me a driver. There was no driver in the the current kernel modules, but there was something matching in an unrelated directory. There was a message towards the end about failure to recreate the initrd. I looked at the error message left in the install log and it turns out that I need to install libelf-dev. Then I ran dpkg-reconfigure r8168-dkms and this time it created a r8168.ko in the current kernel modules.

    Still not out of the woods yet. For some reason the interface doesn't come up on boot, but doing ifconfig r8168 works. I'll have to look at this later.

  • I fail to boot GalliumOS from USB, until...

    Ken Yap01/18/2020 at 12:51 0 comments

    So I wrote the GalliumOS ISO image to the USB stick again and boot with it. Even though I press Ctrl-U to boot from USB, nothing happens.

    Some searching found something about the firmware not recognising the USB ports during the boot process. There are updated firmware images at MrChromebox. I download the script with curl as directed and run it (it requires bash, not sh). It then presented me with the option of either updating the RW_LEGACY firmware which is based on SeaBIOS, or installing a full custom firmware. The former is safe so I decided to try that first.

    The firmware upgrade takes and I power cycled and wait for it to boot GalliumOS. Still no joy. Even if I type Ctrl-U it does nothing.

    Some searching uncovers the fact that there are actually two sets of firmware onboard, the ChromeOS loader and the legacy BIOS loader which is more similar to PC firmware. To get the legacy loader I have to type Ctrl-l.

    Bingo! It boots from the USB stick, fairly quickly I must say, and gives me a live desktop. I decide to run the installer right away to put GalliumOS on the SSD.

    I am presented with a dialog giving me a choice of WiFi APs to log into so that I can install and upgrade to the latest package versions as well as install any 3rd party software. But I still can't login to my AP. Is the Chromebox in a WiFi shadow? It's in the same room but almost vertically below the AP.

    Ahhh, the MAC filter! I have the MAC filter enabled on my AP so that only my devices can use the AP, an additional layer of protection to the password. I added the MAC address of the Chromebox to the table, and this time I can connect.

    The install was fairly quick, considering the slow speed of the USB2 stick. I ended up with the GalliumOS desktop.

    Success! I think I'll call it a day. I still have to work out how to make legacy BIOS the default on power up so that I don't have to type Ctrl-l. Maybe replace the legacy BIOS with the custom BIOS, which cannot boot ChromeOS, but I don't care about that now. I must also see if I can install another SSD inside for a /home partition, 16 GB isn't a lot after the OS has taken its share.

  • ChromeOS is useless (to me)

    Ken Yap01/18/2020 at 12:25 0 comments

    I booted up ChromeOS (so the RAM is good) and it started off by telling me I could configure Google Hangouts. Hmm?

    First I adjusted the timezone and locale language and clicked on Let's go. It proceeded to ask me to connect to a wireless AP. Unfortunately this didn't work (I discover later it's my own fault), but I do manage to connect up the wired Ethernet to my switch (so that works too).

    It then said it would restore the saved settings. But I don't have any saved settings? It asked me for an Enterprise login. Well, I'm enterprising, but I'm not an enterprise. I have no idea who the device was registered to. Just for kicks I clicked on Forgot password, and it took me through various dialogues before allowing me to login with my personal Google account. It then said I had no permissions on this hardware.

    I think I understand what's going on. These boxes are intended as mass deployment devices that can be controlled by the administrator in an organisation. When such a device is registered to the Enterprise, the OS can be restored by going through the steps I did and then it will restore the organisation settings. It also means the device is useless for running ChromeOS by anybody who is not in the organisation, so no good stealing one. Unless you have the nous to install a different OS on it.

    Well that settles it then, I can wipe ChromeOS and install GalliumOS without any regret. I also discover that for the CN60 ChromeOS update support ended Sep 2019. Maybe that's why it was thrown out.

    Before I proceed with that I get a console session with Ctrl-Alt-F2. By using the CLI commands: cat /proc/cpuinfo, free, and dmesg I find out more about the hardware specs. It turns out the processor is a 4-core Intel i7-4600U. It has 4 GB of RAM, a Gb Ethernet interface as well as WiFi interface. There is a 16 GB SSD. It's M2 form factor and it's easy to get a larger one for not much money now. The RAM can be increased too.

    Wow, that's a much better device than I had expected. Great incentive to continue.

  • I fail to boot GaliumOS but restored ChromeOS

    Ken Yap01/18/2020 at 11:36 0 comments

    I wrote the GalliumOS ISO image onto a USB stick and tried to boot it. It said that the USB stick did not contain a valid recovery image.

    Recovery image? Maybe I should try to get ChromeOS working on it first before trying to boot another OS.

    A search found a site holding images for many ChromeOS devices. I took the CN60 one. It's about 500 MB zipped and about 1.5 GB unzipped.

    Wrote the ChromeOS recovery image on the USB stick and at the "scary prompt" typed Ctrl-U to boot from USB.

    It took many minutes to restore ChromeOS. I power cycled it and at the "scary prompt" let it boot from SSD. I could also have typed Ctrl-D. It booted up to the ChromeOS splash screen.

    So maybe I have a working ChromeOS device now?

View all 12 project logs

Enjoy this project?

Share

Discussions

tyler wrote 12/15/2021 at 21:51 point

Free computer! I love this! I have actually considered buying a new Chromebox to run Linux at my hacker bench, but you really nailed it for the low, low price of free :]

  Are you sure? yes | no

Ken Yap wrote 12/15/2021 at 21:54 point

Thanks! I really got very lucky that day when I looked into the e-waste bin. These days the best I can find are some laptop power supply bricks.

  Are you sure? yes | no

tyler wrote 12/15/2021 at 22:55 point

Hey, I'll take just about anything that I can disassemble and possibly resuse! Especially for someone like me, who runs multiple laptops that are coming up on their 10th anniversary, and for whom there are no longer charging cords produced. I am convinced that they'll never die though. Long live the thinkpads!

  Are you sure? yes | no

Similar Projects

Does this project spark your interest?

Become a member to follow this project and never miss any updates