Esmacat
You can read more about this and other Esmacat tutorials on the official Esmacat website. You can also learn more about us on our main website.
Detailed documentation of the codes and steps for this tutorial can be found here.
Check out our EASE Crowd Supply Campaign Page: https://www.crowdsupply.com/harmonic-bionics/ease
Overview:
In this tutorial, you will learn how to set up and use the EtherCAT Arduino Shield by Esmacat (EASE) Slave device on top of an Arduino subsystem and interface it with an LCD and Motor Shield to enable data transfer between the two slave devices via the EtherCAT master (Raspberry Pi).
- First, some general information about Raspberry Pi and the shields is discussed.
- After learning to set up the devices, you will learn to implement a practical project involving both the LCD and Motor Shields to control the Motors connected via the buttons on the LCD Shield by exchanging data between the 2 slave devices and the EtherCAT master. The data about the current motor to be controlled and its state (speed/position) is also printed on the terminal of the Pi.
EtherCAT Arduino Shield by Esmacat (EASE):
EASE is an EtherCAT slave that connects to an EtherCAT master (PC/ Laptop/ Dedicated Master devices like the Esmacat Master S and Esmacat Master C. It can be stacked on top of Arduino, Arduino-like boards and Arduino Shields. This shield allows high-speed communication with an industry-standard EtherCAT protocol for high-performance robotic applications.

This shield has 8 registers that can be used to send/receive data between devices via ethernet cables attached to the shield.
More info: https://www.esmacat.com/ease
Suggested Reading: EASE Datasheet.
Raspberry Pi:
Raspberry Pi is a tiny, dual-display, low-cost desktop computer that is used widely in robot brains, smart home hubs, media centers, as a networked AI core and factory controllers. It can also be used as an EtherCAT master just like a Laptop/PC. However, it should be noted that the Pi is a Linux based computer.

Suggested Reading: Section 4.2 Getting Started with EASE, Motor & LCD Shields.
LCD Shield:
The LCD shield used in the tutorial is a 16x02 LCD display with six buttons which is simple and convenient to stack it onto the Arduino Uno board. There are 5 control buttons (Select, Up, Down, Left, Right) and a reset button. The 5 buttons are connected with the A0 analog input of the Arduino board.
 Suggested Reference: keyestudio LCD 1602 Expansion Shield.
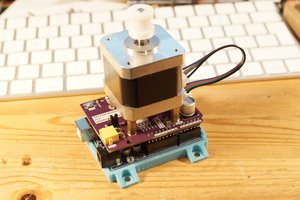
Motor Shield:
The Adafruit Motor Shield is a stackable motor shield that allows up to a maximum of 2 Servo motors, 4 DC motors or 2 Stepper Motors to be controlled using a single shield. By configuring the shield for our requirement one can control the motors as per the need. In this tutorial 1 servo motor, 1 dc motor and 1 stepper motor has been controlled as a proof of concept. Suggested Reference: Adafruit Motor Shield V2 datasheet.
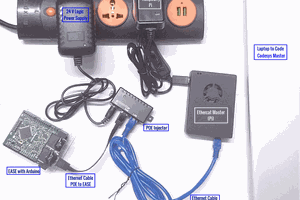
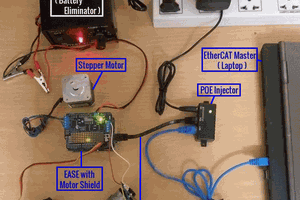
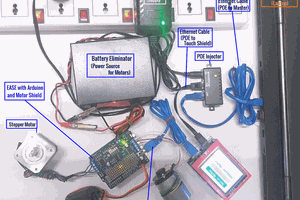
Hardware Connections:
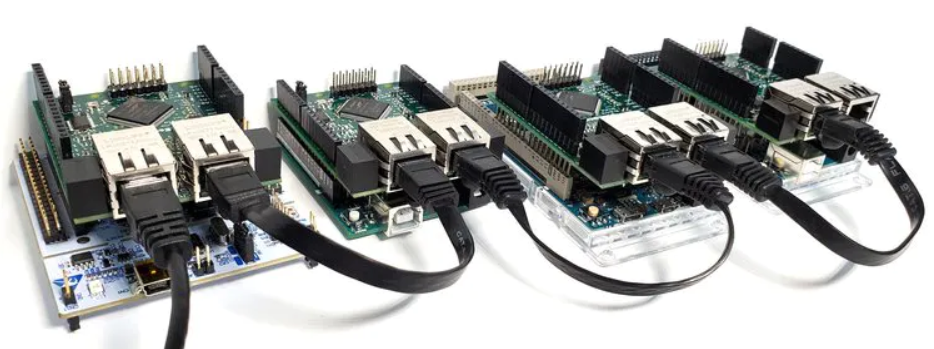
The primary hardware components include,- EtherCAT slave1 (EASE with Arduino)
- EtherCAT slave2 (EASE with Arduino)
- EtherCAT Master (Raspberry Pi)
- Power Over Ethernet (POE Injector)
- Motor Shield
- LCD Shield
- Motors
- Ethernet cables
- DC Adapter (for POE) and
- Power Source (battery to power the motors)
- Make sure the Ethernet connections are fit tightly into the sockets. (Loose connections may lead to the slave device not being recognized.)
Required Libraries:
There are two libraries that will be used for this tutorial.- An EASE Library for Arduino to communicate with the Arduino...
 Jan Neumann