The purpose of the camera is to serve as a research tool for a project involving local fire department that I'm currently working on as part of my PhD in CS. I needed a cheap IR camera to do some proof of concept work and this really turned out great for that.
I made this project (idea to prototype) in only 6 hours. Because of how quickly this came together, the print files are rough and the code is simplistic. But it works. I'm already planning on a V2 (with better ergonomics) and I'll certainly update this page as I implement it.
Total cost for the camcorder is roughly $100-120 (US)
One really nice aspect of this project is that assembly is simple so if you clone the SD card, it's really easy to make multiple of these.
ASSEMBLY:
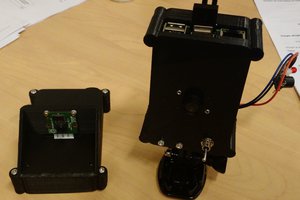
Print the parts
Flash Raspbian Buster lite to your SD. Setup wifi.
Feed the camera cable and the camera into the lens holder and snap the camera into place. Barely heat the rim of the lens holder with a hair-dryer or heat gun, then pop the lens into the rim. Its tight and the heat helps prevent PLA cracking.
solder wires onto the button and LED. Don't forget to solder the resistor inline with one of the LED leads. It doesn't matter which. Heat shrink all joints.
Press the button into the square hole on the pi-holder part and press the LED into the round hole.
I used a 4-pin female header to connect the button/LED wires to the raspberry pi headers. Using a GND-LED-BTN-GND arrangement on the header pins will let you plug the header right into GPIO pin 23/24 and the two grounds that neighbor them. Note that the button will simply bridge GND to pin 24 when pressed. Similarly, the LED will have the positive lead connected to the pin 23 and the negative to GND. Soldering would work just fine here too.
Pop the raspberry pi into the holder. Make sure the LED and button don't disconnect from the pi.
Slide the lens-holder part onto the dovetail of the pi-holder part. Make sure the camera cable is up w.r.t. to the pi. If this is a tight fit, heat the dovetail with a hairdryer or heat gun and quickly press them together. The hot plastic is softer but will quickly fuse.
Plug the camera cable into the pi.
Boot the pi. Log in. Clone the git.
Install RPi.GPIO, picamera, and cron onto the pi.
Create a cronjob (use crontab -e) with the following command:
"@reboot python3 /home/pi/Near-IR-RPi-Camcorder/Camcorder.py"
Reboot pi.
ASSEMBLY COMPLETE =)
Operation:
Upon boot, the LED flashes 2 times slowly to indicate ready. Once the button is pressed, the LED begins to blink to indicate the recording status and the camcorder begins recording to a date-stamped file. Simply press the button again to stop recording and the LED will stop blinking. If the button is held for >2 seconds, the LED blinks 5-times fast and the pi will cleanup and shutdown.
Currently the only way to download files is over the network using a utility like WinSCP. The code could easily be modified to write video to a flash-drive instead of the SD card.
Video demonstration here:
Code is available here:
https://github.com/NiklasMelton/Near-IR-RPi-Camcorder
STLs are available here:
 piat.jonathan
 nick.r.brewer
 Jim Bennett