Close
0%
0%

Street Camper

Popup camper in a plywood storage box on wheels!

Similar projects worth following
2.6k views
This project is an inexpensive (around $75 USD in parts ) popup camper (tent). When open, the camper is 7 feet long, 3 feet high and 2.5 feet wide. When closed, its base forms a large 33"x30"x18" plywood box that can store belongings. The box can be locked with a padlock. It has four coaster wheels for transporting it on a pavement. "Street Camper" is intended to be built by makers around the world and given away to homeless people. Goals of this project are similar to http://www.edar.org/ however their units are designed to be built commercially.

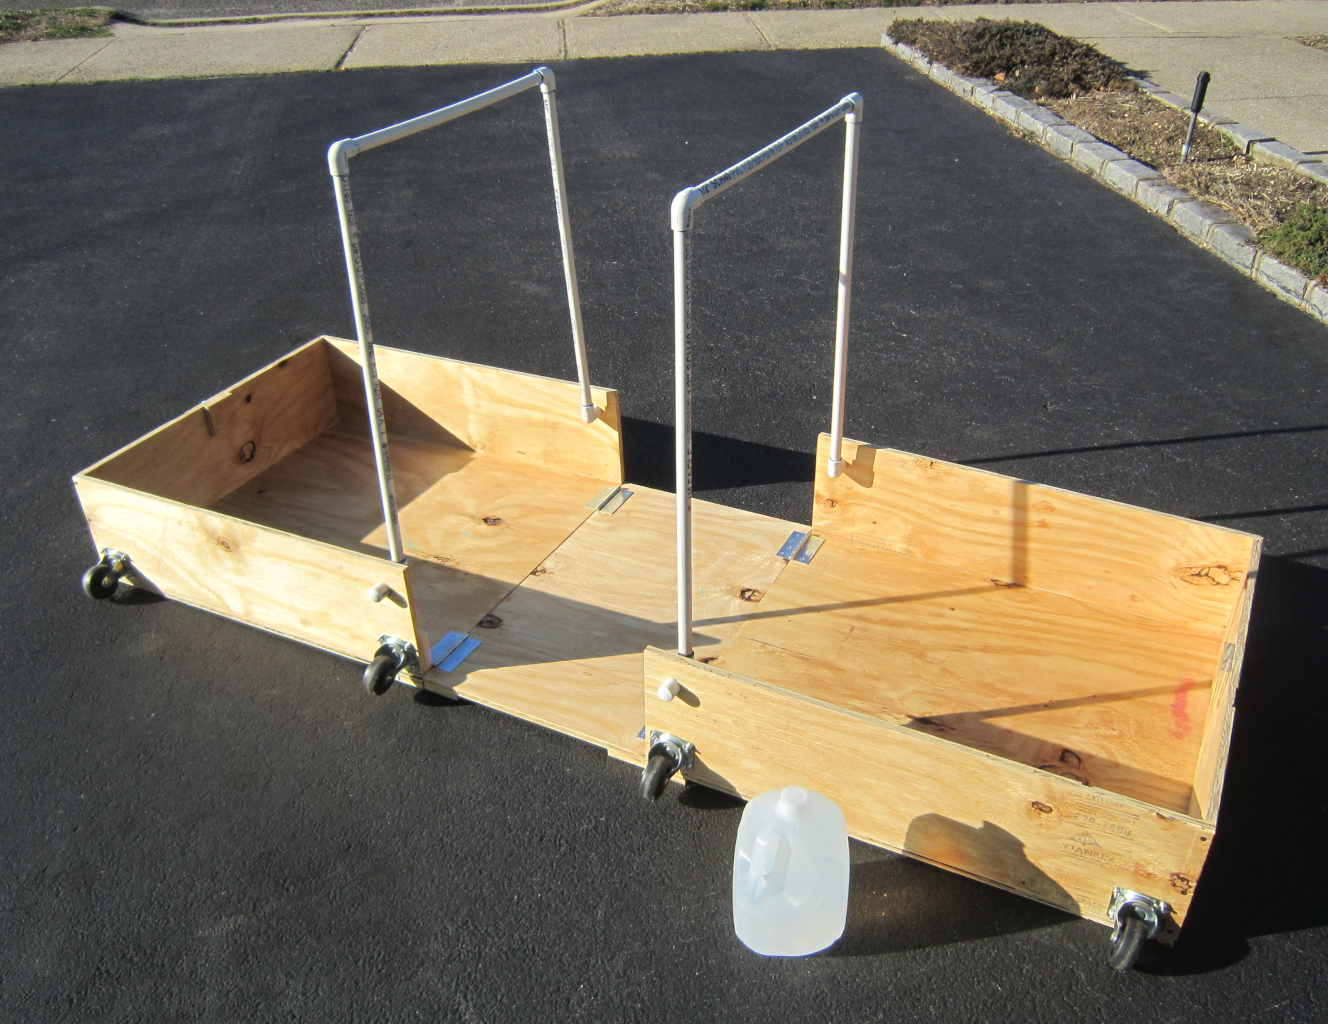
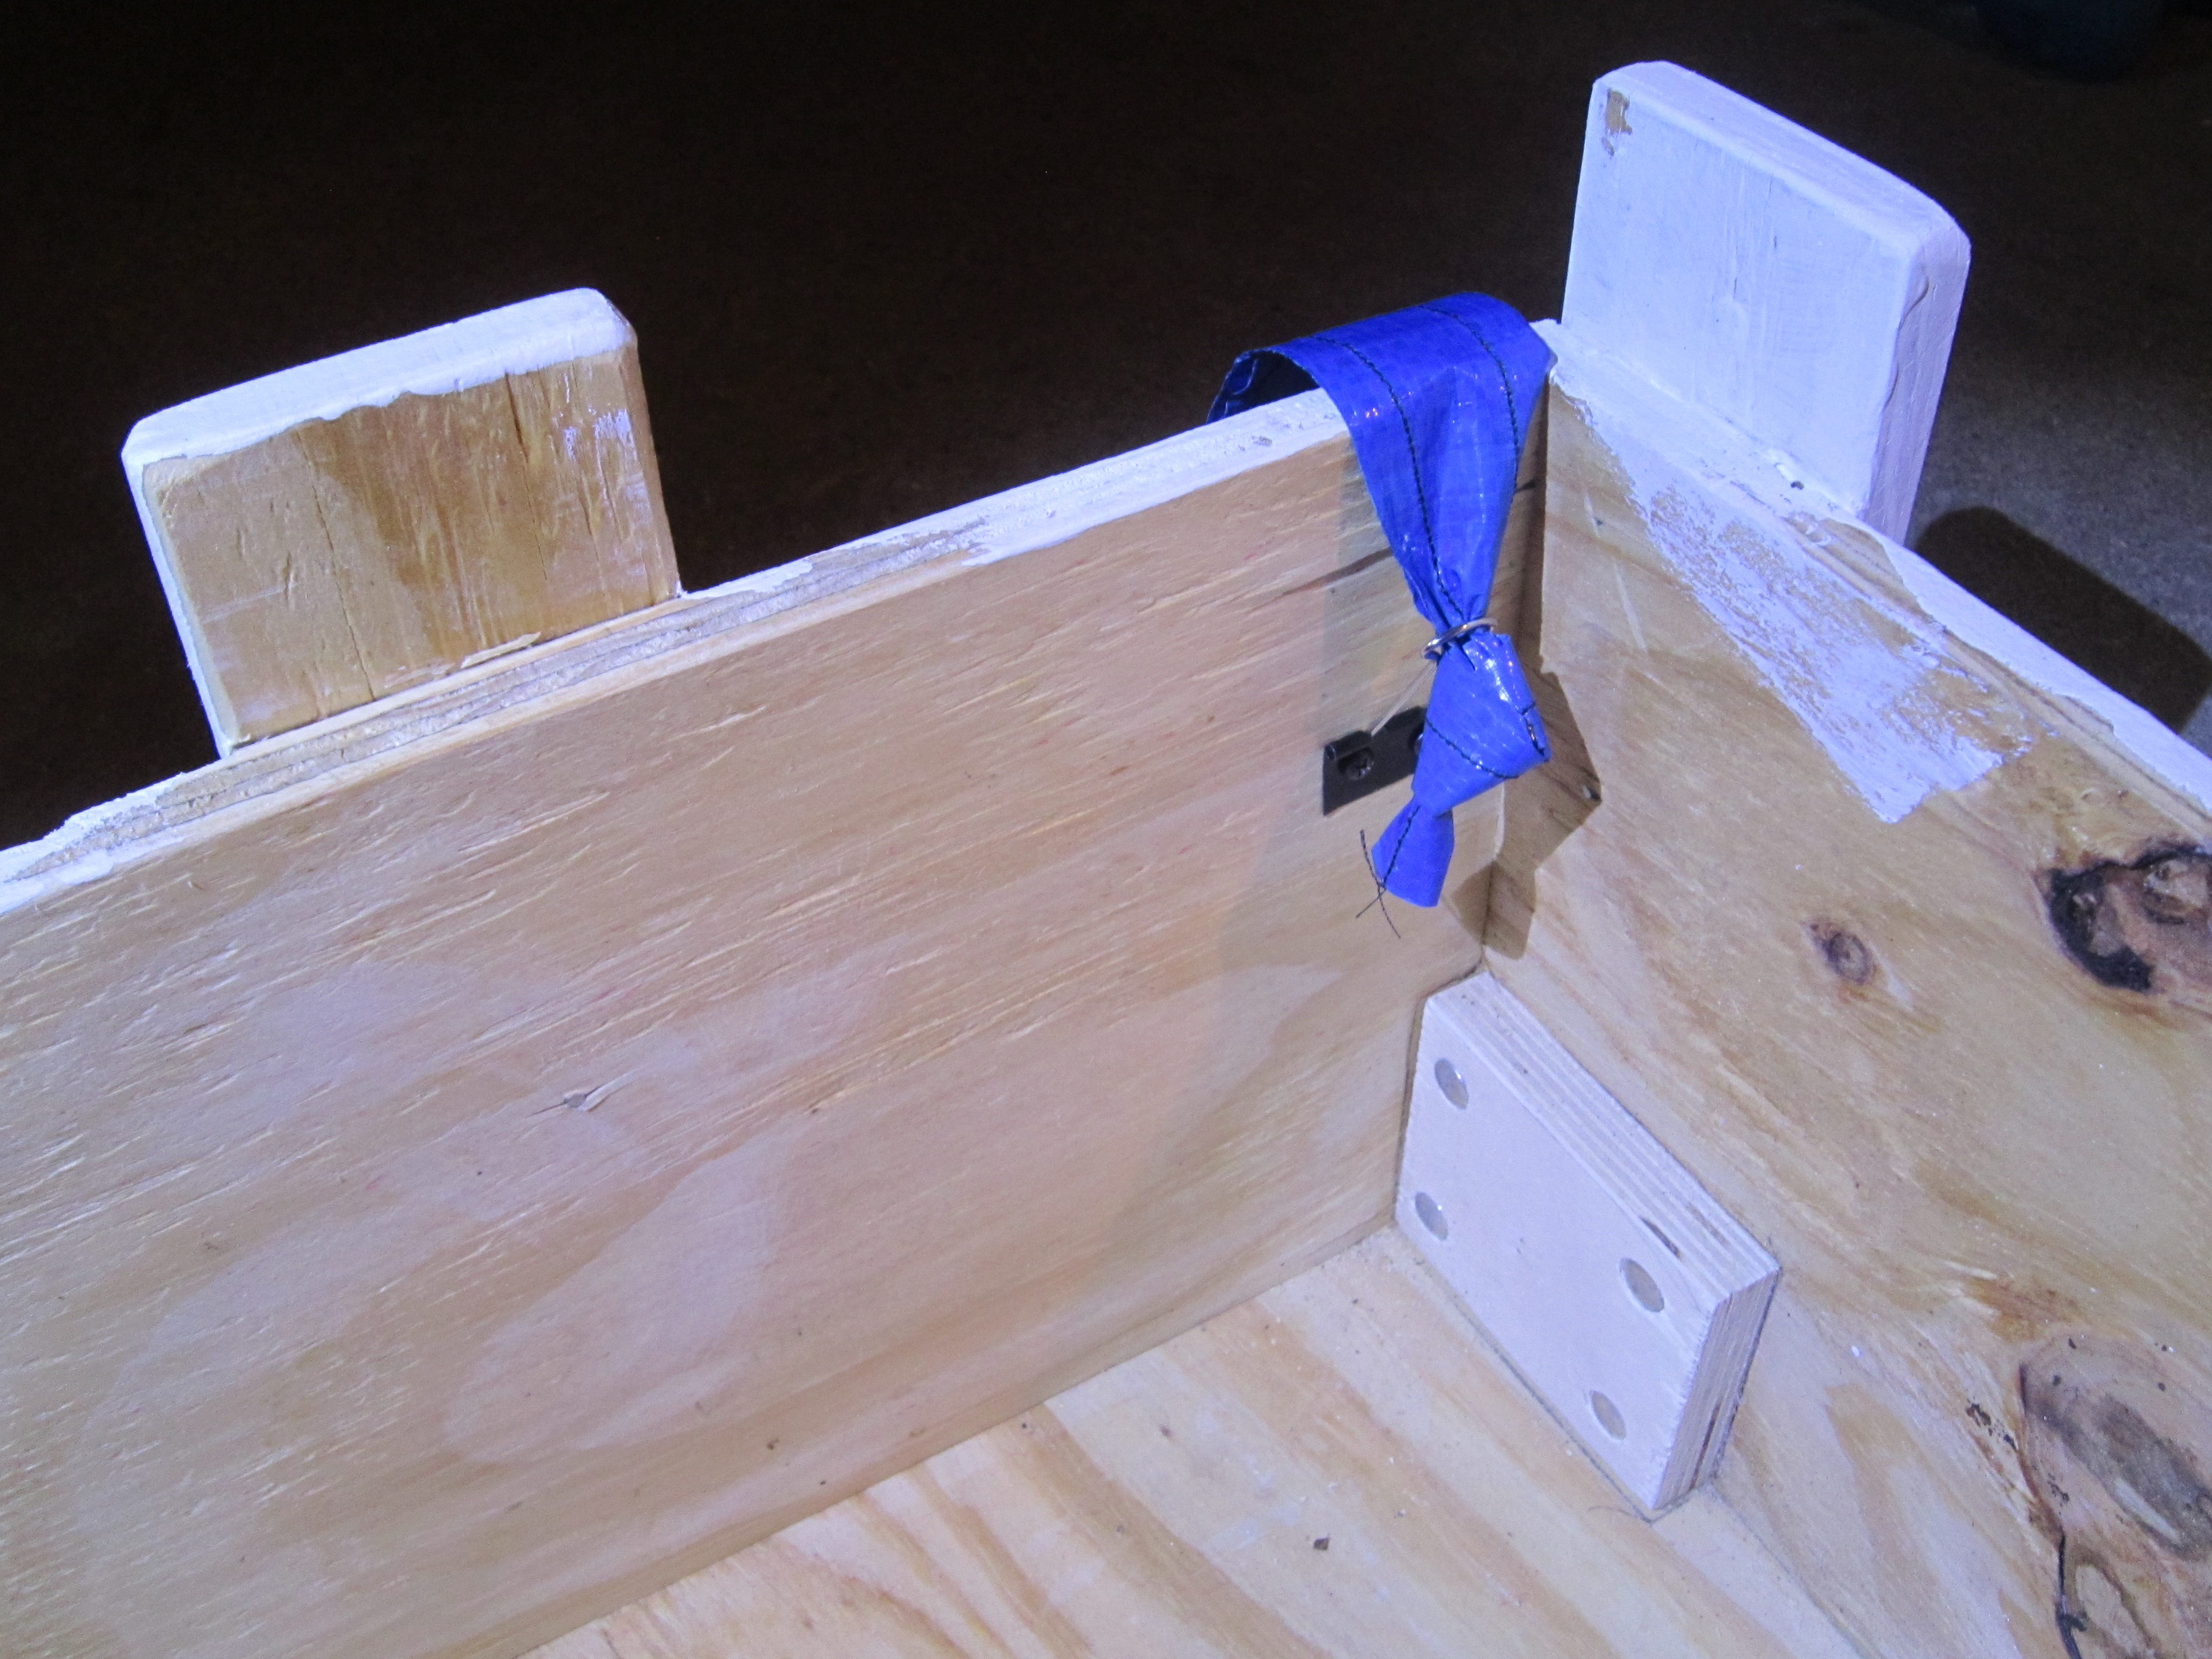
The project was designed to use widely available materials effectively.  It uses one sheet of plywood and one tarp.  I am placing the design into public domain.  Please modify and improve!  Desired improvements include: better wheels (current configuration makes a lot of noise), base feet, tent attachment mechanism, tent entrance, better tarp material.  Please msg me if you improve the design.

Here is a video:
https://cdn.hackaday.io/files/1702727284917248/camper2020-03-27.avi

Matherials:

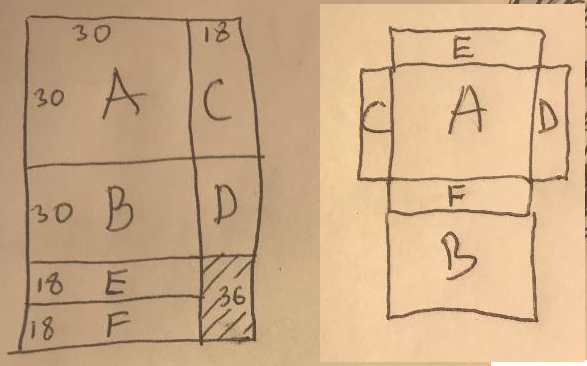
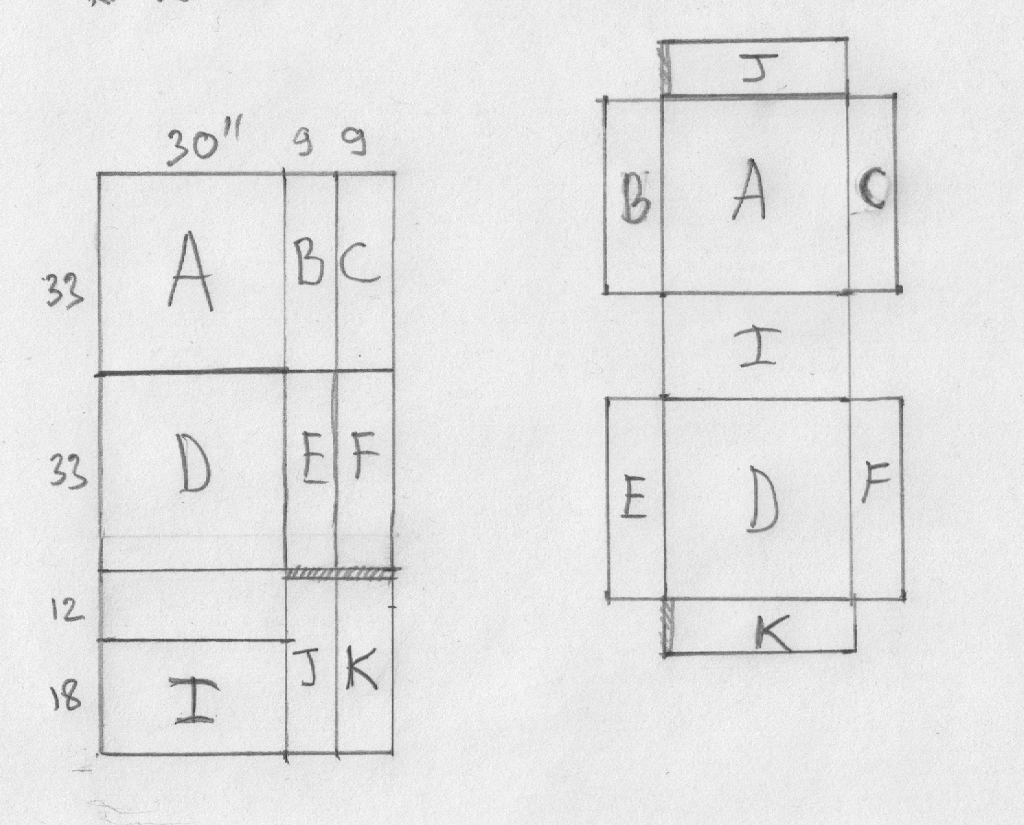
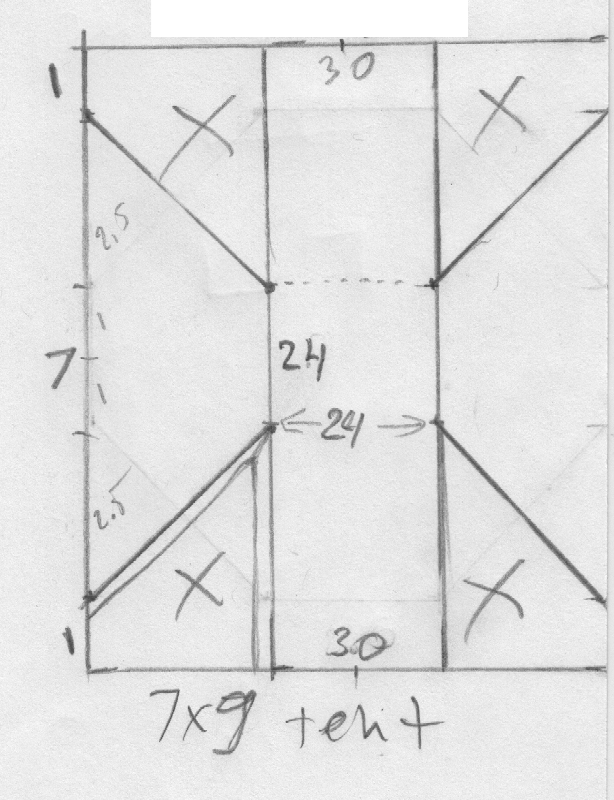
  • 1  7'x9' blue tarp ( $5 @ harbor freight)
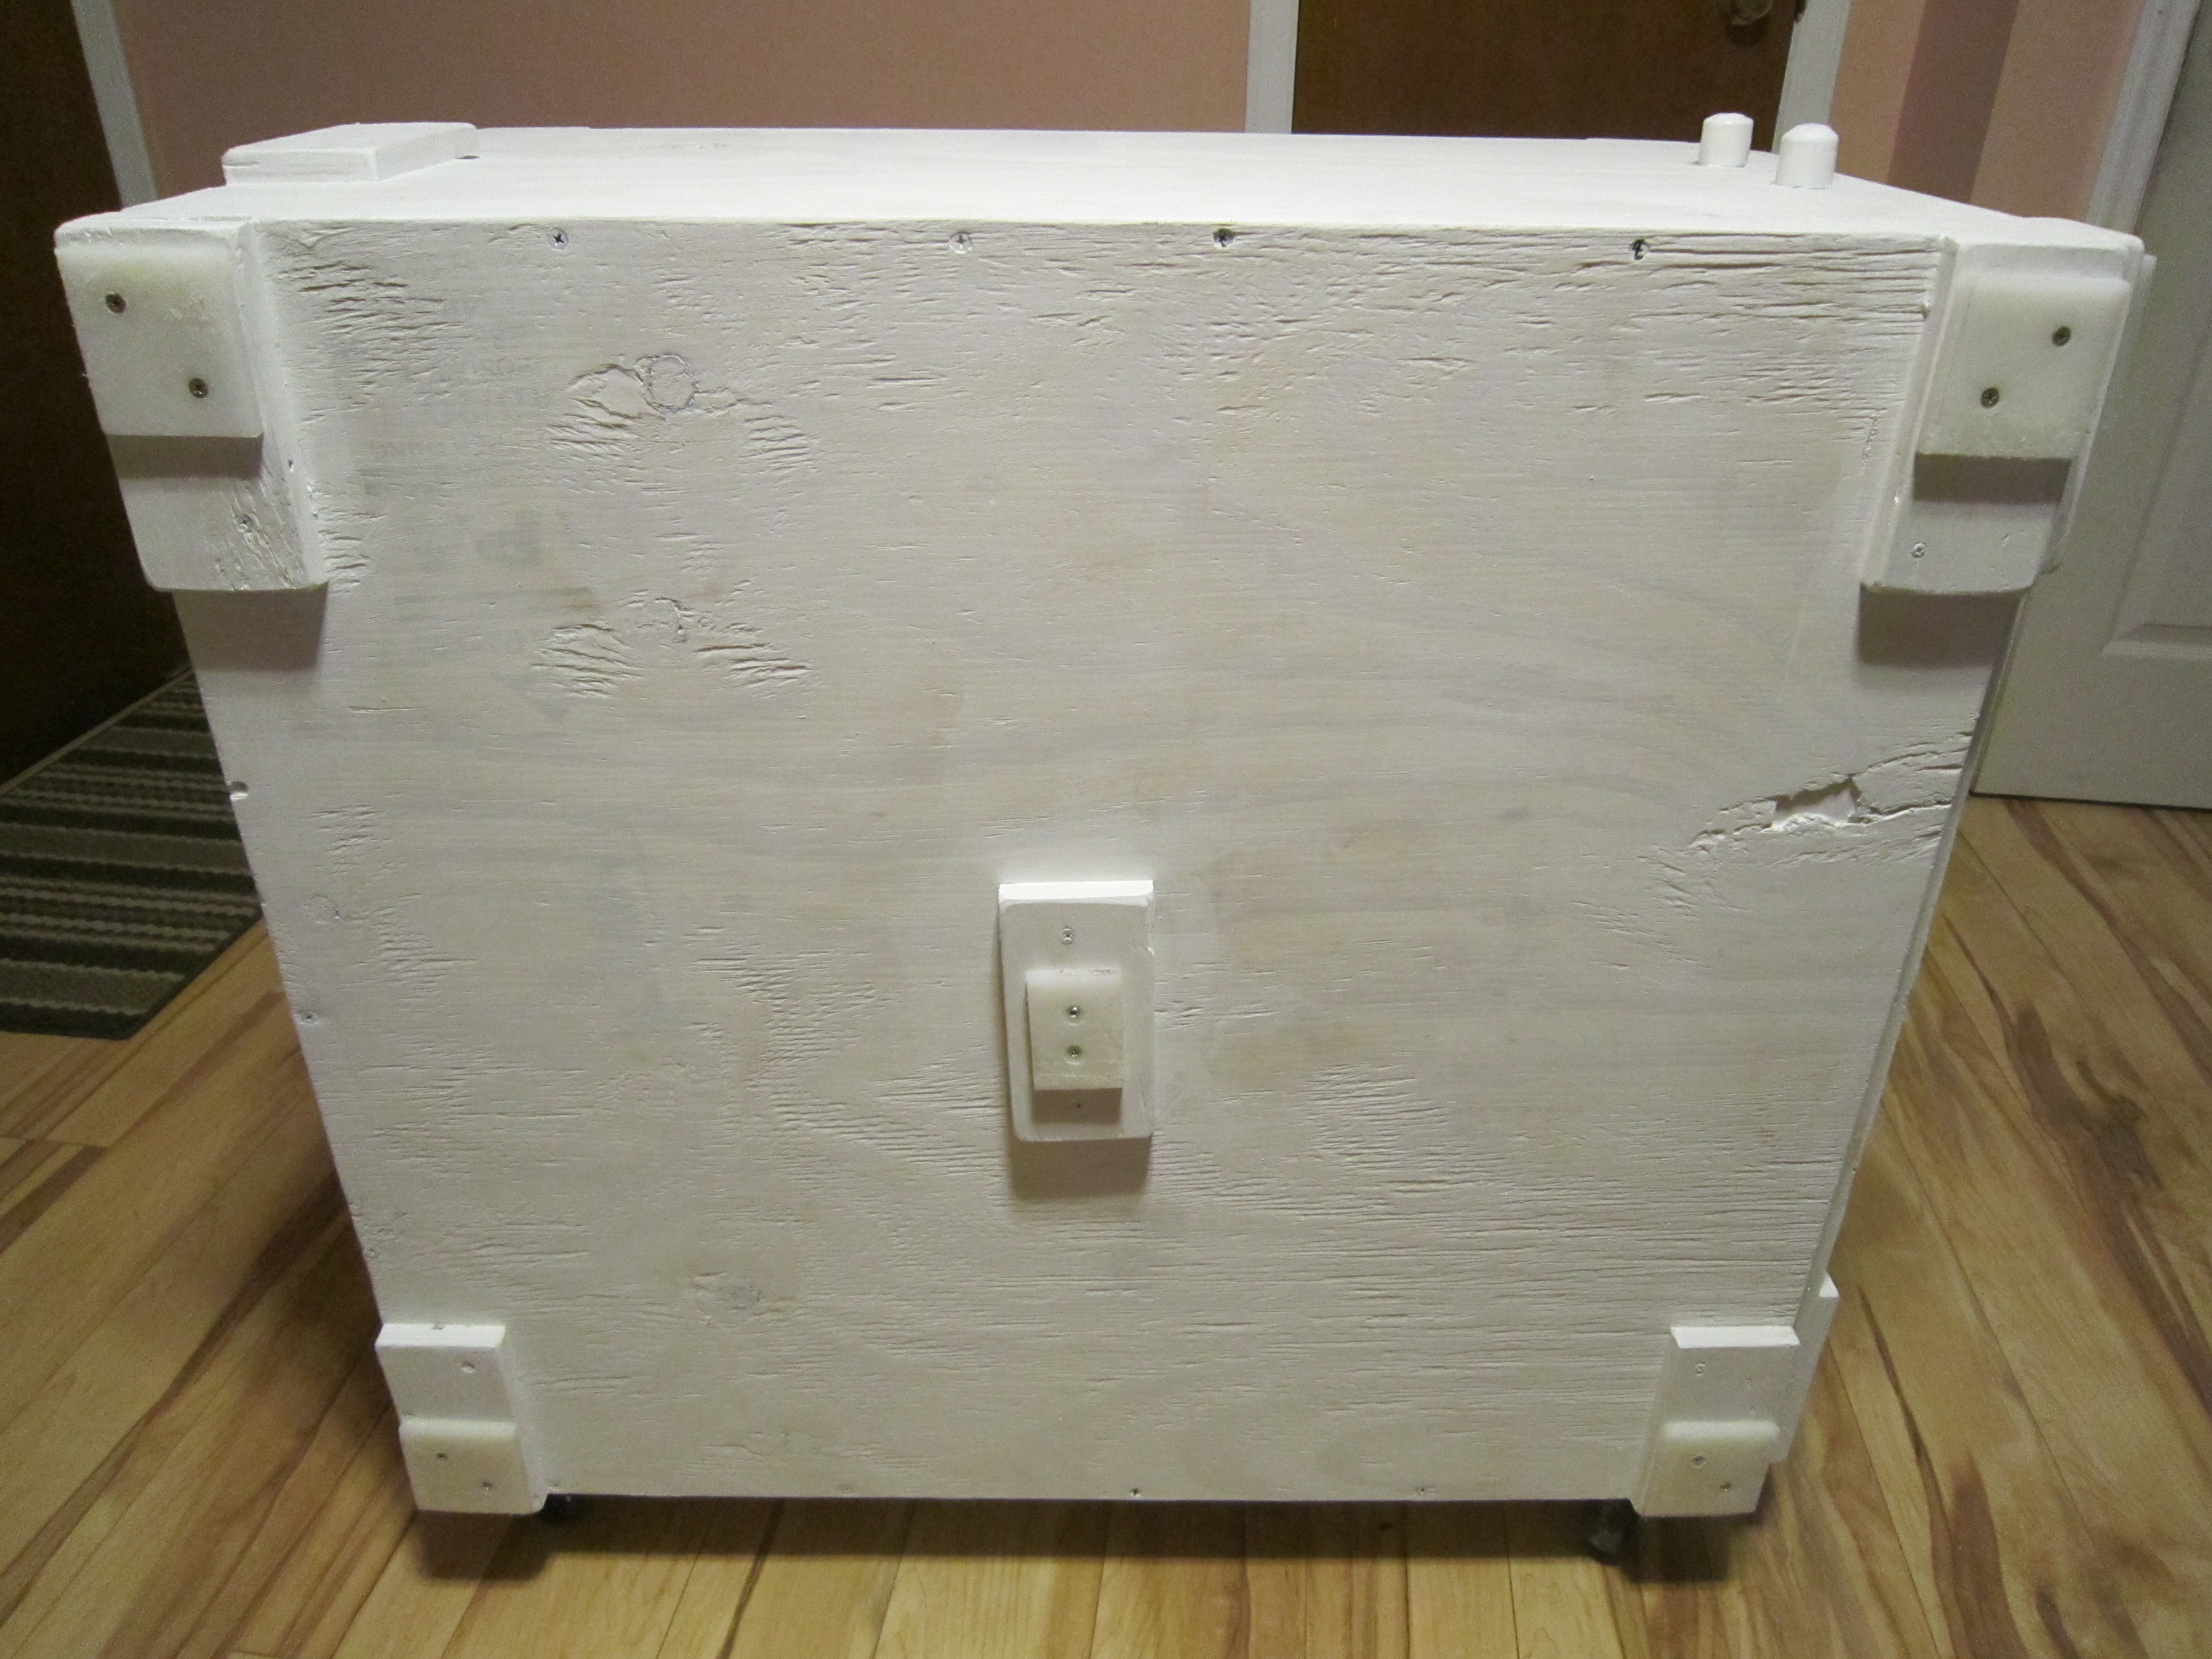
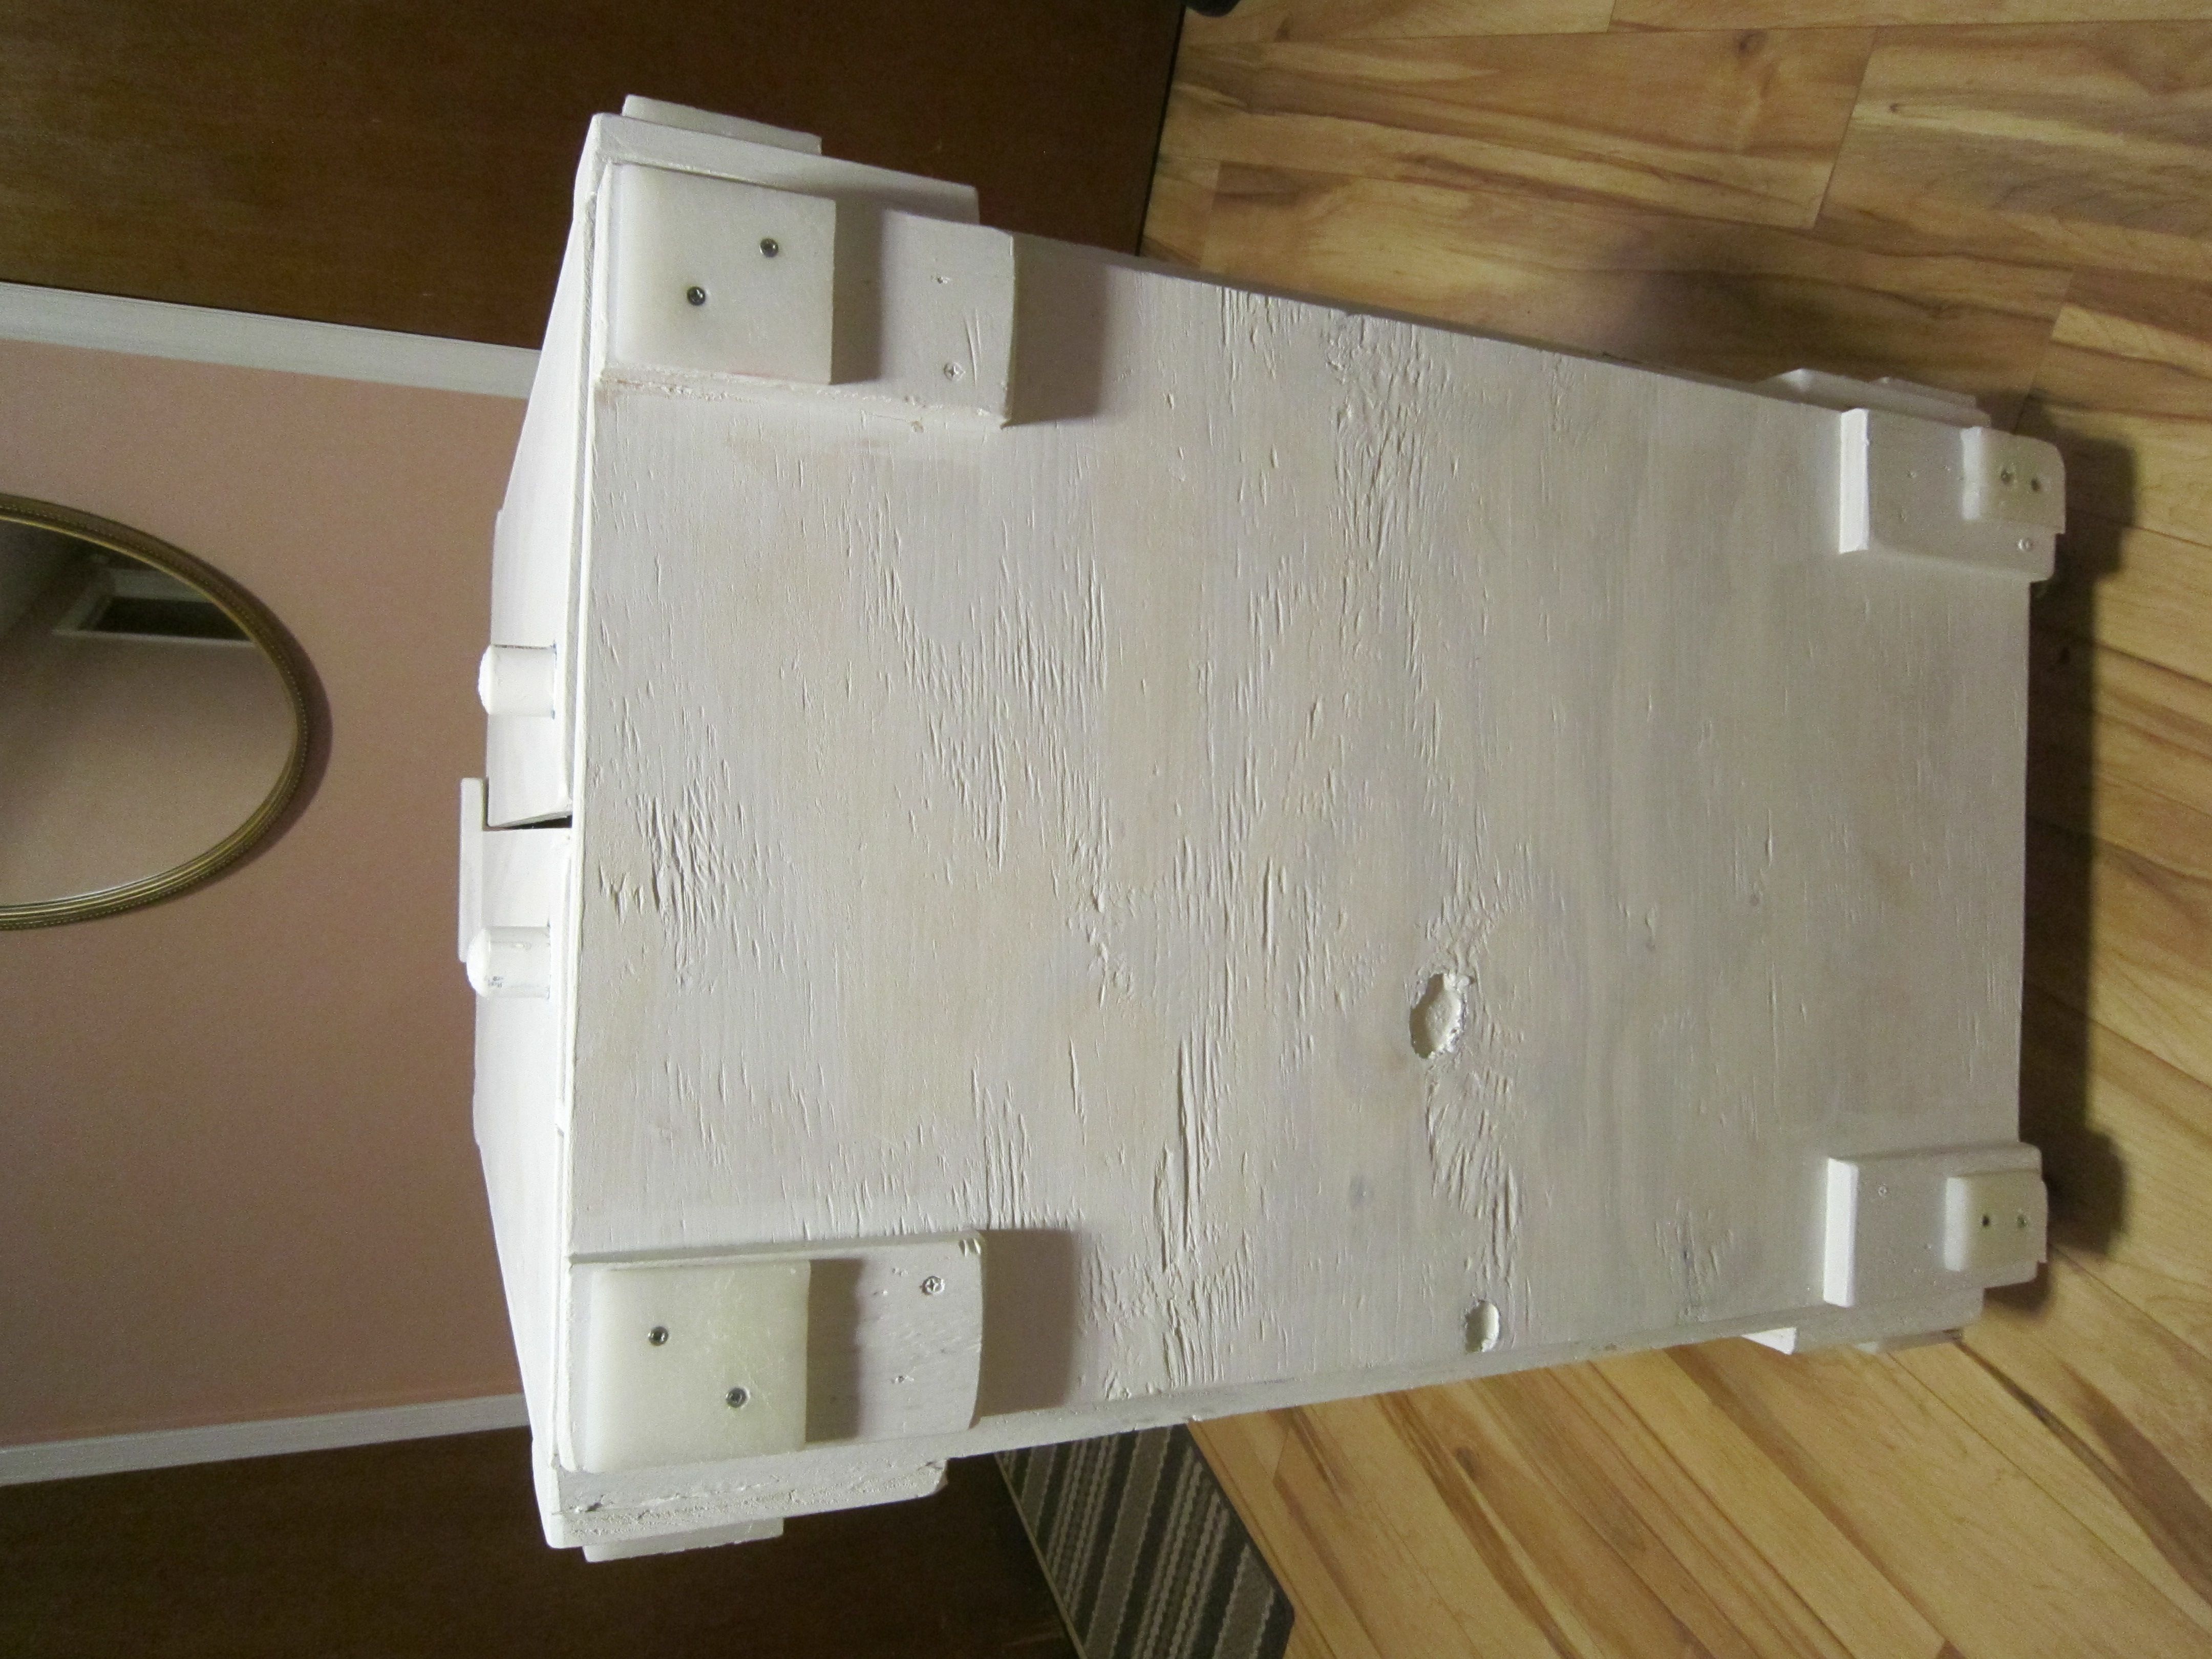
  • 4 Coasters 3" ( $8 12x18 dolly @ harbor freight)
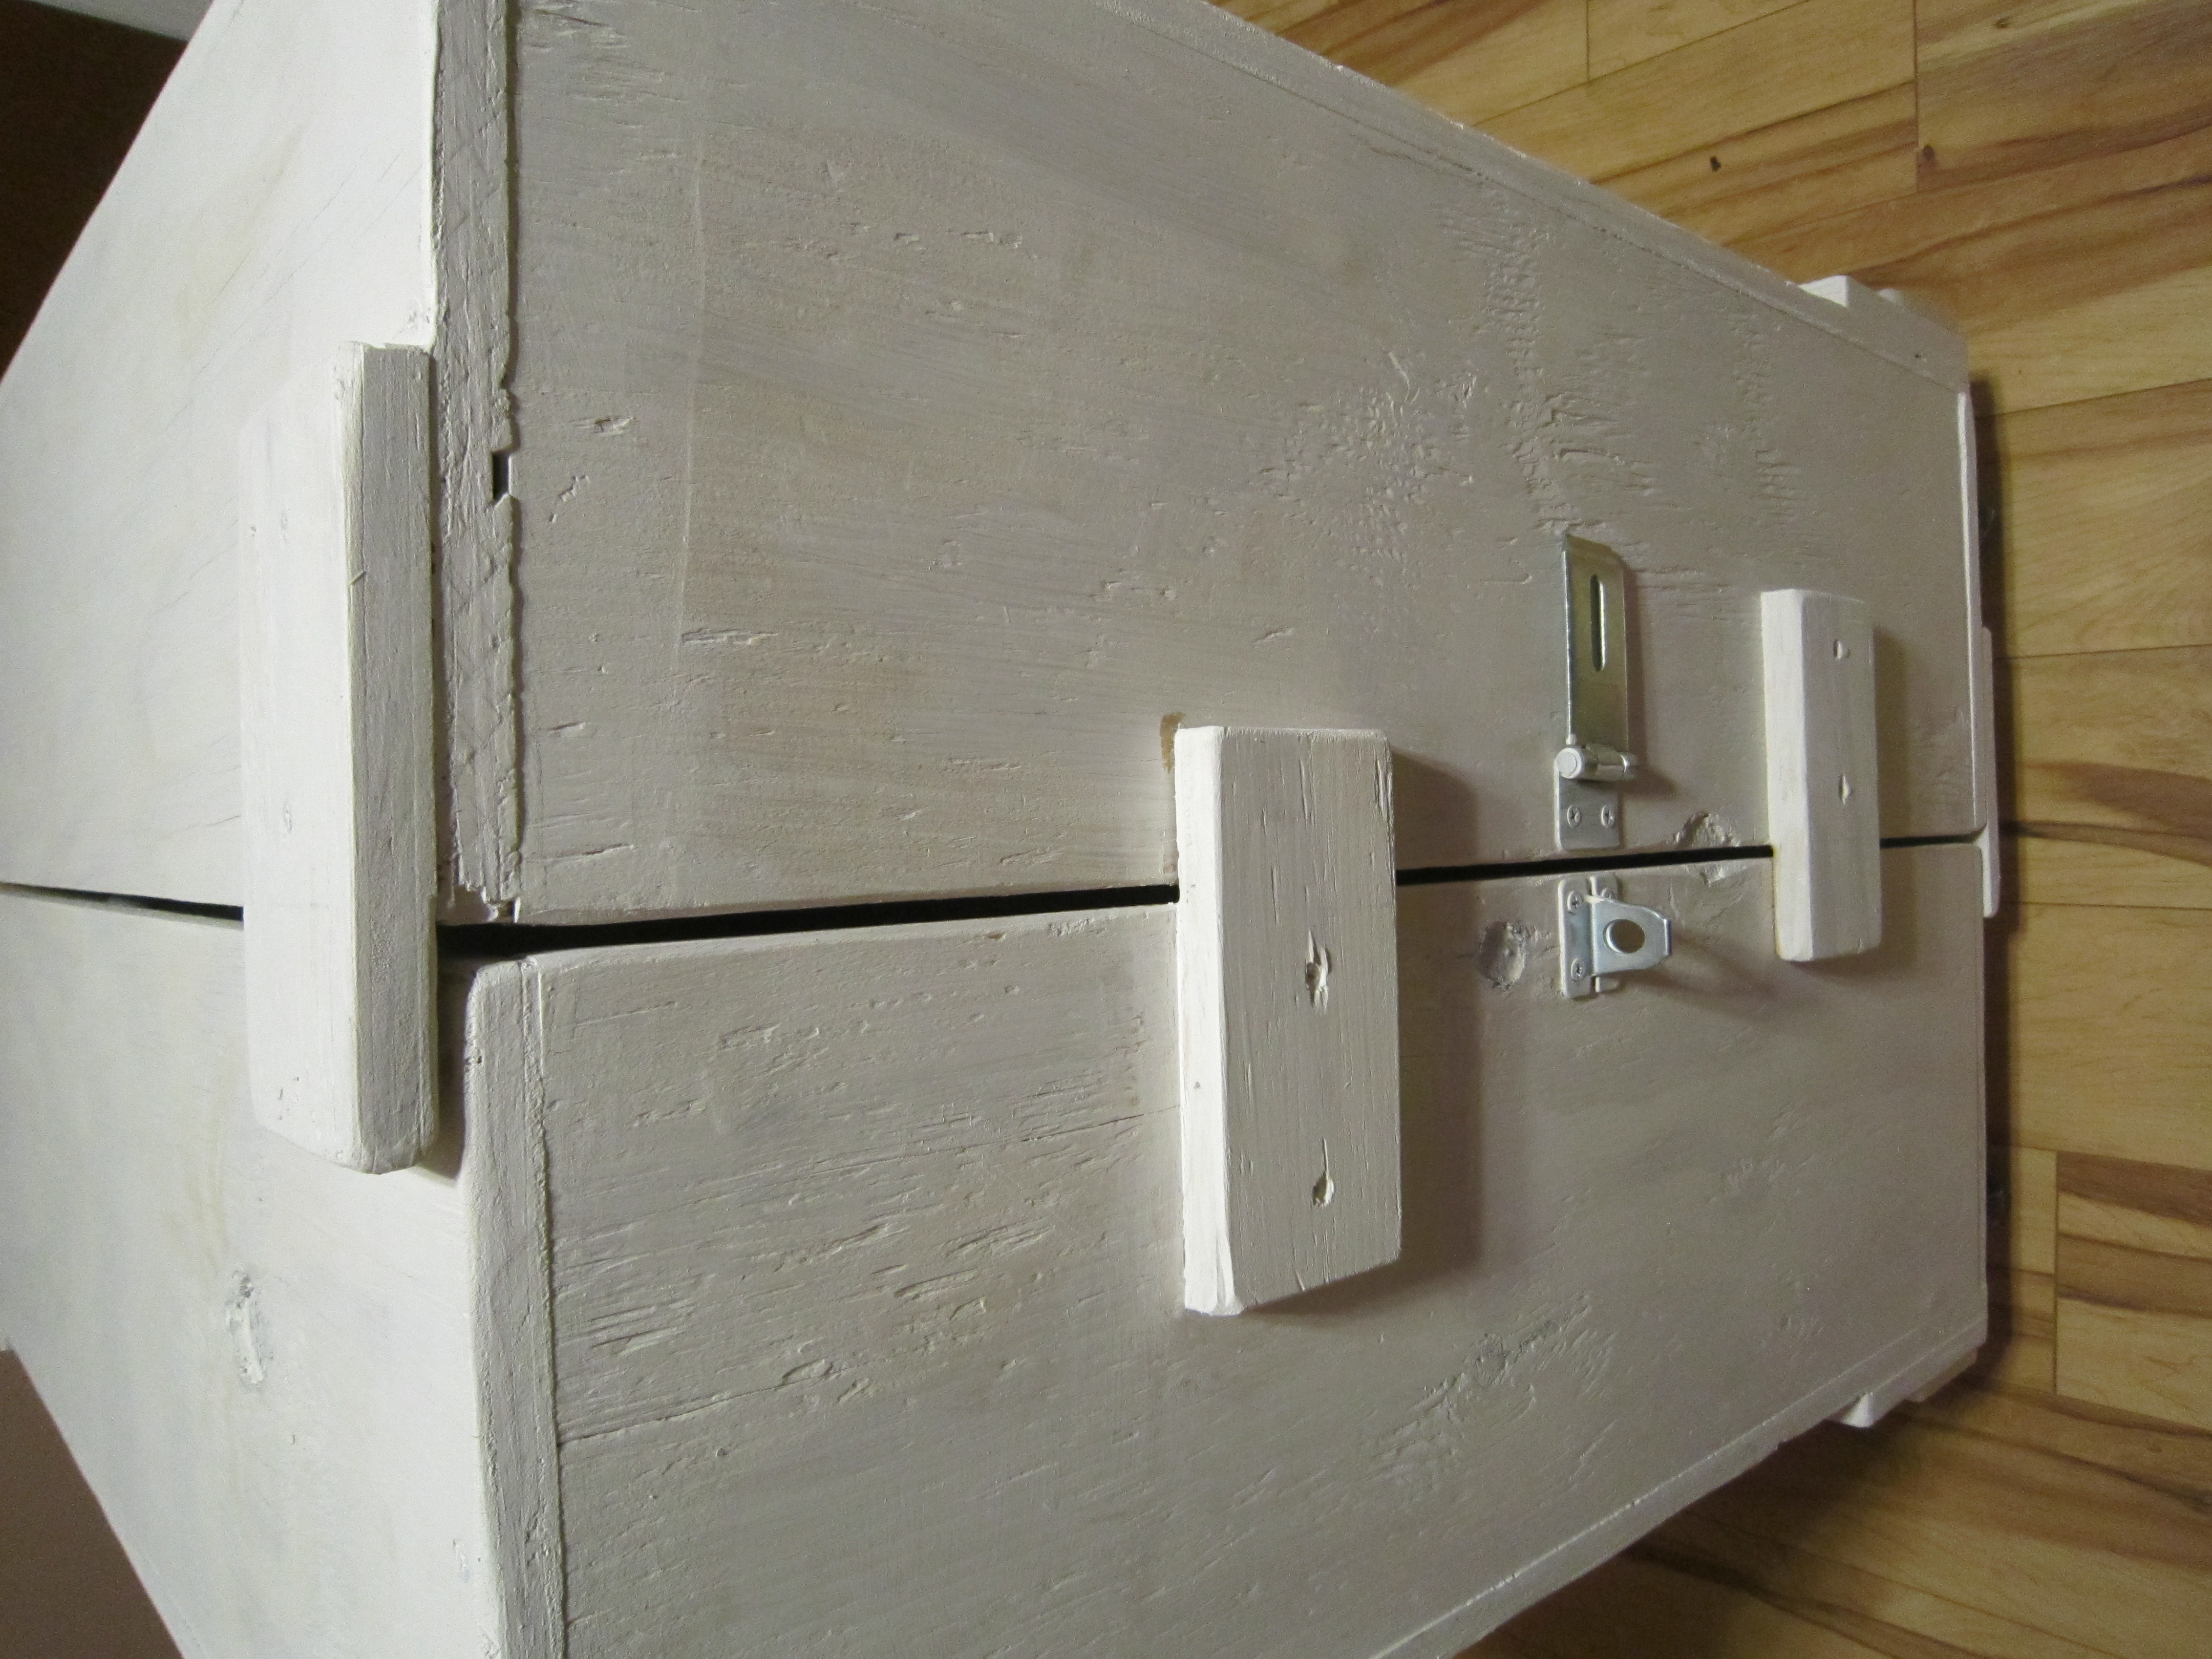
  • 4 Hinges ( $2 each @ harbor freight)
  • 1 Hasp & Staple 3" ($2.29 @ harbor freight)
  • 1 lock ( ~$3 @ harbor freight)
  • 2 1/2" sch 40 pvc pipe 10ft ( $1.98 @ homedepot)
  • 8 1/2" 90 degree pvc elbows ( $0.36 @ homedepot)
  • 4 1/2" pvc caps ( $0.49 @ homedepot)
  • 1 PVC cement ($8 @ homedepot)
  • 1 Sheet of 19/32 or 5/8 plywood ($20 @ homedepot) 
  • Wood Glue ( $3 @ homedepot)
  • 50 coarse thread 1" screws ( $6 @ homedepot)
  • 50 #8 coarse thread 2.5" screws ( $6 @ homedepot)
  • 1 quart exterior paint ( oops paint @ homedepot)
  • thick plastic for making feet ( I used a kitchen cutting board )
  • thread for sawing the tarp ($3 @ Michael's craft store)
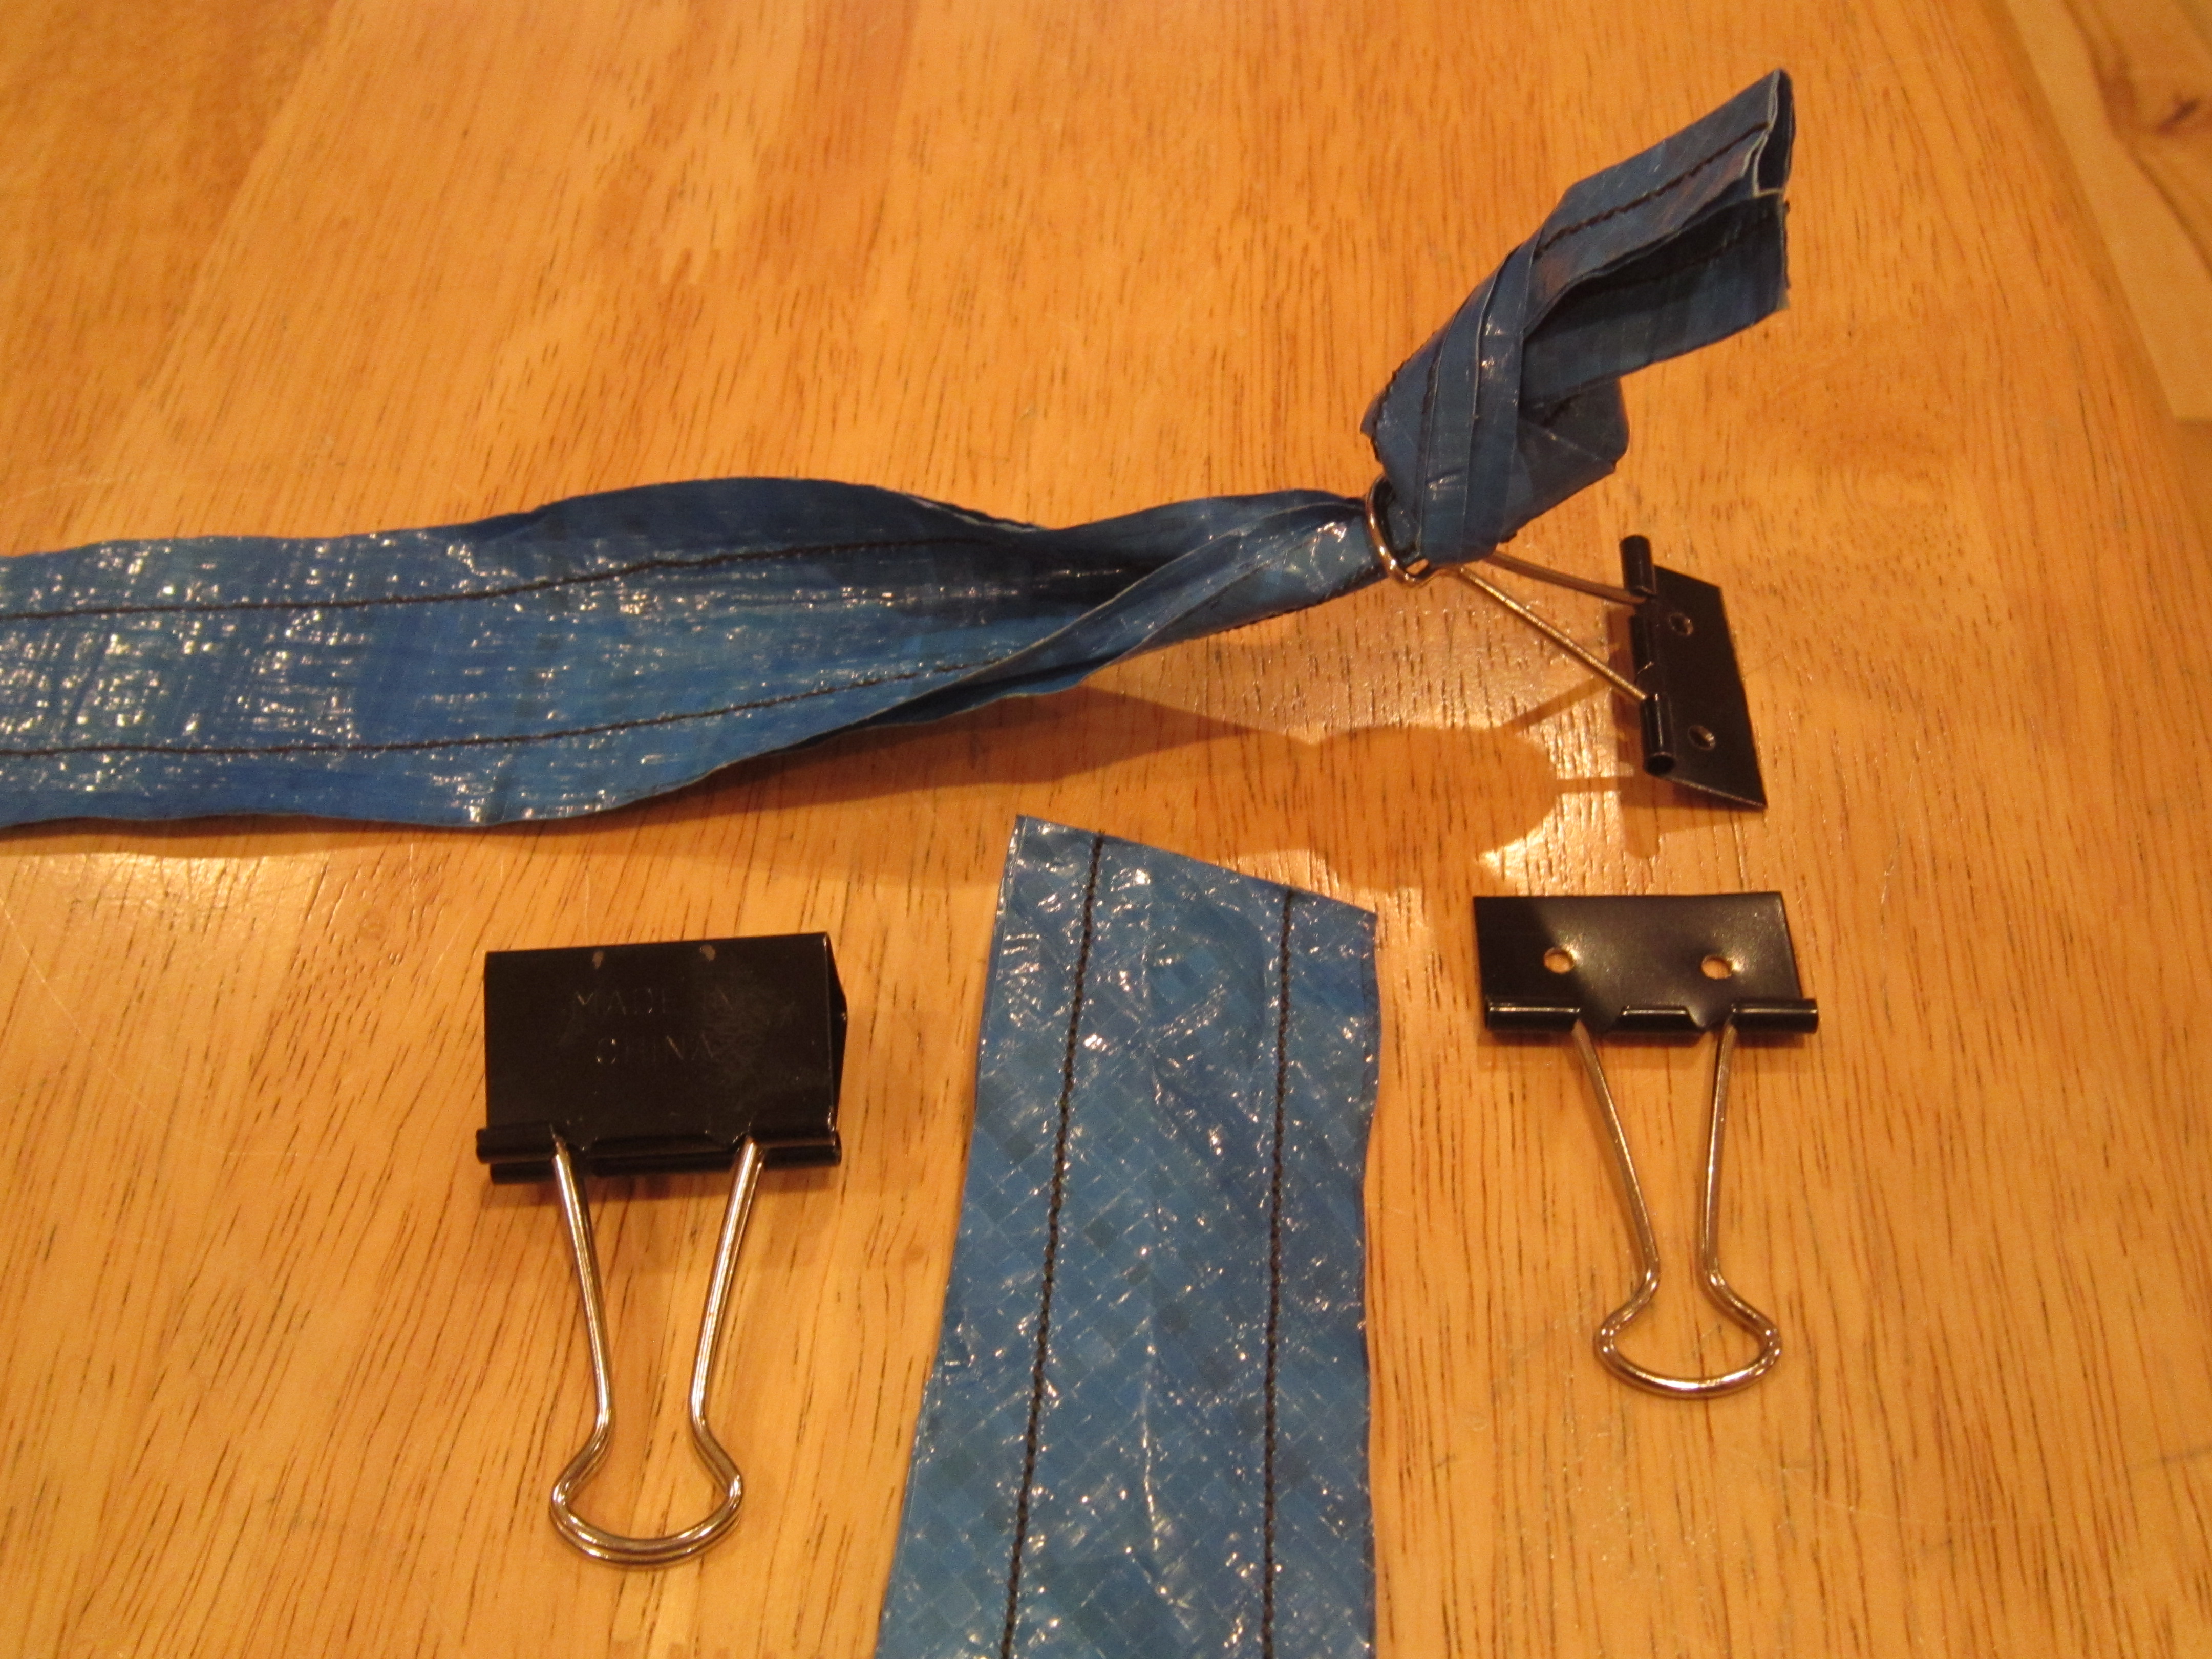
  • 4 medium sized paper clips for attaching the tent straps to base

Tools:

  • measuring tape
  • gloves for working with plywood
  • saw for cutting plywood and pvc pipe
  • drill
  • drill bits to pre-drill screw holes, coaster bolts and paper clips
  • 7/8" drill/spade bit for 1/2" pvc pipe holes
  • hex screw driver
  • pencil for marking wood
  • paper towel for wiping excess glue
  • wrench for disassembling the dolly and attaching the coasters
  • tin snips for cutting paper clips
  • 3" paint brush
  • rasp or alike for rounding sharp corners
  • permanent marker for marking the tarp
  • scissors for cutting the tarp
  • sawing machine for sawing the tarp

Portable Network Graphics (PNG) - 180.57 kB - 04/22/2020 at 00:40

Preview
Download

x-msvideo - 3.22 MB - 03/28/2020 at 04:21

Download

JPEG Image - 2.76 MB - 03/25/2020 at 22:38

Preview
Download

JPEG Image - 2.72 MB - 03/25/2020 at 22:38

Preview
Download

JPEG Image - 3.02 MB - 03/25/2020 at 22:38

Preview
Download

View all 10 files

  • Warning!

    rand328904/04/2020 at 06:26 0 comments

    I've left the empty camper outside for a few days to see how it handles the rain.  Although it's painted outside I've decided to keep the inside natural.  The camper was closed however it soaked a lot of water to the point where the joints on the bottom got saturated and swelled.  If there were any belongings inside, they would be soaked.  Due to this I believe this design has a flaw.  To remedy the problem I would mount the wheels on the sides where the latch for the lock is located.  This would require you to flip the box 180 degrees when in the transport mode.  However this would make the top board solid without any holes and be a much better protection from rain.

    I have also started working on a new version of the camper which will eliminate the crack between the two halves.  Here is an 4x8 ft plywood cutting pattern with sizes in inches.

     AF and BF edges have hinges.  Hinge design also needs to be addressed.  Waterproof hinge  can be made of strong fabric strip covering full length of the joint.  This would solve the problem with water getting in, however it creates a new problem where the hinges can be cut with a  knife breaching the security of the box.  C and D are mounted to the sides of A and E.  This way F and B will also fold in-between  C and D to make a water resistant joint.  Coaster wheels will mount on side C or D.  New tarp cutting pattern for  the tent is needed.

View project log

  • 1
    Building overview

    Cut one sheet of 8x4 feet plywood as shown below:

    Cut the unused 12"x30" piece into 24  3"x5" blocks.
    Lay the pieces out as seen in the second part of the image.
    (Pre-drill all screw holes in the following steps.)
    Attach B,C,J to A with long screws and glue to form a box half.
    Attach E,F,K to D with long screws and glue to form the second half of a box.
    Attach all 3"x5" blocks with glue and 1" screws.
    Wait for glue to dry.

    Attach box halves to panel "I" using four hinges (see pic below).  This is the hardest part of the base build.

    Attach clips.
    Attach plastic or thick rubber feet.  Mine are made from pieces of a cutting board.  Use strips of a car tire?
    Attach four coaster wheels (see pic below).
    Close the box and attach the Hasp & Staple.

    Drill four 7/8" holes for PVC pipe 2.5" from the edges of the box (see pic below).
    Cut the two PVC pipes into two 22", four 28" and four 2" pieces.
    Assemble PVC structure using 90 degree elbows, end caps and PVC glue as seen here:

    Paint the exterior of the base with two coats of exterior grade paint.
    Cut the 7"x9" blue tarp as shown here (parts marked with an "X" are left overs):

    Sew the tarp into the tent shape. The tent base should be 7 feet by 30 inch wide.
    Extend the middle edges of the tarp to reach the bottom of the base using  two left over triangles.
    Cut an incision (entrance) in the middle of the tent from the bottom to the top.
    Sew two left over triangles into a rectangle.
    Sew the rectangle over/under the incision to form a "door" (see video).
    Sew straps to the tent.
    Attach the tent to the base by using the straps.

  • 2
    Blocks

    3"x5" blocks are cut from the unused 12x30 piece of plywood. They are used to reinforce the hinges, reinforce the locking mechanism (hasp & staple), reinforce the coaster wheels, make feet and make the box more rigid.  Blocks at least 5" wide are needed for attaching the 4" hinges.  They make the plywood thicker and allow for stronger attachment points.  To make the box more rigid when folded blocks are attached to one side for vertical alignment and opposite sides of the box for the front alignment. (picture below)  Blocks are glued to the box and in addition attached by several screws.

  • 3
    Clips, straps and sleeves

    On the top of the tent where it touches the PVC pipes, I sewed a couple of sleeves to put the pipe through.  Leave one side of the 90 degree elbow without PVC glue in order to be able to slip the pipe into the sleeve.

    Tent is fastened to the base by eight straps around the perimeter.  Straps are two 1.5 inch wide strips of tarp about 8"-9" long sewn together on the sides.  Straps are adjustable and attach to clips which are fastened to the base about one inch below the edge by two screws.  Clips are made from medium paper clips cut in half. (see pictures).  They are easily cut by tin snips and drilled.  To adjust the strap, you tie a knot and insert it into the clip.

View all 3 instructions

Enjoy this project?

Share

Discussions

[deleted]

[this comment has been deleted]

rand3289 wrote 04/14/2021 at 00:53 point

Thanks!  Please feel free to use the project materials in any way you would like.  They are all in public domain.  I hope someone other than me makes a few of these and gives them to homeless people.  Also, I want to make you aware of this project: https://www.edar.org/  which has very similar goals.  They are a non-profit organization.  Their "carts" are a bit expensive though costing around $500 since they are manufactured commercially

  Are you sure? yes | no

gck3691 wrote 03/24/2020 at 10:04 point

Nice - simple and useful. Perhaps screw/nail some rubber carpet protectors to the surfaces that are in contact with ground when opened up, to protect from rainwater soaking into wood.

  Are you sure? yes | no

rand3289 wrote 03/28/2020 at 00:14 point

Thanks!  I agree about the rubber feet. They are essential to protect the plywood.

  Are you sure? yes | no

Similar Projects

Does this project spark your interest?

Become a member to follow this project and never miss any updates