Close
0%
0%

Raspberry Pi Lunchbox Laptop

A fully functional portable laptop in a lunchbox

Public Chat
Similar projects worth following
Based on a previous project I saw I am creating a Raspberry Pi lunchbox laptop using a Pi 3 B+ and a tin lunchbox.

I've had my Raspberry Pi 3 B+ for about a year and couldn't find a good project for it until I stumbled on to a Pi Lunchbox Laptop idea on Instructables. I liked the basic concept but knew I could improve on it. I decided to place the Pi behind the screen and mount it that way which gave me a lot more room inside to put the battery.

The battery bank was a bit of an issue but (although I haven't tried it out yet) the 10,000 mAh bank should provide sufficient power for the pi and screen. The only downside is that the bank will have to be charged between uses but it is a better design than using the Pi battery chord that came with the kit. There was just no place to put it.

Lunchbox Pi BOM.xlsx

Bill of materials for project

sheet - 10.14 kB - 03/24/2020 at 21:05

Download

  • 1 × Raspberry Pi 3 B+
  • 1 × MINI i8 2.4GHz 3-color Backlight Wireless Keyboard with Touchpad White
  • 1 × Golf 10,000 mAh Li-Po Dual Output Power Bank With 4 Power Indicators
  • 1 × The Tin Box Company 344707-DS Star Wars Vintage Classic Tin Lunchbox, Black
  • 1 × 3.5"TFT Touch Screen Monitor LCD Display+Case+Heatsink For Raspberry Pi 3/2/B/B+

  • The Lunchbox

    jordanbrandes03/16/2020 at 15:35 0 comments

    After some back and forth with Amazon I finally got the lunchbox in the mail on Saturday. All I am missing now is the wireless keyboard.

  • Hooking Up the Battery Bank and Screen

    jordanbrandes03/16/2020 at 15:32 0 comments

    So yesterday I hooked up the 3.5" screen along with two heat sinks and made it external with the 10,000 mAh battery bank. Though I wasn't actively using it the screen was running fine and the bank still had full power after 5 hours of non-stop use.

View all 2 project logs

  • 1
    Load SD card with proper OS

    I used rasbarian but you can do whatever you want

  • 2
    Put screen on Pi

    My tft was very plug and play. Remember to add the heat sinks too.

  • 3
    Properly place inside lunchbox

    This was really the most important step. Make sure everything is lined up and where you want it.  I used velcro so I could take out the parts that would need to be moved or charged. Only the Pi was mounted with double sided mounting tape.

View all 6 instructions

Enjoy this project?

Share

Discussions

Dan Maloney wrote 03/11/2020 at 16:47 point

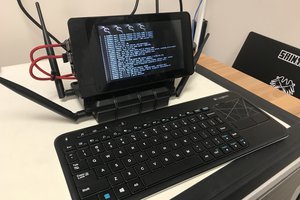
Extra points for the lunchbox. I can practically smell the inside of that...

  Are you sure? yes | no

Similar Projects

Does this project spark your interest?

Become a member to follow this project and never miss any updates