 Tim Schonberger
The aim of this project is to end up with a handheld device with programmable settings for controlling Philips Hue and Nanoleaf lights, rather than having two separate remotes.
I was disappointed to find that there didn't seem to be an easy way to hack the Hue dimmer switch to control both brands of lights (despite it containing an ATMEGA256RFR2), so I decided to build my own.
I'll admit that it may be a bit heavy-handed to use a Raspberry Pi just to make a few network calls, but Python makes it a bit easier to prototype everything out. I may move this over to an ESP32 board in the future.
The Raspberry Pi runs some python code that takes care of menus, applications, input, and display. Originally, the "applications" were intended to just be one-off on/off toggles for lights in my home, but I quickly realized that these could be anything from editing files, controlling network connectivity, etc. The possibilities are endless :D
Hardware
- Raspberry Pi Zero W.
- A perma proto hat is used to connect some pushbuttons to act as GPIO inputs.
- A 128x32 Adafruit PiOLED display
Software
The software is written in Python and operates on a PyGame loop.
In general the code is split up as follows:
API Clients
API clients are implemented for both the Hue and Nanoleaf lights based on the documentation found here:
Philips Hue API Docs (Free account needed)
The clients aren't full implementations of the API. Only the parts relevant to this project are included.
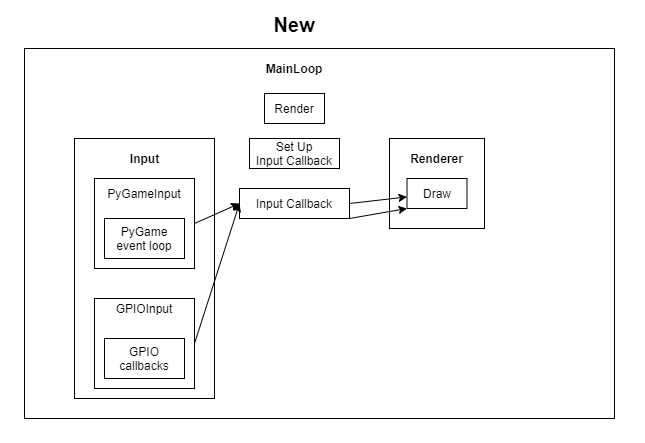
Display Logic
I didn't want to develop directly on the Pi because I enjoy the facilities provided by an IDE. To make running on a desktop computer vs on the Pi easier, I abstracted out the rendering code to be platform independent. The only thing that differs is the code that either chooses to render text to a PyGame window, or to the OLED display. The PyGame loop doesn't know or care which one.
Input
The logical buttons that are understood by the program are defined in an enum. Like the display logic, there's an abstraction layer for the input. One implementation reads PyGame keyboard events and converts them to logical buttons, another interprets GPIO inputs.
Menus
The base menu class includes code to handle input and render up to 4 lines of text.
Menus can be nested. Leaves can be considered the "apps". For example, we might have one app that controls the lights in one room, one app that displays system info, etc.
The nested menu system operates on a stack. At any given point, the main loop peeks at the top of the stack, renders that menu, and uses that menu to interpret input.
When entering a menu or a leaf, that menu gets pushed onto the stack.
When going back, the top menu is popped.


 facelessloser
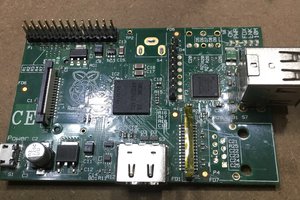
 Myles Eftos
 Craig Hissett
 Kyle F