Close
0%
0%

Lights Camera

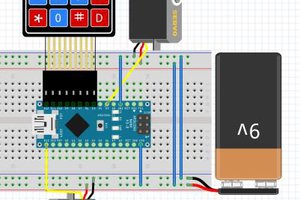
Light ring for a DSLR Camera.

Public Chat
Similar projects worth following
This project centers around a NeoPixel style 24 LED ring module. The LEDs are controlled by an Arduino Nano. The aim of this project is to provide illumination for a camera for desk photography. The light ring, hotshoe mount, and Arduino enclosure are all 3d printed from PLA.

Currently this project is complete. It was supposed to be a quick build to fulfill a particular requirement with the components that I had at hand. The current generation/build has met these requirements however it is far from polished, and I may, in the future revisit this project. There are a few things that I would change or improve on if I were to build this again, particularly with the light control. Ideally the use of three potentiometers to control each colour channel individually would be better.

Fritz.png

This diagram show an Arduino uno. The wiring and sketch should work for either. Feel free to mix it up :)

Portable Network Graphics (PNG) - 334.00 kB - 04/10/2020 at 07:39

Preview
Download

RoadMap.png

Basic manual of operation. This could be greatly improved.

Portable Network Graphics (PNG) - 176.11 kB - 04/10/2020 at 05:47

Preview
Download

200404Nano_firmware.ino

The Arduino sketch. I had to use the old boot loader to upload this to the Nano. It should also work on most Arduino boards.

x-arduino - 3.22 kB - 04/10/2020 at 05:07

Download

light holder.scad

The openSCAD file for all the light holder components. May not be reader friendly, however added here so that others may modify the components for their own use. The base design for the hotshoe came from Raster (Hot Shoe Mount by raster 06NOV2012. From Thingiverse).

scad - 4.03 kB - 04/10/2020 at 04:58

Download

box.scad

The openSCAD file for all the light holder components. May not be reader friendly, however added here so that others may modify the components for their own use.

scad - 5.26 kB - 04/10/2020 at 04:58

Download

View all 13 files

  • 1 × Duinotech RGB LED Circular Board From Jaycar. cat No: XC4385
  • 1 × Arduino Nano
  • 2 × resistor to use as pull down resistors
  • 2 × 3.5mm SPST micro tactile switch Jaycar CAT No: SP0602. Almost any switch will do
  • 1 × 10k ohm potentiometer (logarithmic) Just an old one I had laying around

View all 7 components

  • End of build thoughts.

    C.E. Daedalus04/10/2020 at 06:42 0 comments

    10 April 2020.

    The first generation of this project is complete. It is the first one that I am uploading to HackaDay. I had no intention of uploading this when I started. None of the code was written with others in mind. I have supplied it here for the curious. While the actual assembly of this project is simple, it wasn't documented. If I revisit this project I shall certainly fix this.

    This was supposed to be a quick day/weekend build.....it wasn't. I have never worked with these types of LEDs before. While it wasn't hard to learn it was one unforeseen obstacle. The code took a bit of nutting out, and it was based around what hardware I had available for inputs. The code and electrical prototyping was relatively quick, taking the weekend. What really chewed time was the printed parts.

    I have only recently acquired a 3d printer (snapmaker v1). This machine is easy to set up and use, and a few test prints and little bits and pieces have gone well. However I found the larger parts of the project peeling of the heated bed, in particular the main enclosure. This was quite frustrating as it was a long print. The solution I found was to use a thin layer of stick glue (an ancient "UHU stic") on the heated bed, as well as using a "brim". This has worked fantastically and is now my default way to print. This glue is reasonably easy to clean off after the print.

    Another hurdle was the actual CAD designing. This was one of my first times using CAD software. I have been using openSCAD. I found this pretty easy to work with as the way the designs are coded has a similar structure to Arduino code. The tricky bit was getting all the components to fit where I wanted them, and allowing some clearance between them. This took a bit of trial and error to get right (and having prints fail didn't help).

    Overall I'm happy with result. If I were make this again I would change the 3d printed arm design to allow more movement. Also I would use three potentiometers to control the colour rather than the over complicated button setup I currently have.

    While this project was designed to help with photography, it could as a whole or in part, be adapted for other uses. One thing that came to mind while building this was that it could be used to make an interesting light display.

    Again, this projected was started without a thought to documenting the build process. It makes it harder to have to organise all your thoughts, pictures, code etc after the fact. Next time I will try to do all this as I go.

    'Till next time :)

View project log

  • 1
    The overall build process.

    1. Learn how to control the LEDs.

    2. Work out what components I needed for inputs (I didn't have a lot to work with here).

    3. Make an Arduino sketch that could control the LEDs with what components I did have.

    4. Prototype the electrical circuit.

    5. Design and print and enclosure for the Arduino Nano and buttons. This also meant learning how to use openSCAD and overcoming printing issues.

    6. Design and print the hotshoe mount, extension arms and holder for the LED ring.

    7. Assemble the printed parts. A hot glue gun was used to secure the LED ring, the NANO, and the little circuit board in place.

    8. Test it out.

    9. Upload to HackaDay!

View all instructions

Enjoy this project?

Share

Discussions

Similar Projects

Does this project spark your interest?

Become a member to follow this project and never miss any updates