 Silícios Lab
How do I change the name of my bluetooth module?
Have you noticed how interesting it is when we buy a device with Bluetooth and the signal is named with the name of the brand or device?
I speak of this, as I have always been curious to understand how it works and to name the module with the name of my own project.
It's simple, but it makes a difference in two points: identifying the module when pairing and customizing your prototype with the device name.
I imagine you have this problem or, at the very least, be curious to learn how to implement this functionality in your prototype module.
Although it is quite simple, I want to teach you how to do yours and not have any more problems.
To understand this configuration, you will learn the following points in this reading:
- How to connect the Bluetooth module on Arduino;
- What they are and how to use the AT commands in the configuration of the Bluetooth Module;
- How to test if the communication between the Bluetooth module and the Arduino is working;
- How to configure the speed;
- How to change the name of the bluetooth device;
- How to configure the password to access our bluetoooth module.
Wow! How much information I am willing to give you. Rest assured that everything is organized and I will deliver everything as simply as possible.
The Bluetooth Module with Arduino
I want to start by telling you about the importance of knowing the Bluetooth module and its connection process with the Arduino. When buying, you will find modules HC-05 and HC-06.
These are two modules widely used by the Arduino community. The main difference between these modules is that the HC-05 module can function as a master or slave.
Thus, the slave mode allows it to have a communication initiated by another device and the master mode allows the Bluetooth module to initiate communication with any other Bluetooth device.
Finally, the HC-06 Bluetooth module works only as a slave mode.
Now, I want to introduce you to the basic structure that you can use to communicate your Bluetooth module with your Arduino.
There are actually two ways, but I'll explain why that way is useful for your projects.
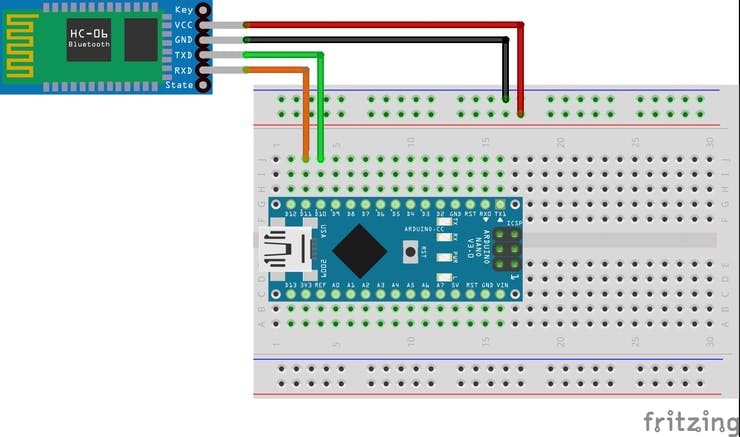
I chose to present you with this model in the Figure below, as we will use the TX and RX pins for serial communication. Therefore, they will be busy and we will not be able to share the same pins with Bluetooth communication.
To avoid this problem, we will use the SoftwareSerial library, to simulate other serial pins on ports 10 and 11 of the Arduino, as shown in the following Figure.
From the assembly diagram above, we will see how to configure our own device.
The configuration process using AT Commands
The term AT comes from the word ATtention. These commands are instructions used to operate the Bluetooth module. In this command structure, any and all instructions must begin with the prefix AT, such as AT + COMMAND.
Therefore, it will be through these commands that we will configure our Bluetooth Module. To know which commands to use, it is important that you access the datasheet of your Bluetooth module.
There you will find all the instructions available for configuring the module.
Now, I will start the configuration of the HC-06 module and provide the links to access the Bluetooth manuals HC-05 and HC-06.
Now, to configure the Bluetooth module, we need a code to send the AT commands.
The code to send the AT commands for the Bluetooth module
The code below is used to send the AT instructions via the Arduino serial and send them to the Bluetooth module.
#include <SoftwareSerial.h>


SoftwareSerial mySerial(10, 11); // RX, TX
String command = ""; // Stores response of bluetooth device
// which simply allows \n between each
// response.

void setup()
{
// Open serial communications and wait for port to open:
Serial.begin(115200);
Serial.println("Type AT commands!");
// SoftwareSerial "com port" data rate. JY-MCU v1.03 defaults to 9600.
mySerial.begin(9600);
}

void loop()
{
// Read device output if available.
if (mySerial.available())
{

while(mySerial.available())
{ // While there is more to be read, keep reading.
command += (char)mySerial.read();
}
Serial.println(command);
command = ""; // No repeats

}

// Read user input if available.
if (Serial.available())
{
delay(10); // The DELAY!
mySerial.write(Serial.read());
}

}
The code above is used to receive AT commands, which are sent by the Arduino IDE. From the commands received by the IDE, they will be sent to the Bluetooth module to configure its functionality.
After all, how to know if the module is working and responding to commands sent by Arduino?
This is one of the questions that many people ask when there is a problem in the transmission or reception of data. Many imagine that the module is damaged and do not understand how to analyze these problems.
That's why I always speak and repeat, get to know the module's control and configuration functions. They will help you to interpret possible misbehavior in your application.
I speak of this because I want to tell you about the AT function, as shown in the following Figure.

Figure 2 - AT command to test communication between Arduino and the Bluetooth Module.
This function is responsible for testing the communication between your Arduino and your module. Thus, every time you execute the AT command, the module must send the message OK to the serial monitor of the Arduino IDE.
This OK message helps us to conclude that our module is working and is communicating correctly with the Arduino.
After this command, we need to prepare the module to work at the same serial communication speed as the Arduino.
How do we configure the communication speed of the Bluetooth Module?
I often say that this is one of the points that many people miss. They choose a serial communication speed on the Arduino, however, the transmission speed of the Bluetooth module is set to another value.
It is obvious that this will present a communication problem and, many times, people do not know how to detect these problems, as they do not understand how to configure a module using AT commands.
The consequence of this is that users indicate problems with the module's functioning, however, the truth is that the module is configured in an inadequate way for the application.
To avoid this problem, perform the tests from the AT command and use the AT + BAUDX configuration command, to set the baud rate of the Bluetooth module.
The X value represents the configured speed parameter, as shown in the items below.
- Baud Rate Value
- 1 1200
- 2 2400
- 3 4800
- 4 9600 (default)
- 5 19200
- 6 38400
- 7 57600
- 8 115200
- 9 230400
First, check the speed used for your serial communication and adjust the speed of your module to the same transmission rate. Therefore, if you use the command-line AT + BAUD8, your Bluetooth module will be configured with a baud rate of 115200bps.

Figure 3 - Configuring Baud Rate of the Bluetooth Module.
That way, you have complete control of the communication speed and avoid communication errors between your module and the Arduino.
In addition to the speed, we must configure two parameters of great importance: the module name and its password. These parameters are essential to establish communication between a device and the Bluetooth module.
After all, how to configure these two parameters?
First, giving a name to your module is fundamental by two points: identification of your device in the list and second, inserting the name of your device/brand in the module itself.
To perform this procedure, use the following AT + NAME statement. From there, use the following instruction: AT + NAMEsilicioslab as is shown in Figure 4,

Figure 4 - Configuring the name of the Bluetooth Module.
After executing this command, the module will be named silicioslab.

Figure 5 - Cellphone connected in bluetooth module named of silicioslab.
In addition to changing the name, it is important to set a password for users. The password is defined from the following instruction AT + PINXXXX.
From this instruction, you must choose a 4-number password and execute the following command, for example: AT + PIN4444.
When this command is executed, the new password to access the module will be 4444.

Figure 6 - Configuring the Pin Password of the Bluetooth Module.
Therefore, from the steps presented above it is possible to configure the entire Bluetooth module and ensure that your communication with the Arduino will be carried out safely.
Safety in the execution of communication in the Project
This information is guaranteed because through the AT configuration instructions it is possible to:
- Test the communication between Arduino and Bluetooth;
- Test faults in the functioning of the Bluetooth module, because in case of failure it will not respond;
- Configuration of the transfer speed of the module, because in some cases the speed is different from the speed programmed for the Arduino. Consequently, the transmission will fail and the user may suspect that there are problems with the module. However, this is a configuration failure and knowledge of the AT configuration instructions.
- The name facilitates the identification and pairing of the module in a list of devices;
- Finally, the password determines the security of data transmission access between devices.
In this way, it is possible to understand how important it is to master the instructions and the datasheet of the devices.
In addition to having control of the settings, we can guarantee an adequate functioning of the module structure in our applications.
So, learn to master the features and create secure applications in your projects with the Bluetooth module.
Acknowledgment
To finish, we thank you for your reading and the support of PCBWAY.COM for supporting Silício Lab in the production of this article for you.
The Silícios Lab thanks UTSOURCE to offer the electronic components for this project.