Close
0%
0%

Internet Speedometer

A fun way to monitor your internet traffic!

Similar projects worth following
With complete lockdown going on in India, everything including mail services has been closed. No new PCB projects, no new components, nothing! So to overcome the boredom and to keep myself busy, I decided to make something from the parts which I already have at home.

I started searching from the pile of electronics junk and found an old, broken analog multimeter. I salvaged the 'meter movement' from it and decided to display some kind of information but didn't exactly know what. First, I thought of displaying COVID-19 stats but there are already many better projects on the internet. Also, the data is updated after a few hours and a still pointer of the meter would be boring. I wanted data that changes quickly, changes every second. I asked for suggestions on Instagram and one of my followers replied with Internet Speedometer. It sounded interesting and decided to make it!

As always before starting with the project I did a bit of research on the internet. I found a few projects related to this topic. They were of two kinds. One which showed internet speed by measuring the 'strength' of the WiFi signal. I am not a networking expert guy but this did not sound right. The others measured the latency and categorized speed as slow, medium or fast. Latency is the time delay between sending the request and getting the response and so it cannot be the actual representation of the internet speed. We can call it a network response speed though! Then there were legit projects which measured the time required to download some data and calculated the internet speed based on that.

But it was in this project (by Alistair) that I learnt about Simple Network Management Protocol or SNMP. Using SNMP, we can communicate with the WiFi router and get the required data directly from it. Easy, right? Actually, no! Because different models of WiFi routers use have different settiings and need a lot of trial and error before you finally get the output. Don't be scared. I will explain in brief whatever I learnt about SNMP and the difficulties I faced in the upcoming steps.

So the plan is to use NodeMCU to connect to the WiFi Router. These are the steps to get to the final output:

  • Send a request to the router 'requesting' the required data
  • Get the response from the router
  • Analyse the response and parse the required data from it
  • Convert the 'raw' data into understandable information
  • Generate voltage proportional to the internet speed for the meter
  • Repeat

I will be using a DAC or Digital to Analog Converter for controlling the meter.

Internet_Speedometer.ino

Open the code in Arduino IDE and upload it to NodeMCU

ino - 8.70 kB - 05/03/2020 at 05:42

Download

Schematic_InternetSpeed.pdf

Adobe Portable Document Format - 145.22 kB - 05/03/2020 at 05:41

Preview

  • 1 × ESP8266 NodeMCU WiFi Module
  • 1 × MCP4725 Data Converters / Digital to Analog Converters (DACs)
  • 1 × Analog Meter Movement

  • 1
    Calculating Full-scale Deflection Current

    Skip this step if you already know the full-scale deflection current for your meter. My meter had no mention of it so I had to calculate. But first, let us quickly see how does such a movement work. It consists of a coil suspended in a magnetic field. When current flows through the coil, according to Faraday's law, it experiences a force. The coil is allowed to rotate freely in the magnetic field and so does the pointer which is attached to the coil. The magnitude of current which makes the pointer move at the 'end of the scale' is called full-scale deflection current. This is also the maximum current which must be allowed to flow through the coil.

    There's a lot more going on but this is enough for what we are doing. We now have the movement. It can be used as a voltmeter by adding a high resistance in series with it or as an Ammeter by adding a small resistance in parallel to it. We will be using it as a voltmeter to display the voltage proportional to the internet speed. So, we need to calculate the resistance which is to be added in series. For that, we first need to calculate the full-scale deflection current.

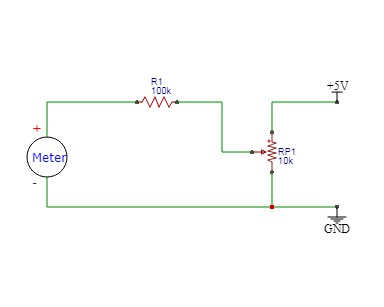
    1. Choose a high resistance value (like >100k)
    2. Connect it in series with the movement and apply a variable voltage across it using the pot.
    3. Keep increasing the voltage slowly till the pointer reaches the end of the scale.
    4. Using a multimeter, measure the current flowing through. This is the full-scale deflection current. (I = 150uA in my case)

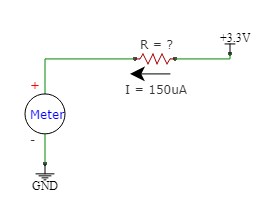
    We are using a DAC which has the output voltage range from 0 to VCC (3.3V due to NodeMCU). This means that when 3.3V is applied to the meter, it should point at the end of the scale. This can happen when full-scale deflection current flows through the circuit when 3.3V is applied. Using Ohm's Law, 3.3/(full-scale deflection current) gives the value to resistance to be inserted in series.

  • 2
    Creating SNMP GET Request

    Simple Network Management Protocol (SNMP) is an Internet Standard protocol for collecting and organizing information about managed devices on IP networks and for modifying that information to change device behavior. Devices that typically support SNMP include cable modems, routers, switches, servers, workstations, printers, and more. For this build, we will be communicating with our WiFi Router using SNMP and get the required data.

    But first, we need to send a request known as a 'GET Request' to the router mentioning the details of the data which we want. GET Request format is shown in the picture. The request consists of various parts. I have highlighted the bytes which you might want to change.

    Please note that everything is in Hexadecimal.

    SNMP Message -In my case, the length of the entire message is 40 (grey color) which when converted to hexadecimal is 0x28.

    SNMP Community String - The value 'PUBLIC' is written in hexadecimal as '70 75 62 6C 69 63' whose length is 6 (yellow).

    SNMP PDU Type - In my case, the length of the message is 27 (blue) i.e. 0x1B.

    Varbind List Type - In my case, the length of the message is 16 (green) i.e. 0x10.

    Varbind Type - In my case, the length of the message is 14 (pink) i.e. 0x0E.

    Object Identifier -

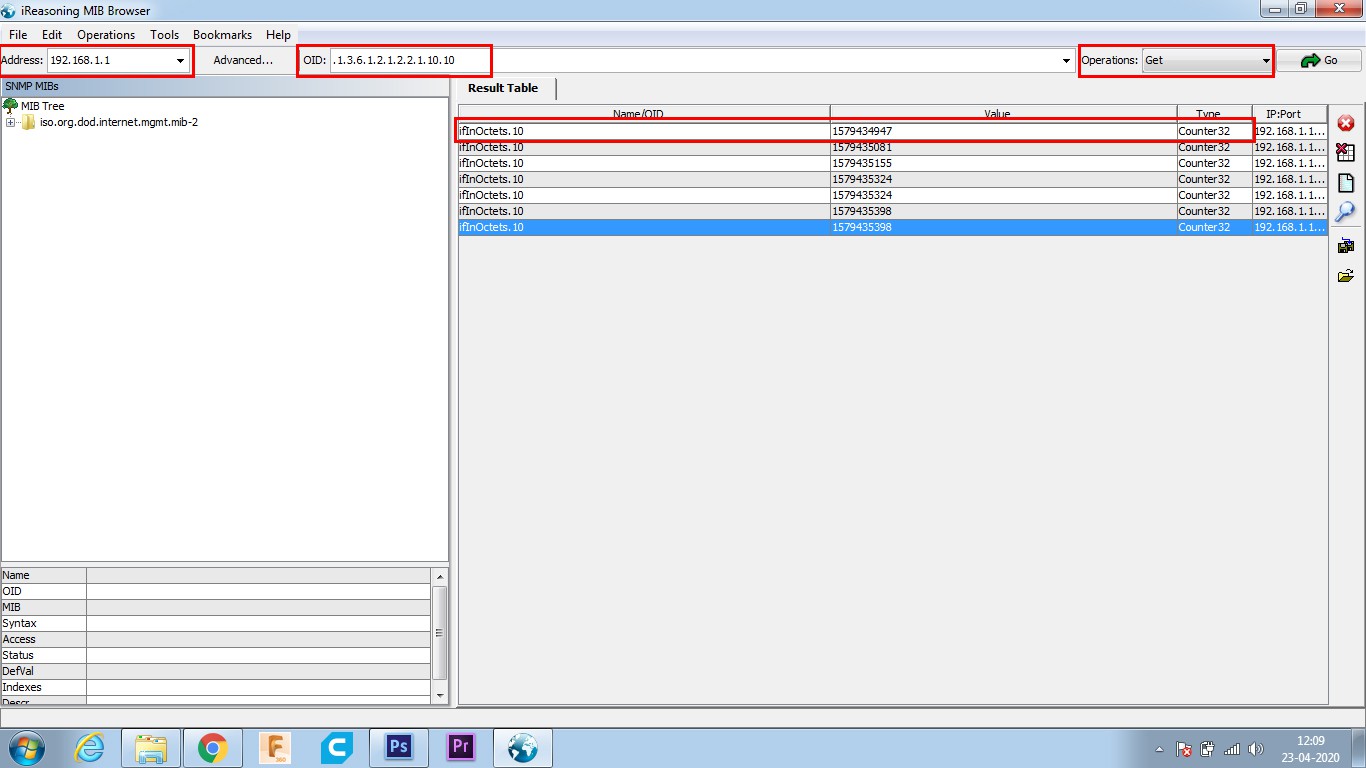
    As mentioned earlier, SNMP-enabled network devices (e.g. routers, switches, etc.) maintains a database of system status, availability, and performance information as objects, identified by OIDs. You need to identify the OIDs of your router for Upload and Download packets. It can be done using a free MIB Browser like this one.

    Enter Address as 192.168.1.1 and OID as .1.3.6.1.2.1.2.2.1.10.x (ifInOctets) or .1.3.6.1.2.1.2.2.1.16.x. (ifOutOctets)Select Get operation and click on Go. You should see the OID along with its value and type.

    In my case, the length of the message is 10 (red) i.e. 0x0A. Replace the value with the OID. In this case, '2B 06 01 02 01 02 02 01 10 10'

    That's it! Your request message is ready. Keep the rest of the bytes as they are.

    Turning ON SNMP on your router:

    • Log on to your WiFi router's page through the default gateway. Type 192.168.1.1 in your browser and press enter. By default, the username and password should be 'admin'.
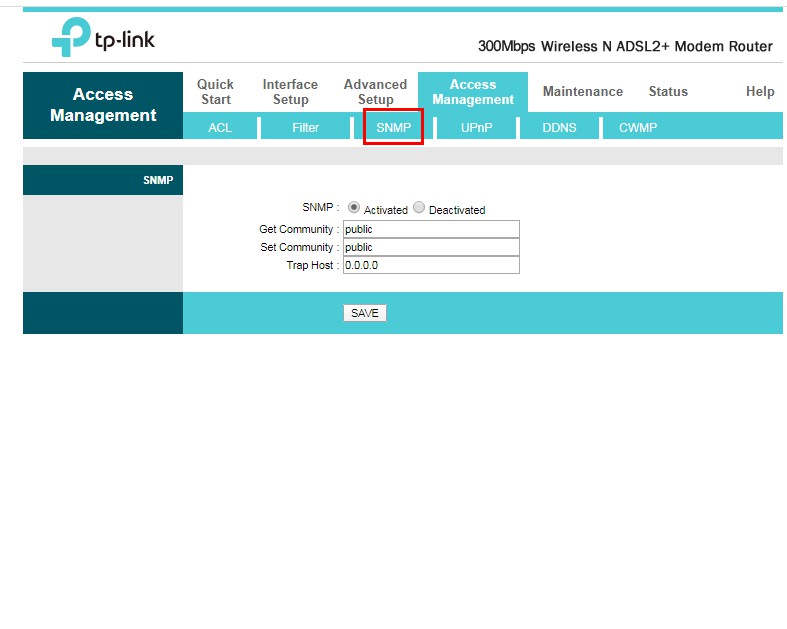
    • I am using a TP-LINK (TD-W8961N) router. For this router, you have to go to Access Management > SNMP and select 'Activated'.
    • GET Community: public
    • Trap host: 0.0.0.0
  • 3
    Understanding GET Response

    You can skip this step, but it's good to know if you need to do some troubleshooting.

    Once you upload the code and run it, you can take a look at the response through the Serial monitor. It should look like as shown in the picture. There are a few bytes you need to look for which I have highlighted.

    Starting from 0,

    15th byte tells the PDU Type - 0xA2 means that it is a GetResponse.

    48th byte tells the data type - 0x41 means that the data type is Counter.

    49th byte tells the length of data - 0x04 means that the data is 4 bytes long.

    Byte 50, 51, 52, 53 contains the data.

View all 7 instructions

Enjoy this project?

Share

Discussions

faizytmst wrote 04/27/2023 at 11:32 point

Impressive! what an amazing idea. Literally I am working on a same type of project you can visit TM speed test to learn about it.

  Are you sure? yes | no

nmassociates76 wrote 11/22/2021 at 06:45 point

I love your idea. I worked on this type of project almost 3 years ago and it took me 3 months to complete this project. But unifi speed test was a masterpiece for me. It’s one of my starting projects I created to upgrade my portfolio.

  Are you sure? yes | no

nmassociates76 wrote 11/22/2021 at 06:43 point

There are many tools and app available that shows you your 4G speed. But only TM Speed Test shows the exact speed results. This tool is free and easy to use. You can also find some tips to increase your speed on this site.

  Are you sure? yes | no

twarwick.hu wrote 09/21/2021 at 06:26 point

Wow what an impressive idea literally I am working on a same type of project you can visit TM speed test to learn about it.

  Are you sure? yes | no

Allan wrote 05/05/2020 at 13:26 point

Show, Good Job.

  Are you sure? yes | no

Dan Maloney wrote 05/04/2020 at 20:10 point

Love the look of that meter. Nice job!

  Are you sure? yes | no

Similar Projects

Does this project spark your interest?

Become a member to follow this project and never miss any updates