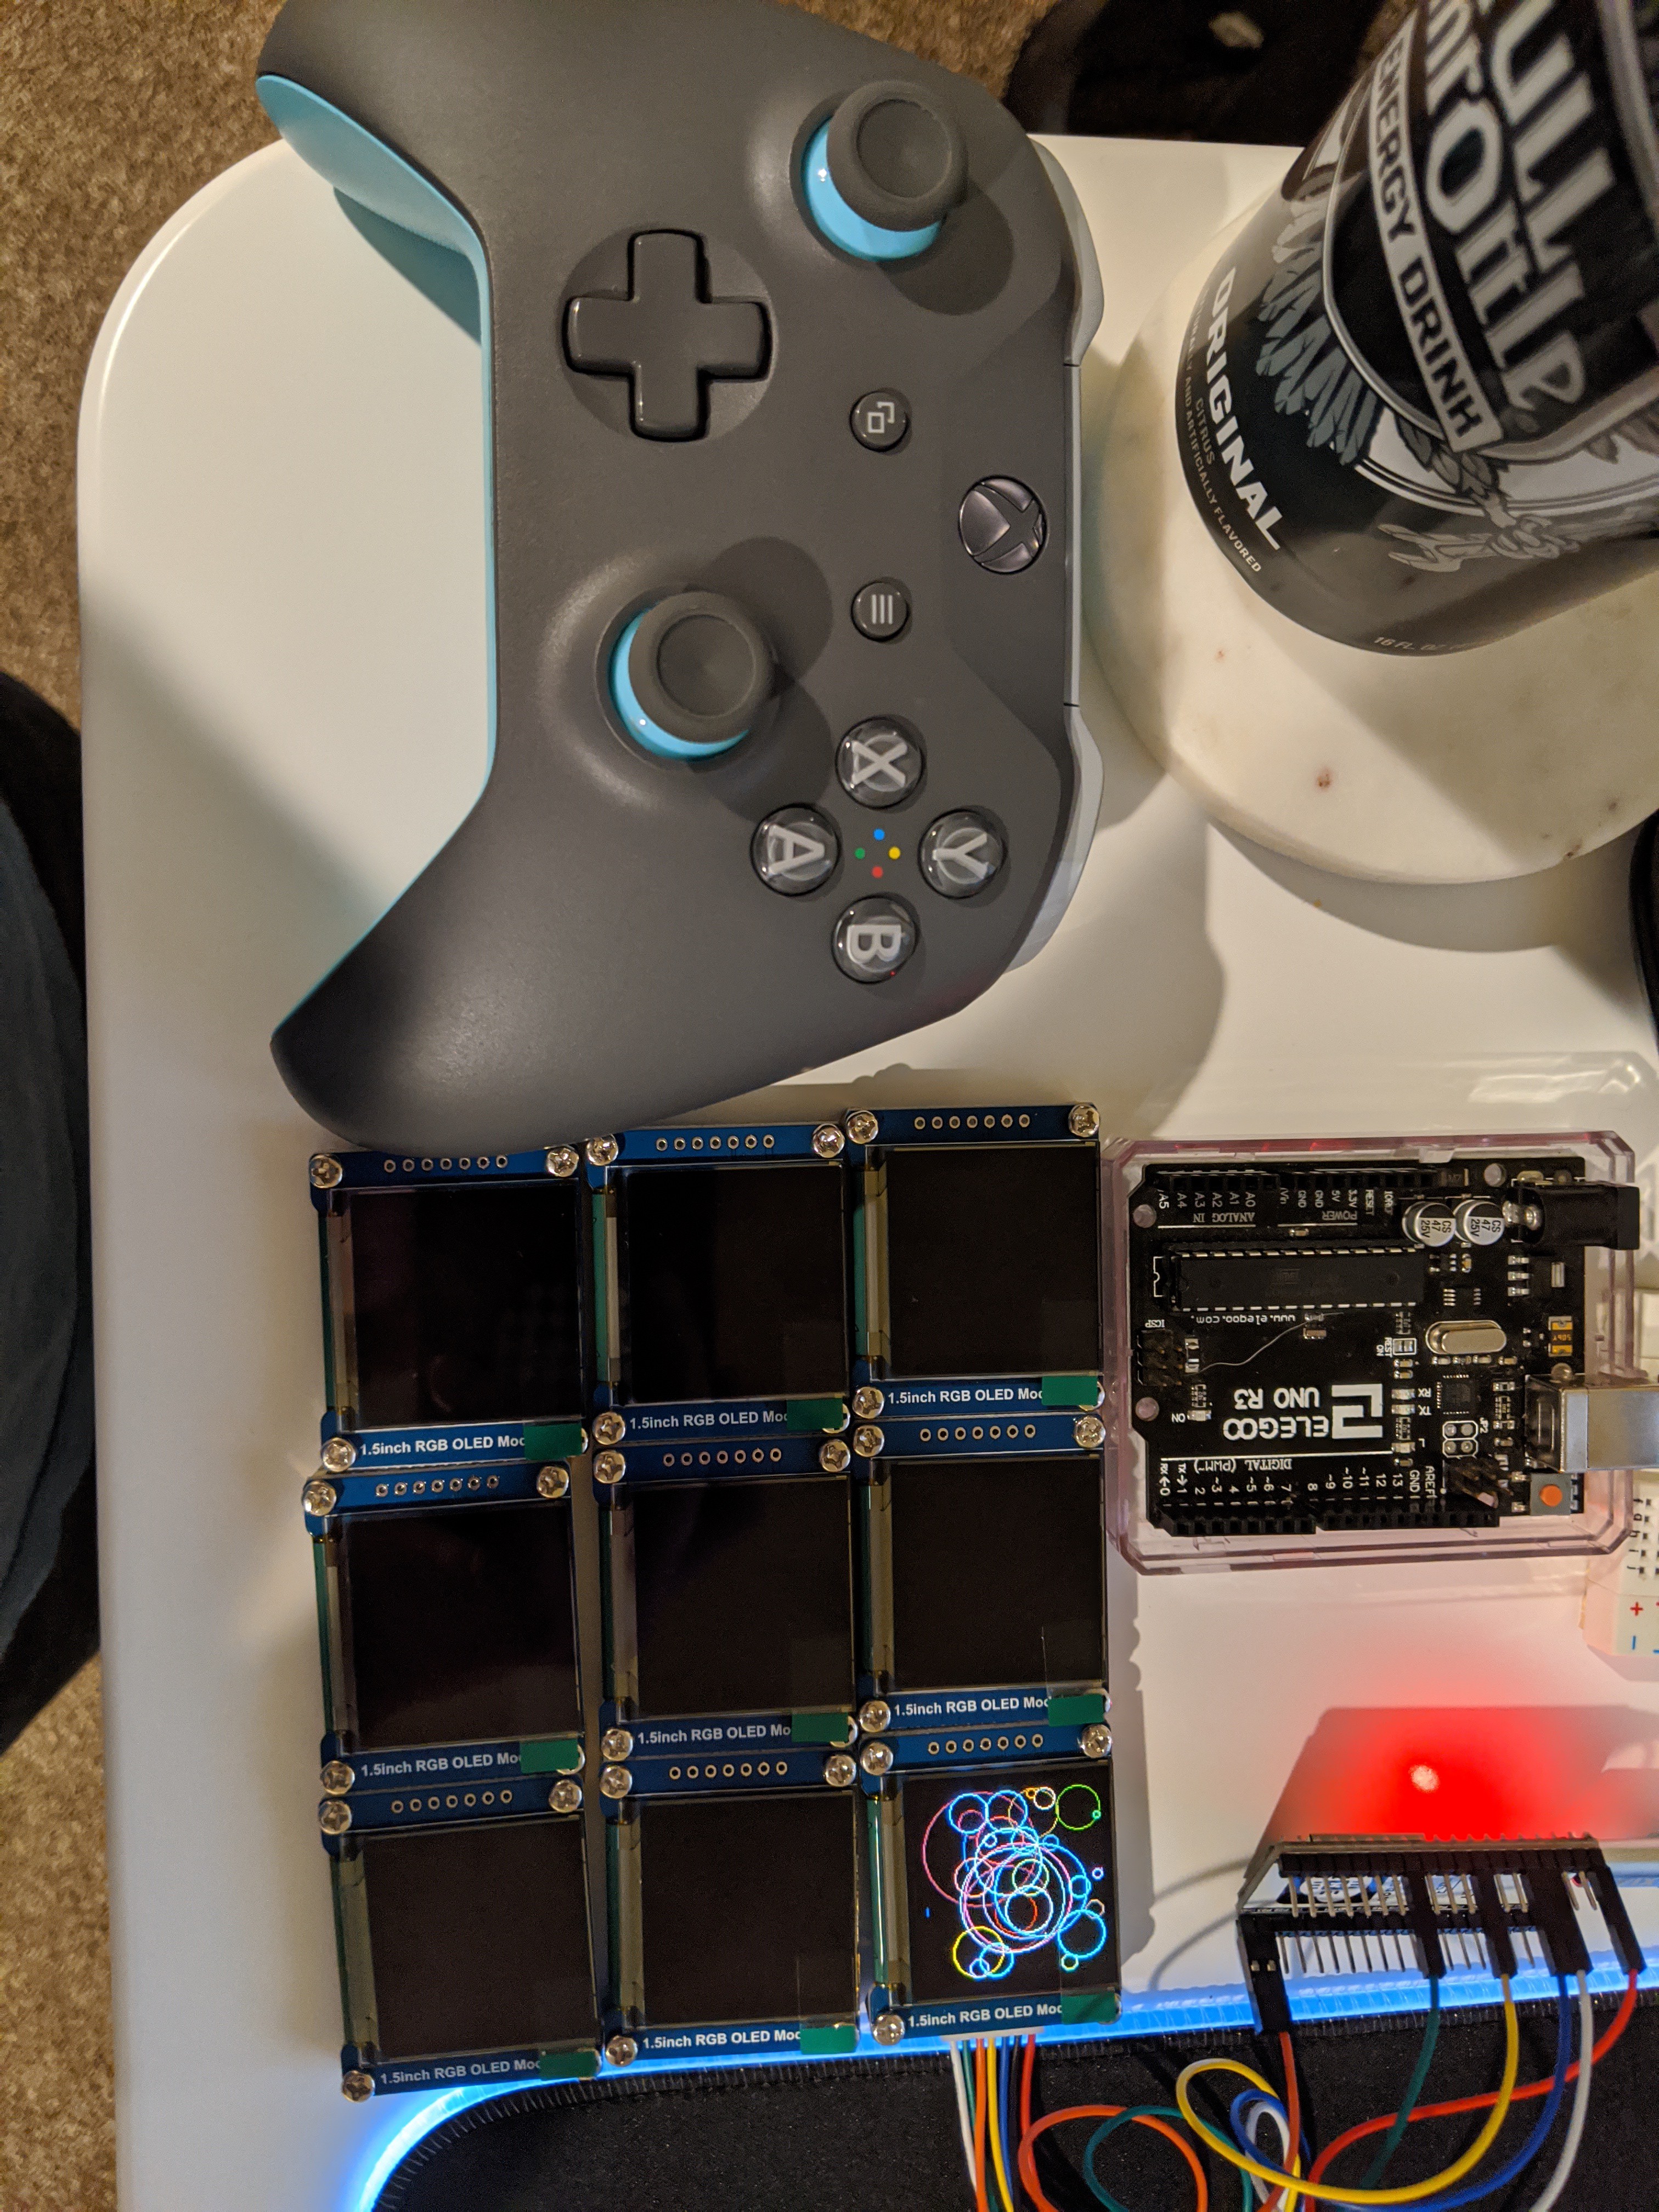
• Perfboard Seems Succesful

    David Cain06/02/2020 at 22:47 0 comments

    So I've put together a perfboard to remove the wire mess included with the breadboard. There will also now be a document in the files of the project that compiles the perfboard schematic. I've tested and everything seems to be functional which is great! It took roughly two days but in my opinion I think it was worth the effort. :)

    Here's some pictures of the board being assembled then finished...

    Finished Product w/ Micro-controller:

    Finished Product w/ Screens and Temporary Buttons:

    Finished Front:

    Finished Back (Flipped):

    Legend

    Signal

    Color

    5V

    Red

    Ground

    Black

    Atmega 32u4 Reset

    Dotted White

    OLED Reset

    White

    OLED DC

    Green

    MOSI

    Blue

    MISO

    Purple

    SCK

    Yellow

    Schematic Diagrams Front:Schematic Diagrams Front:

    Schematic Diagrams Back (Flipped for reading):

    If you've made it this far, just wanted to thank you for reading! This is a fun project but I get even more fun from trying to make this presentable and digestible! I'll probably switch to more software development at this point as my hardware is pretty finalized for the time being. I have begun considering how to add more screens/buttons but will have to look into the best way, I really would prefer to not add another micro-controller and thus far the compute performance of this chip has been acceptable.

  • All Programs Onboard!

    David Cain05/31/2020 at 23:02 0 comments

    Mini Software Update:

    So this is a mini update because I've finally got some software I've been working on to do what I would like for it to do. I've actually created a little diagram so you don't have to dig through the code to see what I'm talking about :)..

    I'm not sure if this is the best way to explain my code structure but I think it does an okay job to get the point across. So the main issue that I needed to address for the code was to seamlessly read a button input and respond with instructions for an OLED screen and the computer the device is connected to, at the same time. I wanted this software to be easily adjustable to allow for different user layouts or any customization.

    I'm not done filling out all the classes with the functionality I want but I have a working prototype that syncs with a computer and then allows for button input over volume control. I'm waiting on some more materials to do a simple perfboard PCB this week. I think I'm also going add a simple neopixel output and play with integrating that into software as well :) 

    I'll post pictures and video when I assemble the circuit board this later week!

    Side note showing some of my LED installments:

    Old desk setup with a strip running WLED: https://imgur.com/a/s1ZrZTT

    New desk setup with a strip behind it: https://imgur.com/a/wMjfrk8

    A strip fixture and a shadow box fixture running custom software: https://imgur.com/a/dziMbhu

    A project I did for a class (mind the mess): https://photos.app.goo.gl/r3SwmdfG5iRgkSE5A

  • The Microcontroller Controller is Here, Also Some Code

    David Cain05/24/2020 at 05:06 0 comments

    Hardware:

    New pro micros after soldering on the pins. These are the amazon ones but they're the same.


    Man I'm gonna have to do something about this wiring soon.. this is the setup for three 128x128 OLED screens and an SD card reader being driven by an Atmega 32u4. Using the Pro-Micro dev board for now.


    I'm no software developer but I figured this could be part of the project where I focus on streamlining the controls for a display array. With the way I'm attempting to develop the software for the screens, it should be easy to control them all under one Display class! Its pretty neat what header files will do for organizing these kinds of things. This is an important point to decide.

    • Display means an array of screens
    • Screen means a singular OLED Modules
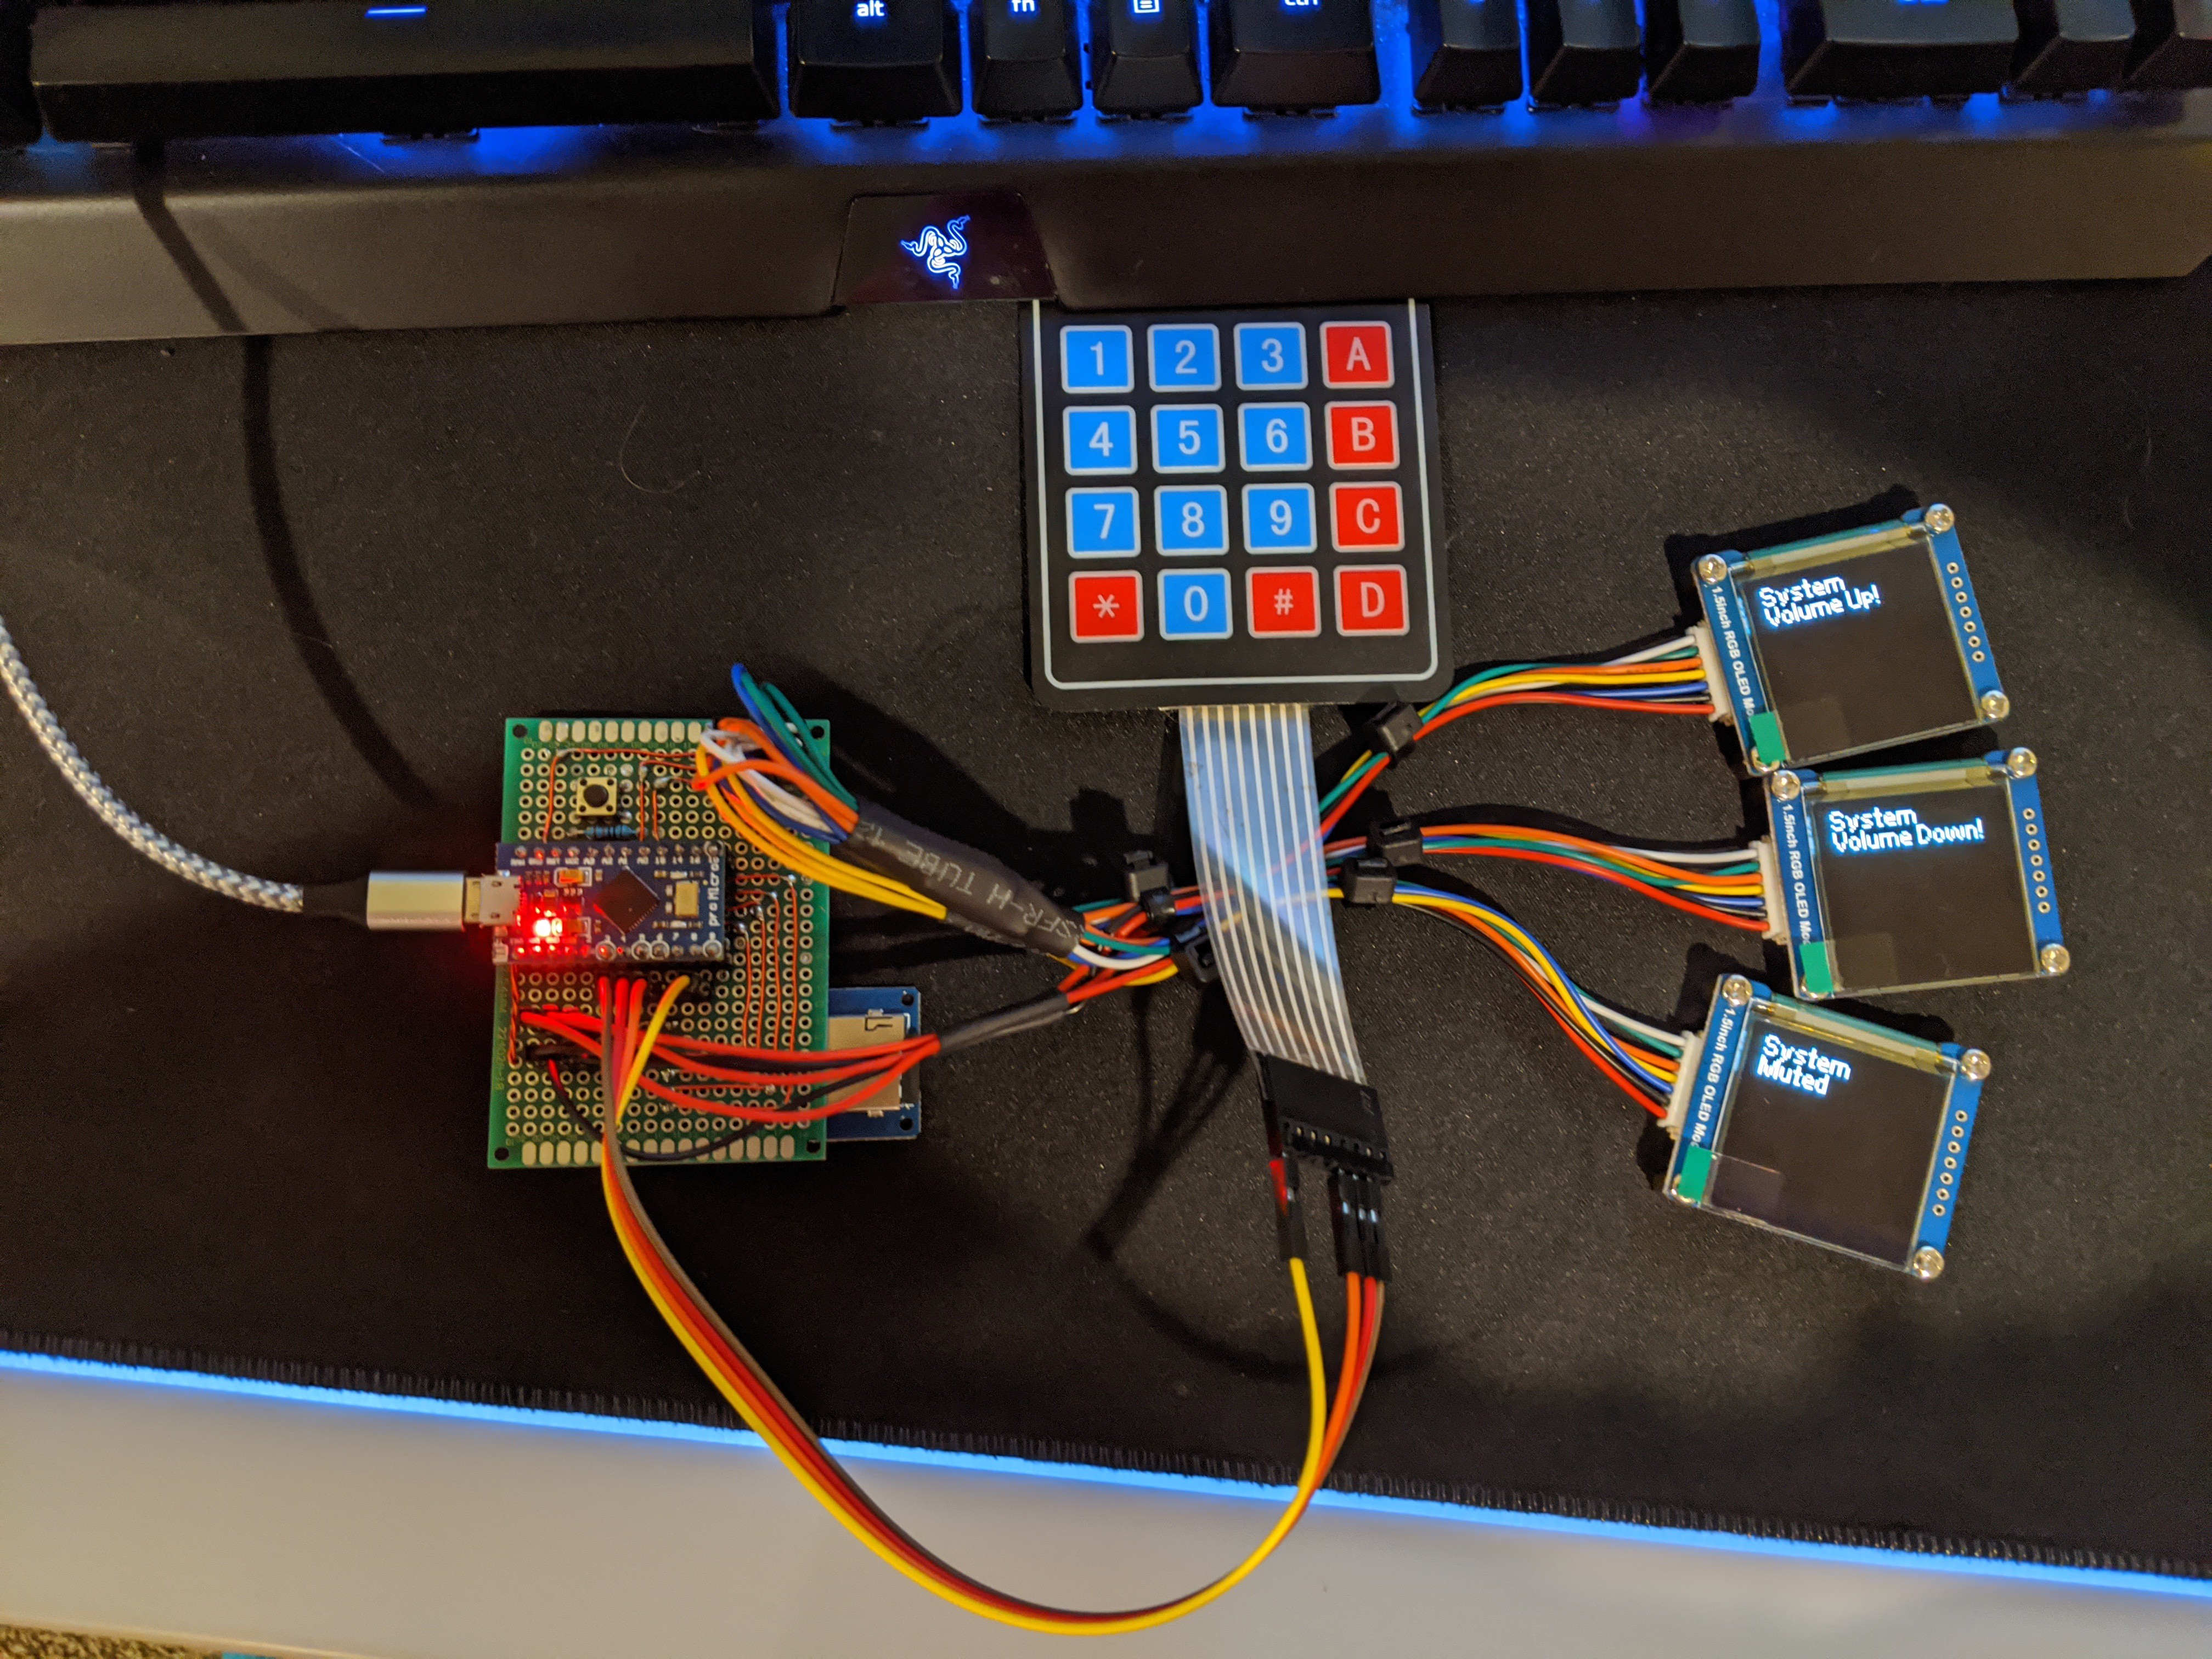
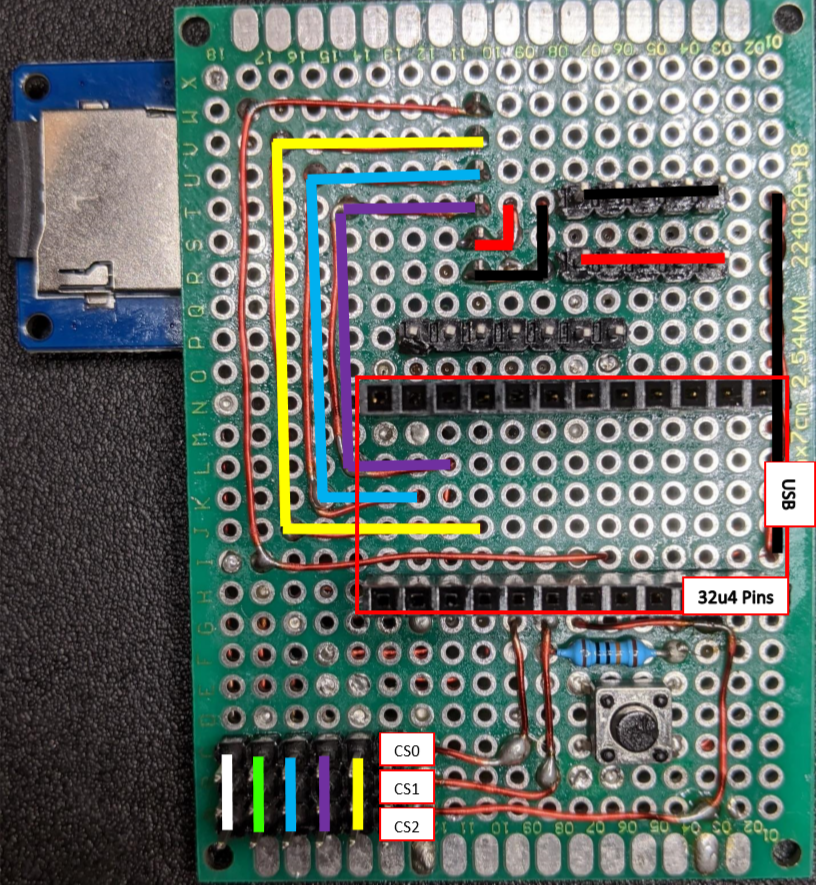
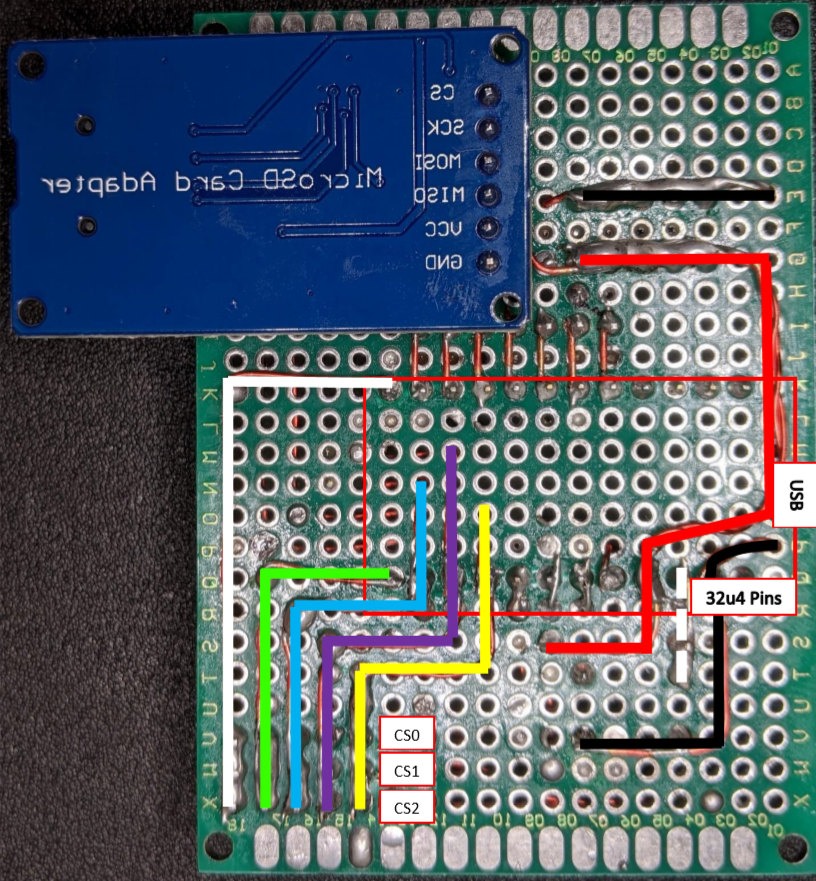
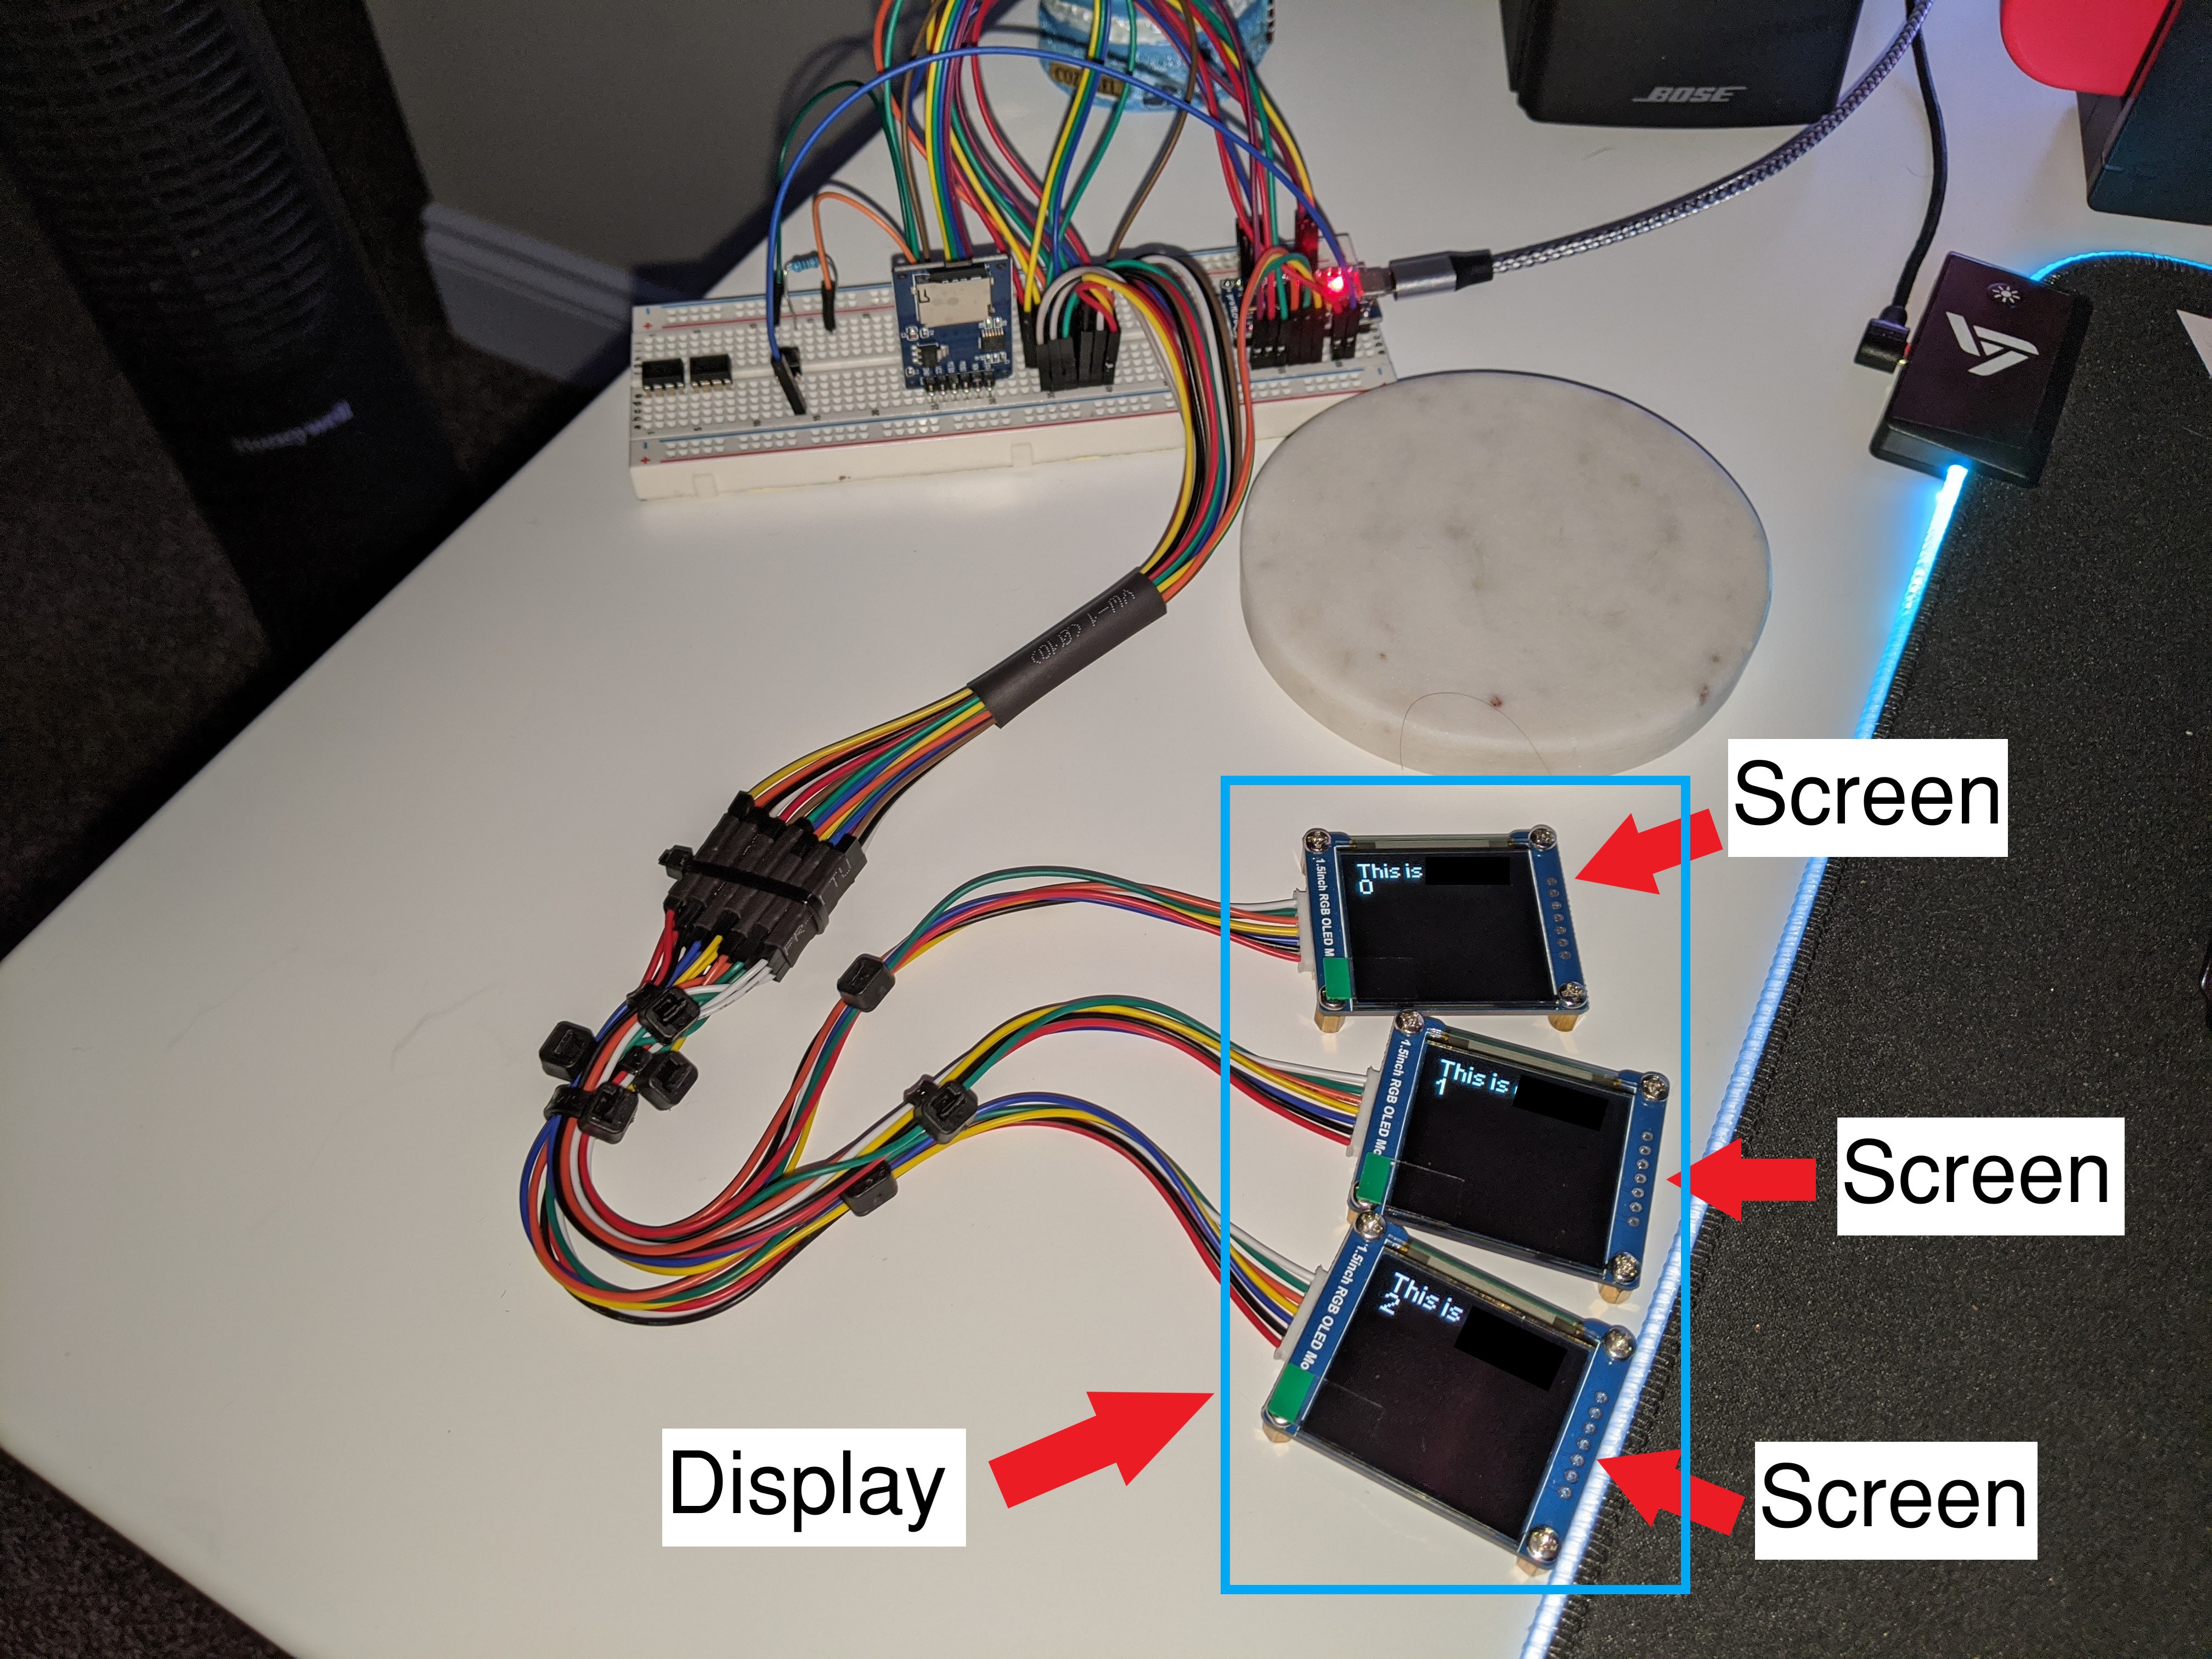
    (I was calling each screen a display in my software so I blacked out the typos... *facepalm*)
    (I've also tried to go back and correct all typos with the screen/display usage. Needed to decide on a system or confusion would ensue.)

    Software:

    The display became a slight focus as I can easily commit HID commands to the computer using the Atmega 32u4, but, there is no UI. This makes for a clunky experience! So I think the next step is to allow for that UI is to begin work on driving these displays in a competent manner. I'm really not happy with it yet but it is a start. If you have any suggestions or queries feel free to email me or checkout my Github!


    I think that is all that I have to show for now. I'm gonna keep updating as frequent as possible!

  • Death of a Controller... New Champion Emerges!

    David Cain05/19/2020 at 03:39 0 comments

    So what originally started me down this rabbit hole was stumbling upon NicoHood Hoodloader2. After playing with this, I've had some simple success with giving a computer HID commands. This was done using the built in USB bridge for the UNO that happens to actually be another micro-controller (The Atmega 16u2). Well today I plugged in the UNO and now it wont output anything so I began considering usage of my other favorite micro-controller platform, the ESP32-Wrover Dev Kit. After some reading, it may not be that difficult to pursue, but it is more work than I was intending to dedicate to simply establishing a USB connection if using that platform.

    This directed me to the Arduino Pro Micro, which features a Atmega 32u4, as the main processor. While its not the hottest tool on the block, this device hopefully should be able to drive the screens I would like sufficiently and also perform HID controls much more stream line. I have no experience using these controllers so I may be over estimating their compute power but I suppose there is only one way for me to find out.

    I'll be ordering a 3 pack from Amazon here. i could get them cheaper elsewhere but I'm a bit inpatient to begin writing more in-depth code that controls the displays and the HID interface simultaneously.

    On another note, I also tidied up the wiring for my screens!

  • Screens Baby!

    David Cain05/17/2020 at 23:46 0 comments

    So I've taken some inspiration from a stream deck and decided it'd be pretty exciting to also add screens for buttons. Here's an example of my prototype setup for coding.

    My end goal will actually support 9 OLED Screens but I really wasn't interested in trying to organize the wires for that so I settled for 3 for testing. These screens are pretty neat and were originally bought from aliexpress a while back so I figured I'd put them to good use finally. They're SPI based so this should make controlling them rather simple. As of right now, I'm planning to utilize the SSD_13XX Library. Hopefully this will do everything I need. If not, it seems like Adafruit also has a library that might be worth trying.

    Here is an example of an array of 9 screens! Will look pretty cool when I'm driving them all simultaneously.

    Needed the full throttle to finish the wiring mess for the three screens... Xbox controller and Arduino Uno for scale!

  • Starting research

    David Cain05/15/2020 at 19:58 0 comments

    So today I'm doing some research on the USB protocol and normal usage. So far I have found this pretty neat guide "USB Made Simple"

    As of now I certainly want a volume slider that will react to system volume and adjust system volume. I also would like to add buttons that would launch programs, but I would like for this to be easy to configure on the fly. I'll update as I gain information.

  • Hello World

    David Cain05/09/2020 at 23:09 0 comments

    This is the start. As of now my aim is to have a pretty dope device at the end of the summer. Will see how it goes.