After some more thinking, looking into physical space available, wondering about how to get the BLE signal to reach out of the metal enclosure etc I decided to do some changes to the system partitioning and components.
Instead of the Feather nRF52840 Express I will instead use the Adafruit itsybitsy nrf52840 express. The itsybitsy version is much smaller, and I should be able to have the antenna portion poke out of one of the MIDI connector openings to ensure the BLE signal is not attenuated too much by the enclosure.
Further, although the nRF52840 Voltage range is up to 5.5V, I discovered that the IO is powered by the internal regulator with a programmable voltage from 1.8 - 3.3V, and the Adafruit itsybitsy nRF52840 Express actually uses an IO voltage of 3V. Because of this, and the fact all the buttons are active HIGH with a 5V output, I decided to wire ALL buttons to the ATmega2560 PRO arduino, and use the Adafruit board only for BLE, pedal inputs and a possible serial MIDI in case I decide to add that as well. I also have plans to add a serial Display, which would then be added to the Adafruit board as well.
As the power is different between the two boards, a voltage level converter is needed for the I2C lines. It is very easy to make such with a few resistors and two MOSFETs, but for ease of implementation and lack of time I just ordered a ready made level converter from Adafruit.
The new design partitioning now looks like this:

And the updated Arduino 2560 connection diagram:
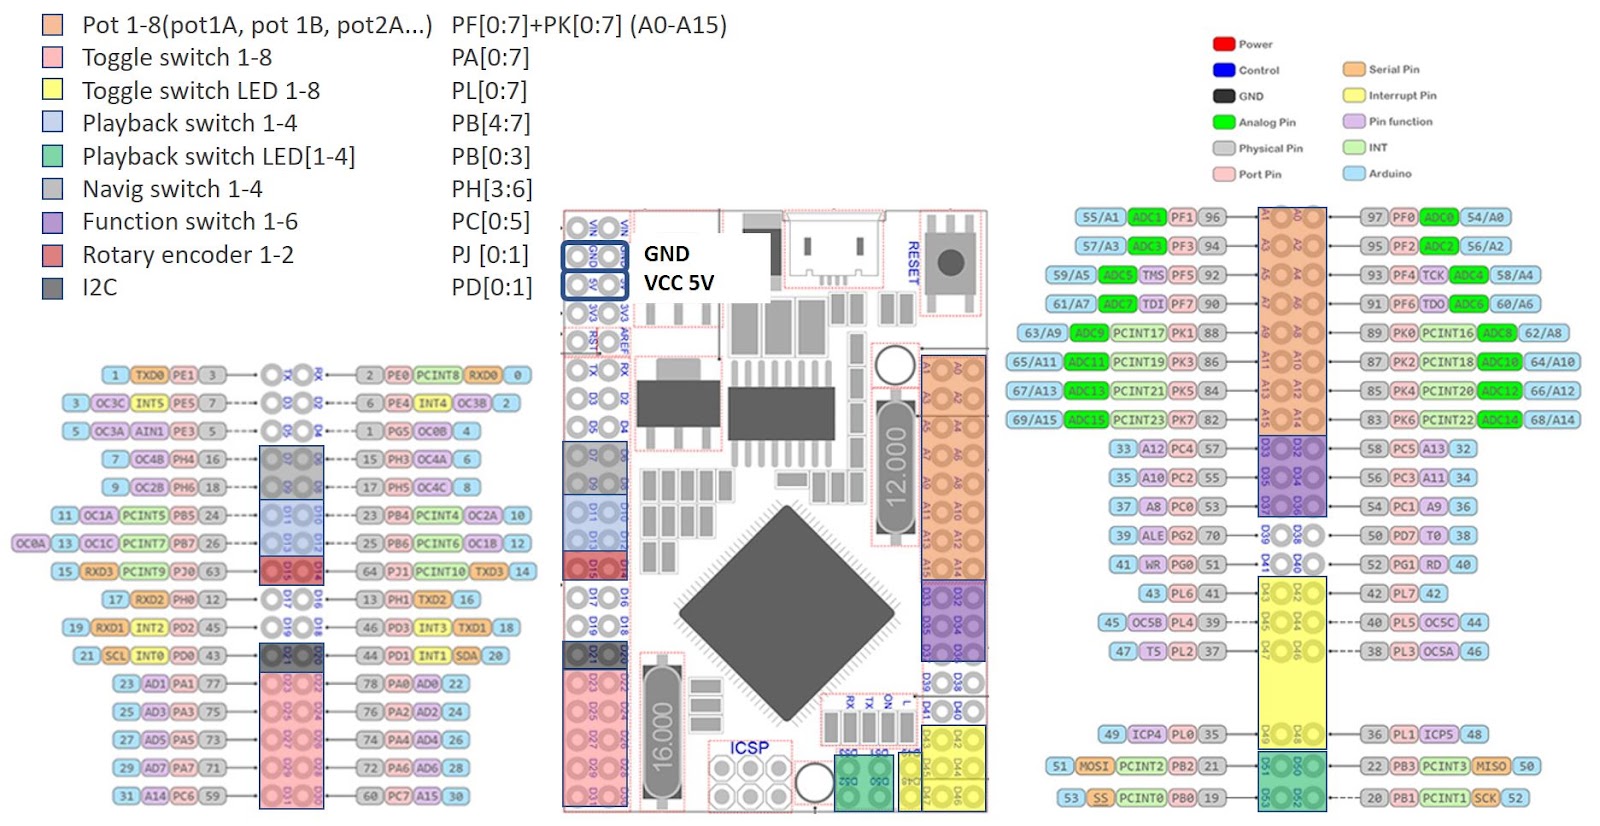
I connected the remaining wiring (Navig switches, Function switches and Rotary Encoder) to the mega 2560 board.
I also added I2C code and to test it I added a second (normal) ATmega2560 Arduino, actually a clone called Funduino, running a simple I2C slave to serial implementation, based on Nicholas Zambetti’s example code for the wire library:
#include <Wire.h>

void setup() {
  Wire.begin(8);                // join i2c bus with address #8
  Wire.onReceive(receiveEvent); // register event
  Serial.begin(115200);         // start serial for output
  Serial.print("I2C slave");    // print the character
}

void loop() {
  delay(100);
}

// function that executes whenever data is received from master
// this function is registered as an event, see setup()
void receiveEvent(int howMany) {
  while (1 < Wire.available()) { // loop through all but the last
    int c = Wire.read();    // receive byte as a integer
    Serial.print(c);        // print the integer
    Serial.print(",");      // print spacing comma
  }
  int x = Wire.read();      // receive byte as an integer
  Serial.println(x);        // print the integer
} 
This is the debug output from the second Arduino showing the data received over I2C with every other knob/button turned to max/on.

So far so good.. Now I just have to wait for Digikey to deliver my new Adafruit itsybitsy board...
Discussions
Become a Hackaday.io Member
Create an account to leave a comment. Already have an account? Log In.