Silícios Lab
In this project, you'll learn how to program the PCBWay Cookie Christmas Module for Arduino. Through this kit, you'll learn how to create your first code lines with Arduino.
It is a simple kit that can be used to teach logical programming in the classroom.
To construct this project you'll need of the following electronic components:
- PCBWay Custom PCB
- TM1637 Module - UTSOURCE
- DS18B20 Temperature Sensor - UTSOURCE
- Arduino UNO - UTSOURCE
Now, I'll explain the full project for you.
The Project
Now, you need understand how works the electronic schematic of the cookie module. In the Figure 1, we shown the circuit.

Figure 1 - Electronic Schematic of the Cookie Christmas Module for Arduino.
After to construct the electronic schematic, you'll create your own format through contour in the BoardOutline Layer.
The Printed Circuit Board
After this, we'll have the following result, that is presented in the Printed Circuit Board of the Figure 2.

Figure 2 - Electronic Schematic of the Printed Circuit Board.
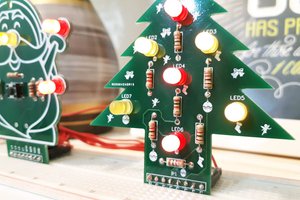
After present the electronic schematic in PCB, we'll show the result of the Cookie PCB Prototype in the Figure 3.

Figure 3 - Result of the Cookie Christmas Arduino Module.
Thus, through this kit, you'll create several Arduino Projects using LED's for children.
And to finish, you can use the code to playing with the Module with Arduino.
        void setup() {  // put your setup code here, to run once:  //Config the pin 2 until pin 9 as OUTPUT  for(byte pin = 2; pin < 7; pin++)  {    pinMode(pin, OUTPUT);  }
}


void loop() {  // put your main code here, to run repeatedly:  digitalWrite(2, HIGH); //Signal light ON left  delay(1000);  digitalWrite(2, LOW); //Signal light OFF left  digitalWrite(3, HIGH); //Signal light ON right  delay(1000);  digitalWrite(3, LOW); //Signal light OFF right

  digitalWrite(4, HIGH); //Turn ON Left Headlight LED   digitalWrite(5, HIGH); //Turn ON Right Headlight LED
  delay(1500);
  digitalWrite(4, LOW); //Signal light OFF right  digitalWrite(5, LOW); //Signal light OFF right  }
Therefore, from the code, it will possibly control and fun with the cookie module for Arduino.
Conclusion
Through this project, you'll learn basic electronics, blink, and basics of the electronic schematic. In addition, you'll use the Arduino to program the kit and learn about logical programming.
Acknowledgment
Thanks to the PCBWay for supporting the our YouTube Channel and produce and assembly PCBs with better quality.
The Silícios Lab thanks UTSOURCE to offer the electronic components.

 ElectronicABC