 sx107
sx107I'll split this desctiption into several steps later
Introduction
You may want to check out the vid I made about this synth first (it's in Russian, but English subs are available):
Here I'd like to share everything I learned about this synth up to this point to maybe have your interest in this vintage synth and show how it can be repaired and modded. This article, in particular, it's "synth schematics" may be interesting not only for someone who actually owns this synth, but also for people who are generally interested in how analog synths work.
I didn't make any complex mods like adding MIDI or CV control, but I am planning on doing that in the future.
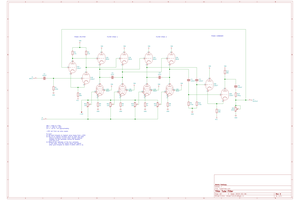
First of all: description of the synth. Lell UDS is a soviet drum synth produced at least in the 80s (if not earlier), the one I bought was made in 1989. It has two independent channels, each with a tone and noise generators (the tone part produces a triangle wave). Each sound generator has its own attack-release envelope volume control, the tone generator also can change its pitch according to the same envelope as the volume one. Noise generator has two timbre controls - "спектр" (spectrum) and "тембр" (timbre). Both generators are then mixed in each channel with a "баланс" (balance) knob, and, finally, both channels are mixed using volume ("уровень") controls. The "snap" ("щелчок") is a separate generator making the sound more, well, snappy.
The synth was originally intended to be connected to two drum pads, therefore the input circuit has a gain/sensitivity ("чувств." for "чувствительность", sensitivity) knob for each channel.
Is it the most amazing sounding synth ever? Nope. Is it an interesting sounding synth? Not definitely. Can it be modded to sound somewhat decent? Hell yeah. Is it worth it? For me - yeah.
Disassembly
For the most part I've shown the whole disassembly process, however, I'll clarify some points just in case if someone will stumble across this article while attempting to mod this synth:
1. A couple of screws is hiding behind the front panel "onlay". The onlay can be taken off by carefully prying it off with something like a knife.
2. Nope, the power cord can't be taken off without cutting it and you will probably end up with the back panel hanging on it.
3. Just to be sure: before you even start the disassembly, turn off the synth, pull the plug off the power outlet and then turn on the synth for a while to discharge all the caps. There are no high voltages on the main boards, but it is still a mains voltage instrument. Be careful.
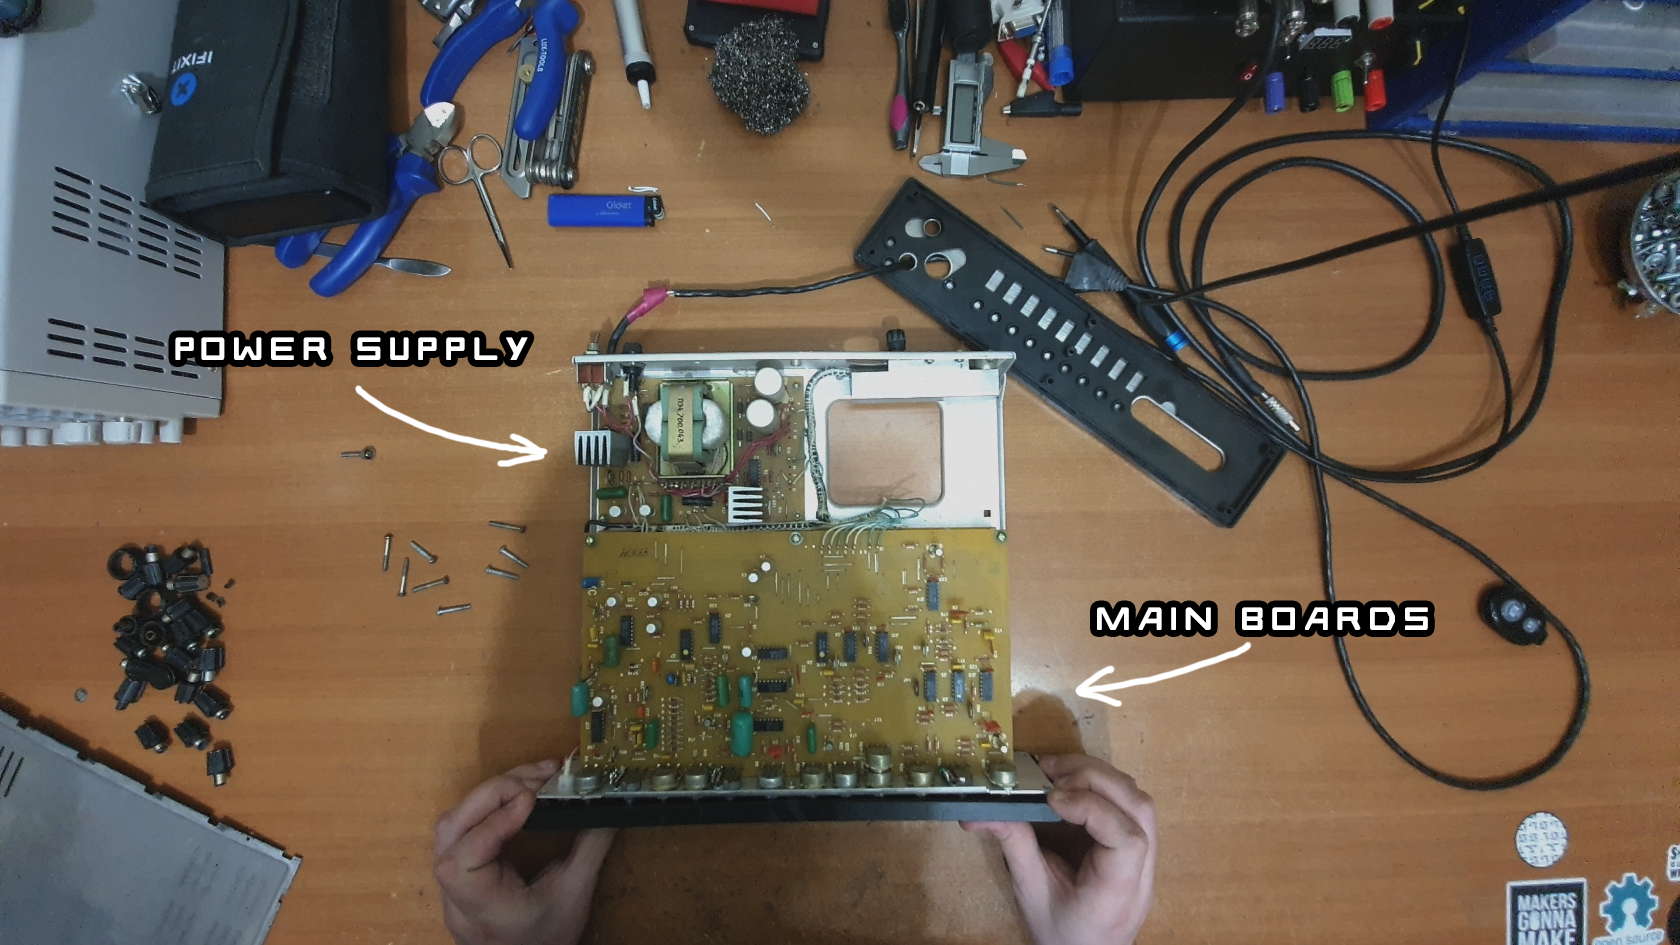
Inside three boards are welcoming us:
- a bipolar +/- 9V transformer power supply, which also produces some kind of reference voltage, which I, unfortunately, forgot to measure. The reference voltage is not present in some versions of this synth if I understood the old schematics correctly. The reference voltage is used in the input amplifier circuit.
- Two almost identical main boards (soundboards, if you will c: ), one for each channel, one beneath another.
The power supply, unfortunately, is a pain to remove, but with some soldering kamasutra you will be able to replace the electrolytic capacitors which most probably will be open-circuited with no visible leakage. On other hand, the main boards are much easier to remove, just unscrew all potentiometers and three screws insides that are holding it and you are in.
What will prevent you from taking the boards out of the case, however, is a mess of cables interconnecting everything and, yes, you've seen right - directly soldered to each board. I haven't repaired a lot of old synth, but If I understand correctly, this practice was quite widespread on the west a decade before this synth hit the market. Fortunately, the spacing between cable mounting holes on each board is exactly 5 mm, so you can easily install some connectors with 5 mm...
Read more »
 Vedran
 256byteram